Week11, Molding and casting
This week is all about Molding and Casting. A prototyping technique that allows a lot of freedom in shape and gives access to other materials then we have seen so far.
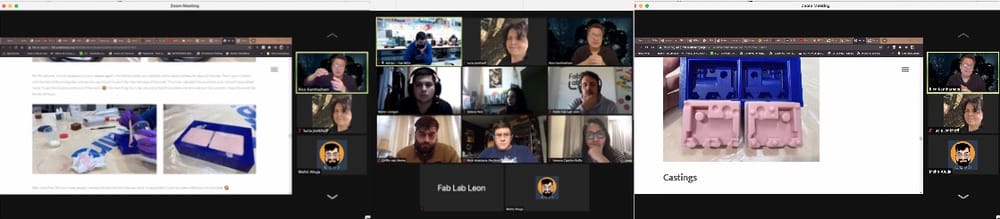
Wednesday Global Class
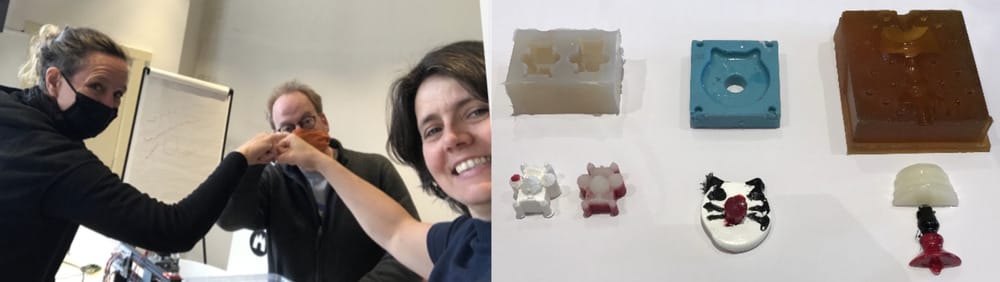
Neil explained everything about all these different casting-methods, it was interesting to learn about the different techniques that you can do at a local lab or even at home. superfun.
Weekly Assignment
In my own words
Group assignment:
- Compare and test the different molding and casting materials
- read a datasheet about one of the molding or casting materials. Individual assignments:
- Design and 3D-mill a mold for casting a 3D-product.
- Mold and cast it.
Planning this week
| Day | Lesson | subject/activity | activities |
|---|---|---|---|
| Wednesday | global class | make this plan | |
| Thursday | local class explanation of molding and casting | group assignment casting-test | |
| Friday | 'work' for my work | think out electronics | |
| Saturday | global open time | shop for components | build electronics |
| Sunday | work on documentation | fusion model | family-time |
| Monday | local Fab time | 3D-milling | cast in milled waxblock |
| Tuesday | work for work | combine with local Fab time | at night Documentation |
| Wednesday | presentations | ready to present | fix last things |
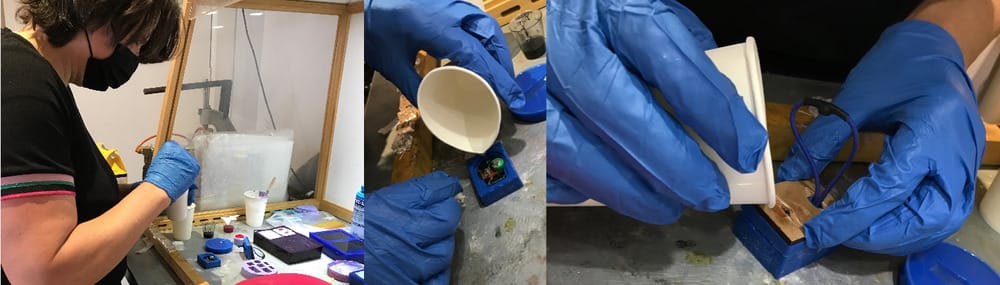
Group assignment
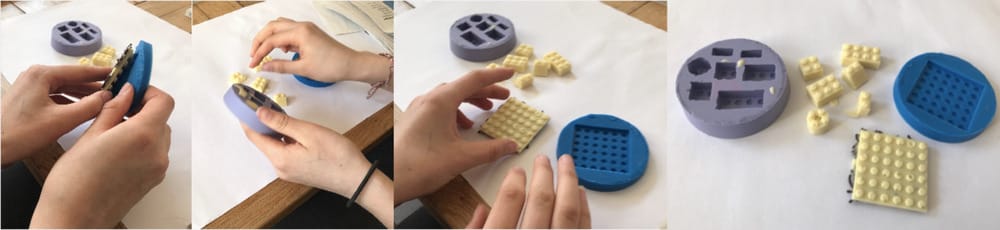
When I heard on thursdaymorning that we would play with the molding and casting stuff thar afternoon I decided during Henks explanation that this was my chance to make something my kids would like. I wanted to make molds to cast lego-blocks so we could make chocolate-blocks at home. I was a little disappointed in myself that I did not think of that earlier because I did not bring any lego. I was teamed up with Loes and I explained my plan to her and we started searching through all the stored toys and craft-stuff in Waag if we could find a good alternative. But we even found some lego!
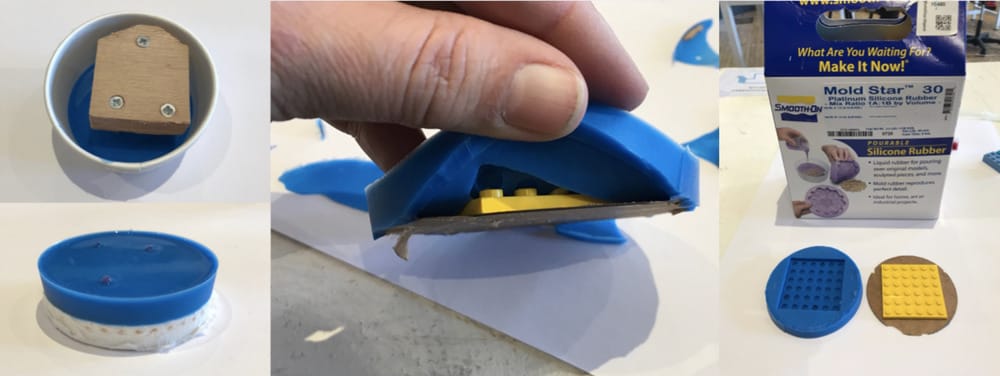
I sorted out different lego-blocks and we used double-sided tape to tape them onto a cardboard circle that we could lay in the cardboard bowls that we found for making the mold.
Erwin joined our team and since we had 3 different prepared cups and there were 3 molding-mixtures we decided to use all of them.
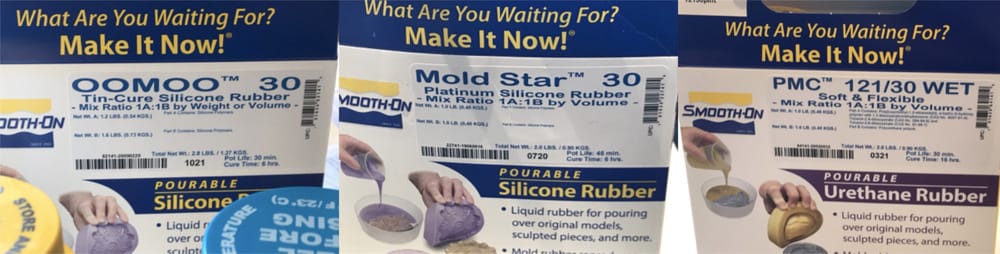
datasheetreading: We read the datasheet of the different casting materials and followed them securely.
| Data | OOMOO: | Moldstar 30 | PMC121/30 wet |
|---|---|---|---|
| safety measures | glasses, longsleeves, vinyl gloves | glasses, longsleeves, vinyl gloves | glasses, longsleeves, vinyl gloves |
| prep | pre-mix parts separately | pre-mix parts separately | pre-mix part B |
| mold release | Ease Release 200 | Ease Release 200 | universal mold release |
| mixing ratio volume | 1A / 1B | 1A /1B | 1A /1B |
| mix weight | 100A/130B | 100A/96B | 1A /1B |
| potlife min | 30 | 45 | 30 |
| vacuum | not necessary | optional | |
| curetime at 23°C | 6 hours | 6 hours | 16 hours |
| cure speed | - | max 60°C | max 65°C |
| post cure | 6 hours at 65°C | - | 4-8 hours at 65°C |
| extra | super easy | heat resistant 232°C | exudes demolding oil |
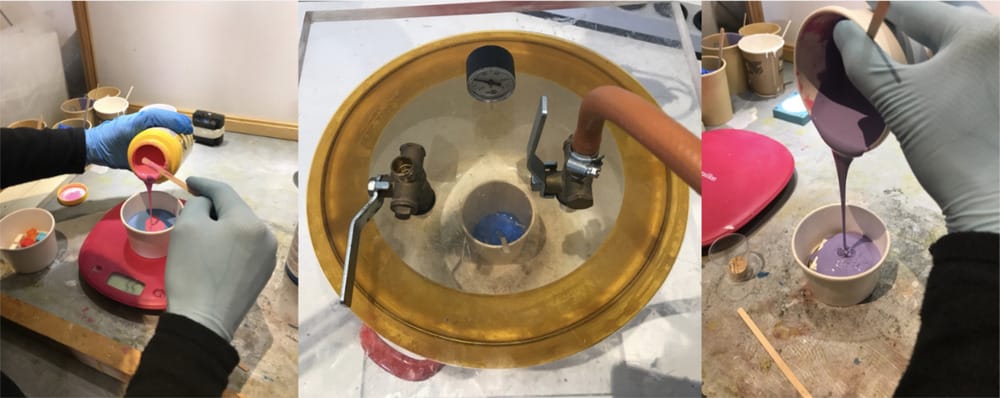
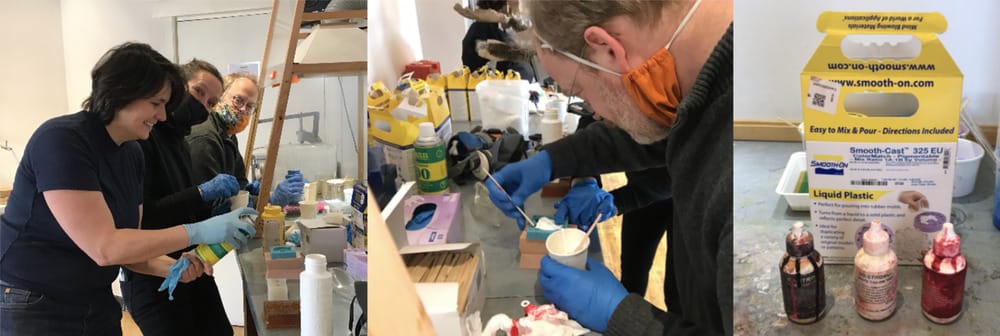
At the end of the afternoon we wanted to do some casting and we found this great dyeable casting mix Smoothcast 325 and Henk gave us some red, black and white pigment.
| Data | Smoothcast 325 |
|---|---|
| safety measures | glasses, longsleeves, vinyl gloves |
| prep | pre-mix parts separately |
| mold release | Universal or 200 |
| mixing ratio volume | 1A / 1B |
| mix weight | 115A/100B |
| potlife min | 2,5 |
| vacuum | no time for that |
| curetime at 23°C | 10 min |
| cure | do not inhale fumes |
| post cure | 4 hours at 65°C |
| extra | can be coloured, mix through part b |
We had to work quickly since te pot-time is only 2,5 minutes.
We decided to make 3 pots with one-third of what we needednand have Erwin as Head of measuring and Loes and I would add the pigments to the different cups and mix it.
.
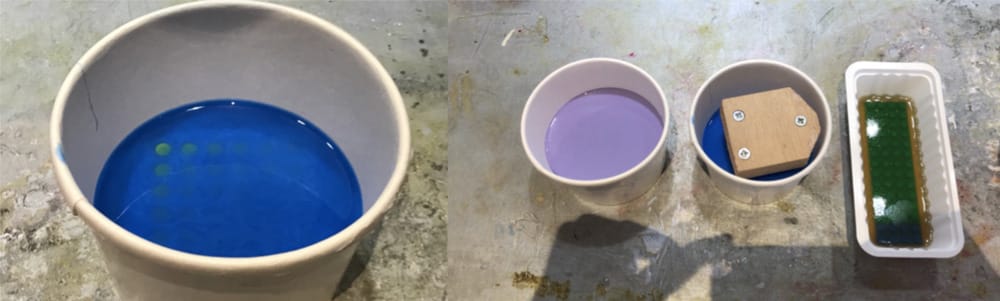
With the short pot-time we did not work too well. we had decided to first poor the clear and the red mix in one of the Waag-molds and use the rest of the clear mixture for the lamp. And then mix in the black pigment to the last of that in the cup, so we could make the cat's ears and eyes black.
what we did not think of is that the white opaque mix would harden faster than the black, so we ended up with a mess in the cat-mold.
We made a kindergarten-cat, but we learned a whole lot about pot-time and mixing.
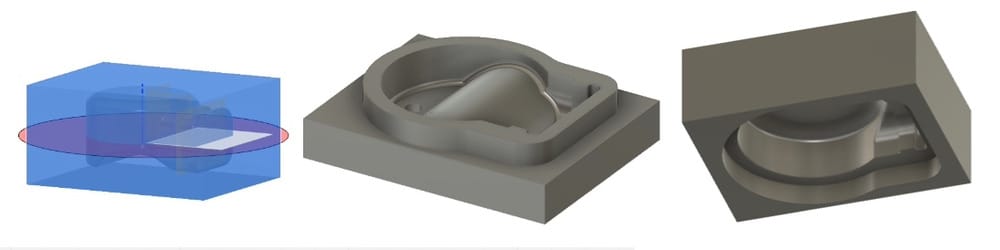
When I saw the little lamp-mold (above on the right) I realized that if you would make your shape rotational-symetric it is possible to use the wax-mold several times to create the two halves of the mold. Important is that the positioning tabs are outward on one side and inward on the other so they would fit also when turned over and put together. That gives you the possibility to make better use of the standard wax-shape that we have, because this way you can use the whole block for half of the mold and bigger things are possible. After this I was playing with the idea and found that in that way you can make any pie-slice shape and add them all to a circular mold. This gives a whole new idea in which you can make inward and outward shapes in virtual every direction.... Coooooooool
Friday Waag
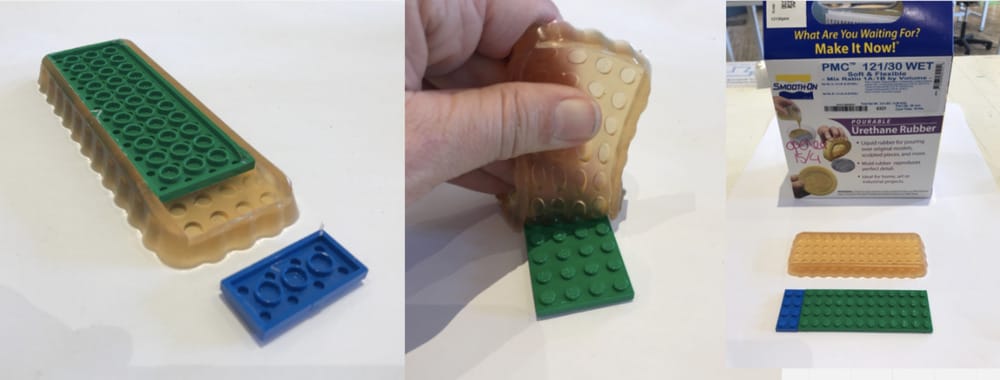
On friday I went back to the Waag to pick up the molds that we made for the lego-blocks.
The OOMOO is quite firm, and the detail is great.

The moldstar feels really nice and smooth, just like the bought silicone molds that we have at home.
THe uerthane-wet was still very smelly and tacky, I did not really like the feel and touch of that material.
Individual assignment
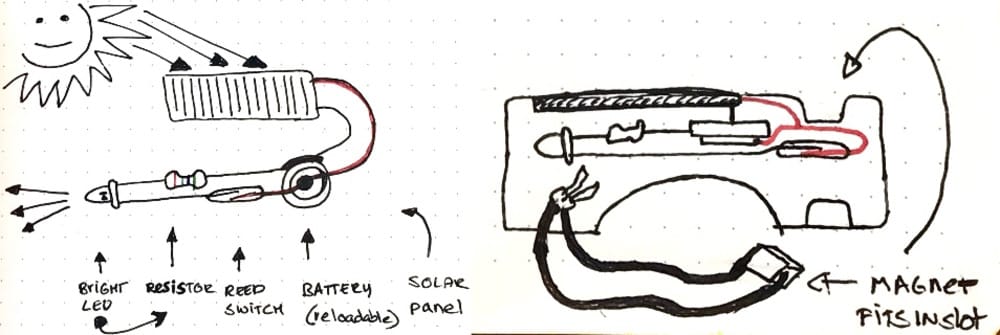
My idea of making a totally waterproof bicycle light does not need a lot of place in the wax and is definitely not rotational symmetric.
But I’ll keep in mind that if I have spare time and spare wax-block i would try and make a slice of something rotational symmetric. I am thinking about a lightbulb 💡 a hot air balloon, a basketball, an apple🍏 with a little lid to make the dent in the top, or pear, a mushroom, or, with points sticking out a cactus in a pot, a pine-apple, a palm-tree a crown hat or maybe for Erwin a hedgehog, rotational symmetric things with holes are a golf ball or a bowling ball or maybe a skippy-ball And not round but with flat surfaces: a cube, pyramid, diamond, umbrella 🌂 More complicated doughnut a finished apple or a strawberry 🍓
Bicycle light
Here in the Netherlands we ride on our bikes a lot, and to be visible at night we have a white light at the front and a red one at the back. The surrounding street is bright enough for seeing yourself, so a single led-light is enough. Everybody has these small lights that you connect with a rubberband to your handlebar (and at the back of the bike to the bike-rack)
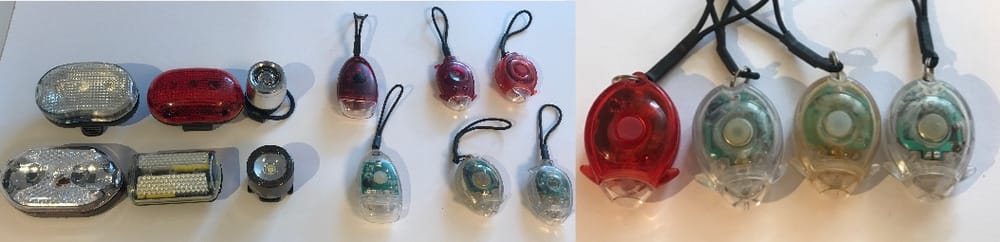
Sad thing is that these lights are always worn after about half a year, the batteries run out and when they were outside they are really rusty inside because water seeps in through the connections and the switch and the battery/electronics stop working. It feels so sad to throw away and buy a new one So with moulding and casting I want to make a truly waterproof bicycle light. that would mean that there is nothing moving on the outside and there are no openings towards the electronics.
Bicycle light Part one:
Find out what parts I’ll need.
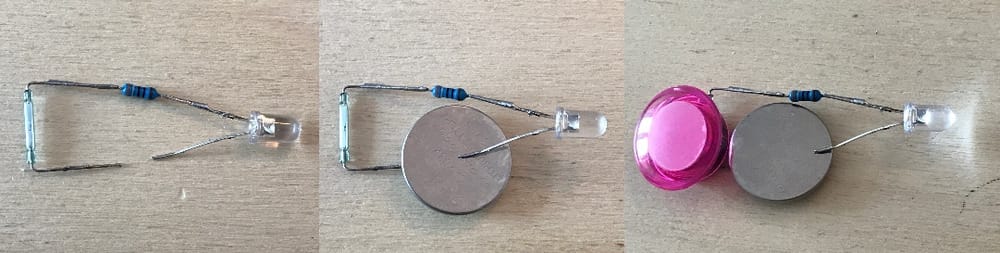
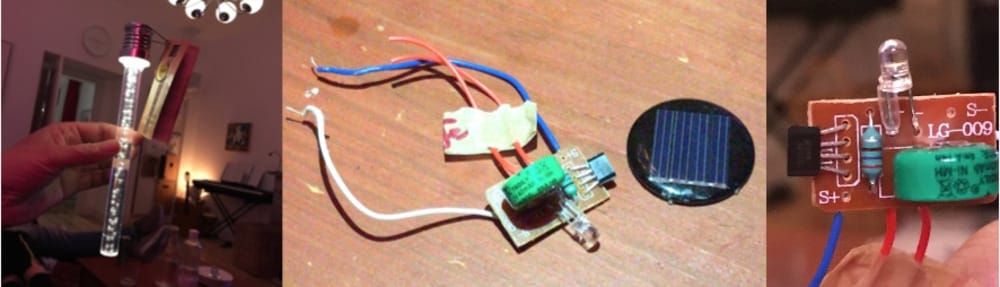
I want to connect the led with a resistor to one side of the battery and I’ll need a switch that does not have moving parts.
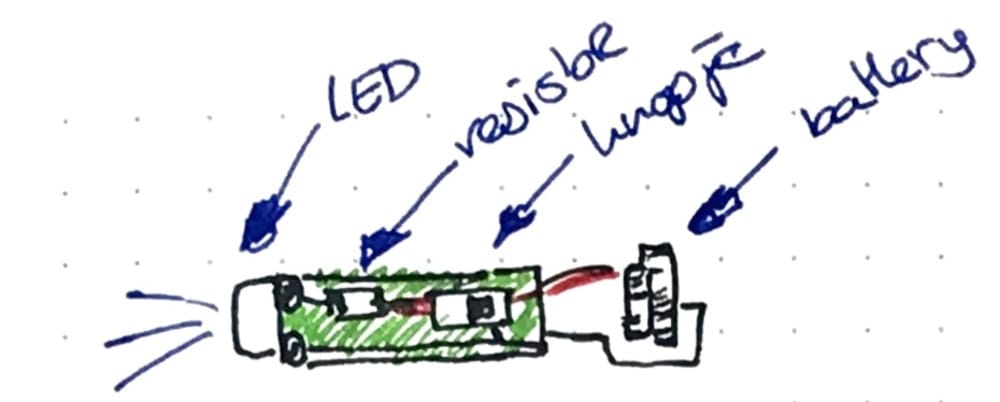 In my sensor-box I found a tilting switch with a little drop of mercury in it, that seems cool. But when talked to Erwin he explained that you can use the micro-controller in several ways and also talked about the reed switch and you can turn it on and of with a magnet, or a coil. If you do it with the microcontroller it is also possible to let the microcontroller sleep. But the Reed-switch does not use any energy when turned off and used with an external magnet.
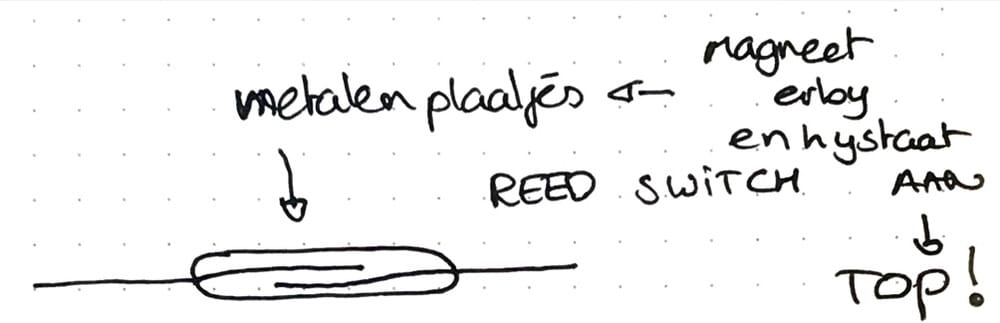 Looking into this Idea i found that I already have a reed switch in my sensor-box.
And now knowing how it looks I found also the reedsensor in our spectro-box, I tested it, and mean while tried some LEDs with 200ohm resitors.
Looking into this Idea i found that I already have a reed switch in my sensor-box.
And now knowing how it looks I found also the reedsensor in our spectro-box, I tested it, and mean while tried some LEDs with 200ohm resitors.
Combing the components:
Since I am going to cast in glass clear epoxy I would like to be able to see my components. I made some drawings to gave a clear image of what I need. On fridays I decided to go to Amsterdam and see what Henk had in stock. At Waag there are not a lot of through hole components so other that a few resistors I could not find.
Henk told me that putting in the solar panel would make it quite complicated. I promised him to see the solar part as an extra spiral. I did draw the setup for my light though.
Finding the right resistor for the LED.
I looked up this great tutorial on LED and with that it was easy to figure out that I could even test a LED without knowing the specs. LED-tutorial Sparkfun I took some old give-away flash- lights apart and found that they are mostly even mare without a resistor in it, but since you have to push the button al the time it probably wont overheat. (But maybe drain the battery real quick.)
The solar panel,
This is harder to figure out, since I don’t have my LED, battery and solarpanel yet I don’t gave any specs and I don’t know where to start finding the right starting point, I opened up a camping-flashlight with a solar panel and saw that there was indeed some mystery-electronics on the pcb. Except from breaking the wire to the solarpanel I did not get further. I would dive into it more if I cannot find the components for sale
 I hope I can still repair it.
Chocolate lego
After cleaning the 'group-assignment-molds' really well, we tried our luck with chocolate. My daughter Anna is a great home-baker and was very willing to make milk, pure and white legoblocks. According to her they were a bit small so she worked with different molds for her famous raspberry-chocolates.
The flat lego-plate made in the 'urethane-wet-cast' was horrible, even your fingers tasted like motor-oil combined with turpentine when touching the chocolate, so after the hero-shots I threw them away. On the other hand the silicone-mould was perfect and left no residue at all.
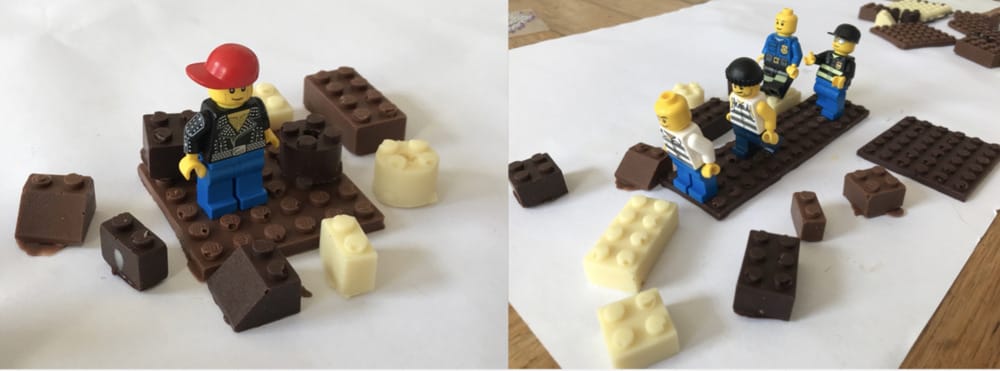
Of course I had to be the food-safety-test-person, and because I am still alive, they are not very poisonous.
Shopping for the components
At the electro-store they did have:
The reed-contact (with the advice to look well how you position it, because it is sensitive only to the magnet in some directions.)
The LED’s a bag full of generic different colors with no labels or specs.
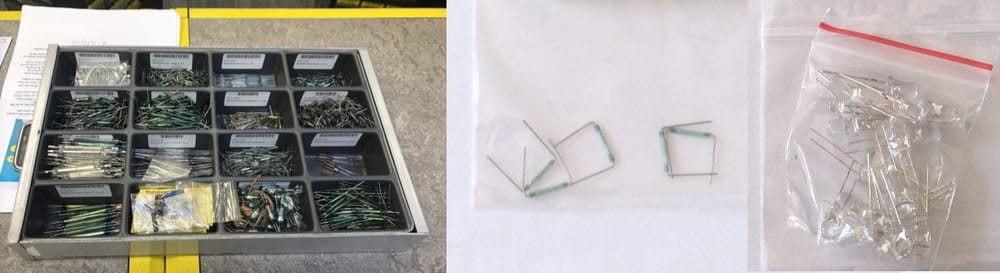 I soldered the Reed-sensor and a 390ohm resistor in a way that I could test it with the battery.
 They did not have the mini-solarpanel and chargeable battery but they did have some good advice: solar panels will drain your battery when it is dark so you’ll need some diode between it to stop loosing energy going the wrong direction. And he advised me to go to the ‘Action’ and buy some solar garden- lights there because the rechargeable battery and the diode is already build in, then I only have to make the other side of the circuit.
But first:
Saturday open time
I had some questions about the size of the milling-bit and Rico explained very well that the smaller the bit the longer the milling would taken (since the stepover will become way smaller with the bitsize.)
 I explained about my solar-panels and they were enthusiastic about the little bicycle light and
Shopping part 2:
I looked in 'the Action' (store) for the smallest solar panel and found some really ugly lights with nice round solarpanels on top. At home I opened the parts and found that it is quite simple, but has a small IC on it with four legs. Probably the Diode is inside of that, because other than the button and the solarpanel all the components are on the little board.
I decided to use the solarpanel and the board, i will solder the panel really close to the board so the light can stay small I will change the switch (which I dismantled anyway) for my reed switch and in the first try I’ll use the standard LED that is already on this board.
 And since I am molding it it quite easy to make more than one light. So I bought 5 of them, I can mess up that way and I can make several lights.
Redesigning the inside
To adjust the ‘Action’-light to my needs for the bicycle light, I turned the battery in a horizontal position, I shortened the solarpanel wires so there is only about 2 mm between the panel and the pcb and resoldered the different wires so that they were through hole now.
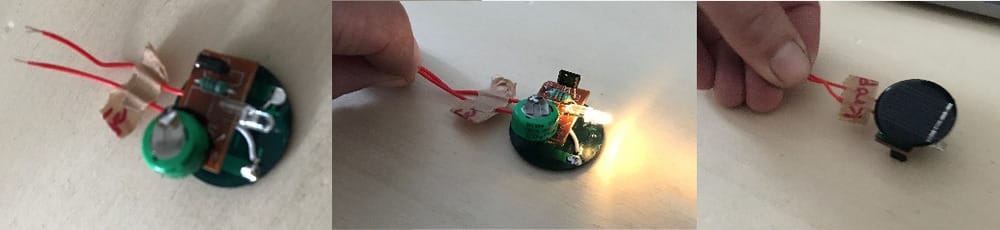 I noticed a cool thing about this set-up, the solarpanel is used as an input-device. The light will only turn on if there is no electric flow from the solar panel. First I thought I made a mistake resoldering everything, or that there was a directional switch or the product was crap, but last night I worked after dark and now in a bright room...
Really cool for my bicycle light, that way it can’t drain the battery at daytime.
I noticed a cool thing about this set-up, the solarpanel is used as an input-device. The light will only turn on if there is no electric flow from the solar panel. First I thought I made a mistake resoldering everything, or that there was a directional switch or the product was crap, but last night I worked after dark and now in a bright room...
Really cool for my bicycle light, that way it can’t drain the battery at daytime.
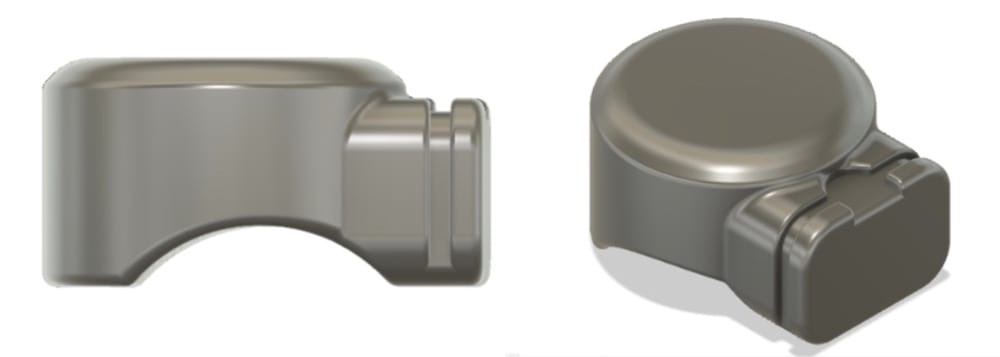
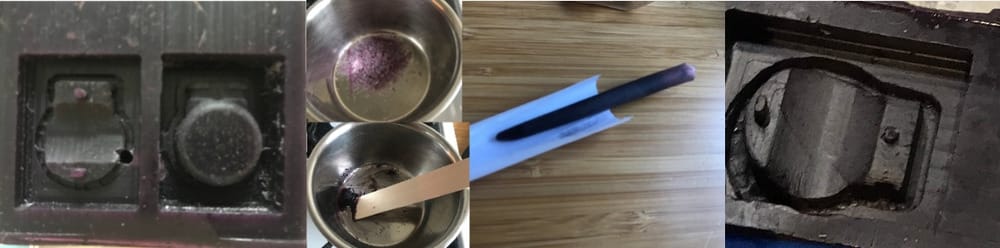
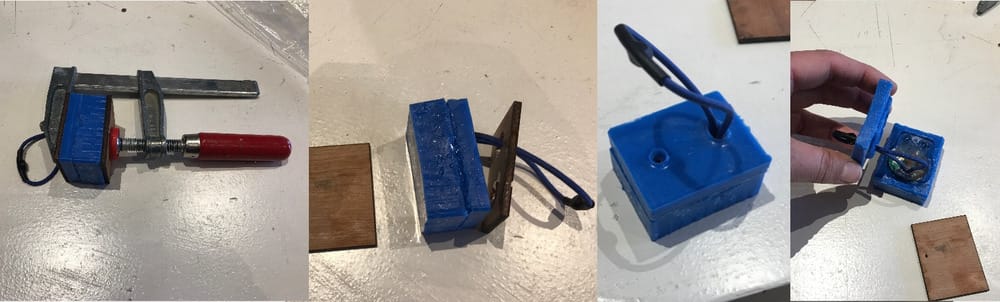
Designing the bicycle-light in fusion:
The solarpanel is round ø25 mm and I want to fit it in the mould so that the epoxy will flow onto the bottom but not on the top (there is epoxy already on the top) The pcb-board is rectangular and with the battery slightly bigger, the LED is on one side and the button wires are on the other side. That is all perfect. I will solder a reed-contact on that side and need some space for the contact and the battery. I looked up standard bicycle handlebars and they have a diameter between 22 an 24 mm so with 25 mm it’ll fit on many bikes.
With these specs I made a nice and small light.
 I cut it out of two pieces with the tutorial that Loes shared.
 And I cut those parts out of the waxblock with my previous knowledge from placing the components with joints.
I made everything parametric (after I had to go back several times for the sizes that I did not make parametric)
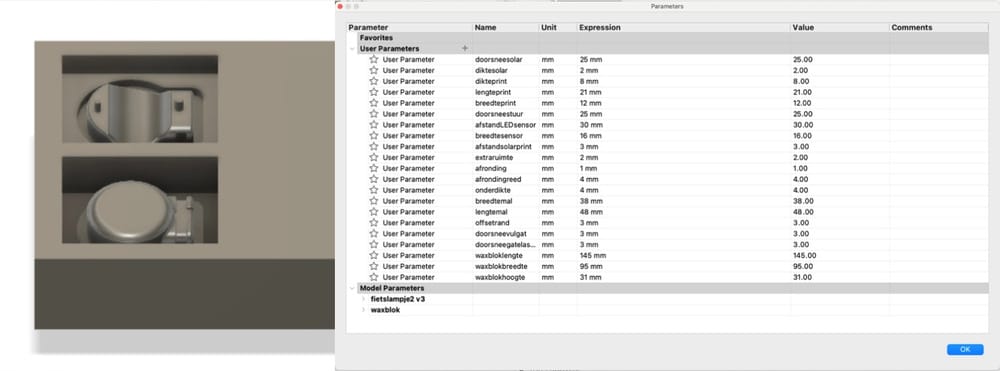
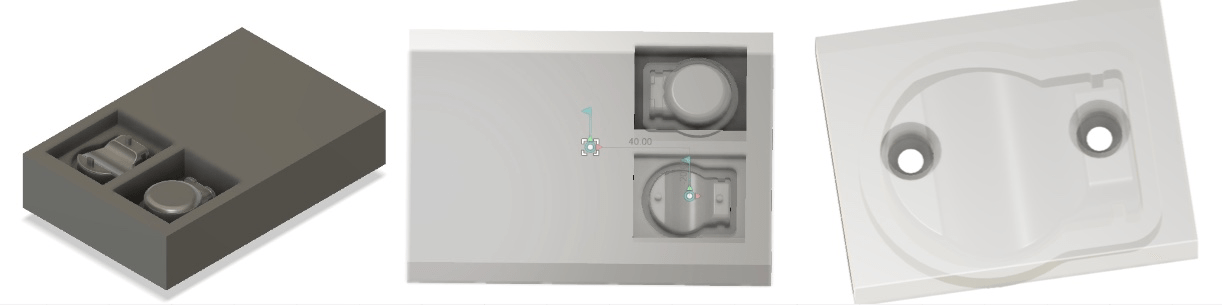
I still have a lot of space in my waxblock, but for now I exported the waxblock as an .stl file.
next spiral
If everything goes well; I do have space for my rotational symmetric part though and that makes me happy.
Monday Waag-time.
Millingtime
Setiing up the VCarve (5mm and 3mm) I found that the settings seemd weird, especially after Nadieh's millingjob came out really rough. I decided to do a 3 mm finishing path.
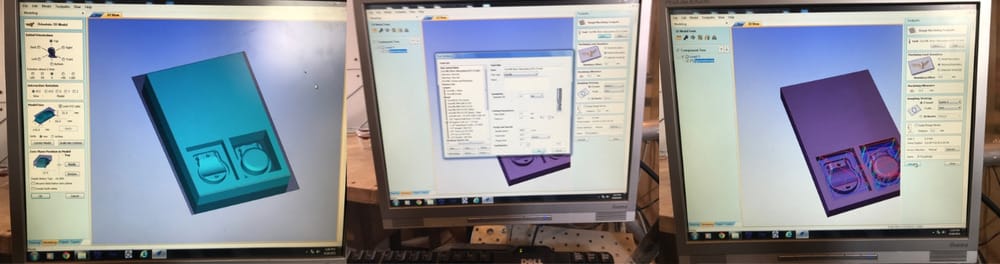 Setting up the shopbot
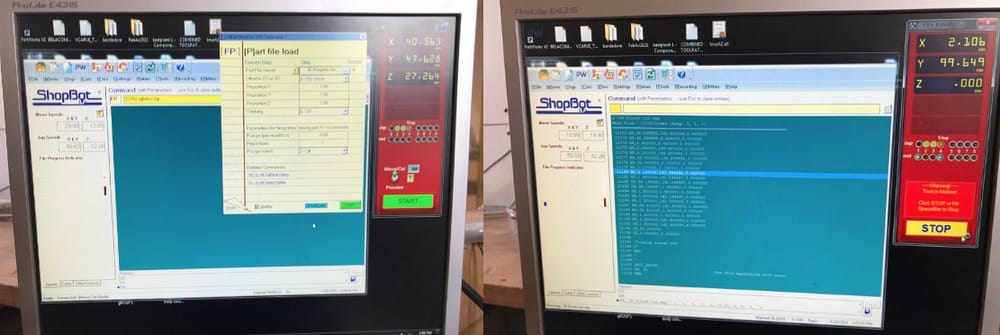 It went way too fast, my block of wax was flying in circles. I think the setting of a feed-forward of 50 mm/sec was too much for the fixing of my block of wax.
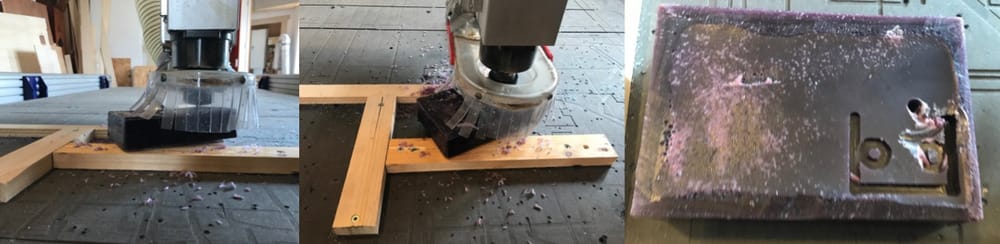 I gave a small shout and while I was trying to stop the machine with the mouse, Loes yelled: "press the spacebar. And because I am a good listener I pressed the spacebar with my other hand.
Luckily the hole was not all the way through, my mould is not to deep and the hole is in the middle of the block, between the two parts, so I can simply turn it over and start again. and if the hole is also on the other side it will be in a part that is not the final product and I can easily fix it.
I lowered the feed-rate to 20 and made a new G-code and then I happily milled away
 I changed the millingbit but I hadn't realized until the machine was running that I of course had to reset the Z-level with the smaller bit. But since this millingbit is shorter no harm was done, it was only running in the air.
I redid the Z-leveling and with my small step-over and slow feed-rate it was really long and precise.
I changed the millingbit but I hadn't realized until the machine was running that I of course had to reset the Z-level with the smaller bit. But since this millingbit is shorter no harm was done, it was only running in the air.
I redid the Z-leveling and with my small step-over and slow feed-rate it was really long and precise.
 Hmmm the hole was all the way through and right through the part where the final product would come, so it needs fixing. At the end of the afternoon in stead of pouring the cast in at the Waag I will take everything home and fix it tonight and pour it tonight so it can cure during the night.
Mondaybight at home
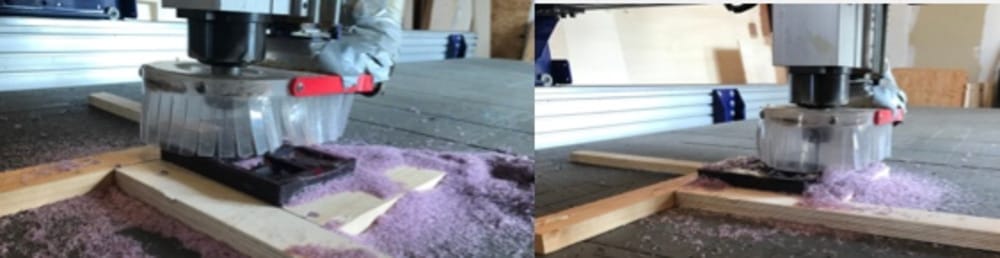
I took the finished waxmold home to fix it and melted some wax.
filled the hole with hot wax
cut away exes wax from the bottom-rim
 Mixed the two mold-star-parts (the very last of the bottles)
3D printed an aihole and a rubberband-hole funnel
 filled the mold
put it under my ventilation in the kitchen overnight

Tuesday morning in Waag
In the morning the Mold-Star has not set yet, if I try to loosen it a bit on the side with a knife, there is still fluid blue stuff on the knife.
Philip gave me the great advice that heat could fasten the setting, so I had to find a warm place. The heater is not on anymore, but, the coffeemachine has a hot plate on top to preheat the cups. I made a little board with rims under the wax, so it won't melt into the coffeemachine. (Although I learned last night that the melting temperature is really high). I put it on there and decided to wait a few hours.
Mean while I wanted to do a test with casting with crystal-clear cast, so I gathered all the available test-molds and read everything about the Tarbender-epoxy and the 202-crystal-clear. The tarbender is not meant for casting, but for coverung tabletops and objects, so I am afraid it won't come out of the mold mould.
In the Datasheet I read that the 202-crystal-Clear only wants to be casted in the urethane and the Mold-star, (and one more , which we did not have at Waag) but not in anything else. So OOMOO was not acknowledged as one of the options, that is sad, because that is the only casting-material that we have a lot of.
But we found a cup with leftover OOMOO and it had space to do a little test.
We tested the 202-crystal clear in urithane lego-plate, OOMOO (with and without release-agent) and the Mold-star Lego-plate.
And they all came out fantastic, even the OOKOO. The 202 is really clear and very easy to pour because it is very liquid. ALthough beforehand we were a little sceptical Loes and I were surprised by the ease of the process and the result.
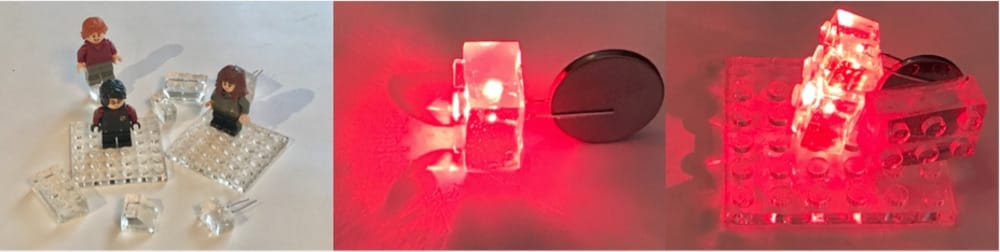
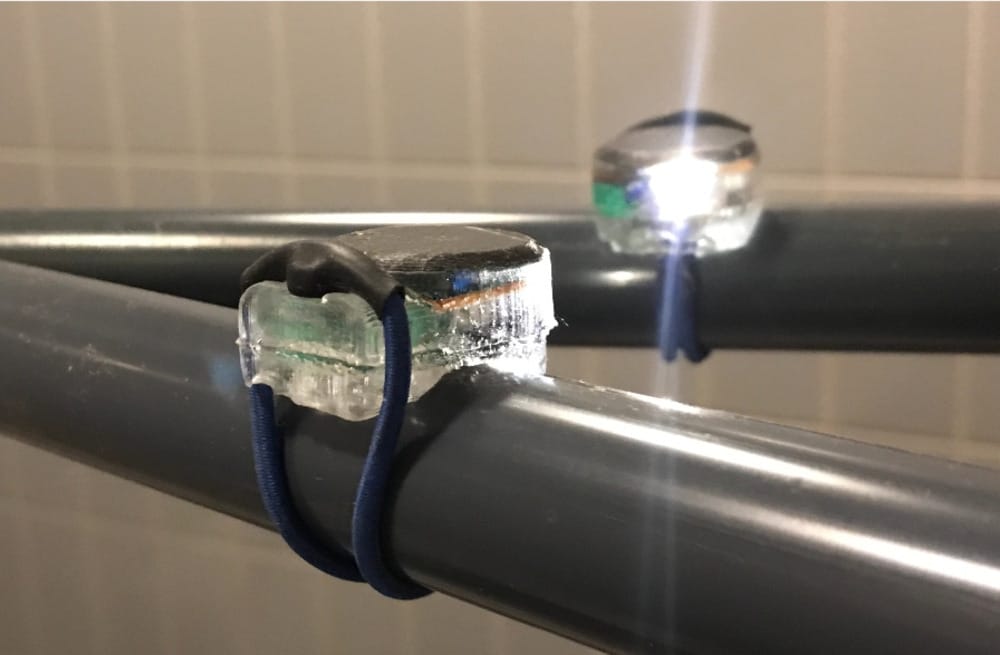
Loes her mold was ready to cast herr lightbulb, but since she had a little accidnet pouring in part B of her 202-cast I was lucky and could make some more crystal clear lego-blocks. I even put in some LED's to see how that would work.
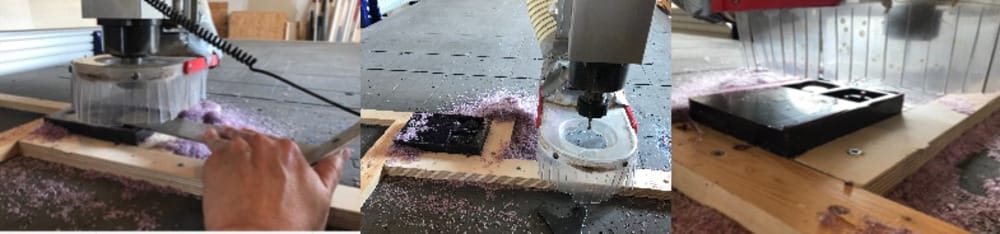
At the start of the afternoon I decided that I had to take my mold out. It had been on the coffeemachine for another 3 hours. If it was cured It would be fine, but if it wasn't I could clean the mold.
The Mold-star came out, but the very low edges were still not hard. in fact they were quite messy.
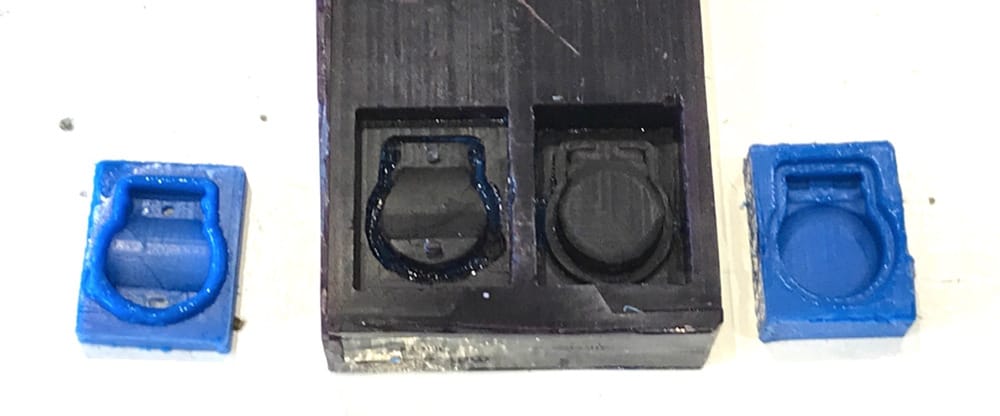 I decided to put the two mold-star-parts back on top of the coffeemachine and cleaned the wax really well to try my luck with the OOMOO.
 I think the wax-mold was either not totally clean (from sanding the fixed parts), or still wet in some parts after cleaning it.
Cast
At the end of the afternoon, my Mold-star-Mold was finally dry (Yes it did dry) but the connections were ugly and not nice and flat so it won;t be to nice. The good things are that the 2 parts do fit together and my electronics do fit in nicely. My rubberband is too small to connect a magnet on and make a knot at the other end to stay in the cast. I decided to cast anyway, because that way I would have something finished tomorrow (on wednesday) Loes lent me a longer elastic band so I could make everything!
And it means that I have to make a second light with my still curing OOMOO mold.
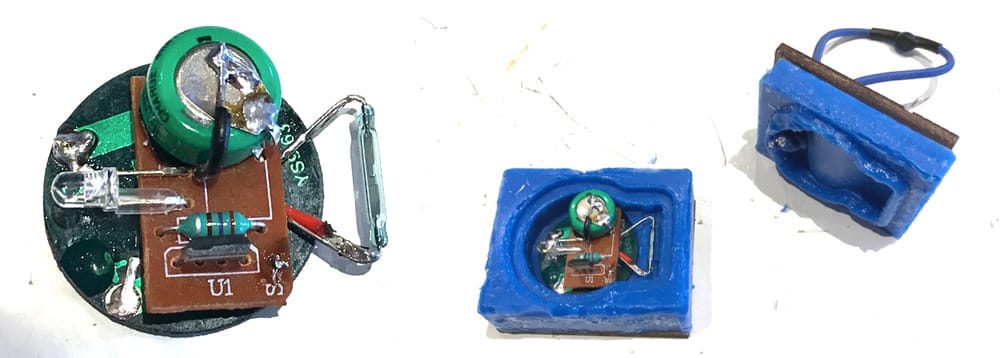
I soldered the Reed-contact on in the right spot, and fitted everything into the mold.
I lifted the PCB with a piece of test-202, so it would stay straight.
casting the product:
I decided to use crystal clear 202, because that is the only clear csting available, next to the epoxy, which is not used this week.
| Data | crystal clear 202 |
|---|---|
| safety measures | resperator, fume-exhaust, longsleeves, gloves |
| prep | pre-mix parts separately, preheat mold |
| mold release | use specific mold material, i.a Moldstar |
| mixing ratio volume | - |
| mix weight | 100A/90B |
| potlife min | 9 |
| vacuum | until rises + 1 minute |
| curetime at 23°C | 10 min |
| cure | 90 minutes |
| post cure | 6 hours at 65°C |
| extra | maximum thickness 1/2 inch |
Time to mix the crystal clear 202 with the scale part A(100) and B(90). I first poured the bottom half while the mold was still open and then put the top-part on and poured into my tiny pouring hole until it also came out of the elastic-band hole.
 I fixated everything with a clamp and left it in the fume-extractor to cure until wednesday-morning.
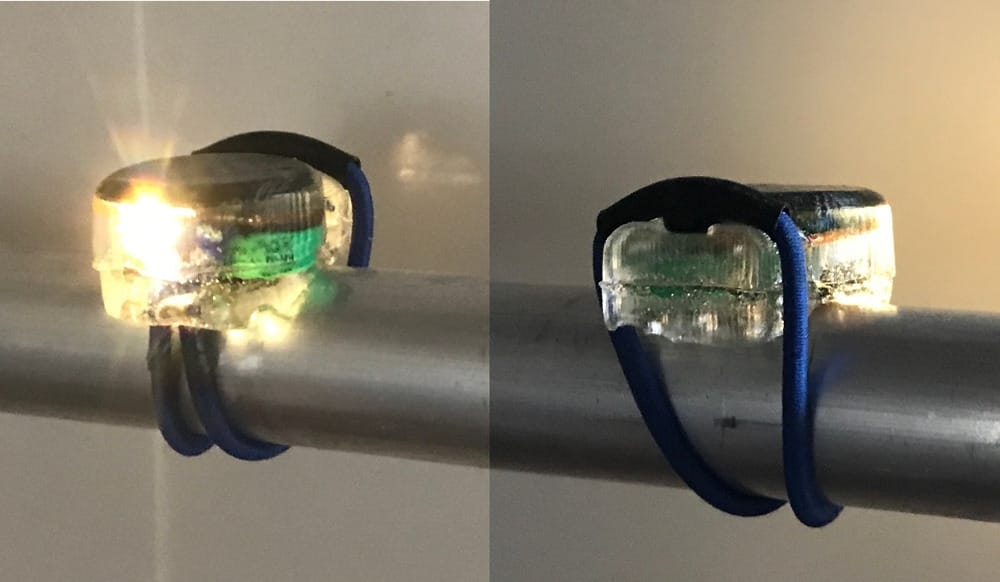
the result
Wednesdaymorning I went to Waag again to pick up my light, hopefully it would work...
so the mold looked still fine and I took the light out.
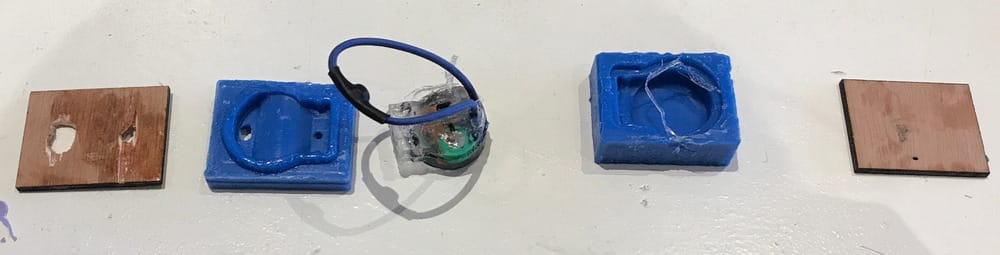
It works...
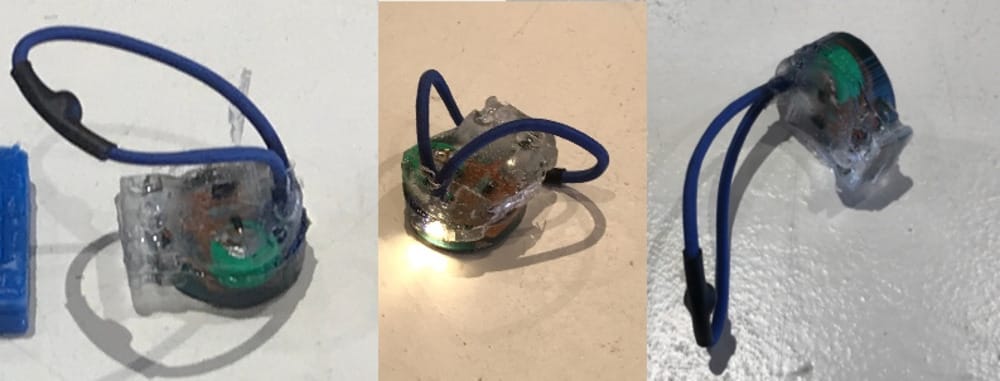
I cleaned it up a bit and then I made some nice pictures.
Learnings this week
Molding and Casting was new to me, I learned a lot about the theory during my study in Delft, but other than chocolate and gypsum and icing I did not have al lot of experience. beforehand I did not really have a good idea what to make, but when I remembered my bicycle light and the lego-block I was really enthusiastic:
- I loved thinking out a product and shaping it to the need of the function (form-follows-function)
- I liked fusion again. I really get better at finding a building strategy for my things.
- It is a bit scary to see your wax flying in circles on the millingmachine
- I am happy that by lowering the Feed-speed I got a nice result
- It is wonderful to cast all these different products in my lego-blocks. It is really fun to have all these different little lego-blocks of left-overs of other people.
- I think it is great to have a product that has all the electronics embedded. It is good fun to be happy about a LED
- it is very precise to mix the material for the casting. and if it goes wrong, the result is immidiately ruined, that is a downside of casting.
- All and all I am a happy camper this week.
Links to Design-files
here are the links to the designfiles of this week:
- fietslampje.dxf or download
- gesnedenwax.stl or download
- tuutjeijsbaan.stl or download
- tuutjerond.stl or download