Mohit Ahuja's Fabacademy 2021
Interface and Application Programming
In this week we were supposed to experiment with different interfaces of our input or output boards. My work for this week is fairly limited due to my pending work from previous weeks. But I will try to find the time to experiment with other interfacing techniques.I experimented with Processing as well as a little bit with Python.
Group Project
Before we began experimenting, our local instructor, Aditi Ma'am gave us a brief introduction to MIT AppInventor and Processing, and I gave a brief overview of Scratch with Python. The results of this week's group assignments are given below.
Group AssignmentFamiliar Turf
I have actually made some interfaces in Processing in the past and integrated it with Arduino, so for this week, I decided to make a simple graph plotter for my Hello Echo board made in Electronic Design Week. The goal was to make the software to simply plot a sine wave generated by the Arduino and sent over the Serial monitor.
For that, I took the reference of the Arduino code made for the embedded programming week, and added some code to calculate the value of sine and sent that over the Serial port.
This is the code that I uploaded to my Hello Echo World Board:
#include "SoftwareSerial.h"
float i = 0;
SoftwareSerial mySerial(2, 1); // RX, TX

void setup() {
  mySerial.begin(4800);
}

void loop() { // run over and over
  float val = sin(i);
  mySerial.println(val);
  i+=0.0314;
}
Code for sending the values of Sine(x) over Serial
This is the output of the program in the Arduino IDE's Serial Plotter
To make the interface in Processing, I dug around on the internet a little bit to find some inspiration for the code and found this code on the Arduino.cc website: Graph
  // Graphing sketch

  // This program takes ASCII-encoded strings from the serial port at 9600 baud
  // and graphs them. It expects values in the range 0 to 1023, followed by a
  // newline, or newline and carriage return

  // created 20 Apr 2005
  // updated 24 Nov 2015
  // by Tom Igoe
  // This example code is in the public domain.

  import processing.serial.*;

  Serial myPort;        // The serial port
  int xPos = 1;         // horizontal position of the graph
  float inByte = 0;

  void setup () {
    // set the window size:
    size(400, 300);

    // List all the available serial ports
    // if using Processing 2.1 or later, use Serial.printArray()
    println(Serial.list());

    // I know that the first port in the serial list on my Mac is always my
    // Arduino, so I open Serial.list()[0].
    // Open whatever port is the one you're using.
    myPort = new Serial(this, Serial.list()[0], 9600);

    // don't generate a serialEvent() unless you get a newline character:
    myPort.bufferUntil('\n');

    // set initial background:
    background(0);
  }

  void draw () {
    // draw the line:
    stroke(127, 34, 255);
    line(xPos, height, xPos, height - inByte);

    // at the edge of the screen, go back to the beginning:
    if (xPos >= width) {
      xPos = 0;
      background(0);
    } else {
      // increment the horizontal position:
      xPos++;
    }
  }

  void serialEvent (Serial myPort) {
    // get the ASCII string:
    String inString = myPort.readStringUntil('\n');

    if (inString != null) {
      // trim off any whitespace:
      inString = trim(inString);
      // convert to an int and map to the screen height:
      inByte = float(inString);
      println(inByte);
      inByte = map(inByte, 0, 1023, 0, height);
    }
  }
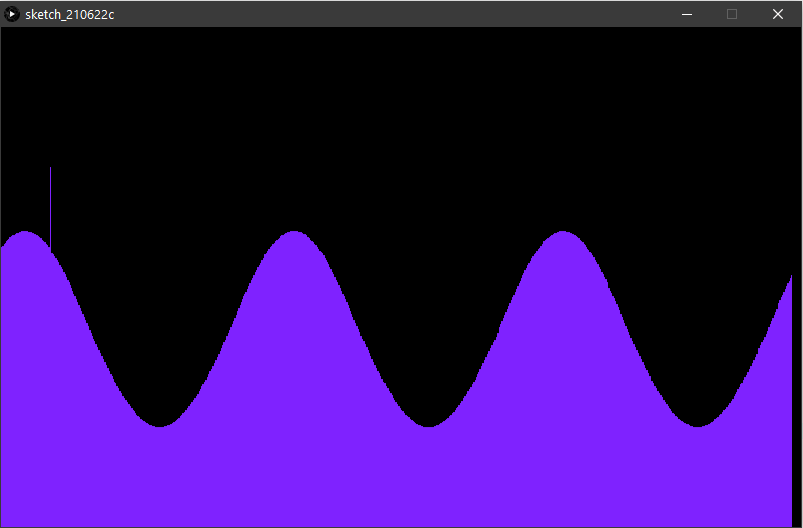
When I tried the code given in the link above without any modifications, I obtained the following result:

So after seeing the above screenshots, you might be thinking what I was thinking, there is no output. But if you zoom and enhance, you'll see that there is actually a short line showing up in the bottom of the screen.

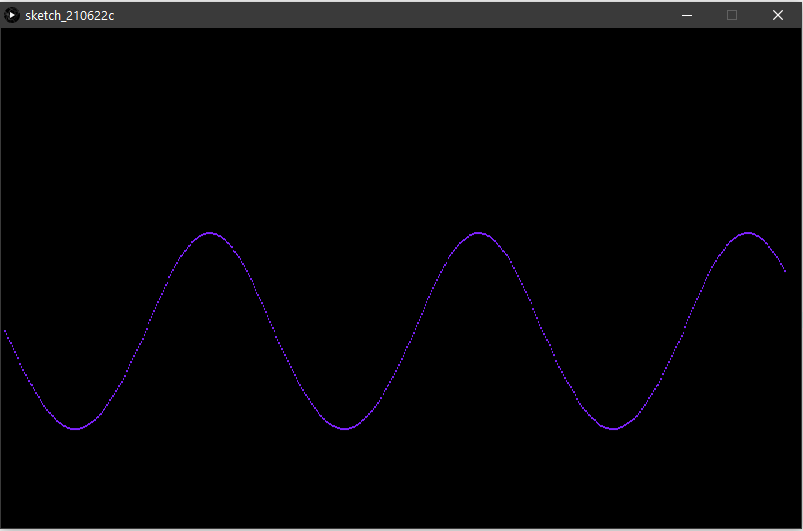
This is happening because the code basically takes the input from the serial monitor, and maps it to the pixels, and since the sine(x) function gives an output between 1 and -1, the program converts it to a pixel of value one when the value of the sine(x) function is greater than 0.5 and zero for all other values of sine(x). I fixed this in the next version of the code, which multiplies the value of sin(x) by 200 and also adds 200 to the output so that the negative values can also be displayed.
// Graphing sketch

// This program takes ASCII-encoded strings from the serial port at 9600 baud
// and graphs them. It expects values in the range 0 to 1023, followed by a
// newline, or newline and carriage return

// created 20 Apr 2005
// updated 24 Nov 2015
// by Tom Igoe
// modified 12 May 2021
// by Mohit Ahuja
// This example code is in the public domain.

import processing.serial.*;

Serial myPort;        // The serial port
int xPos = 1;         // horizontal position of the graph
float inByte = 0;

void setup () {
// set the window size:
size(800, 500);

// List all the available serial ports
// if using Processing 2.1 or later, use Serial.printArray()
println(Serial.list());
// I know that the first port in the serial list on my Mac is always my
// Arduino, so I open Serial.list()[0].
// Open whatever port is the one you're using.
myPort = new Serial(this, Serial.list()[1], 4800);

// don't generate a serialEvent() unless you get a newline character:
myPort.bufferUntil('\n');

// set initial background:
background(0);
}

void draw () {
// draw the line:
stroke(127, 34, 255);
line(xPos, height, xPos, height - inByte);
// at the edge of the screen, go back to the beginning:
if (xPos >= width) {
  xPos = 0;
  background(0);
} else {
  // increment the horizontal position:
  xPos++;
}
}
void serialEvent (Serial myPort) {
// get the ASCII string:
String inString = myPort.readStringUntil('\n');

if (inString != null) {
  // trim off any whitespace:
  inString = trim(inString);
  // convert to an int and map to the screen height:
  inByte = (float(inString)*200) +200;
  println(inByte);
  inByte = map(inByte, 0, 1023, 0, height)+100;
}
}
This was the output of the above code:
But I wanted to see a single line output of the curve, so I modified the code to display the same sine curve twice, with the second curve coloured black to match the background and hence make it appear as if there is a single line. This is the code for that:
// This program takes ASCII-encoded strings from the serial port at 9600 baud
// and graphs them. It expects values in the range 0 to 1023, followed by a
// newline, or newline and carriage return

// created 20 Apr 2005
// updated 24 Nov 2015
// by Tom Igoe
// modified 12 May 2021
// by Mohit Ahuja
// This example code is in the public domain.

import processing.serial.*;

Serial myPort;        // The serial port
int xPos = 1;         // horizontal position of the graph
float inByte = 0;

void setup () {
  // set the window size:
  size(800, 500);

  // List all the available serial ports
  // if using Processing 2.1 or later, use Serial.printArray()
  println(Serial.list());
  // I know that the first port in the serial list on my Mac is always my
  // Arduino, so I open Serial.list()[0].
  // Open whatever port is the one you're using.
  myPort = new Serial(this, Serial.list()[1], 4800);

  // don't generate a serialEvent() unless you get a newline character:
  myPort.bufferUntil('\n');

  // set initial background:
  background(0);
}

void draw () {
  // draw the line:
  stroke(127, 34, 255);
  line(xPos, height, xPos, height - inByte);
  stroke(0);
  line(xPos, height, xPos, (height - inByte)+2);
  // at the edge of the screen, go back to the beginning:
  if (xPos >= width) {
    xPos = 0;
    background(0);
  } else {
    // increment the horizontal position:
    xPos++;
  }
}
void serialEvent (Serial myPort) {
  // get the ASCII string:
  String inString = myPort.readStringUntil('\n');

  if (inString != null) {
    // trim off any whitespace:
    inString = trim(inString);
    // convert to an int and map to the screen height:
    inByte = (float(inString)*200) +200;
    println(inByte);
    inByte = map(inByte, 0, 1023, 0, height)+100;
  }
}
And this is the output of the above code:
By using the above concept of overlapping shapes, I made a different, fun interpretation of the code by overlaying multiple graphs of different colors all measuring the same value. Here is the code that I wrote for that:
// Graphing sketch

// This program takes ASCII-encoded strings from the serial port at 9600 baud
// and graphs them. It expects values in the range 0 to 1023, followed by a
// newline, or newline and carriage return

// created 20 Apr 2005
// updated 24 Nov 2015
// by Tom Igoe
// This example code is in the public domain.

import processing.serial.*;

Serial myPort;        // The serial port
int xPos = 1;         // horizontal position of the graph
float inByte = 0;

void setup () {
  // set the window size:
  size(400, 300);

  // List all the available serial ports
  // if using Processing 2.1 or later, use Serial.printArray()
  println(Serial.list());

  // I know that the first port in the serial list on my Mac is always my
  // Arduino, so I open Serial.list()[0].
  // Open whatever port is the one you're using.
  myPort = new Serial(this, Serial.list()[1], 4800);

  // don't generate a serialEvent() unless you get a newline character:
  myPort.bufferUntil('\n');

  // set initial background:
  background(0);
}

void draw () {
  // draw the line:
  stroke(127, 34, 255);
  line(xPos, height, xPos, height - inByte);
    stroke(250,100,100);
  line(xPos, height+20, xPos, height - inByte+20);
      stroke(100,250,100);
  line(xPos, height+40, xPos, height - inByte+40);
        stroke(250,250,100);
  line(xPos, height+60, xPos, height - inByte+60);
  // at the edge of the screen, go back to the beginning:
  if (xPos >= width) {
    xPos = 0;
    background(0);
  } else {
    // increment the horizontal position:
    xPos++;
  }
}

void serialEvent (Serial myPort) {
  // get the ASCII string:
  String inString = myPort.readStringUntil('\n');

  if (inString != null) {
    // trim off any whitespace:
    inString = trim(inString);
    // convert to an int and map to the screen height:
    inByte = float(inString);
    println(inByte);
    inByte = map(inByte, 0, 1023, 0, height)*200+200;
  }
}
And this is what the output of that code looks like:
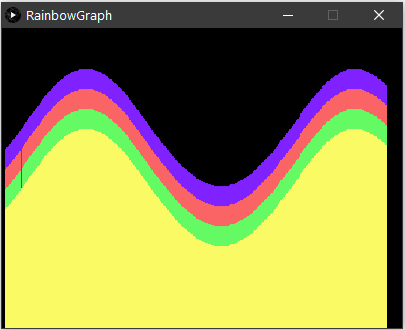
This was a pretty satisfying result, but I wanted more features. Features such as the ability to change the baud rate of the monitor, or to be able to select the com port that i want from a list of available devices, or the ability to control the size of the graph being displayed. So I looked around on the internet some more. And I found this page: Serial Port selection in a Processing Application
Here is the unmodified code from the website:
/*------------------------------------------------------------------------------------
   Program:     port_select

   Description: Allows a serial port to be selected and connected to graphically.
                Has the following buttons:
                Up         - scrolls up through the serial port list
                Down       - scrolls down through the serial port list
                Connect    - connects to the selected serial port
                Disconnect - disconnects from the serial port allowing a new serial
                             port to be connected to
                Refresh    - refreshes the list of serial ports. Useful if a new
                             serial device is connected to the PC after this app-
                             lication is started

   Purpose:     Allows the serial port to be selected within an application instead
                of hard-coding the port number

   Hardware:    Can be used to connect to Arduino or other serial devices

   Software:    Developed using Processing 2.2.1 (processing.org)
                Uses the Button class from:
                http://blog.startingelectronics.com/a-simple-button-for-processing-language-code/

   Date:        21 July 2015   Author:   W.A. Smith, http://startingelectronics.org

------------------------------------------------------------------------------------*/

import processing.serial.*;

Serial serial_port = null;        // the serial port

// serial port buttons
Button btn_serial_up;              // move up through the serial port list
Button btn_serial_dn;              // move down through the serial port list
Button btn_serial_connect;         // connect to the selected serial port
Button btn_serial_disconnect;      // disconnect from the serial port
Button btn_serial_list_refresh;    // refresh the serial port list
String serial_list;                // list of serial ports
int serial_list_index = 0;         // currently selected serial port
int num_serial_ports = 0;          // number of serial ports in the list

void setup() {
  // set the window size
  size (640, 480);

  // create the buttons
  btn_serial_up = new Button("^", 140, 10, 40, 20);
  btn_serial_dn = new Button("v", 140, 50, 40, 20);
  btn_serial_connect = new Button("Connect", 190, 10, 100, 25);
  btn_serial_disconnect = new Button("Disconnect", 190, 45, 100, 25);
  btn_serial_list_refresh = new Button("Refresh", 190, 80, 100, 25);

  // get the list of serial ports on the computer
  serial_list = Serial.list()[serial_list_index];

  //println(Serial.list());
  //println(Serial.list().length);

  // get the number of serial ports in the list
  num_serial_ports = Serial.list().length;
}

void mousePressed() {
  // up button clicked
  if (btn_serial_up.MouseIsOver()) {
    if (serial_list_index > 0) {
      // move one position up in the list of serial ports
      serial_list_index--;
      serial_list = Serial.list()[serial_list_index];
    }
  }
  // down button clicked
  if (btn_serial_dn.MouseIsOver()) {
    if (serial_list_index < (num_serial_ports - 1)) {
      // move one position down in the list of serial ports
      serial_list_index++;
      serial_list = Serial.list()[serial_list_index];
    }
  }
  // Connect button clicked
  if (btn_serial_connect.MouseIsOver()) {
    if (serial_port == null) {
      // connect to the selected serial port
      serial_port = new Serial(this, Serial.list()[serial_list_index], 9600);
    }
  }
  // Disconnect button clicked
  if (btn_serial_disconnect.MouseIsOver()) {
    if (serial_port != null) {
      // disconnect from the serial port
      serial_port.stop();
      serial_port = null;
    }
  }
  // Refresh button clicked
  if (btn_serial_list_refresh.MouseIsOver()) {
    // get the serial port list and length of the list
    serial_list = Serial.list()[serial_list_index];
    num_serial_ports = Serial.list().length;
  }
}

void draw() {
  // draw the buttons in the application window
  btn_serial_up.Draw();
  btn_serial_dn.Draw();
  btn_serial_connect.Draw();
  btn_serial_disconnect.Draw();
  btn_serial_list_refresh.Draw();
  // draw the text box containing the selected serial port
  DrawTextBox("Select Port", serial_list, 10, 10, 120, 60);
}

// function for drawing a text box with title and contents
void DrawTextBox(String title, String str, int x, int y, int w, int h)
{
  fill(255);
  rect(x, y, w, h);
  fill(0);
  textAlign(LEFT);
  textSize(14);
  text(title, x + 10, y + 10, w - 20, 20);
  textSize(12);
  text(str, x + 10, y + 40, w - 20, h - 10);
}

// button class used for all buttons
class Button {
  String label;
  float x;    // top left corner x position
  float y;    // top left corner y position
  float w;    // width of button
  float h;    // height of button

  // constructor
  Button(String labelB, float xpos, float ypos, float widthB, float heightB) {
    label = labelB;
    x = xpos;
    y = ypos;
    w = widthB;
    h = heightB;
  }

  // draw the button in the window
  void Draw() {
    fill(218);
    stroke(141);
    rect(x, y, w, h, 10);
    textAlign(CENTER, CENTER);
    fill(0);
    text(label, x + (w / 2), y + (h / 2));
  }

  // returns true if the mouse cursor is over the button
  boolean MouseIsOver() {
    if (mouseX > x && mouseX < (x + w) && mouseY > y && mouseY < (y + h)) {
      return true;
    }
    return false;
  }
}
And this is what I get upon executing the code:
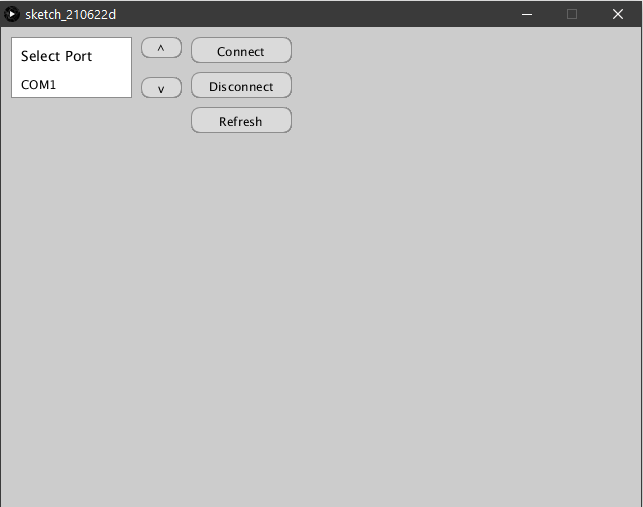
The code works very well, with the up and down buttons used for choosing the relevant com port and the connect disconnect button working as expected. The one missing link was to control the baud rates at which the serial plotter operates. I added that by taking bits and pieces from the existing code. I also added a section where a user can input an amplification factor that will be applied to the graph display. This is what the final code looks like after I made the changes:
// Graphing sketch

// This program takes ASCII-encoded strings from the serial port at 9600 baud
// and graphs them. It expects values in the range 0 to 1023, followed by a
// newline, or newline and carriage return

// created 20 Apr 2005
// updated 24 Nov 2015
// by Tom Igoe
// updated 19 May 2021
// by Mohit Ahuja
// This example code is in the public domain.

import processing.serial.*;

Serial serial_port;        // The serial port
int xPos = 1;         // horizontal position of the graph
float inByte = 0;

// serial port buttons
Button btn_serial_up;              // move up through the serial port list
Button btn_serial_dn;              // move down through the serial port list
Button btn_serial_connect;         // connect to the selected serial port
Button btn_serial_disconnect;      // disconnect from the serial port
Button btn_serial_list_refresh;    // refresh the serial port list
Button btn_baud_up;
Button btn_baud_dn;
Button btn_baud_sel;

String baud[]={"300", "400", "1200", "2400", "4800", "9600", "19200", "38400", "57600", "74880", "115200", "230400"};
String baudrate = baud[4];
int baud_index = 0;

String typing = "";                // Variable to store text currently being typed
String saved = "";                 // Variable to store saved text when return is hit

String serial_list;                // list of serial ports
int serial_list_index = 0;         // currently selected serial port
int num_serial_ports = 0;          // number of serial ports in the list

int connected =0;
int factor=1;
int h=300;

void setup () {
  // set the window size:
  size(700, 700);

  // create the buttons
  btn_serial_up = new Button("^", 140, 10, 40, 20);
  btn_serial_dn = new Button("v", 140, 30, 40, 20);
  btn_serial_connect = new Button("Connect", 190, 10, 80, 40);
  btn_serial_disconnect = new Button("Disconnect", 280, 10, 80, 40);
  btn_serial_list_refresh = new Button("Refresh", 370, 10, 100, 40);

  btn_baud_up = new Button("^", 140, 60, 40, 20);
  btn_baud_dn = new Button("v", 140, 80, 40, 20);

  // get the list of serial ports on the computer
  serial_list = Serial.list()[serial_list_index];

  // List all the available serial ports
  // if using Processing 2.1 or later, use Serial.printArray()
  println(Serial.list());

  // get the number of serial ports in the list
  num_serial_ports = Serial.list().length;

  // set initial background:
  background(0);
}

void mousePressed() {
  // up button clicked
  if (btn_serial_up.MouseIsOver()) {
    if (serial_list_index > 0) {
      // move one position up in the list of serial ports
      serial_list_index--;
      serial_list = Serial.list()[serial_list_index];
    }
  }
  // down button clicked
  if (btn_serial_dn.MouseIsOver()) {
    if (serial_list_index < (num_serial_ports - 1)) {
      // move one position down in the list of serial ports
      serial_list_index++;
      serial_list = Serial.list()[serial_list_index];
    }
  }
  // Connect button clicked
  if (btn_serial_connect.MouseIsOver()) {
    if (serial_port == null) {
      // connect to the selected serial port
      serial_port = new Serial(this, Serial.list()[serial_list_index], Integer.valueOf(baudrate));

      // don't generate a serialEvent() unless you get a newline character:
      serial_port.bufferUntil('\n');

      connected=1;

      fill(0);
      rect(10, 100, 480, 20);
      fill(255);
      text(serial_list+" connected at "+baudrate+" baudrate and amplification "+saved, 10, 115);
    }
  }
  // Disconnect button clicked
  if (btn_serial_disconnect.MouseIsOver()) {
    if (serial_port != null) {
      // disconnect from the serial port
      serial_port.stop();
      serial_port = null;
      connected=0;
      fill(0);
      rect(10, 100, 480, 20);
      fill(255);
      text(serial_list+" diconnected", 10, 115);
    }
  }
  // Refresh button clicked
  if (btn_serial_list_refresh.MouseIsOver()) {
    // get the serial port list and length of the list
    serial_list = Serial.list()[serial_list_index];
    num_serial_ports = Serial.list().length;
  }
  // up button clicked
  if (btn_baud_up.MouseIsOver()) {
    if (baud_index > 0) {
      // move one position up in the list of serial ports
      baud_index--;
      baudrate = baud[baud_index];
    }
  }
  // down button clicked
  if (btn_baud_dn.MouseIsOver()) {
    if (baud_index < (baud.length - 1)) {
      // move one position down in the list of serial ports
      baud_index++;
      baudrate = baud[baud_index];
    }
  }
}
void draw () {
  // draw the buttons in the application window
  btn_serial_up.Draw();
  btn_serial_dn.Draw();
  btn_serial_connect.Draw();
  btn_serial_disconnect.Draw();
  btn_serial_list_refresh.Draw();

  btn_baud_up.Draw();
  btn_baud_dn.Draw();

  // draw the text box containing the selected serial port
  DrawTextBox(serial_list, 10, 10, 120, 40);
  DrawTextBox(baudrate, 10, 60, 120, 40);

  int indent=18;
  fill(255);
  rect(10, 135, 400, 20);
  fill(0);
  text("Amplification factor: " + typing, indent, 150);

  stroke(50, 50, 255);
  line(0, height-h-100, width, height-h-100);
  stroke(50, 50, 255);
  line(0, height-h, width, height-h);
  stroke(50, 50, 255);
  line(0, height-h+100, width, height-h+100);

  // draw the line:
  if (connected==1) {
    stroke(255);
    line(xPos, height, xPos, height - inByte);
    stroke(0);
    line(xPos, height+2, xPos, height - inByte+2);

    stroke(50, 50, 255);
    line(0, height-h-100, width, height-h-100);
    stroke(50, 50, 255);
    line(0, height-h, width, height-h);
    stroke(50, 50, 255);
    line(0, height-h+100, width, height-h+100);

    // at the edge of the screen, go back to the beginning:
    if (xPos >= width) {
      xPos = 0;
      background(0);
    } else {
      // increment the horizontal position:
      xPos++;
    }
  }
}

void serialEvent (Serial serial_port) {
  // get the ASCII string:
  String inString = serial_port.readStringUntil('\n');
  if (inString != null) {
    // trim off any whitespace:
    inString = trim(inString);
    // convert to an int and map to the screen height:
    inByte = float(inString);
    inByte = map(inByte, 0, 1023, 0, 1000*factor)+h;
    println(inByte);
  }
}

void keyPressed() {
  // If the return key is pressed, save the String and clear it
  if (key == '\n' ) {
    saved = typing;
    factor=Integer.valueOf(saved);
    // A String can be cleared by setting it equal to ""
    typing = "";
    fill(0);
    rect(10, 100, 480, 20);
    fill(255);
    text(serial_list+" connected at "+baudrate+" baudrate and amplification "+saved, 10, 115);
  } else if (key==BACKSPACE) {
    typing = typing.substring( 0, typing.length()-1 );
  } else switch(key) {
  case '1':
  case '2':
  case '3':
  case '4':
  case '5':
  case '6':
  case '7':
  case '8':
  case '9':
  case '0':
    // Otherwise, concatenate the String
    // Each character typed by the user is added to the end of the String variable.
    typing = typing + key;
    break;
  }
}

// function for drawing a text box with title and contents
void DrawTextBox(String str, int x, int y, int w, int h)
{
  fill(255);
  rect(x, y, w, h);
  fill(0);
  textAlign(LEFT);
  textSize(12);
  text(str, x + 10, y + 15, w - 20, h - 10);
}

// button class used for all buttons
class Button {
  String label;
  float x;    // top left corner x position
  float y;    // top left corner y position
  float w;    // width of button
  float h;    // height of button

  // constructor
  Button(String labelB, float xpos, float ypos, float widthB, float heightB) {
    label = labelB;
    x = xpos;
    y = ypos;
    w = widthB;
    h = heightB;
  }

  // draw the button in the window
  void Draw() {
    fill(218);
    stroke(141);
    rect(x, y, w, h, 10);
    textAlign(CENTER, CENTER);
    fill(0);
    text(label, x + (w / 2), y + (h / 2));
  }

  // returns true if the mouse cursor is over the button
  boolean MouseIsOver() {
    if (mouseX > x && mouseX < (x + w) && mouseY > y && mouseY < (y + h)) {
      return true;
    }
    return false;
  }
}
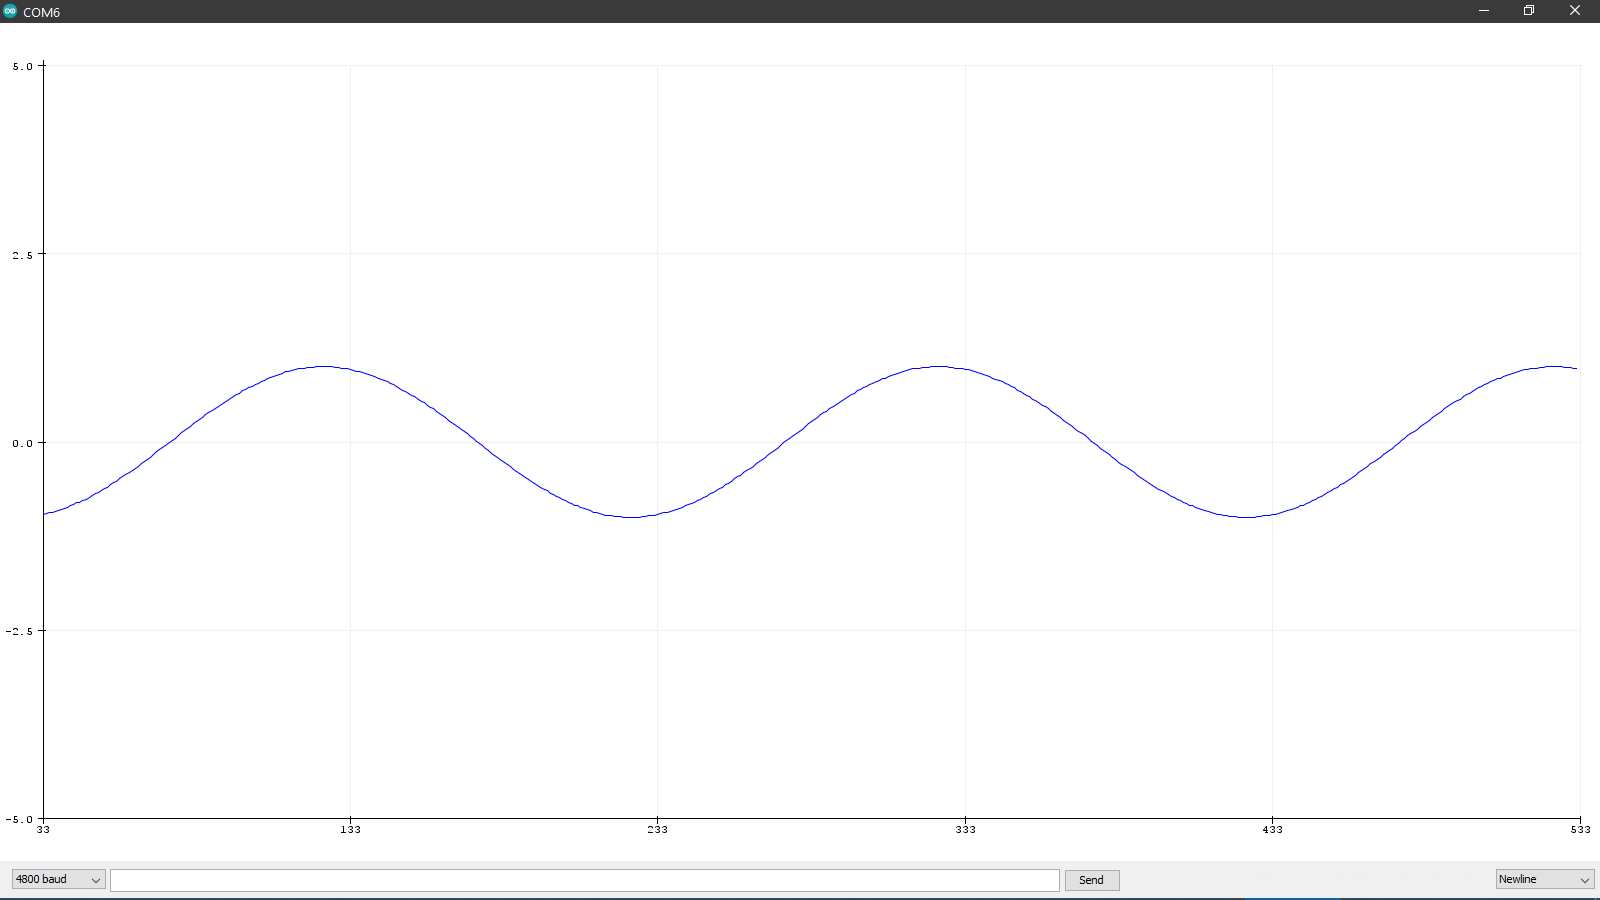
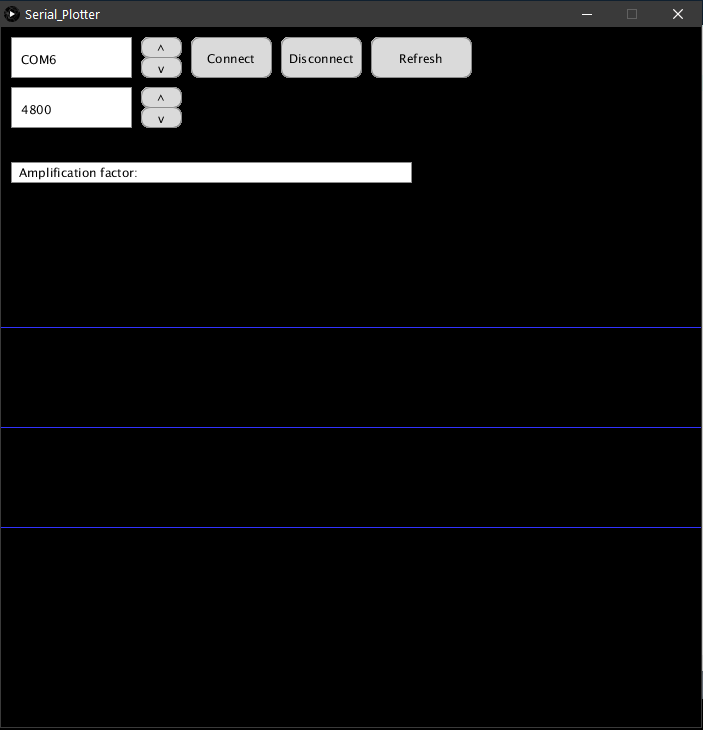
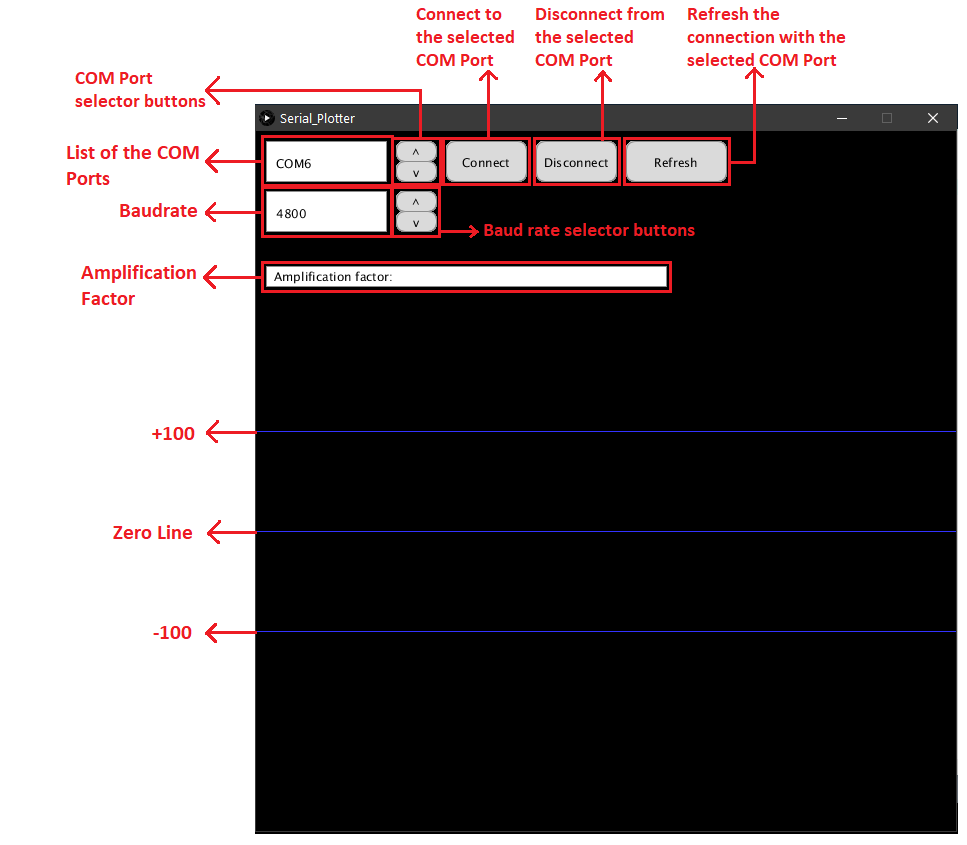
This is how the interface works:
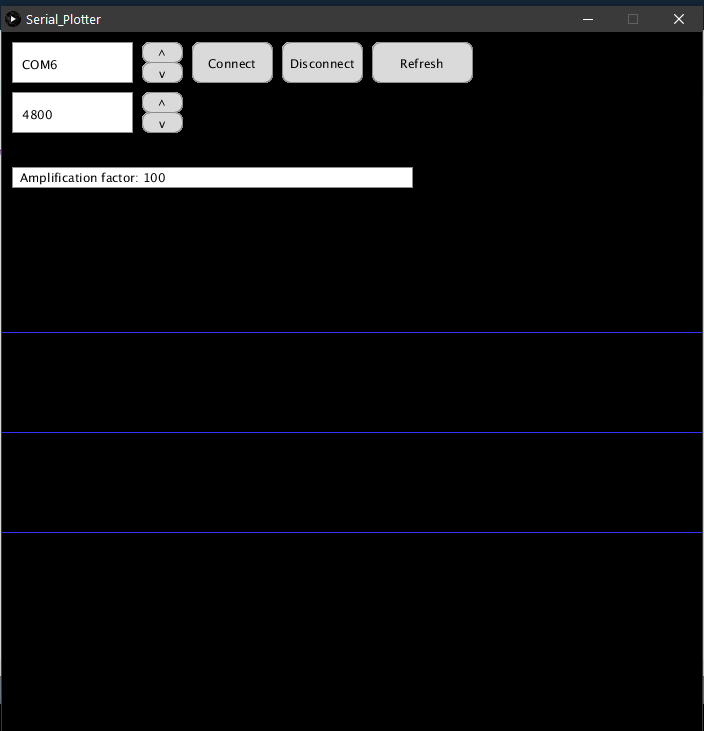
This is the window that greets you when you first start the program.
This is how everything works:
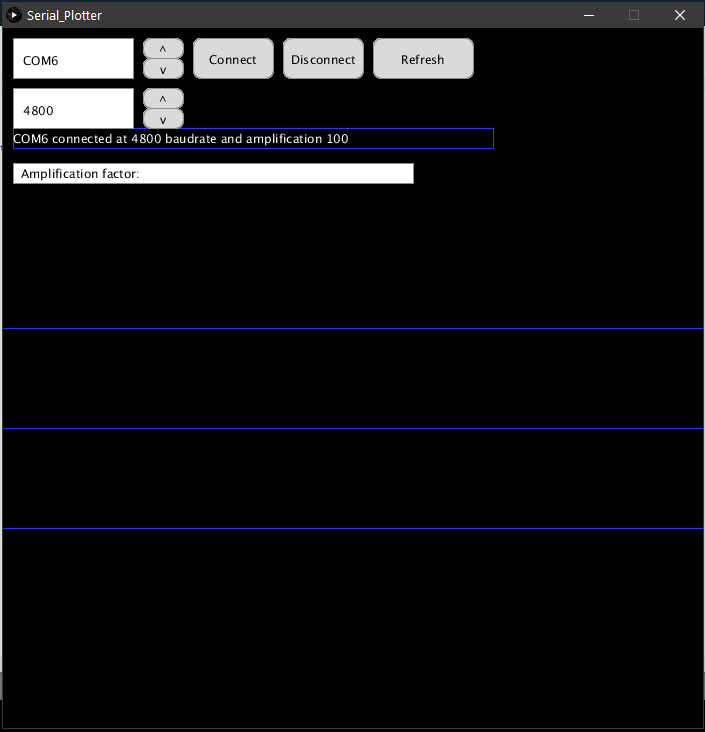
I connected the plotter with COM6, which is the name of the COM port to which the FTDI Breakout board is connected. After that I typed the amplification factor that I wanted. We don't need to click anywhere to start typing. Make sure that the number is a positive integer. Also pressing the backspace button without typing anything will lead to the program hanging up. So don't do that:
After that you may press enter to set the amplification factor. You will see a message confirming your selections as shown below:
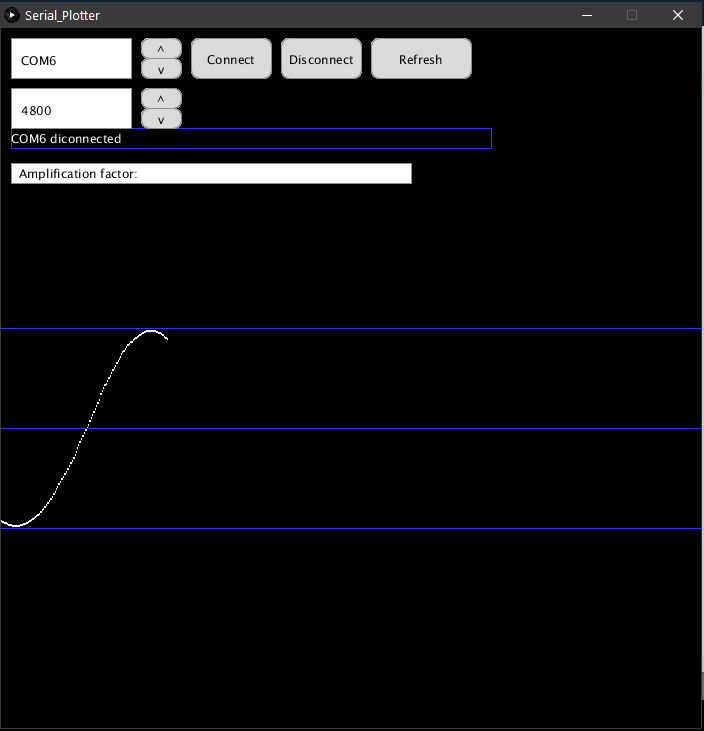
After setting all the parameters, I clicked on the Connect button, which made the code display the output in the following way:

To test the Disconnect button, I clicked on it, and as expected, the graph stopped. Also there is a message display that informed me that the COM6 port has been disconnected as seen below:
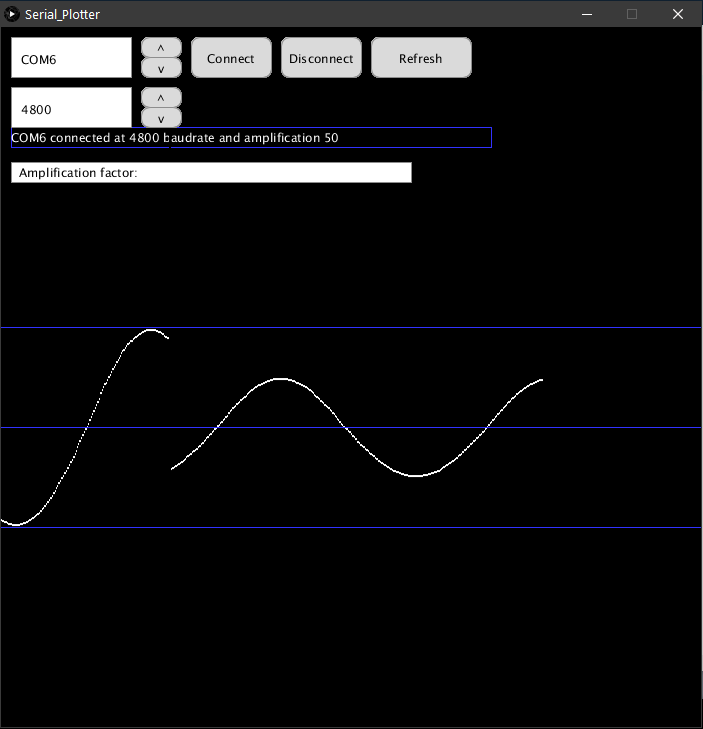
Just for fun, I tried to change the amplification factor to 50 and then reconnect with the port, and this was the output:
I uploaded a code to the hello echo world board that sends 0 when the button on the board is pressed, and 1 when it is not pressed. Here's the program:
/*
  Software serial multple serial test

  Receives from the hardware serial, sends to software serial.
  Receives from software serial, sends to hardware serial.

  The circuit:
   RX is digital pin 10 (connect to TX of other device)
   TX is digital pin 11 (connect to RX of other device)

  Note:
  Not all pins on the Mega and Mega 2560 support change interrupts,
  so only the following can be used for RX:
  10, 11, 12, 13, 50, 51, 52, 53, 62, 63, 64, 65, 66, 67, 68, 69

  Not all pins on the Leonardo and Micro support change interrupts,
  so only the following can be used for RX:
  8, 9, 10, 11, 14 (MISO), 15 (SCK), 16 (MOSI).

  created back in the mists of time
  modified 25 May 2012
  by Tom Igoe
  based on Mikal Hart's example

  This example code is in the public domain.

*/
#include <SoftwareSerial.h>
SoftwareSerial mySerial(2, 1); // RX, TX

void setup() {
  mySerial.begin(4800);
  pinMode(3, INPUT_PULLUP);
}

void loop() { // run over and over
  float val = digitalRead(3);
  mySerial.println(val);
}
Here is a video of the interface in action with the button input program
To convert this Processing sketch into an executable interface, I did the following:
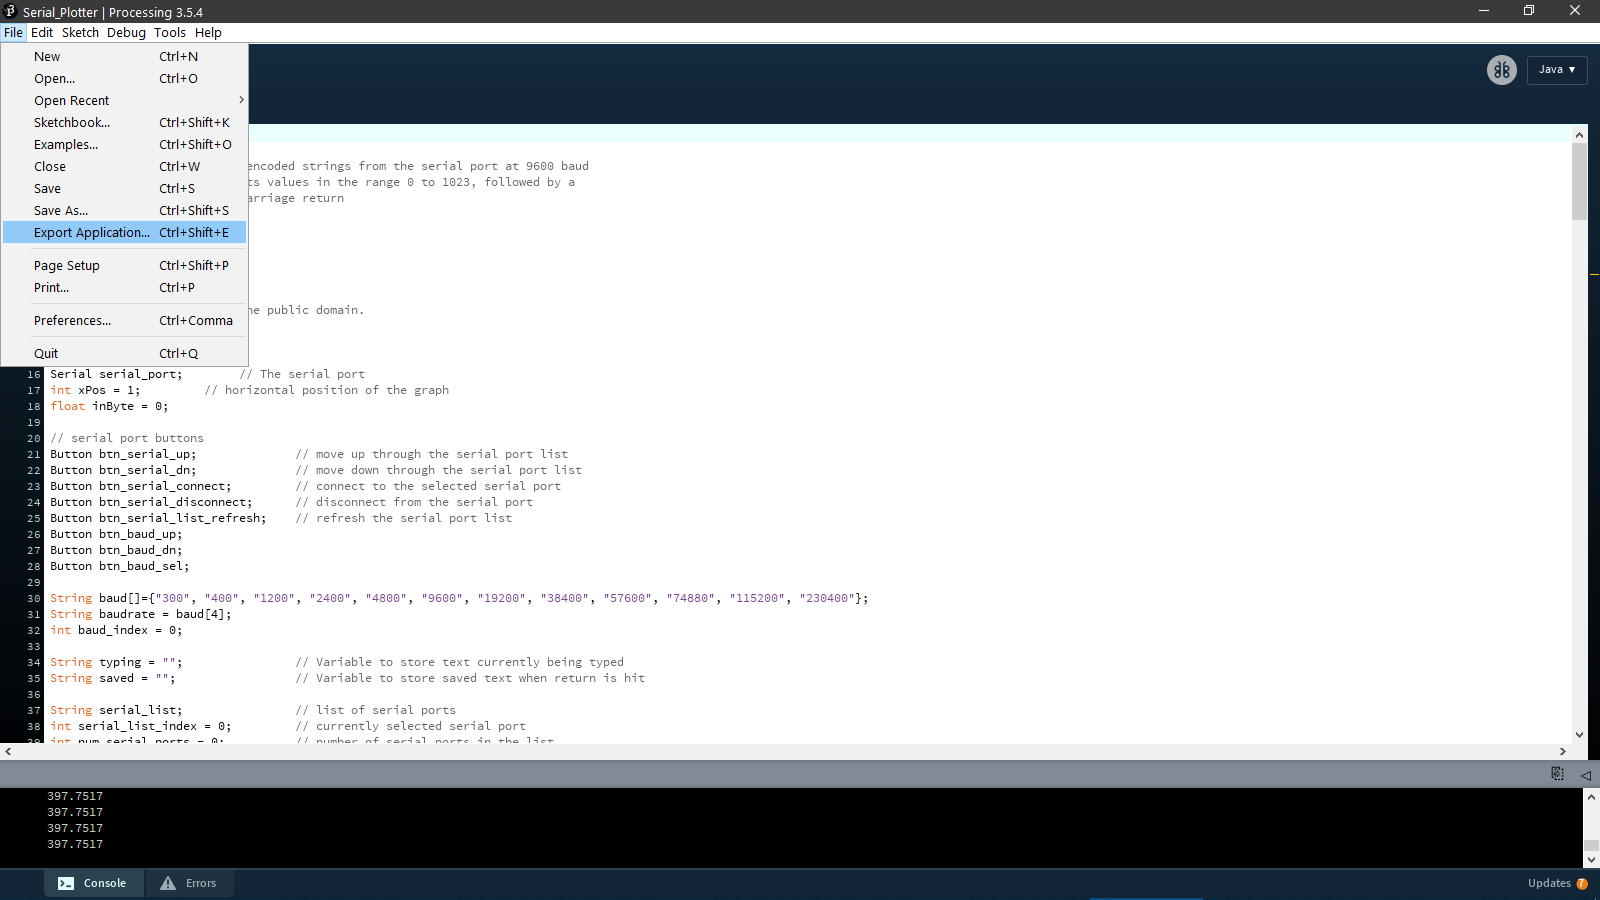
I start by clicking on File>Export Application
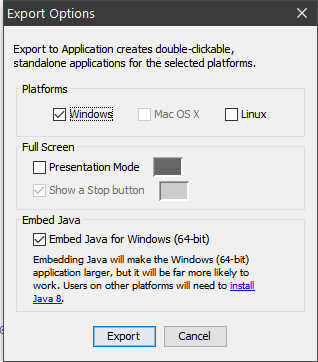
In the new window that opens up, I selected the operating system(Windows), I seleced the Embed Java option and then I clicked on Export.
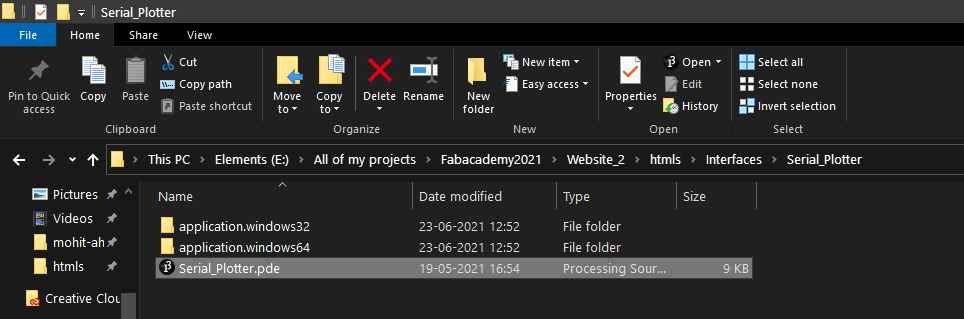
In the directory where your program is located, you will see two new folders appear, one folder has the 32-bit version of your application and the other folder has the 64 bit version, as it can be seen from the name of the folders:
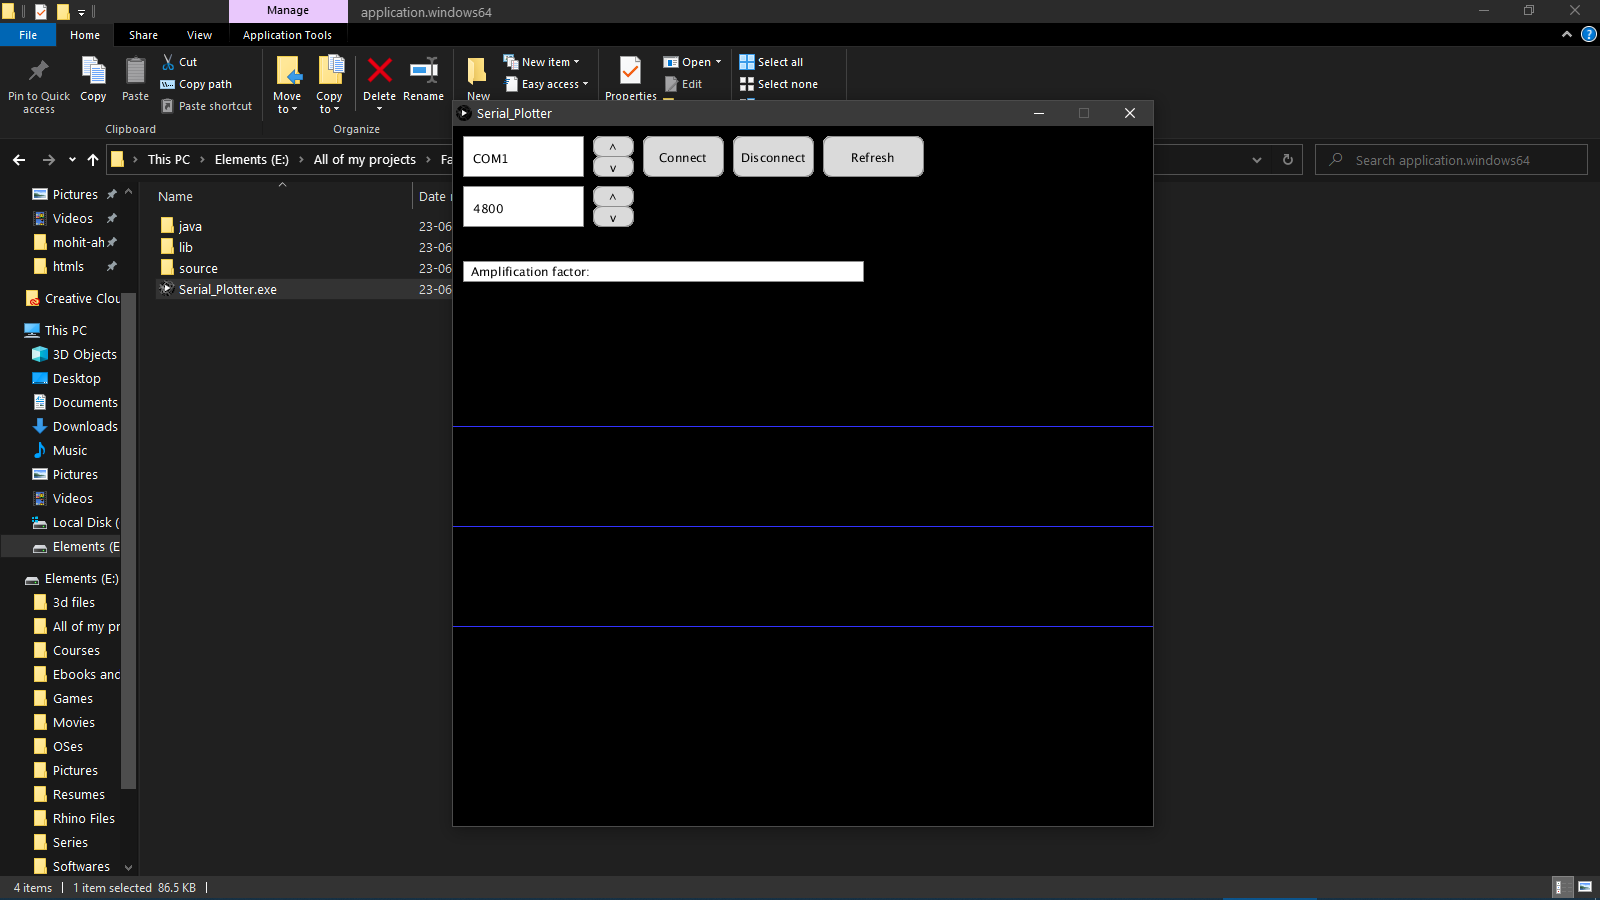
I opened the 64 bit folder and ran the exe file there, which immediately started the program as expected:
I wanted to link the file of this software in my repository, but unfortunately, when I archived the 64 bit application and checked its size, i found out that it was 80MB in size, which is way above the limit of the size of files that are allowed to be uploaded to the repository per push. So I went back to the Export Application command within Processing and deselected the Embed Java option. This reduced the size of the exported application significantly, as the archived folder is now ~4MB. The only issue is that now users will have to install Java before running the application Here is the linked application:
Serial_Plotter the app
Using Python
The Arduino code
/*
  Software serial multple serial test

  Receives from the hardware serial, sends to software serial.
  Receives from software serial, sends to hardware serial.

  The circuit:
   RX is digital pin 10 (connect to TX of other device)
   TX is digital pin 11 (connect to RX of other device)

  Note:
  Not all pins on the Mega and Mega 2560 support change interrupts,
  so only the following can be used for RX:
  10, 11, 12, 13, 50, 51, 52, 53, 62, 63, 64, 65, 66, 67, 68, 69

  Not all pins on the Leonardo and Micro support change interrupts,
  so only the following can be used for RX:
  8, 9, 10, 11, 14 (MISO), 15 (SCK), 16 (MOSI).

  created back in the mists of time
  modified 25 May 2012
  by Tom Igoe
  based on Mikal Hart's example

  This example code is in the public domain.

*/
#include <SoftwareSerial.h>
SoftwareSerial mySerial(2, 1); // RX, TX

void setup() {
  mySerial.begin(4800);
  pinMode(3, INPUT_PULLUP);
}

void loop() { // run over and over
  float val = digitalRead(3);
  mySerial.print(val);
}
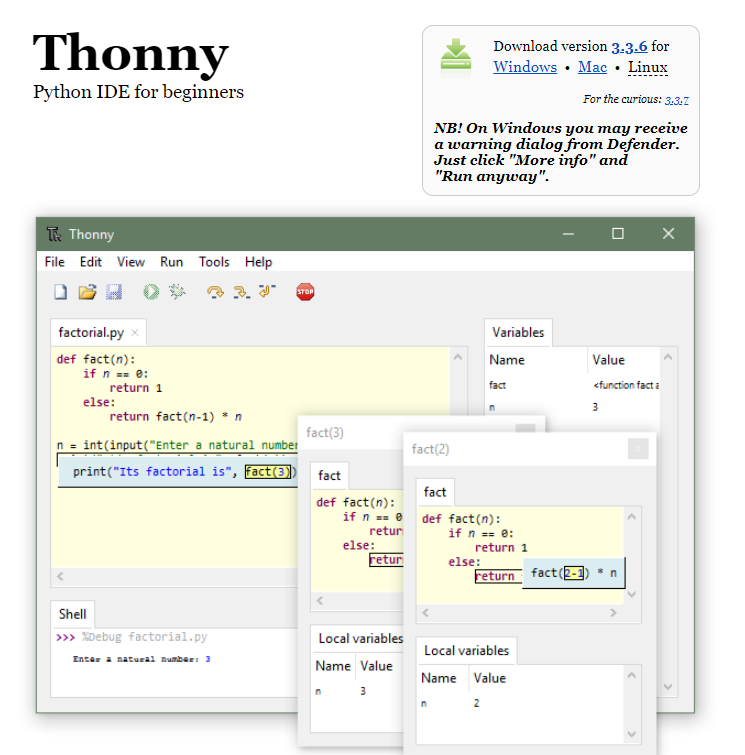
Downloading Thonny Python IDE
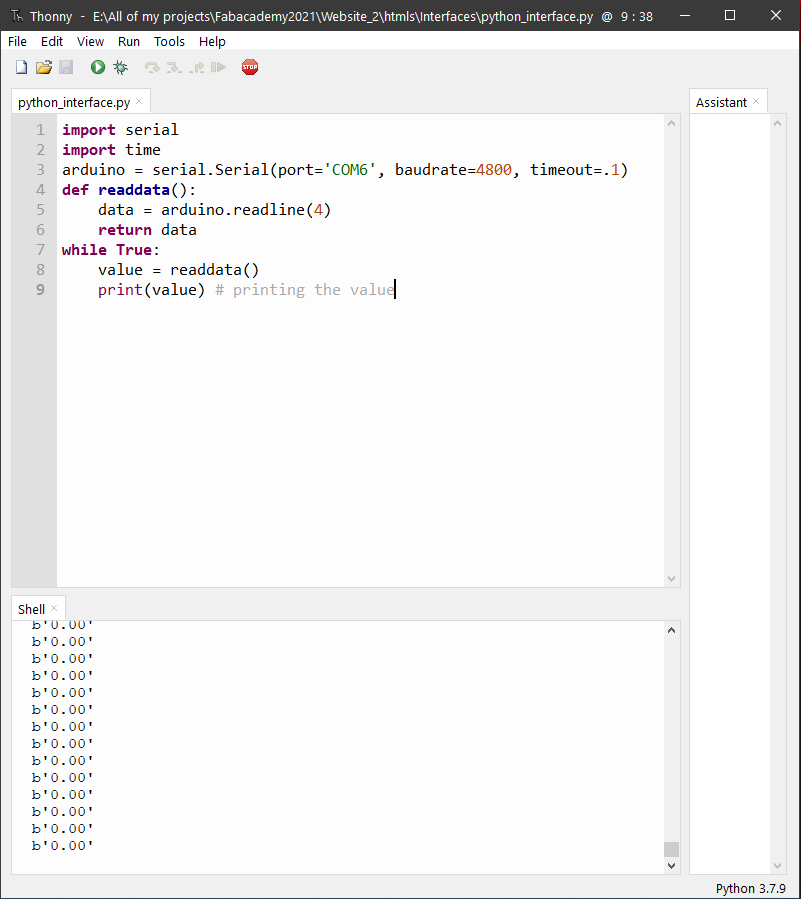
Using Python
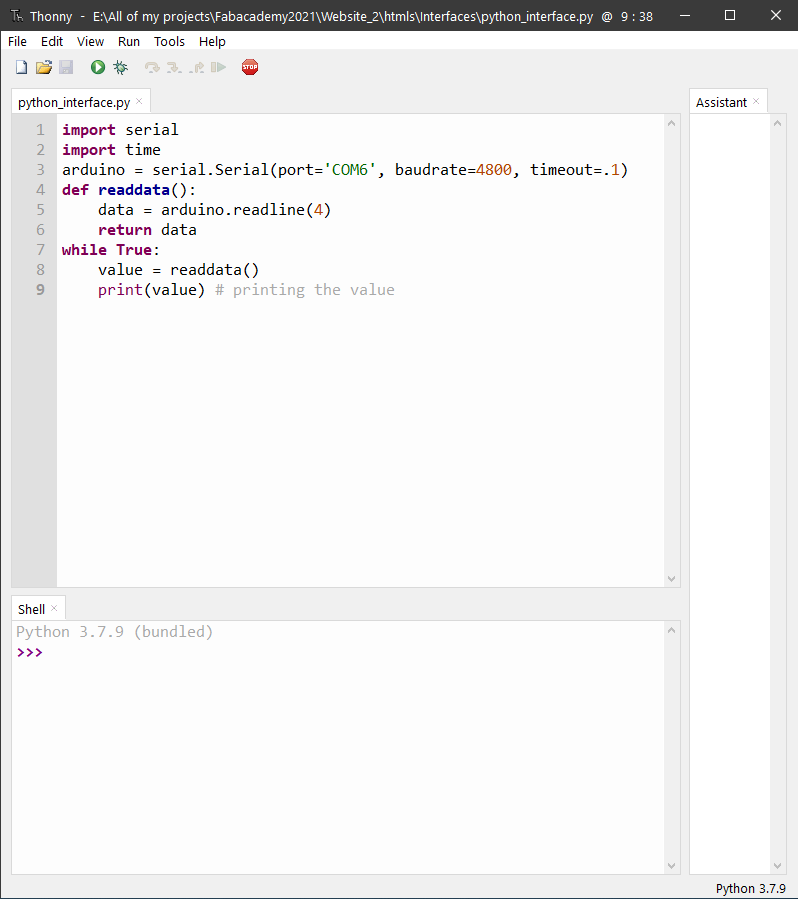
import serial
import time
arduino = serial.Serial(port='COM6', baudrate=4800, timeout=.1)
def readdata():
    data = arduino.readline(4)
    return data
while True:
    value = readdata()
    print(value) # printing the value
Running the program
As you can see in the screenshot below, there is a series of ones that is being sent by the board. This is because the button is connected to 5V via internal pullup.
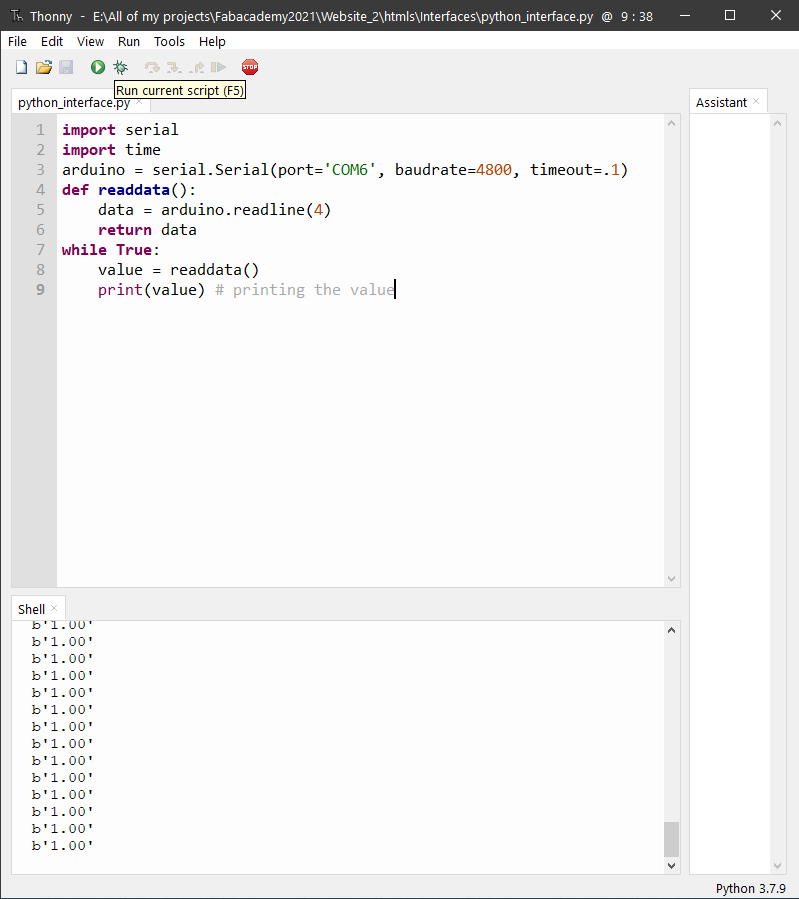
As soon as the button is pressed, the output becomes zero. This is because the button pin is now connected to GND directly..