
Week 15 - Interface & Application Programming
individual assignment:
      write an application that interfaces a user with an
input &/or output device that you made

group assignment:
      compare as many tool options as possible
Processing
Processing is a flexible software sketchbook and a language for learning how to code within the context of the visual arts.

I really like this platform. It allows you to create sketches rather like you would for an arduino. The difference is that these sketches run on your local computer and can send and recieve information with a connected microcontroller. You need to download the Processing app and the interface looks rather like the Arduino IDE. It also has libraries and example sketches which are a great way to get started.
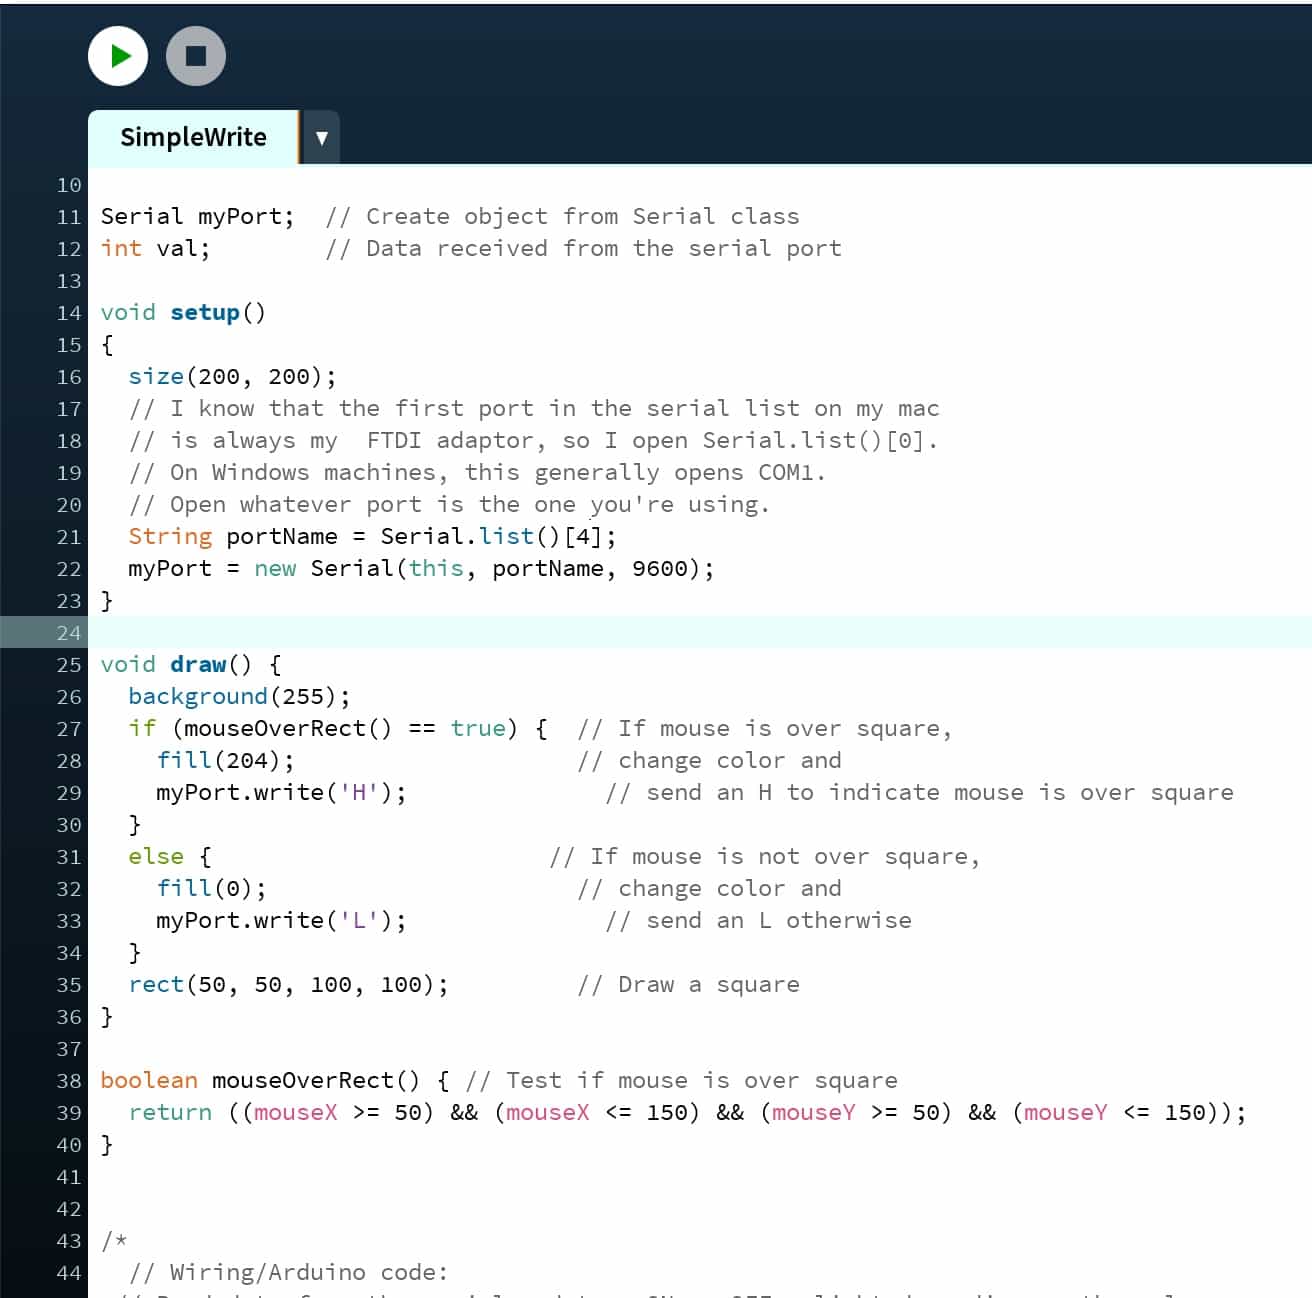
1st Sketch - Simple Write
This example sketch allows you to check whether the mouse curser is hovered over a square icon. If it is, it will send an 'H' to the microcontroller and if not, it will send an 'L'. It sends the data through the serial port.
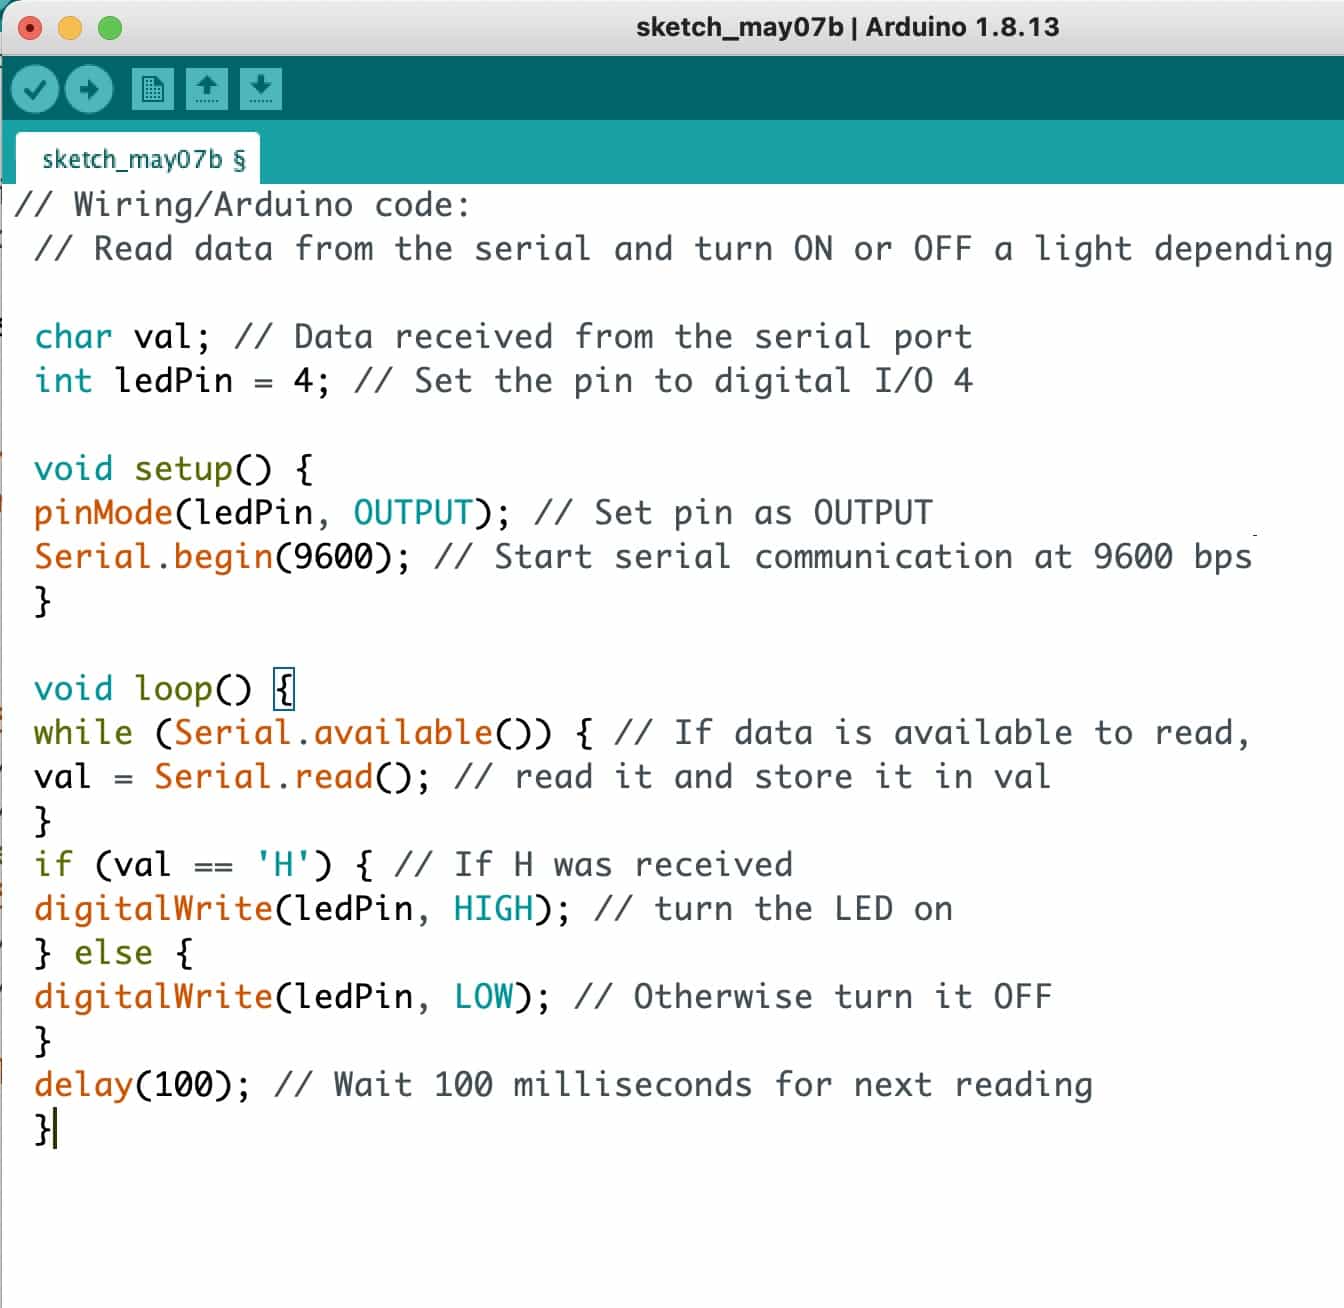
Now here is the Arduino sketch that works together with the Processing sketch above. This sketch reads on the serial port and can detect when it recieves the letter 'H' or 'L'. Some simple logic sets it to power an LED according to the data it recieves.
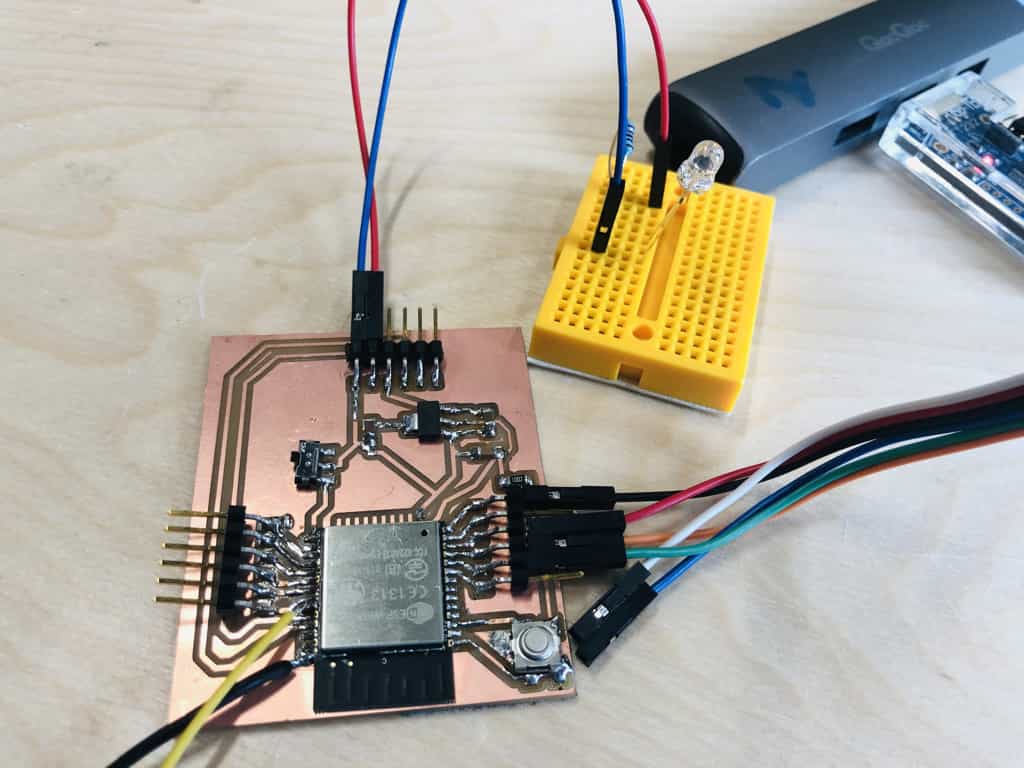
Now here is the circuit for the 2 sketches above. Its just a simple circuit with an LED connected to a GPIO pin on my ESP32.
Here is a video to show this successfully working:
2nd Sketch - Simple Read
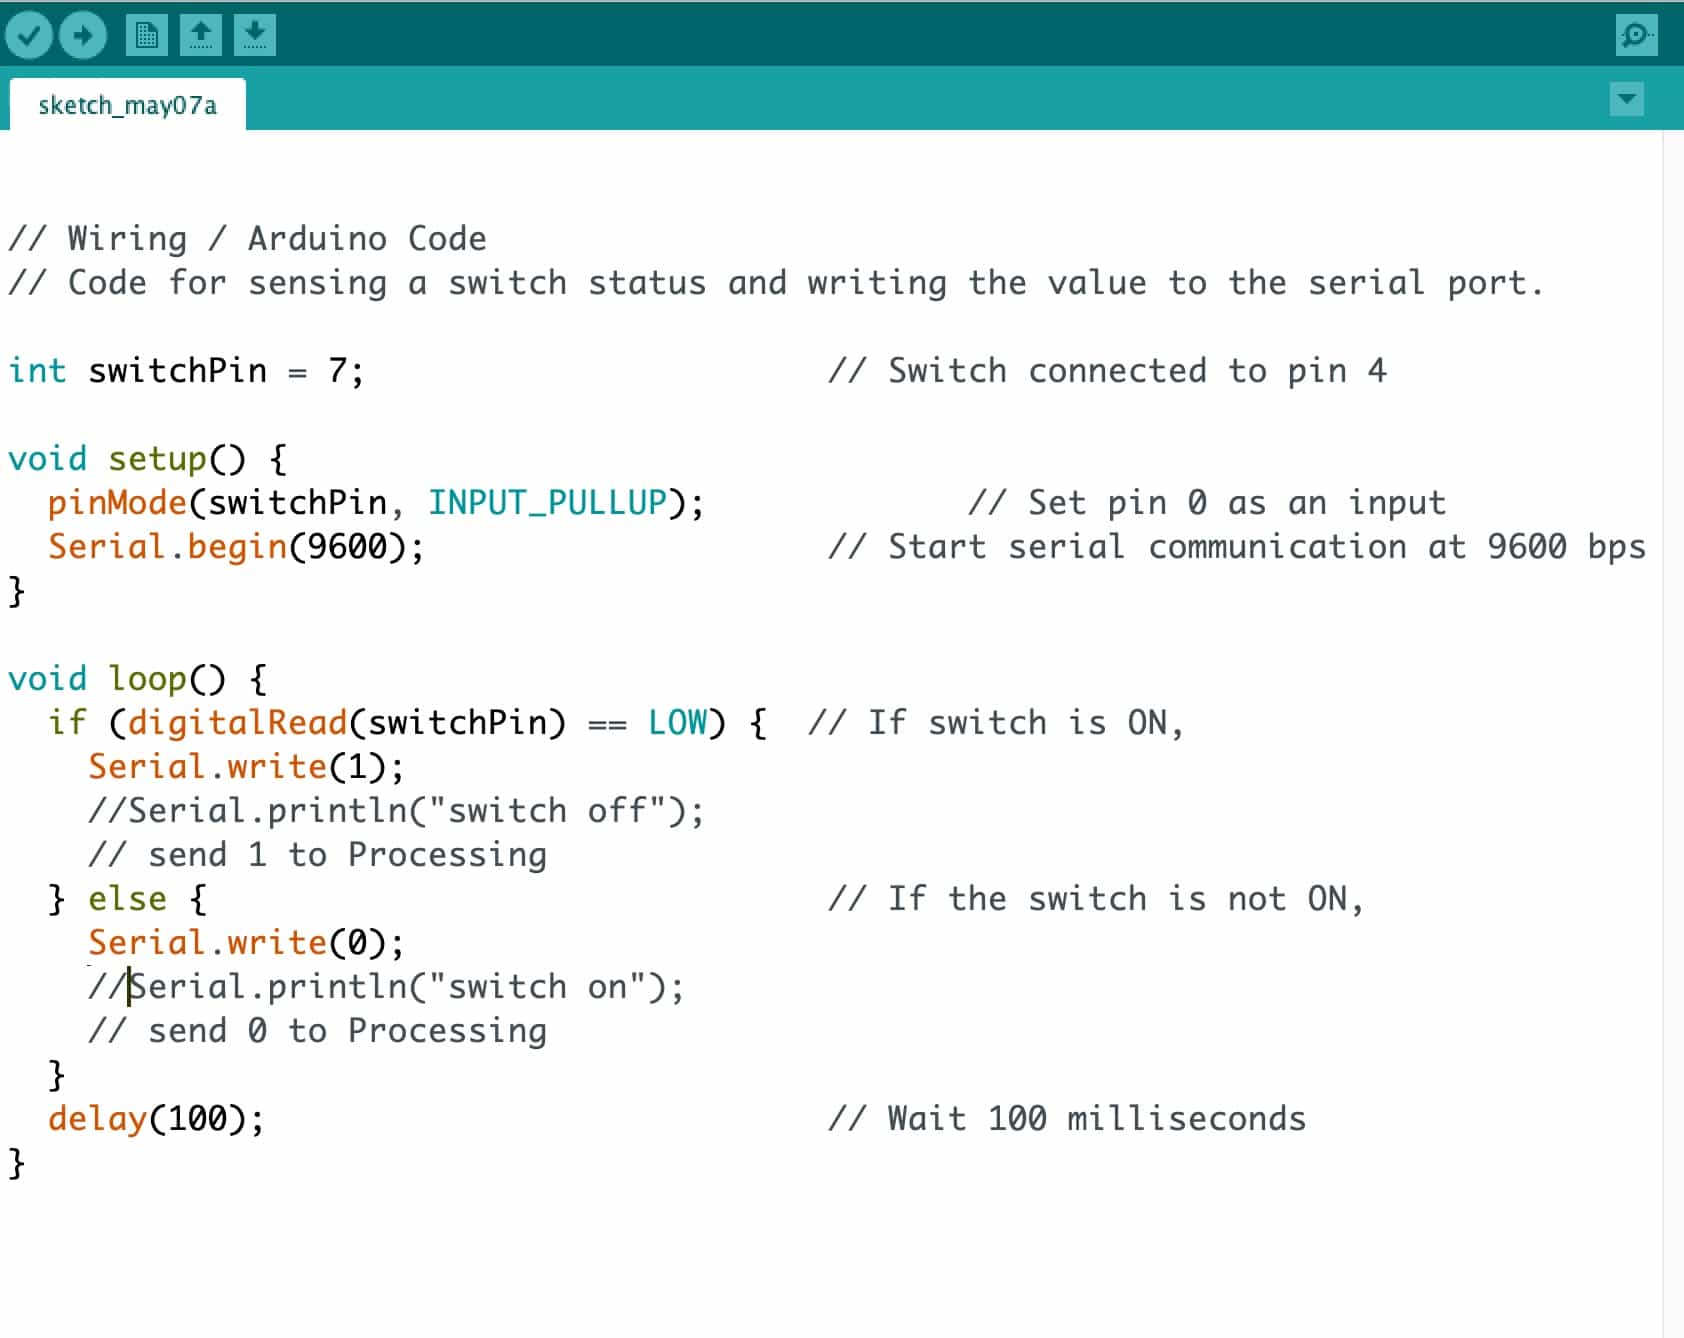
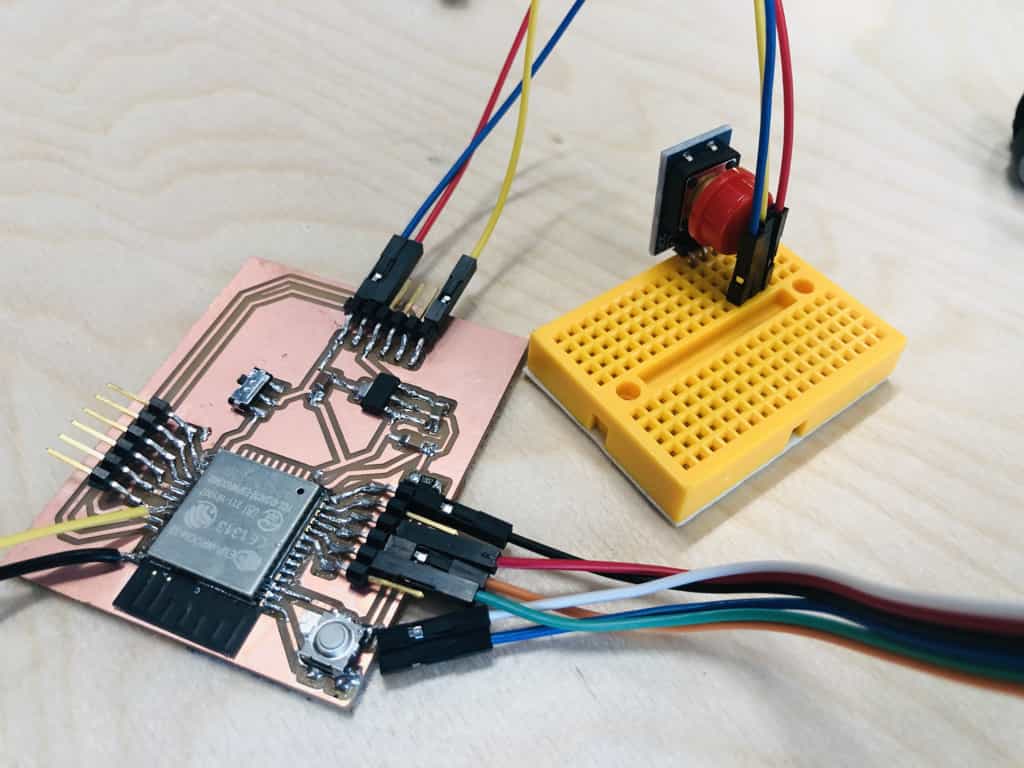
This example sketch allows you to check whether a button on the microcontroller has been pressed. When the button is pressed, the number 1 is sent via the serial connection. When not pressed, the number 0 is sent.
This is the Processing sketch that is reading on the serial port for a 1 or 0. Some logic sets it to change the colour of a square icon when the button is pressed.

Now here is the circuit for the 2 sketches above. Its just a simple circuit with an LED connected to a GPIO pin on my ESP32.
Here is a video to show this successfully working:
Problems and solutions
I made some silly mistakes which took me some time to solve. Firstly I kept forgetting to use baud rate of 9600. I was on autopilot tryig to use my normal rate of 115200. Initially I did not update the number of the port from '0' to '3'. Then everything stopped working and it took me a long to realise I had connected an Arduino on a different USB port which had changed the port number from 3 to 4. That took me nearly an hour to solve and I can confidently say I will never make that mistake again!
ESP32 Web Server
I decided to try another way of interfacing with my controller. If your ESP32 is connected to the internet, you can set it up as a web server. This has the benefit of allowing anyone to interface with your project. They don't need to be physically connected to your microcontroller as in the method above. They would access an interface in a web browser using an IP address that you give them.
I've decided to work through this tutorial from Random Nerd Tutorials:
 https://randomnerdtutorials.com/esp32-web-server-arduino-ide/
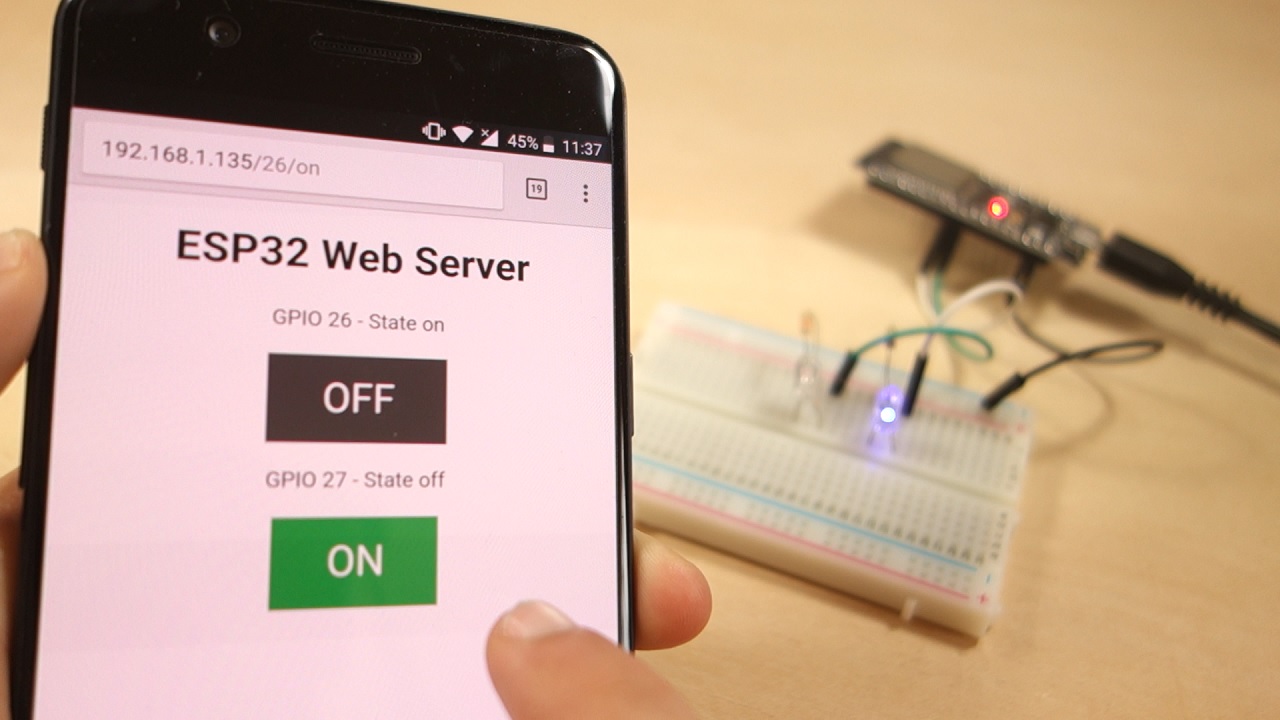
This is the code I'll be using on my ESP32:
/*********
  Rui Santos
  Complete project details at https://randomnerdtutorials.com
*********/

// Load Wi-Fi library
#include <WiFi.h>

// Replace with your network credentials
const char* ssid = "REPLACE_WITH_YOUR_SSID";
const char* password = "REPLACE_WITH_YOUR_PASSWORD";

// Set web server port number to 80
WiFiServer server(80);

// Variable to store the HTTP request
String header;

// Auxiliar variables to store the current output state
String output26State = "off";
String output27State = "off";

// Assign output variables to GPIO pins
const int output26 = 26;
const int output27 = 27;

// Current time
unsigned long currentTime = millis();
// Previous time
unsigned long previousTime = 0;
// Define timeout time in milliseconds (example: 2000ms = 2s)
const long timeoutTime = 2000;

void setup() {
  Serial.begin(115200);
  // Initialize the output variables as outputs
  pinMode(output26, OUTPUT);
  pinMode(output27, OUTPUT);
  // Set outputs to LOW
  digitalWrite(output26, LOW);
  digitalWrite(output27, LOW);

  // Connect to Wi-Fi network with SSID and password
  Serial.print("Connecting to ");
  Serial.println(ssid);
  WiFi.begin(ssid, password);
  while (WiFi.status() != WL_CONNECTED) {
    delay(500);
    Serial.print(".");
  }
  // Print local IP address and start web server
  Serial.println("");
  Serial.println("WiFi connected.");
  Serial.println("IP address: ");
  Serial.println(WiFi.localIP());
  server.begin();
}

void loop(){
  WiFiClient client = server.available();   // Listen for incoming clients

  if (client) {                             // If a new client connects,
    currentTime = millis();
    previousTime = currentTime;
    Serial.println("New Client.");          // print a message out in the serial port
    String currentLine = "";                // make a String to hold incoming data from the client
    while (client.connected() && currentTime - previousTime <= timeoutTime) {  // loop while the client's connected
      currentTime = millis();
      if (client.available()) {             // if there's bytes to read from the client,
        char c = client.read();             // read a byte, then
        Serial.write(c);                    // print it out the serial monitor
        header += c;
        if (c == '\n') {                    // if the byte is a newline character
          // if the current line is blank, you got two newline characters in a row.
          // that's the end of the client HTTP request, so send a response:
          if (currentLine.length() == 0) {
            // HTTP headers always start with a response code (e.g. HTTP/1.1 200 OK)
            // and a content-type so the client knows what's coming, then a blank line:
            client.println("HTTP/1.1 200 OK");
            client.println("Content-type:text/html");
            client.println("Connection: close");
            client.println();

            // turns the GPIOs on and off
            if (header.indexOf("GET /26/on") >= 0) {
              Serial.println("GPIO 26 on");
              output26State = "on";
              digitalWrite(output26, HIGH);
            } else if (header.indexOf("GET /26/off") >= 0) {
              Serial.println("GPIO 26 off");
              output26State = "off";
              digitalWrite(output26, LOW);
            } else if (header.indexOf("GET /27/on") >= 0) {
              Serial.println("GPIO 27 on");
              output27State = "on";
              digitalWrite(output27, HIGH);
            } else if (header.indexOf("GET /27/off") >= 0) {
              Serial.println("GPIO 27 off");
              output27State = "off";
              digitalWrite(output27, LOW);
            }

            // Display the HTML web page
            client.println("<!DOCTYPE html><html>");
            client.println("<head><meta name=\"viewport\" content=\"width=device-width, initial-scale=1\">");
            client.println("<link rel=\"icon\" href=\"data:,\">");
            // CSS to style the on/off buttons
            // Feel free to change the background-color and font-size attributes to fit your preferences
            client.println("<style>html { font-family: Helvetica; display: inline-block; margin: 0px auto; text-align: center;}");
            client.println(".button { background-color: #4CAF50; border: none; color: white; padding: 16px 40px;");
            client.println("text-decoration: none; font-size: 30px; margin: 2px; cursor: pointer;}");
            client.println(".button2 {background-color: #555555;}</style></head>");

            // Web Page Heading
            client.println("<body><h1>ESP32 Web Server</h1>");

            // Display current state, and ON/OFF buttons for GPIO 26
            client.println("<p>GPIO 26 - State " + output26State + "</p>");
            // If the output26State is off, it displays the ON button
            if (output26State=="off") {
              client.println("<p><a href=\"/26/on\"><button class=\"button\">ON</button></a></p>");
            } else {
              client.println("<p><a href=\"/26/off\"><button class=\"button button2\">OFF</button></a></p>");
            }

            // Display current state, and ON/OFF buttons for GPIO 27
            client.println("<p>GPIO 27 - State " + output27State + "</p>");
            // If the output27State is off, it displays the ON button
            if (output27State=="off") {
              client.println("<p><a href=\"/27/on\"><button class=\"button\">ON</button></a></p>");
            } else {
              client.println("<p><a href=\"/27/off\"><button class=\"button button2\">OFF</button></a></p>");
            }
            client.println("</body></html>");

            // The HTTP response ends with another blank line
            client.println();
            // Break out of the while loop
            break;
          } else { // if you got a newline, then clear currentLine
            currentLine = "";
          }
        } else if (c != '\r') {  // if you got anything else but a carriage return character,
          currentLine += c;      // add it to the end of the currentLine
        }
      }
    }
    // Clear the header variable
    header = "";
    // Close the connection
    client.stop();
    Serial.println("Client disconnected.");
    Serial.println("");
  }
}
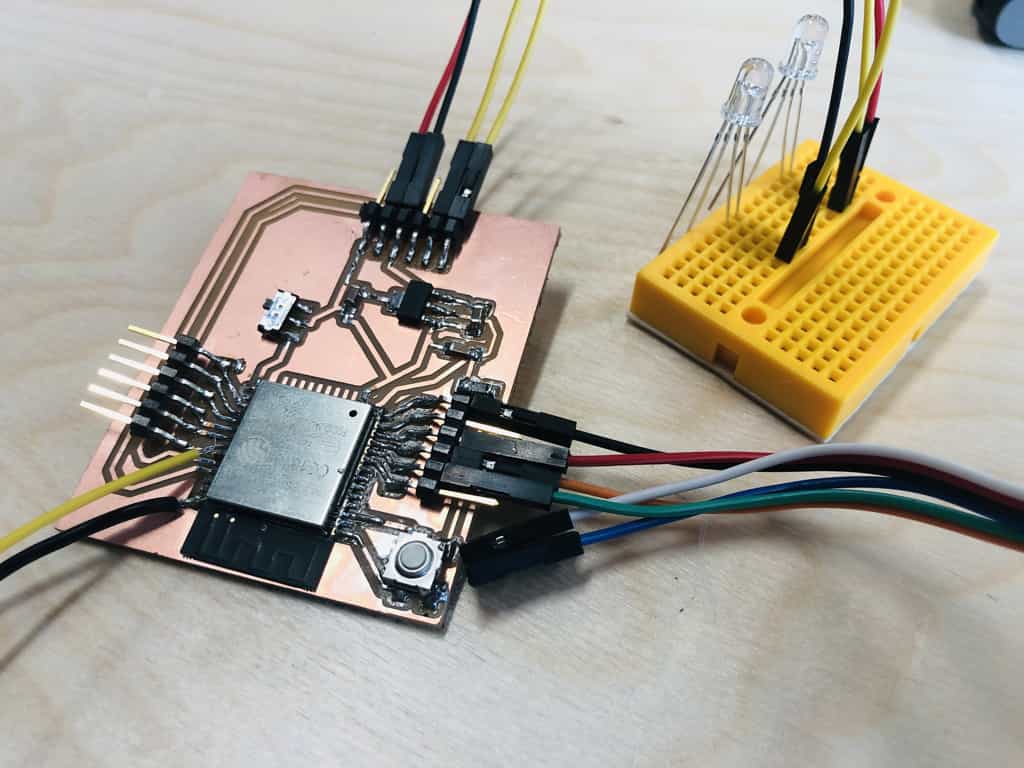
I changed the WiFi credentials to match my router and then I set up the following simple circuit with 2 LEDs connected to GPIO pins.
It works great. Here is the result in my browser using the IP address that the sketch generates. I believe this is assigned by our router.

Webserver modification for my final project
It would be a lovely addition to my final project, if people could interface with it via a browser to control the behaviour. This would suit my project well because I'd like it to appear like a simple architectural model, with all the electronics and tech hidden inside. When the skateboard moves, it should come as a pleasant surprise. With that in mind, it would work well to use the wifi on my chip so you can interface wirelessly through a browser, saving the need for buttons and displays built into the model.
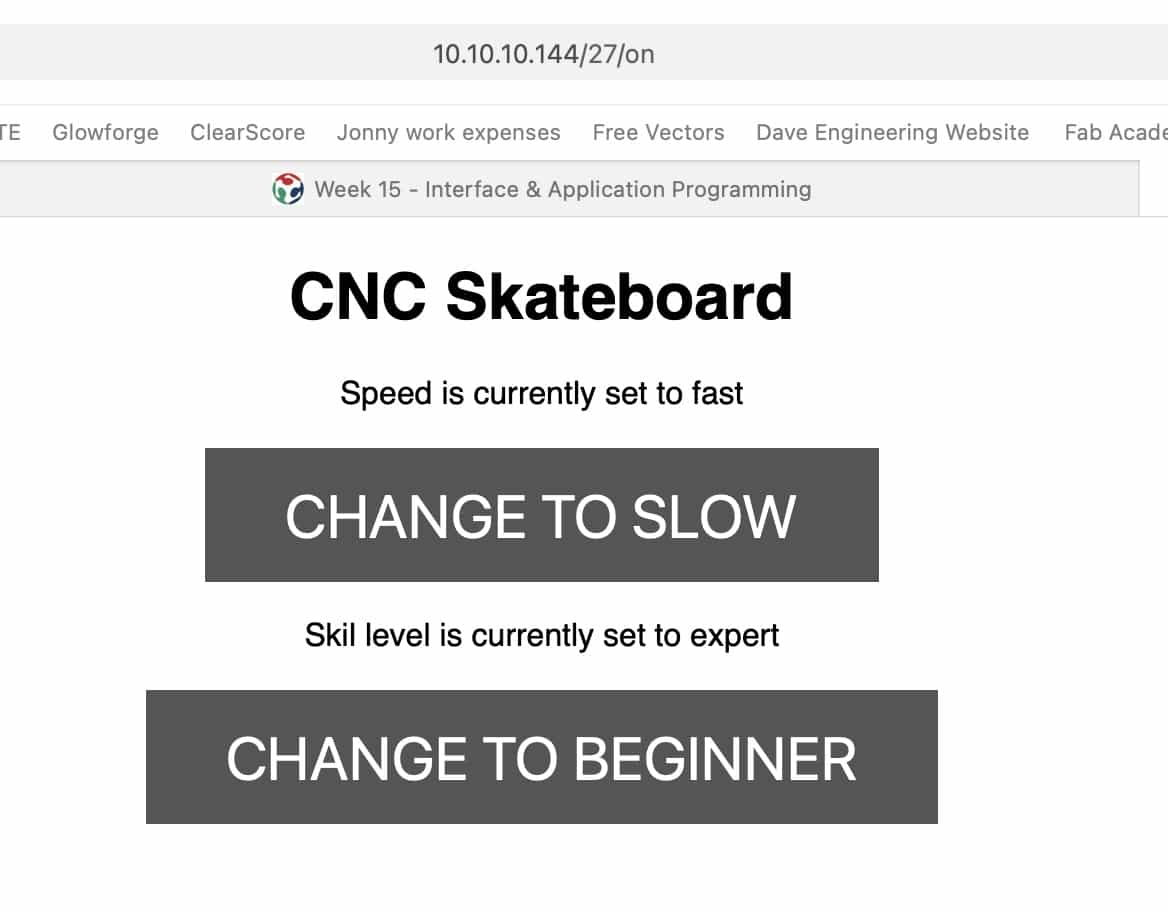
Speed and skill level control
I'd like people to be able to set a speed that could be slow or fast. I'd also like an option where they can choose a skill level of beginner or expert. As beginner the skateboarder will only travel up and down and use the main ramps. As expert they will interact with all the obstacles in the park.
Adjusting global variables
The webserver example I used was controlling a GPIO pin, setting it either high or low depending upon the button state in the browser. I need to do something a little different. I have a global variable in my code called motorSpeed. It is an integer and it is the delay in microseconds that is made between every step of each motor. A larger delay makes the motor move slower. I also have a global variable called skillLevel. This is a boolean with 2 states, beginner and expert. In beginner mode it will run through only some of the functions in the main loop. In expert mode it will run through every function in the main code.
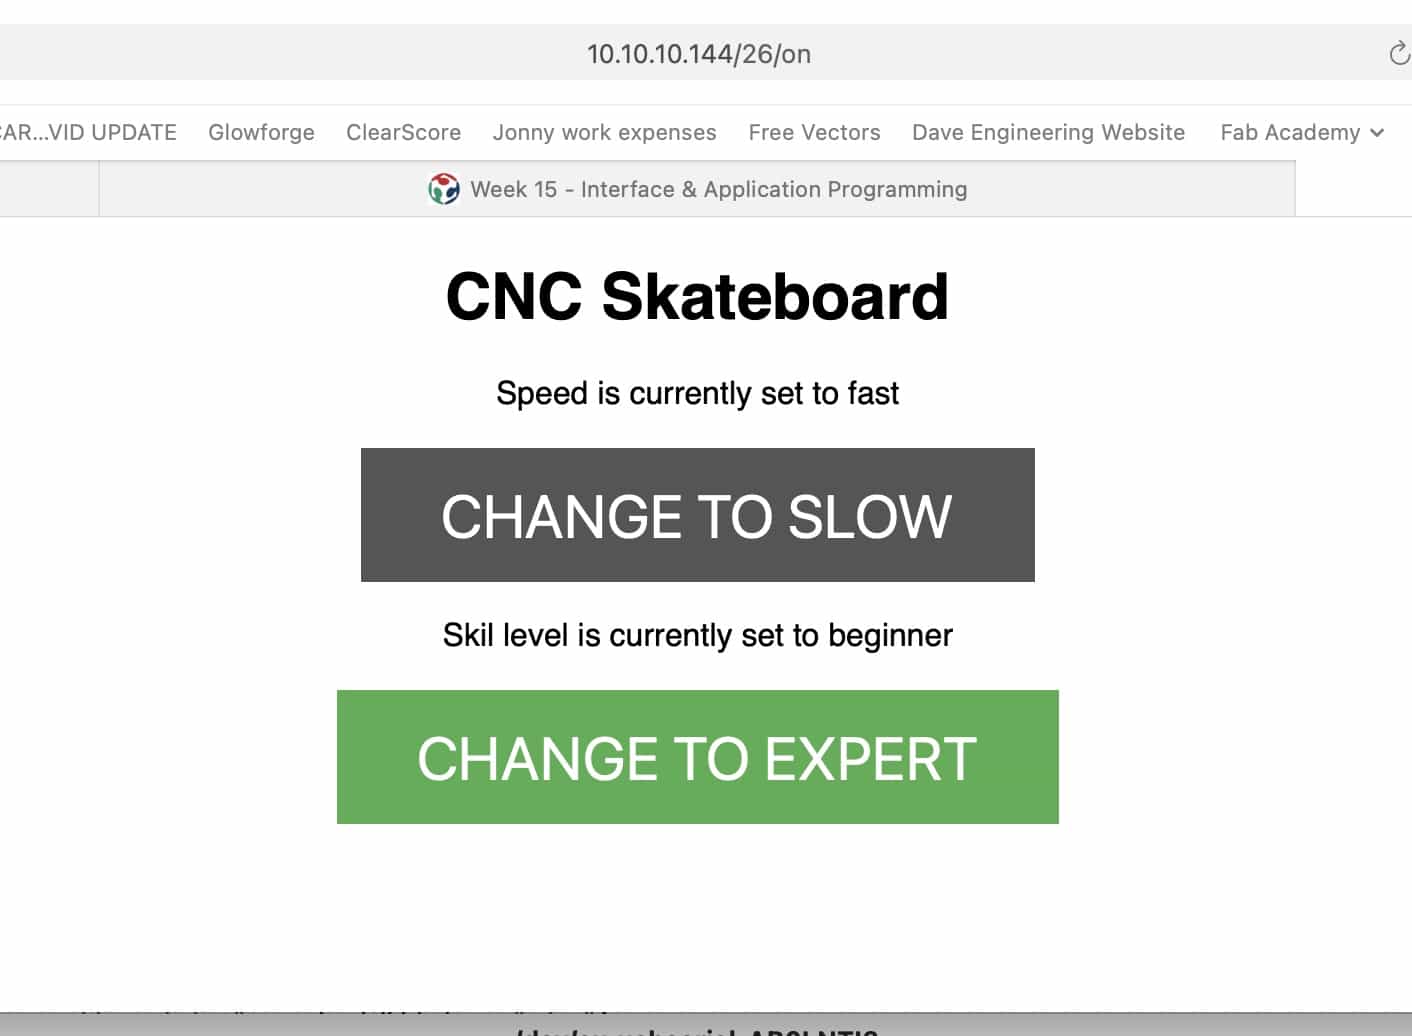
CNC Skateboard web server
Here is my modified code which allows a user to interface with my model skatepark:
/*********
  Rui Santos
  Complete project details at https://randomnerdtutorials.com
*********/

// Load Wi-Fi library
#include <WiFi.h>

// Replace with your network credentials
const char* ssid = "Plus X Member";
const char* password = "Connect+Collaborate";
int motorDelay;
String skillLevel;

// Set web server port number to 80
WiFiServer server(80);

// Variable to store the HTTP request
String header;

// Auxiliar variables to store the current output state
String output26State = "slow";//slow or fast
String output27State = "beginner";//beginner or expert

// Assign output variables to GPIO pins
const int output26 = 26;
const int output27 = 27;

// Current time
unsigned long currentTime = millis();
// Previous time
unsigned long previousTime = 0;
// Define timeout time in milliseconds (example: 2000ms = 2s)
const long timeoutTime = 2000;

void setup() {
  Serial.begin(115200);
  // Initialize the output variables as outputs
  pinMode(output26, OUTPUT);
  pinMode(output27, OUTPUT);
  // Set outputs to LOW
  digitalWrite(output26, LOW);
  digitalWrite(output27, LOW);

  // Connect to Wi-Fi network with SSID and password
  Serial.print("Connecting to ");
  Serial.println(ssid);
  WiFi.begin(ssid, password);
  while (WiFi.status() != WL_CONNECTED) {
    delay(500);
    Serial.print(".");
  }
  // Print local IP address and start web server
  Serial.println("");
  Serial.println("WiFi connected.");
  Serial.println("IP address: ");
  Serial.println(WiFi.localIP());
  server.begin();
}

void loop(){
  WiFiClient client = server.available();   // Listen for incoming clients

  if (client) {                             // If a new client connects,
    currentTime = millis();
    previousTime = currentTime;
    Serial.println("New Client.");          // print a message out in the serial port
    String currentLine = "";                // make a String to hold incoming data from the client
    while (client.connected() && currentTime - previousTime <= timeoutTime) {  // loop while the client's connected
      currentTime = millis();
      if (client.available()) {             // if there's bytes to read from the client,
        char c = client.read();             // read a byte, then
        Serial.write(c);                    // print it out the serial monitor
        header += c;
        if (c == '\n') {                    // if the byte is a newline character
          // if the current line is blank, you got two newline characters in a row.
          // that's the end of the client HTTP request, so send a response:
          if (currentLine.length() == 0) {
            // HTTP headers always start with a response code (e.g. HTTP/1.1 200 OK)
            // and a content-type so the client knows what's coming, then a blank line:
            client.println("HTTP/1.1 200 OK");
            client.println("Content-type:text/html");
            client.println("Connection: close");
            client.println();

            // turns the GPIOs on and off
            if (header.indexOf("GET /26/on") >= 0) {
              Serial.println("Speed has been set to fast");
              Serial.println("Motor delay reduced to 55 microseconds");
              motorDelay = 55;
              output26State = "fast";
              digitalWrite(output26, HIGH);
            } else if (header.indexOf("GET /26/off") >= 0) {
              Serial.println("Speed has been set to slow");
              Serial.println("Motor delay increased to 85 microseconds");
              motorDelay = 85;
              output26State = "slow";
              digitalWrite(output26, LOW);
            } else if (header.indexOf("GET /27/on") >= 0) {
              Serial.println("Skill level has been set to expert");
              Serial.println("All tricks will be included");
              skillLevel = "expert";
              output27State = "expert";
              digitalWrite(output27, HIGH);
            } else if (header.indexOf("GET /27/off") >= 0) {
              Serial.println("Skill level has been set to beginner");
              Serial.println("Only ramps will be included");
              skillLevel = "beginner";
              output27State = "beginner";
              digitalWrite(output27, LOW);
            }

            // Display the HTML web page
            client.println("<!DOCTYPE html><html>");
            client.println("<head><meta name=\"viewport\" content=\"width=device-width, initial-scale=1\">");
            client.println("<link rel=\"icon\" href=\"data:,\">");
            // CSS to style the on/off buttons
            // Feel free to change the background-color and font-size attributes to fit your preferences
            client.println("<style>html { font-family: Helvetica; display: inline-block; margin: 0px auto; text-align: center;}");
            client.println(".button { background-color: #4CAF50; border: none; color: white; padding: 16px 40px;");
            client.println("text-decoration: none; font-size: 30px; margin: 2px; cursor: pointer;}");
            client.println(".button2 {background-color: #555555;}</style></head>");

            // Web Page Heading
            client.println("<body><h1>CNC Skateboard</h1>");

            // Display current state, and ON/OFF buttons for GPIO 26
            client.println("<p>Speed is currently set to " + output26State + "</p>");
            // If the output26State is off, it displays the ON button
            if (output26State=="slow") {
              client.println("<p><a href=\"/26/on\"><button class=\"button\">CHANGE TO FAST</button></a></p>");
            } else {
              client.println("<p><a href=\"/26/off\"><button class=\"button button2\">CHANGE TO SLOW</button></a></p>");
            }

            // Display current state, and ON/OFF buttons for GPIO 27
            client.println("<p>Skil level is currently set to " + output27State + "</p>");
            // If the output27State is off, it displays the ON button
            if (output27State=="beginner") {
              client.println("<p><a href=\"/27/on\"><button class=\"button\">CHANGE TO EXPERT</button></a></p>");
            } else {
              client.println("<p><a href=\"/27/off\"><button class=\"button button2\">CHANGE TO BEGINNER</button></a></p>");
            }
            client.println("</body></html>");

            // The HTTP response ends with another blank line
            client.println();
            // Break out of the while loop
            break;
          } else { // if you got a newline, then clear currentLine
            currentLine = "";
          }
        } else if (c != '\r') {  // if you got anything else but a carriage return character,
          currentLine += c;      // add it to the end of the currentLine
        }
      }
    }
    // Clear the header variable
    header = "";
    // Close the connection
    client.stop();
    Serial.println("Client disconnected.");
    Serial.println("");
  }
}
Here is my web-app in a Safari browser window on my Macbook:

After you click to change the speed, the button changes to indicate the change:
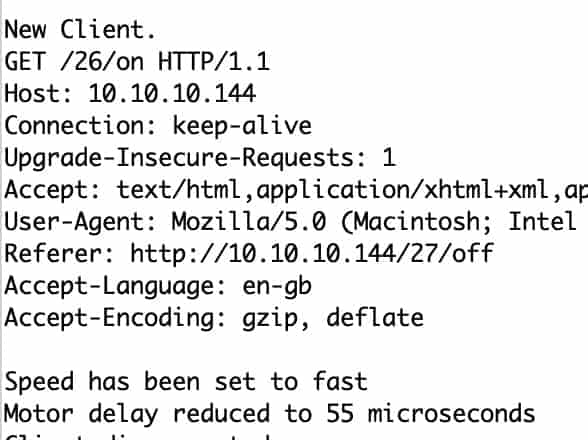
There is a more important implication when you change the speed. The motorSpeed variable in my main code has been reduced, thereby increasing the motor speed. You can confirm on the serial monitor that the update has been made:
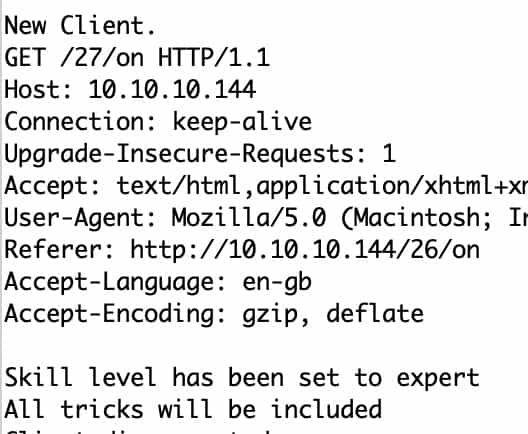
Now I'll click on the skill level button which will change the button in the browser and also switch the state of my skillLevel variable. Now the main loop of my code will include all available functions:
Final thoughts
I've enjoyed learning about interfaces and I think the webserver is a good fit for me, for my final project and other future projects. I preferred it for the following reasons:
1 - My favourite chip is the ESP32 which is perfect for a webserver because it is a fast chip that comes with wifi.
2 - I have no experience of Java or Javascript which seemed like it would have been useful when working in Processing. The webserver uses html which I am more familiar with.
3 - I like the idea that a user of my project could use the browser on their own phone. With processing it feels like you would need to hand someone a laptop which makes things a little more clunky.
Files for download
Link to the group assignment:

Back to homepage: