Objectives
Individual Assignment
1)Read a micro-controller data sheet.
2)program your board to do something,
with as many different programming languages
and programming environments as possible.
Group Assignment
1)Compare the performance and development workflows
for other architectures.
it's a dedicated computer system designed for one or two specific functions. This system is embedded as a part of a complete device system that includes hardware, such as electrical and mechanical components. The embedded system is unlike the general-purpose computer, which is engineered to manage a wide range of processing tasks.
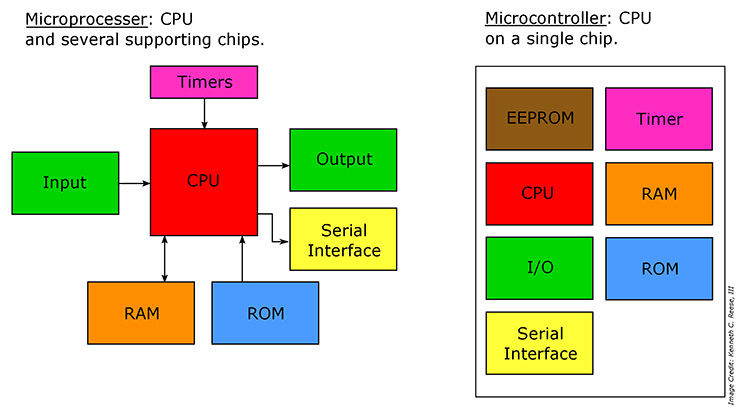
Microprocessor is a central processing unit (CPU) on a single chip. but in Micro-controllers it consist of CPU,Memory Unit (RAM , ROM )and I/O's .but Micro-controllers is extremely slow when comparing Microprocessor.In here we are Focusing on Micro-controllers.
Harvard architecture
The Harvard architecture is a computer architecture with physically separate storage and signal pathways for instructions and data.so it can simultaneously use both buses.
Von Neumann architecture
The design of a Von Neumann architecture machine is simpler than that of a Harvard architecture machine, which is also a stored-program system but has one dedicated set of address and data buses for reading data from and writing data to memory, and another set of address and data buses for instruction fetching.
Harvard architecture has separate data and instruction busses, allowing transfers to be performed simultaneously on both busses. A Von Neumann architecture has only one bus which is used for both data transfers and instruction fetches, and therefore data transfers and instruction fetches must be scheduled - they can not be performed at the same time.
CISC
A complex instruction set computer processor has complex instructions that take up multiple clocks for execution. The average clock cycle per instruction (CPI) is in the range of 2 and 15.it's Performance is optimized with more focus on hardware. also It has a memory unit to implement complex instructions. CISC mainly used in Microprocessor.
RISC
A reduced instruction set computer is a computer which only uses simple commands that can be divided into several instructions which achieve low-level operation within a single CLK cycle, as its name proposes “Reduced Instruction Set”.it's performance is optimized with more focus on software. RISC mainly Used in Micro-controller.
PIC
PIC(peripheral interface controller) is Initially this was developed for supporting PDP computers to control its peripheral devices, and therefore, named as a peripheral interface device. These micro-controllers are very fast and easy to execute a program compared with other micro-controllers. PIC Micro-controller architecture is based on Harvard architecture. PIC micro-controllers are very popular due to their ease of programming, wide availability, easy to interfacing with other peripherals, low cost, large user base and serial programming capability (reprogramming with flash memory), etc.
AVR
AVR is a family of micro-controllers developed by Atmel. These are modified Harvard architecture 8-bit RISC single-chip micro-controllers. AVR was one of the first micro-controller families to use on-chip flash memory for program storage, as opposed to one-time programmable ROM, EPROM, or EEPROM used by other micro-controllers at the time.
This week we need to programmer the Hello-echo board that we designed in the Electronics Design week.
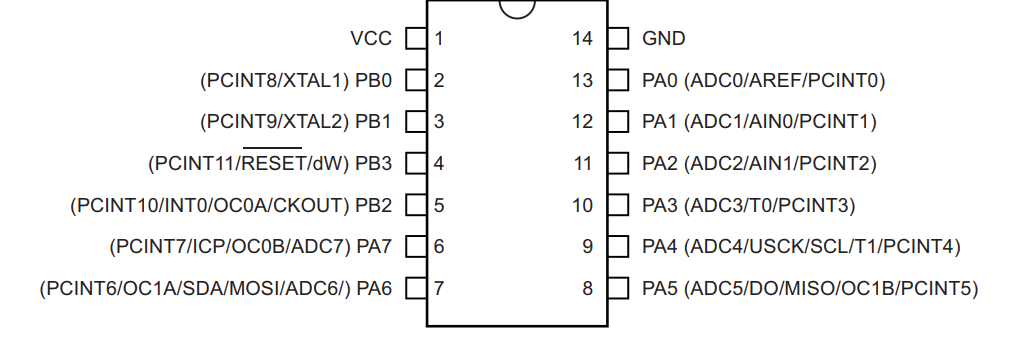
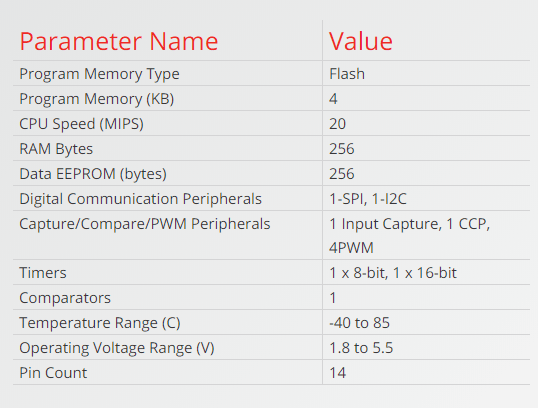
Echo board is based on the Microchip ATtiny84 .It's high-performance and packed with Microchip's picoPower technology in an 8-bit AVR RISC architecture based Microcontroller unit that has 14 pins, out of which 12 pins can be used as I/O pins. also it's have 20hz External Resonator.
Pin Out of ATtiny44/84
The Atmel ATtiny24/44/84 provides the following features: 2/4/8K bytes of in-system programmable flash, 128/256/512 bytes EEPROM, 128/256/512 bytes SRAM, 12 general purpose I/O lines, 32 general purpose working registers, an 8-bit Timer/Counter with two PWM channels, a 16-bit Timer/Counter with two PWM channels, internal and external interrupts, an 8-channel 10-bit ADC, programmable gain stage (1x, 20x) for 12 differential ADC channel pairs, a programmable watchdog timer with internal oscillator, internal calibrated oscillator, and three software selectable power saving modes
SCK (Serial Clock): Programming clock, generated by the In-System Programmer (Master)
MOSI (Master Out - Slave In ): Communication line from In-System Programmer (Master) to target AVR being programmed (Slave )
MISO ( Master In - Slave Out ): Communication line from target AVR (Slave) to In- System Programmer (Master)
RST (Reset): To enable In-System Programming, the target AVR Reset must be kept active. To simplify this, the In-System Programmer should control the target AVR Reset
GND (Ground): Common Ground
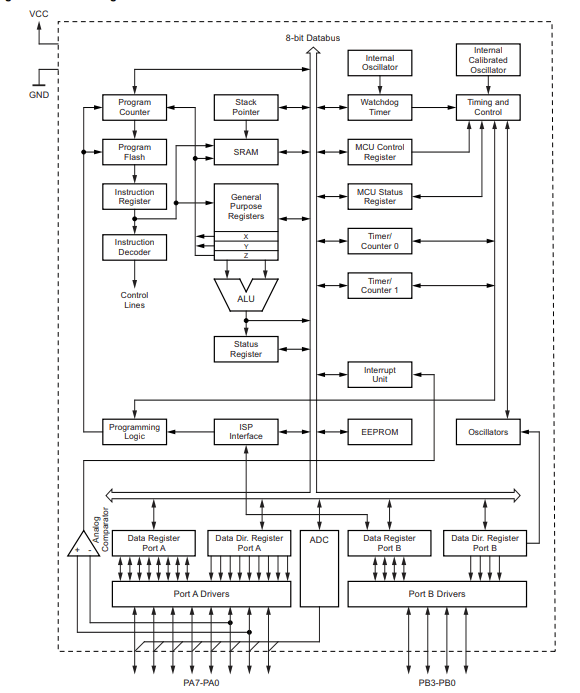
Block Diagram will explain Architecture of the Microcontroller.The AVR uses a Harvard architecture, with separate memories and buses for program and data. Instructions in the program memory are executed with a single-level pipelining. While one instruction is being executed, the next instruction is pre-fetched from the program memory. The ALU supports arithmetic and logic operations between registers or between a constant and a register.
Different Parameters of ATtiny84
VCC -Supply voltage
GND -Ground
Port B (PB3...PB0)
Port B is a 4-bit bi-directional I/O port with internal pull-up resistors (selected for each bit). As inputs, Port B pins that are externally pulled low will source current if the pull-up resistors are activated.so we don't need to add a pull-up resistor externally for button's and other purpose.
RESET
Reset input. A low level on this pin for longer than the minimum pulse length will generate a reset, even if the clock is not running.a reset will just reset the program that currently running .
Port A (PA7...PA0)
Port A is a 8-bit bi-directional I/O port with internal pull-up resistors (selected for each bit). As inputs, Port A pins that are externally pulled low will source current if the pull-up resistors are activated
There is several ways to progaramme a AVR Microcontroller. Easiest one is using Arduino IDE and there is Microchip Official tool one Microchip Studio renamed after Atmel Studio also we have toolchain in GCC.We are using the FabTiny ISP as our Programmer. Mr.Yadu explained basic concepts and it was interesting and Mr.Jojin also helped me a lot in understanding things.
Arduino is an open-source electronics platform based on easy-to-use hardware and software.ou can tell your board what to do by sending a set of instructions to the microcontroller on the board. To do so you use the Arduino programming language (based on Wiring), and the Arduino Software (IDE), based on Processing.Anyone can use Arduino.
The Arduino system is based on the avr-gcc compiler and makes use of the standard AVR libc libraries, which are open-source C libraries, specifically written for Atmel hardware.You can downdload the Arduino IDE here.now arduino also have Online IDE.
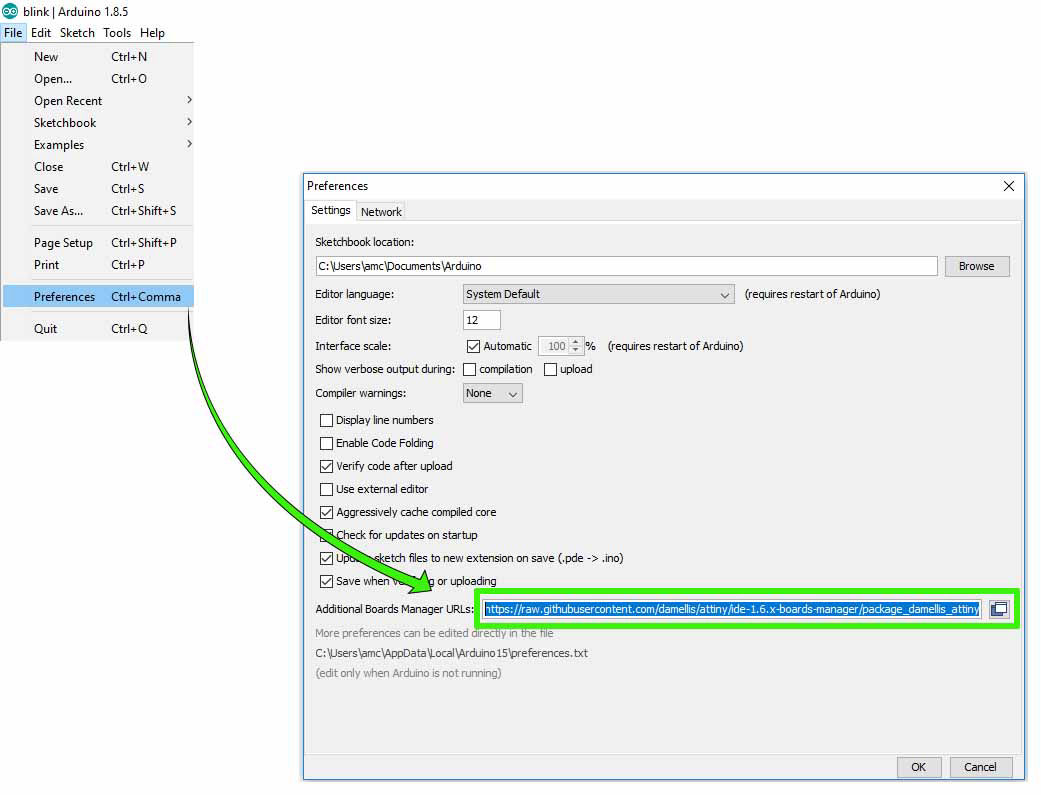
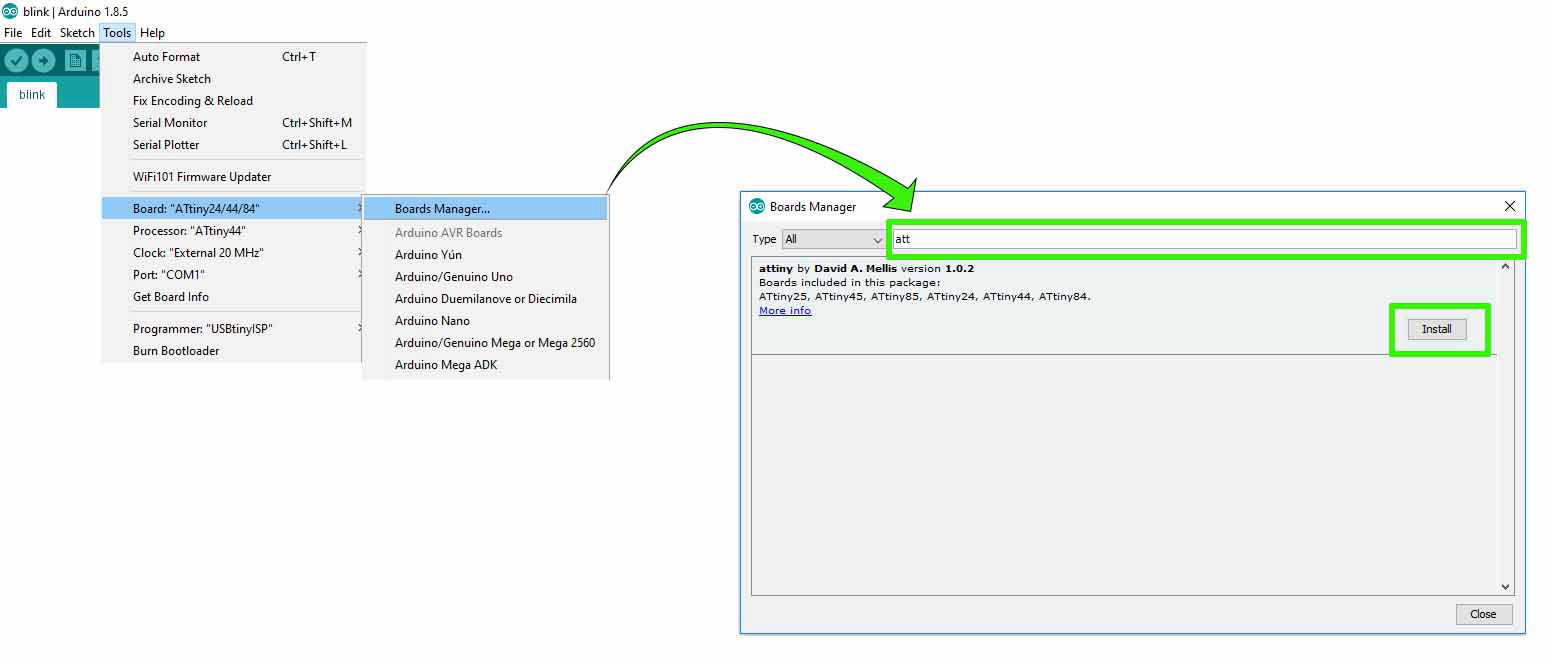
By default the Arduino software doesn't contain Attiny 44 chip library's. We need to include the details manually.
The original Arduino software does not support the ATtiny44, so I have to add some board directories for enabling my ATtiny44 board to my arduino environment.
> I clicked on preferences under file in the main menu
> In Additional Board Manager URLs, it is empty now.
> I found the additional url from the link
> I added the Following URL http://drazzy.com/package_drazzy.com_index.json
>After adding the URL open Board Manager by clicking Tools >> Board >> Boards Manager…
>I searched for ATtiny44 in the window that popped out.(Make sure you have Internet connection)
>I iInstalled the latest version available in the list.
> Now ATtiny44 is available as an option under the ATtiny Microcontrollers in board Selection.
>Next I selected the Clock as 20MHz.
> As I’m using Fab ISP to programme the Hello-Echo board, I selected the Programmer as USBtinyISP.
>Burn the Bootloader.
ATTiny44 is by default set to use the Internal clock .So if you are using Arduino to program it. It will not get a program initially . We have to upload the Bootloader first.
The bootloader contains a map of the chip, it sets all the transistors in the right state and it puts the IC in programming mode. The bootloader is the little program that runs when the Arduino is turned on, or the reset button is pressed. Its main function is to wait for the Arduino software on the computer to send it a new program for the board, which it then writes to the memory on the board. The next step is to connect the programmer USBtinyISP to the Hello Echo Board with the wire through the 2 * 3 pin header. Here I used the USBtinyISP as a programmer. I just had to click on the burn bootloader in the Arduino menu.
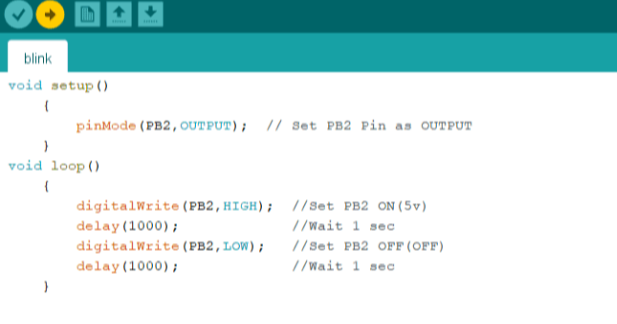
blink Program for my Boad.
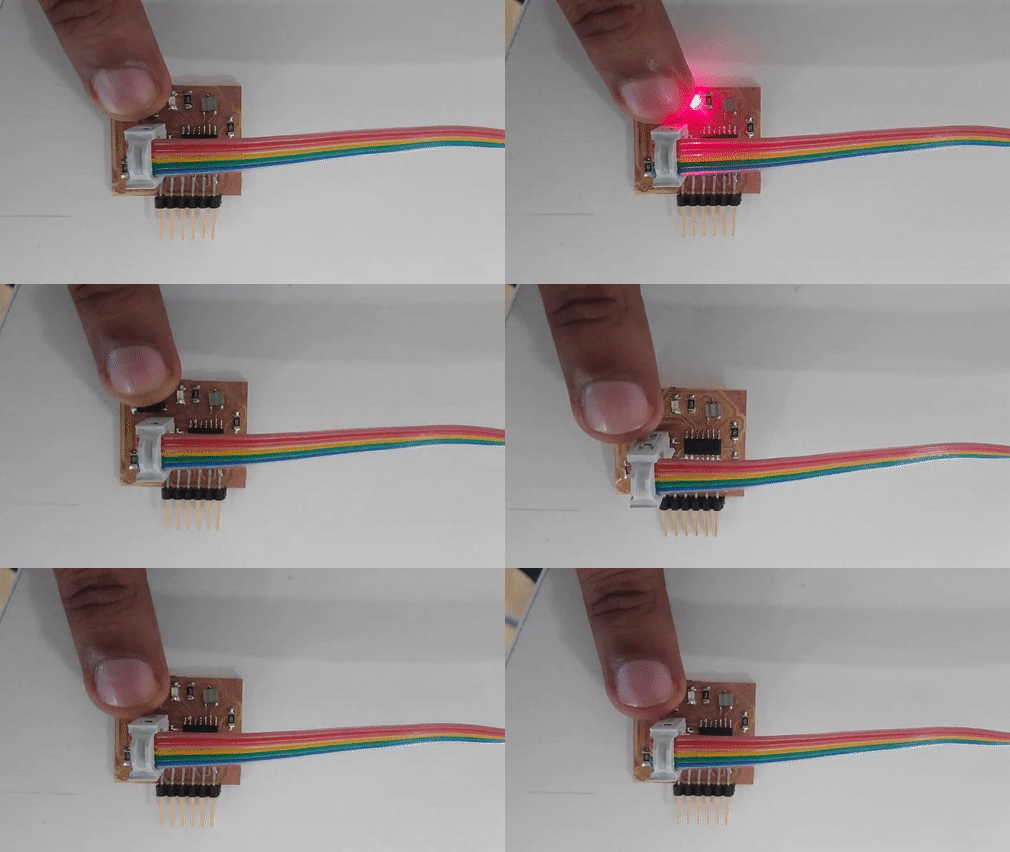
YEaaaa its Working.
So then I connected to FTDI Connector and just tried if its working by eco-ing something.
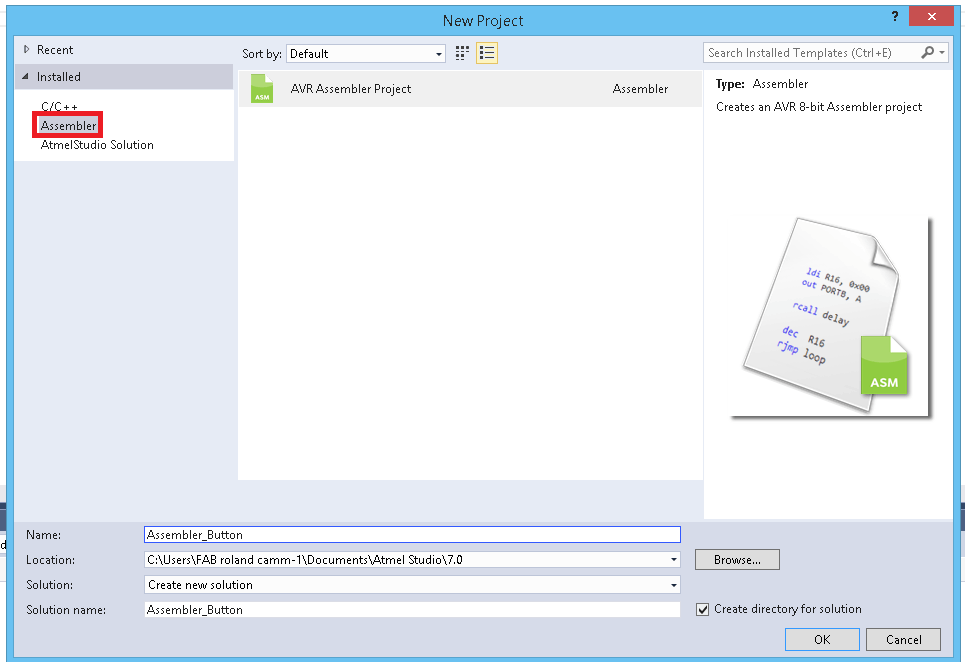
First I downloaded Atmel Studio and set it up.
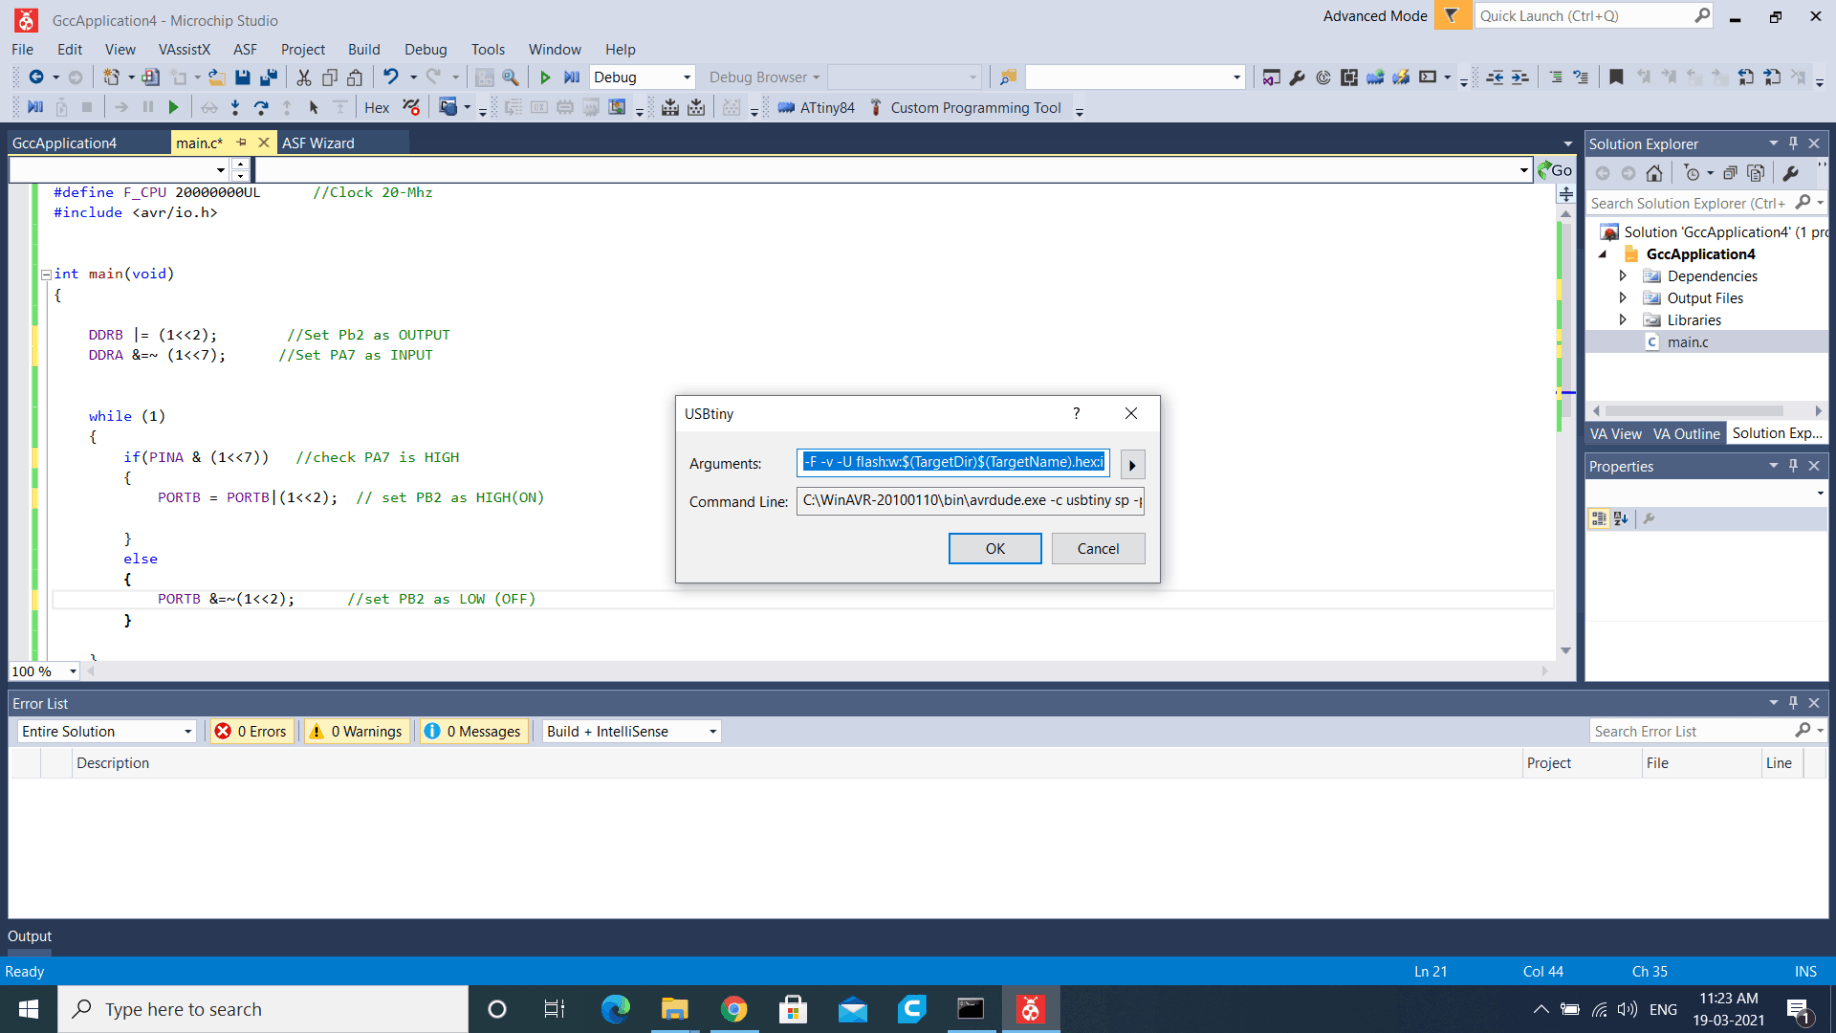
Next step is to add the programmer to our enviournment. Choose External Tools under Tools in the main menu to fill up the spaces as shown below.
Avrdude was already installed in the computer I was using. It can be checked by simply typing Avrdude in cmd. If it is not installed it has to be downloaded and installed.
A small window appears and press ok and check if USBtiny is added as a tool.
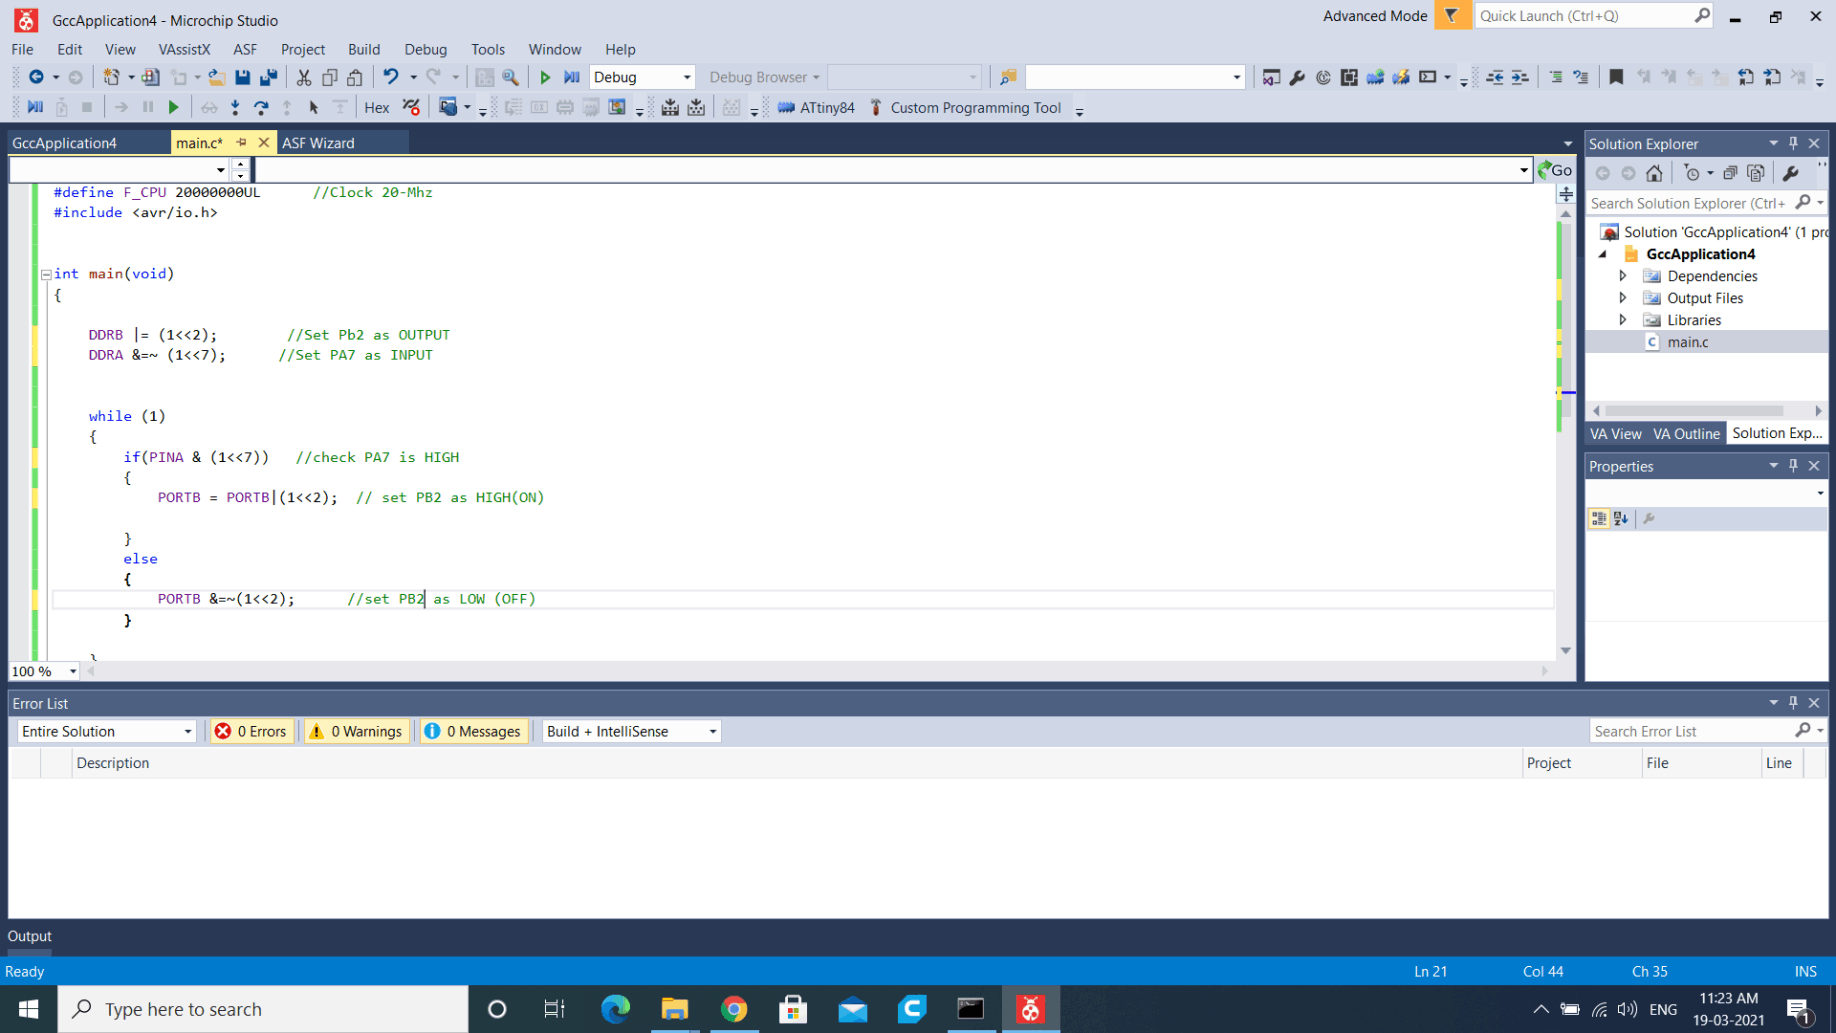
>I created a simple led blinking program based on what Jogin told me to do.
>For Uploading code I had to first build/compile it by using Build Soution in Build under main menu.
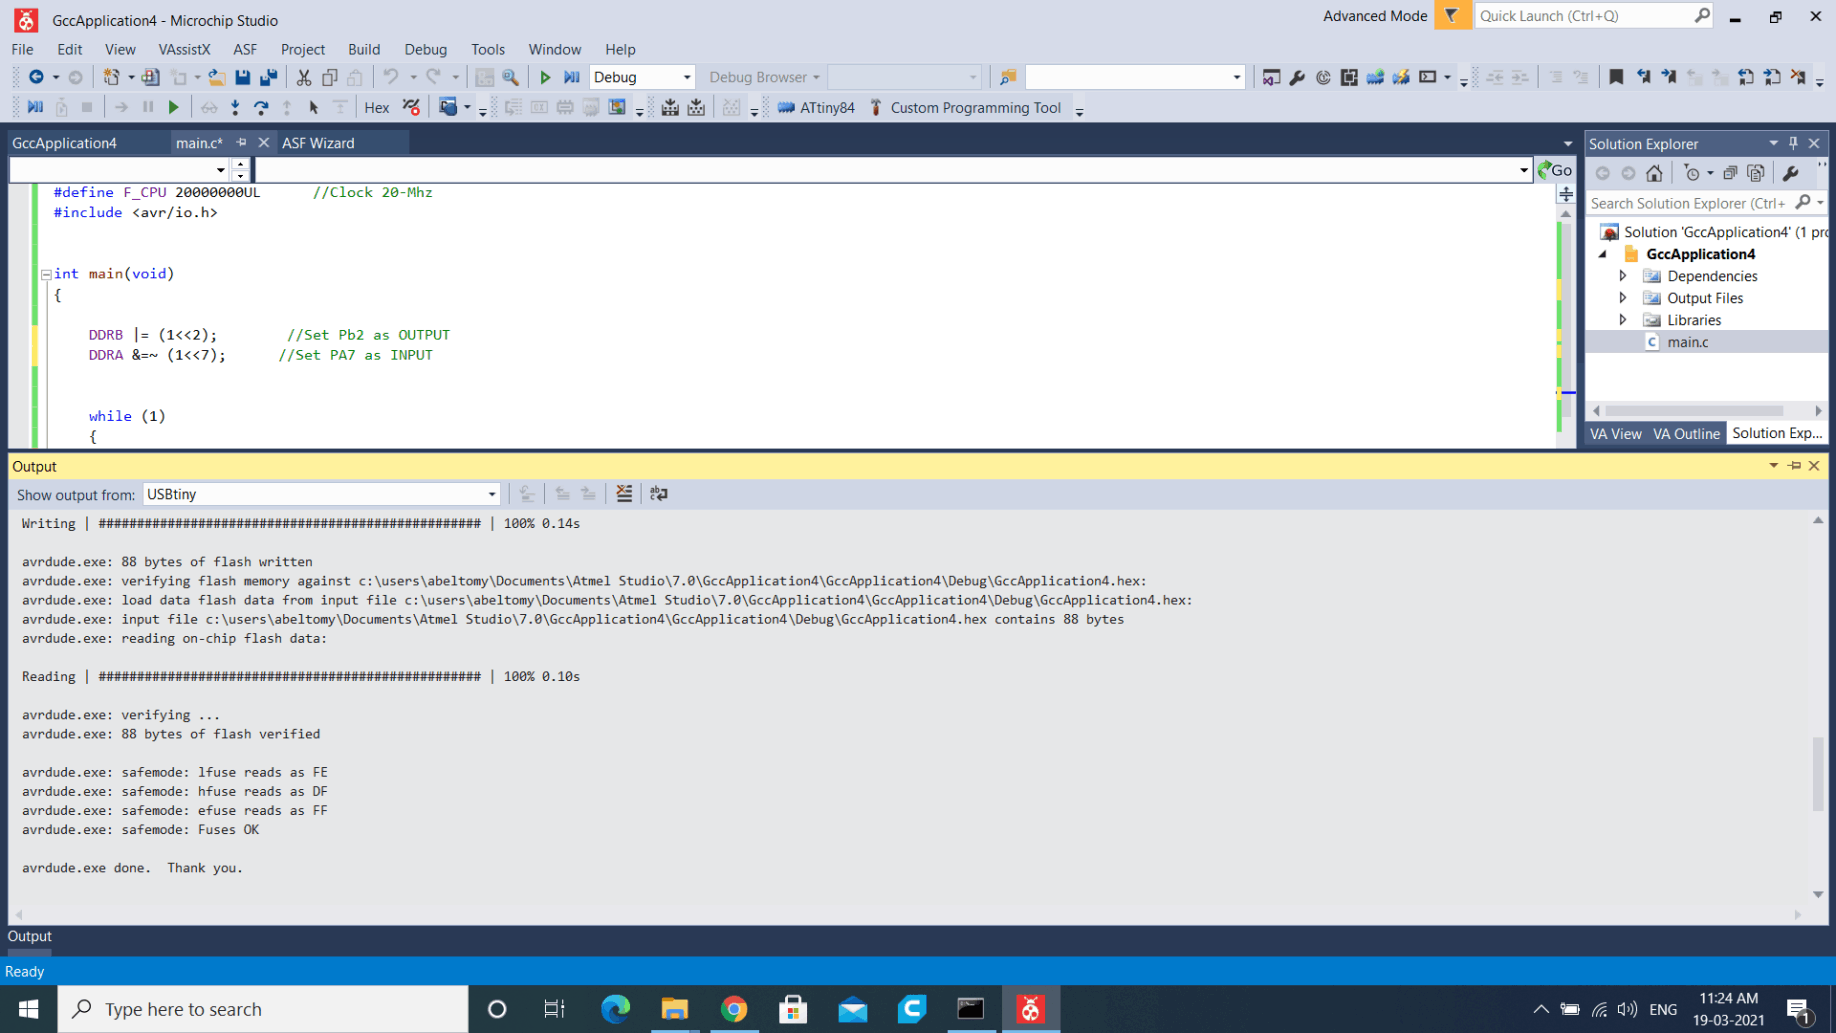
> As the build is success the program is ready to flash using programmer Tools=>USBTinys
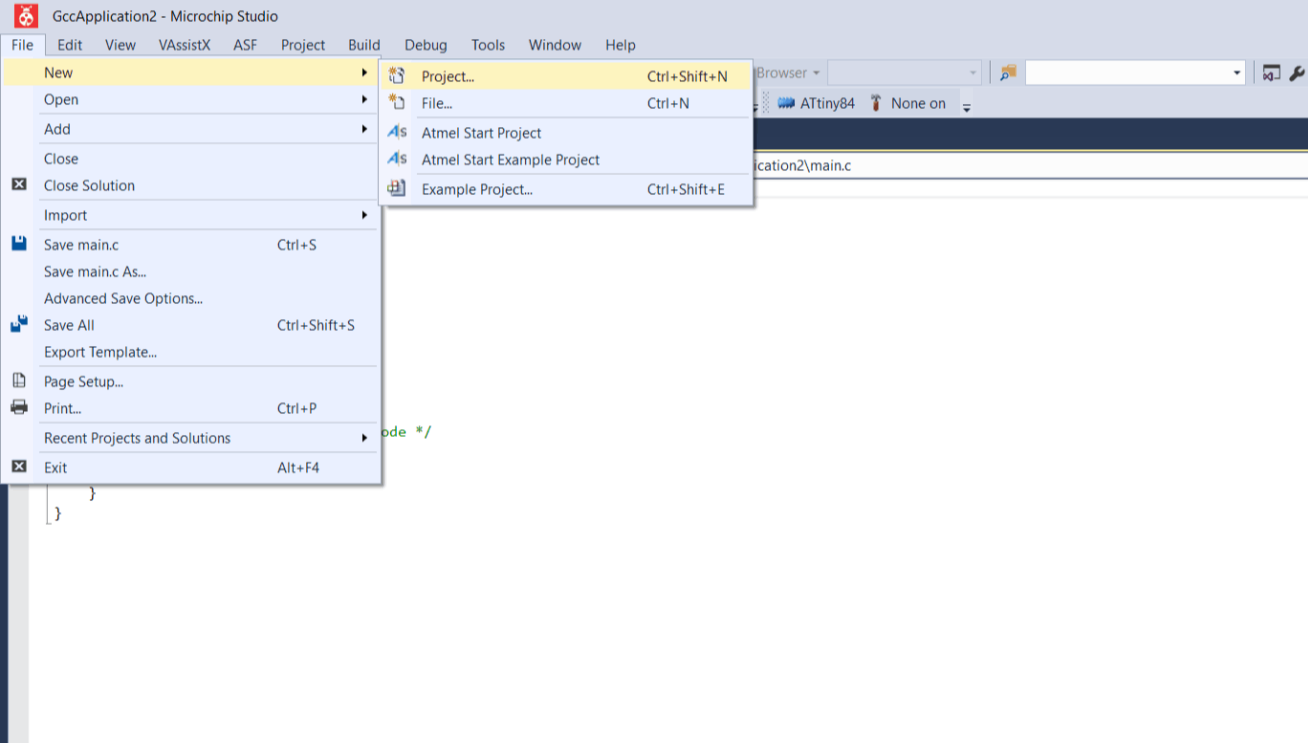
I opened the software and chose File>>new>>project from the main menu.
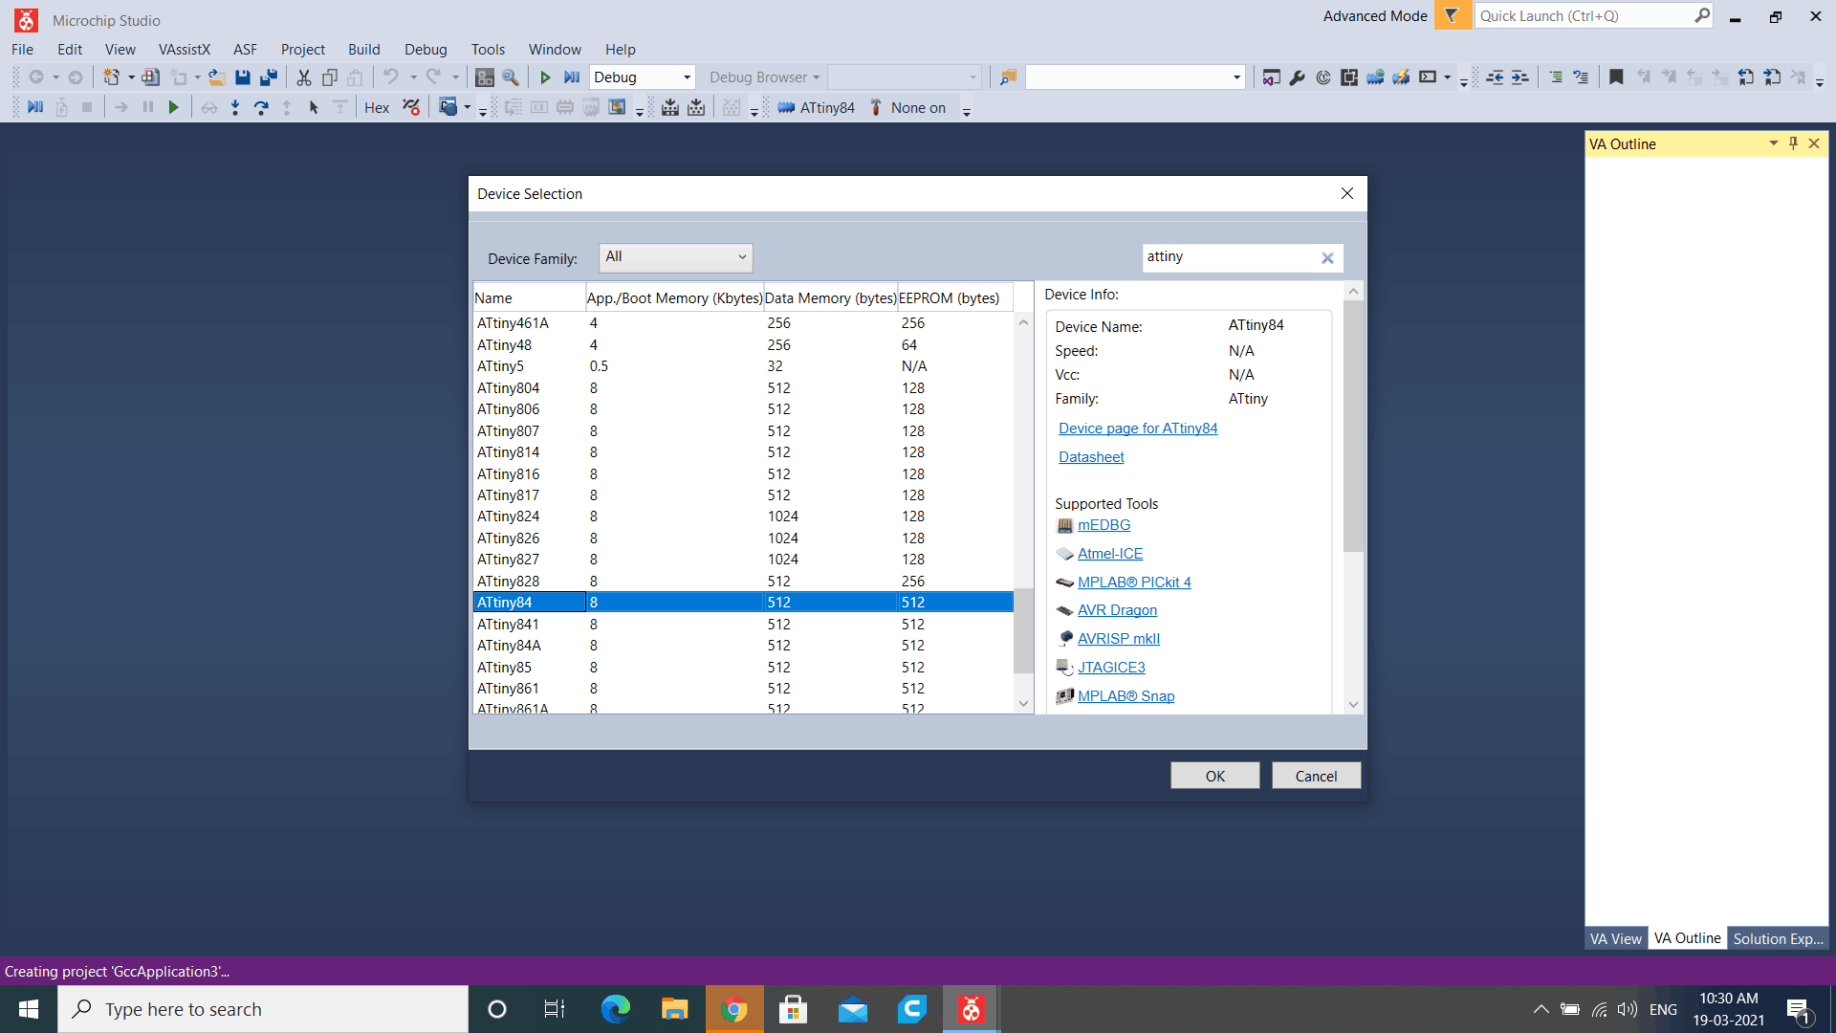
I selected the microcontroller that I used in my target board (Hello blinky) from the next window and clicked on
The Program for to turn on led when the switch is high.
Debug Version
Title:- USBTiny ISP Debug.
Command :- avrdude.exe
Arguments :- -c usbtiny -p attiny44 -U flash:w:$(ProjectDir)Debug\$(TargetName).hex:i
click apply and ok to save the tool.
Flashinggggggg.
Assembly language is an alphanumeric representation of machine code.The instructions used in writing programs in assembly language are not general but specific to the microcontroller. Each company provides a set of instructions for there microcontrollers. AVR 8-bits microcontrollers have a common instruction set.
When we code in Assembler we need the datasheet to know about the MC instruction set.
This our Assembler code that will Turn on the led when we press the LED.
.org it used for set the PC(Programme Counter) in a Specific value, in here we set PC in Zero
sbiit is used to set the pin to OUTPUT (ie 2nd bit of B as 1)
cbiClear the bit usually used for input (7th pin of A as 0)
mainthis is a label name it's like a function, all the code under the label we can get by calling the label name
SBIC in here it will skips the next instruction depending on the I/O bit's state
RJMP Relative Jump , here it will jump into a specfic label's that we mentioned , so here it will jump to main label.
Nucleo STM32F401
STM32 is a family of 32-bit microcontroller integrated circuits by STMicroelectronics. The STM32 chips are grouped into related series that are based around the same 32-bit ARM processor core, such as the Cortex-M7F, Cortex-M4F, Cortex-M3, Cortex-M0+, or Cortex-M0. Internally, each microcontroller consists of the processor core, static RAM memory, flash memory, debugging interface, and various peripherals. In here Fablab Kochi we have the STM32F401 series Nucleo development boards.it's a part of the STM32 Dynamic Efficiency™ device range. These devices offer the best balance of dynamic power consumption (in run mode) and processing performance, while integrating a high number of added-value features in packages as small as 3 x 3 mm. The MCUs deliver the performance of Cortex®-M4 core with floating point unit, running at 84 MHz, while achieving outstandingly low power consumption values in run and stop modes.
NodeMCU ESP8266
The NodeMCU (Node MicroController Unit) is an open-source software and hardware development environment built around an inexpensive System-on-a-Chip (SoC) called the ESP8266. The ESP8266, designed and manufactured by Espressif Systems, contains the crucial elements of a computer: CPU, RAM, networking (WiFi), and even a modern operating system and SDK. That makes it an excellent choice for the Internet of Things (IoT) projects of all kinds. However, as a chip, the ESP8266 is also hard to access and use. You must solder wires, with the appropriate analog voltage, to its pins for the simplest tasks such as powering it on or sending a keystroke to the “computer” on the chip. You also have to program it in low-level machine instructions that can be interpreted by the chip hardware. This level of integration is not a problem using the ESP8266 as an embedded controller chip in mass-produced electronics. It is a huge burden for hobbyists, hackers, or students who want to experiment with it in their own IoT projects.
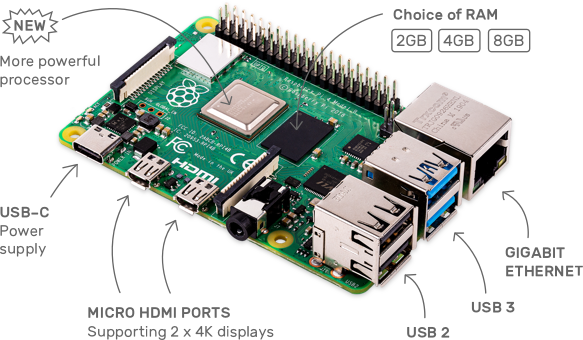
ARM, previously Advanced RISC Machine, originally Acorn RISC Machine, is a family of reduced instruction set computing (RISC) architectures for computer processors, configured for various environments.Processors that have a RISC architecture typically require fewer transistors than those with a complex instruction set computing (CISC) architecture (such as the x86 processors found in most personal computers), which improves cost, power consumption, and heat dissipation. These characteristics are desirable for light, portable, battery-powered device-including smartphones, laptops and tablet computers, and other embedded systems.] For supercomputers, which consume large amounts of electricity, ARM could also be a power-efficient solution. Most of our mobile phones are based on ARM and now it used on server's and super controllers.Raspberry Pi is Single board computer that based on ARM.
Broadcom BCM2711, Quad core Cortex-A72 (ARM v8) 64-bit SoC @ 1.5GHz
2GB, 4GB or 8GB LPDDR4-3200 SDRAM (depending on model)
2.4 GHz and 5.0 GHz IEEE 802.11ac wireless, Bluetooth 5.0, BLE
Gigabit Ethernet
2 USB 3.0 ports; 2 USB 2.0 ports.
Raspberry Pi standard 40 pin GPIO header (fully backwards compatible with previous boards)
2 × micro-HDMI ports (up to 4kp60 supported)
2-lane MIPI DSI display port
2-lane MIPI CSI camera port
4-pole stereo audio and composite video port
H.265 (4kp60 decode), H264 (1080p60 decode, 1080p30 encode)
OpenGL ES 3.0 graphics
Micro-SD card slot for loading operating system and data storage
5V DC via USB-C connector (minimum 3A*)
5V DC via GPIO header (minimum 3A*)
Power over Ethernet (PoE) enabled (requires separate PoE HAT)
Operating temperature: 0 – 50 degrees C ambient
* A good quality 2.5A power supply can be used if downstream USB peripherals consume less than 500mA in total.
Website was designed with Mobirise