Week 15 - Wildcard week
For this week's assignment I decided to play a little bit with computer vision using OpenCV on a Raspberry Pi Model B. The process includes compiling OpenCV from source and a small test program.
The first step before starting to install the dependencies is to update the package list, this is done by running the command
sudo apt-get update
OpenCV uses many dependencies to be able to compile correctly to ease the work of having to install them one by one you can use this command that includes all the necessary dependencies
sudo apt install build-essential cmake git pkg-config libgtk-3-dev \
   libavcodec-dev libavformat-dev libswscale-dev libv4l-dev \
   libxvidcore-dev libx264-dev libjpeg-dev libpng-dev libtiff-dev \
   gfortran openexr libatlas-base-dev python3-dev python3-numpy \
   libtbb2 libtbb-dev libdc1394-22-dev libopenexr-dev \
   libgstreamer-plugins-base1.0-dev libgstreamer1.0-dev
With all the dependencies installed the next step is to prepare a folder for the compilation process, in my case in the HOME directory I am going to create a folder with the name "opencv_build".
mkdir ~/opencv_build
Then we change to the folder we just created.
cd ~/opencv_build
Then in the folder we just created we clone the following repositories.
git clone https://github.com/opencv/opencv.git
git clone https://github.com/opencv/opencv_contrib.git
Now we need to switch to the "opencv" repository we just cloned
cd opencv
In that place we create a folder called "build".
mkdir build
And change to that directory
cd build
The compilation process will be through CMake, we just need to execute the following command using these flags.
cmake -D CMAKE_BUILD_TYPE=RELEASE \
   -D CMAKE_INSTALL_PREFIX=/usr/local \
   -D INSTALL_C_EXAMPLES=ON \
   -D INSTALL_PYTHON_EXAMPLES=ON \
   -D OPENCV_GENERATE_PKGCONFIG=ON \
   -D OPENCV_EXTRA_MODULES_PATH=~/opencv_build/opencv_contrib/modules \
   -D BUILD_EXAMPLES=ON ..
The next step is to start the build process which takes a long time so take a coffee or something while waiting, on a Raspberry this can take over an hour depending on the amount of RAM.
make -j8
When the compilation process has finished it is a matter of installing using the following command
sudo make install
We can check that the whole process was successful by running python and importing the library.
python3
>> import cv2
>> print(cv2.__version__)
The following is a fairly simple example of face detection. It is important to clarify that face detection is different from face recognition, in face detection it simply detects the faces but in face recognition besides detecting the faces it also edentifies them but for that it is necessary to train the model with several samples.
For this example I will use "Haar Cascade Classifier" which has several pre-trained models to recognize faces, eyes, bodies, smiles and many more, you can take a look at this link, to see the models link.
We start by creating the python file we are going to work with.
man face_detection.py
Before starting with the code we need the pre-trained model file to detect faces.
wget https://raw.githubusercontent.com/opencv/opencv/master/data/haarcascades/haarcascade_frontalface_default.xml
To edit the file you can use any editor of your choice, it can be VIM, VS Code, Sublime, PyCharm or any other. In my case I am going to use nano.
nano face_detection.py
OpenCV has an incredible amount of functionalities and to use them is simply to import it in our script
import cv2
We load the model
cascade_data = cv2.CascadeClassifier('haarcascade_frontalface_default.xml')
We add our video capture device, in my case it is 0
cap = cv2.VideoCapture(0)
OpenCV captures the video in frame by frame so it is necessary to add a while to maintain the video capture.
while(True):
   _, frame = cap.read()
To operate our the current frame we convert it from a color frame to gray scale.
gray = cv2.cvtColor(frame, cv2.COLOR_BGR2GRAY)
The next step is to detect the face in the current frame for that we use the following line that consists of the frame, and two parameters that must be set to have a detection.
faces = cascade_data.detectMultiScale(gray, 1, 4)
If the objective is to visualize the face it is possible to draw a rectangle around it, in case of several faces it is necessary to use a loop to draw the rectangles.
for (x, y, z, w) in faces:
   cv2.rectangle(img, (x, y), (x + w, y+h), (0, 0, 255))
To show the result
cv2.imshow('frame',gray)
The complete script is as follows.
import cv2

def main():

      cascade_data = cv2.CascadeClassifier('haarcascade_frontalface_default.xml')

      # init video device
      cap = cv2.VideoCapture(0)

      # Frame capture loop
      while(True):
         # Capture frame-by-frame
         _, frame = cap.read()

         # Our operations on the frame come here
         gray = cv2.cvtColor(frame, cv2.COLOR_BGR2GRAY)

         faces = cascade_data.detectMultiScale(gray, 1, 4)

         for (x, y, z, w) in faces:
            cv2.rectangle(img, (x, y), (x + w, y+h), (0, 0, 255))

         # Display the resulting frame
         cv2.imshow('frame',gray)

         if cv2.waitKey(1) & 0xFF == ord('q'):
            break

      # When everything done, release the capture
      cap.release()
      cv2.destroyAllWindows()


if __name__ == "__main__":
      main()
To test the operation it is necessary to run the python script with the following line
python face_detection.py
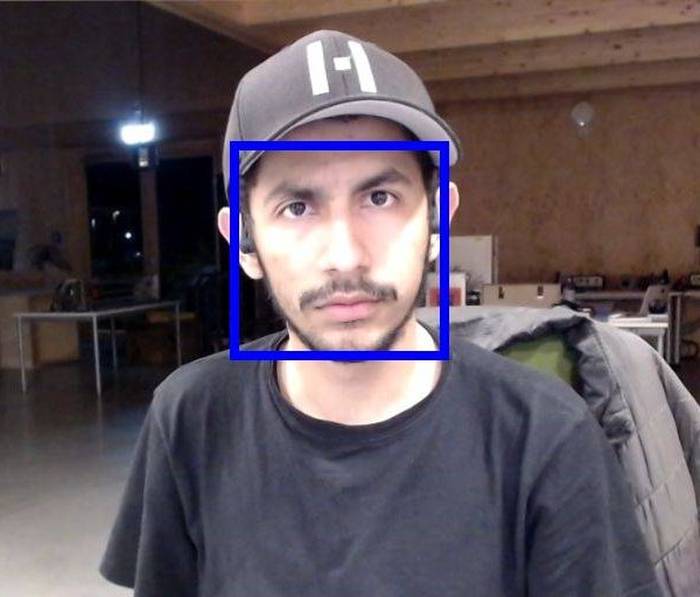
The expected result is to show the image coming from the webcam and in case it detects a face it will show a box around it. Normally if there is only one video capture device the script will work fine, in case of having more than one it is necessary to modify the line "cap = cv2.VideoCapture(0)" by the index to the corresponding device.
This is the result of running the script
- Raspberry Pi 4 Model B