Week 10: Input devices
For this assignment that consists of adding a sensor to the board I designed. I decided to use one of my PCB's that I made in the week Electronic Design specifically the board that I call MidTiny which has an ATtiny1614 microcontroller and has all the pins exposed. Regarding the sensor to be added to the pcb I select a nine degrees of freedom IMU that I designed and fabricated myself, the integrated circuit that brings it to life is the ICM-20945, you can find a tutorial fully dedicated to the design and fabrication of the one I call Fab IMU .
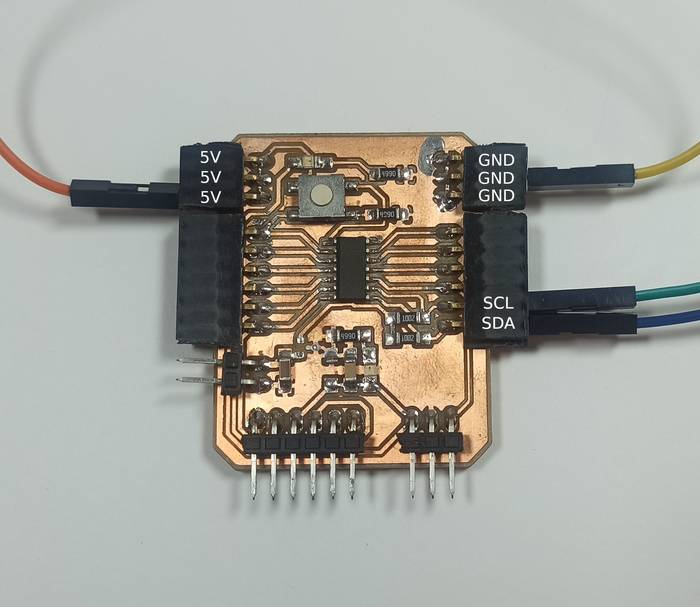
The two components involved in this assignment are the MidTiny controller board and the MEMS Fab IMU sensor that communicates via I2C with the controller.
The physical connection between the two components is quite simple, the image below shows the connection on the MidTiny.
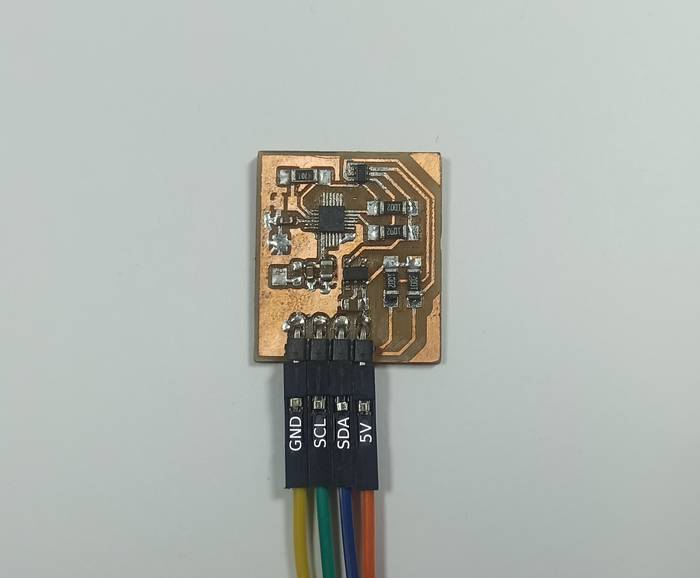
On the Fab IMU side the connection is as follows
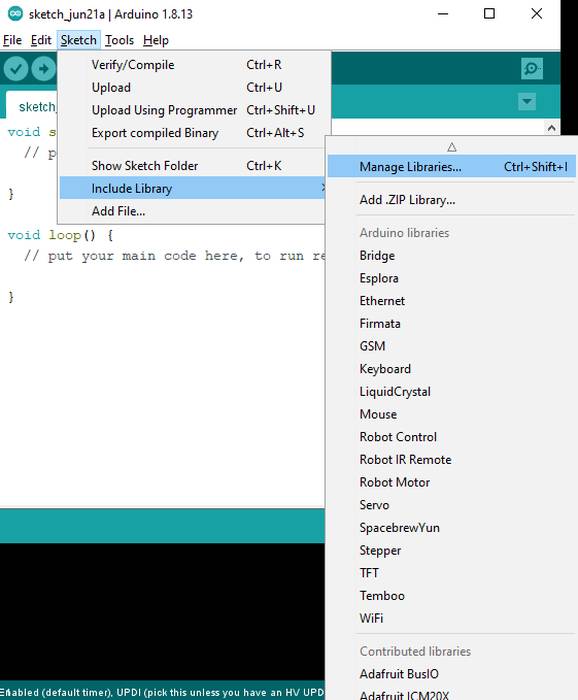
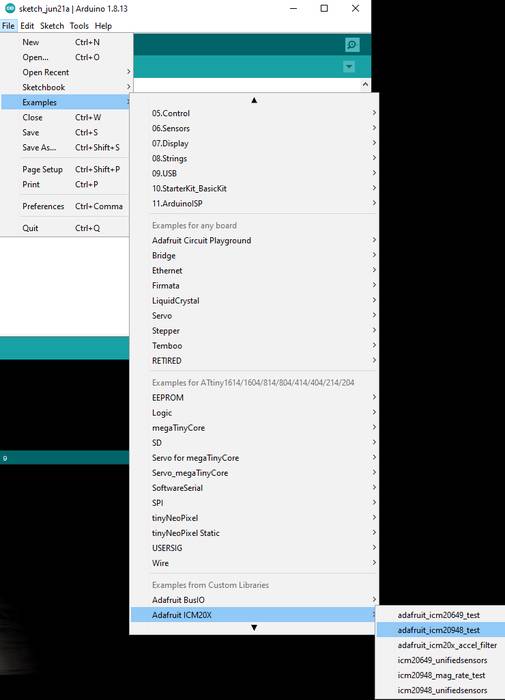
To facilitate the work of reading the data from the IMU I used a library developed by Adafruit for this IC ICM20X. To add the library you have to go to Sketch->Include Library->Manage Libraries...
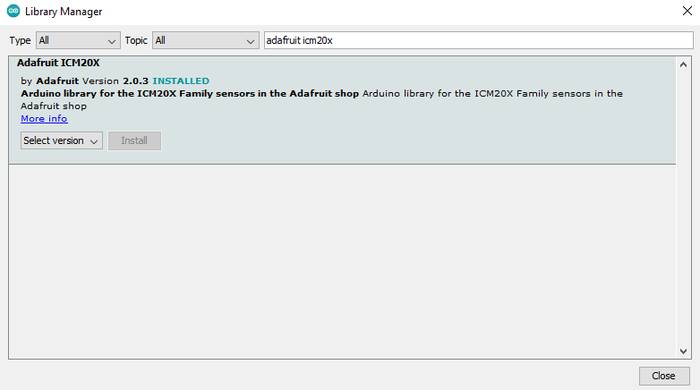
Search for "adafruit ICM20X" and press the install button
The library includes a test program which is located in File->Examples->Adafruit ICM20X->adafruit_icm20948_test
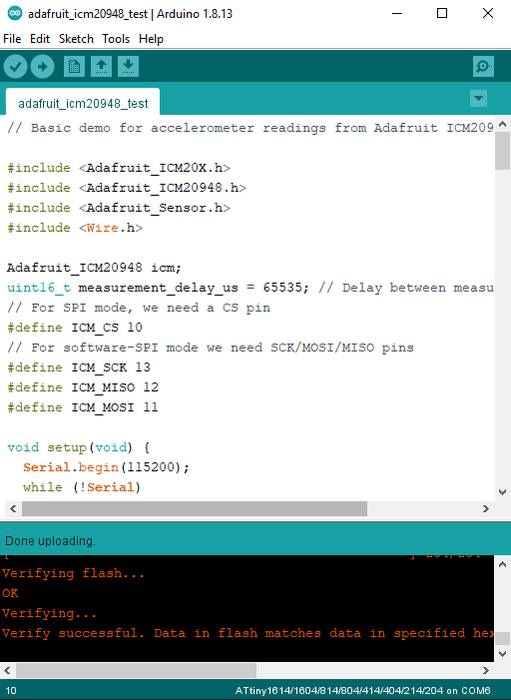
The test program has several ways of communication available but by default it starts by testing the I2C connection, so it is not necessary to modify the code.
The complete code of the test program is as follows.
// Basic demo for accelerometer readings from Adafruit ICM20948

#include
#include
#include
#include

Adafruit_ICM20948 icm;
uint16_t measurement_delay_us = 65535; // Delay between measurements for testing
// For SPI mode, we need a CS pin
#define ICM_CS 10
// For software-SPI mode we need SCK/MOSI/MISO pins
#define ICM_SCK 13
#define ICM_MISO 12
#define ICM_MOSI 11

void setup(void) {
  Serial.begin(115200);
  while (!Serial)
    delay(10); // will pause Zero, Leonardo, etc until serial console opens

  Serial.println("Adafruit ICM20948 test!");

  // Try to initialize!
  if (!icm.begin_I2C()) {
    // if (!icm.begin_SPI(ICM_CS)) {
    // if (!icm.begin_SPI(ICM_CS, ICM_SCK, ICM_MISO, ICM_MOSI)) {

    Serial.println("Failed to find ICM20948 chip");
    while (1) {
      delay(10);
    }
  }
  Serial.println("ICM20948 Found!");
  // icm.setAccelRange(ICM20948_ACCEL_RANGE_16_G);
  Serial.print("Accelerometer range set to: ");
  switch (icm.getAccelRange()) {
  case ICM20948_ACCEL_RANGE_2_G:
    Serial.println("+-2G");
    break;
  case ICM20948_ACCEL_RANGE_4_G:
    Serial.println("+-4G");
    break;
  case ICM20948_ACCEL_RANGE_8_G:
    Serial.println("+-8G");
    break;
  case ICM20948_ACCEL_RANGE_16_G:
    Serial.println("+-16G");
    break;
  }
  Serial.println("OK");

  // icm.setGyroRange(ICM20948_GYRO_RANGE_2000_DPS);
  Serial.print("Gyro range set to: ");
  switch (icm.getGyroRange()) {
  case ICM20948_GYRO_RANGE_250_DPS:
    Serial.println("250 degrees/s");
    break;
  case ICM20948_GYRO_RANGE_500_DPS:
    Serial.println("500 degrees/s");
    break;
  case ICM20948_GYRO_RANGE_1000_DPS:
    Serial.println("1000 degrees/s");
    break;
  case ICM20948_GYRO_RANGE_2000_DPS:
    Serial.println("2000 degrees/s");
    break;
  }

  //  icm.setAccelRateDivisor(4095);
  uint16_t accel_divisor = icm.getAccelRateDivisor();
  float accel_rate = 1125 / (1.0 + accel_divisor);

  Serial.print("Accelerometer data rate divisor set to: ");
  Serial.println(accel_divisor);
  Serial.print("Accelerometer data rate (Hz) is approximately: ");
  Serial.println(accel_rate);

  //  icm.setGyroRateDivisor(255);
  uint8_t gyro_divisor = icm.getGyroRateDivisor();
  float gyro_rate = 1100 / (1.0 + gyro_divisor);

  Serial.print("Gyro data rate divisor set to: ");
  Serial.println(gyro_divisor);
  Serial.print("Gyro data rate (Hz) is approximately: ");
  Serial.println(gyro_rate);

  // icm.setMagDataRate(AK09916_MAG_DATARATE_10_HZ);
  Serial.print("Magnetometer data rate set to: ");
  switch (icm.getMagDataRate()) {
  case AK09916_MAG_DATARATE_SHUTDOWN:
    Serial.println("Shutdown");
    break;
  case AK09916_MAG_DATARATE_SINGLE:
    Serial.println("Single/One shot");
    break;
  case AK09916_MAG_DATARATE_10_HZ:
    Serial.println("10 Hz");
    break;
  case AK09916_MAG_DATARATE_20_HZ:
    Serial.println("20 Hz");
    break;
  case AK09916_MAG_DATARATE_50_HZ:
    Serial.println("50 Hz");
    break;
  case AK09916_MAG_DATARATE_100_HZ:
    Serial.println("100 Hz");
    break;
  }
  Serial.println();

}

void loop() {

  //  /* Get a new normalized sensor event */
  sensors_event_t accel;
  sensors_event_t gyro;
  sensors_event_t mag;
  sensors_event_t temp;
  icm.getEvent(&accel, &gyro, &temp, &mag);

  Serial.print("\t\tTemperature ");
  Serial.print(temp.temperature);
  Serial.println(" deg C");

  /* Display the results (acceleration is measured in m/s^2) */
  Serial.print("\t\tAccel X: ");
  Serial.print(accel.acceleration.x);
  Serial.print(" \tY: ");
  Serial.print(accel.acceleration.y);
  Serial.print(" \tZ: ");
  Serial.print(accel.acceleration.z);
  Serial.println(" m/s^2 ");

  Serial.print("\t\tMag X: ");
  Serial.print(mag.magnetic.x);
  Serial.print(" \tY: ");
  Serial.print(mag.magnetic.y);
  Serial.print(" \tZ: ");
  Serial.print(mag.magnetic.z);
  Serial.println(" uT");

  /* Display the results (acceleration is measured in m/s^2) */
  Serial.print("\t\tGyro X: ");
  Serial.print(gyro.gyro.x);
  Serial.print(" \tY: ");
  Serial.print(gyro.gyro.y);
  Serial.print(" \tZ: ");
  Serial.print(gyro.gyro.z);
  Serial.println(" radians/s ");
  Serial.println();

  delay(100);

  //  Serial.print(temp.temperature);
  //
  //  Serial.print(",");
  //
  //  Serial.print(accel.acceleration.x);
  //  Serial.print(","); Serial.print(accel.acceleration.y);
  //  Serial.print(","); Serial.print(accel.acceleration.z);
  //
  //  Serial.print(",");
  //  Serial.print(gyro.gyro.x);
  //  Serial.print(","); Serial.print(gyro.gyro.y);
  //  Serial.print(","); Serial.print(gyro.gyro.z);
  //
  //  Serial.print(",");
  //  Serial.print(mag.magnetic.x);
  //  Serial.print(","); Serial.print(mag.magnetic.y);
  //  Serial.print(","); Serial.print(mag.magnetic.z);

  //  Serial.println();
  //
  //  delayMicroseconds(measurement_delay_us);
}
The complete connection is shown in the following image. It contains the programmer to upload the program to the controller and the FTDI cable to view the data on the serial port.

Now it is just a matter of connecting the controller to the computer and uploading the test program.
Here you can see a video demonstration
Group assignment page