CAD-design something for casting. 2. Make .stl file for mold. 3. Mill the mold with Roland milling machine. 4. Casting the mold for casting the final product. 5. Casting the final mold. The moment Neil mentioned that FabLabs have material for a mold that can be used to cast food products. After thinking I decided to make a chess piece set.
I used Fusion 360 for this assingment as well. I am getting a good hang of it. Thought I am still not sure it is a good thing to run it as a cloud service. Anyway, I knew I did not have much time to use for design of the pawns, so I swiftly made a set of chess peaces. While working on it I realized that it will be a quite hard to fit them all on one block of wax. As it turned out, it was not possible. Then I thought that I would have half of the pieces of the block but that did not work out eather. At the end I made a set that has one of all the higher pawns and set of four soldiers. Also casting entrance holes are on two sides of the block. This means that I have to make 4 runs on the soldiers when makeing a set and two castings of king, queen, knite, horse and bishop and after that a two more sets of horse, knight and bishop.
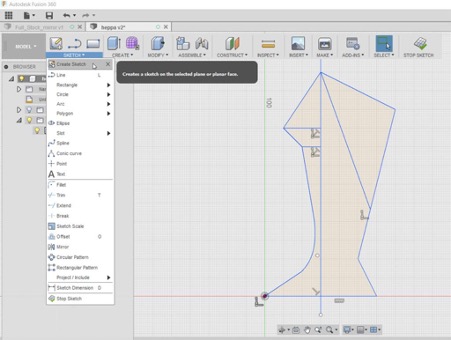
Sketch the profile, use sketch mode.

Create -> revolve to make 3D-part from sketched profile.
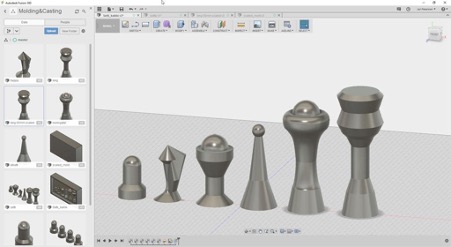
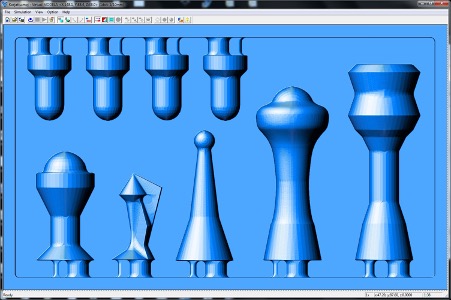
Ready set of pawns. They have to be scaled down as I did not draw them in scale yet. I did it as I made the wax block as a basis for the final model. Scaling happens from Modify -> Scale. I ended up using 0.241 scale factor to make them fit on my wax block. Creating a wax block with walls for the final mold. It was easy to make with Modify -> Shell.

Imported all pawns into to the final project. Scaled them down. Started to fit them into the block. I tried to fit as many as possible, but at the end I realized I can not make it. Here is one model with a lot of the pawns in it.
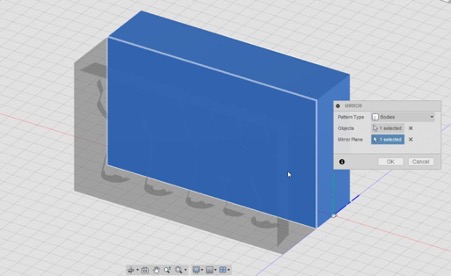
When the block was ready, I needed to make a mirror copy of it to get both sides for casting. It was done easily with Create -> Mirror. Now I had 2 models ready for exporting.

At the end I desided to go with this setup. Added the holes for filling. Set them in right order. Then I had to make them all as one body as the only way to export .stl is to export single body under right click -> export .stl. Making all the parts as one body I used modify -> combine command. To be able to make this all happen on only one block of wax, I desided to use both sides of the block, so there is mirror image on the other side of the block. After finishing the CAD desing, I exported two .stl files, one for both sides of the casting molds. Other being a mirror image and would be milled to the other side of the wax block.
Setting up the milling was partly a new process, partly same what we have done when milling pcb's. Setting up the milling goes as follows: 1. Set up the wax block to the milling machine table with 2-sided tape. 2. Setting up the origo, right milling bit and z-azis. 3. Using the Roland Modela 4 program to make milling tracks. 4. Milling For milling I used 3.18mm flat head milling bit. 1. Setting up the milling machine, first we have to put the wax block on to the roland milling table with the expendable part on it. I did use 2-sided tape to make the block stay in place. Then the table goes into the roland. Next step is to define the origo on the block. This is done in the VPanel for SRM-20 software. Process is the same as when milling a pcb. X and Y axis are set to the left bottom of the wax block. Z-axis zero point is on the top of the wax block, just drive the mill bit next to the top and manually drop the bit to the surface. Zero the values in VPanel program. The milling is commanded from the other program called Roland Modela Player 4. It is also used to calculate the milling tracks. Now it was time to make the milling tracks with Roland Modela 4 program. Open the program and load the .stl file.
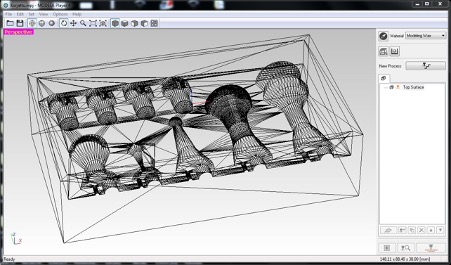
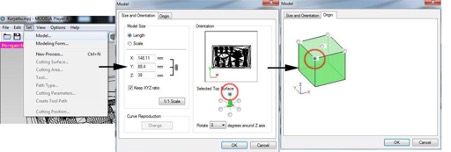
From Set -> Set Model, Top surface on "Start and Orientation" tab and Model origin is set to left bottom and top corner in "Origin" tab.
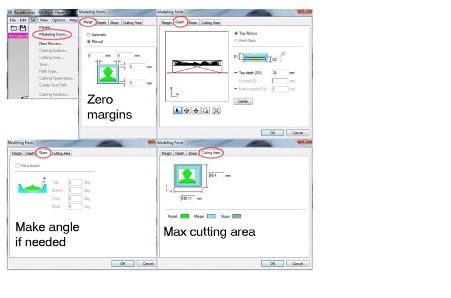
Make sure in Set -> Modeling Form margins are 0. No changes here actually. Just checking.
From Set -> New process Creation, select Roughing -> next. Main change here is to select the mill bit to be used. I used 3.18mm flat head mill bit. Milling speeds are other thing that might need changing. I used 30 mm xy-direction cutting and 0.4mm step down (cutting-in) speed. That was too small value for roughing. Better value for step down would be 1mm or even more. 1 mm was used by others in our lab and that worked fine. This will cut the huge 7 hour cut time to less than a half of that.


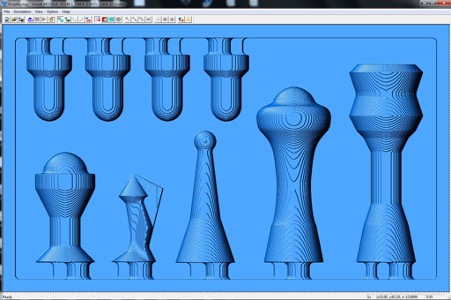
Here is the result of track calculation. To start the milling, use start button on left bottom corner. I did do the finish tracks as well before cutting, so I only simulated the results.

Simulation setting were kept as default.
This is the result simulation. When simulation is running the milling is shown as mill bit moving in its track. The picture shows the results of roughing.
Next the finishing tool path is generated. Finish tool paths are generated from Set -> New Process as the roughing was selected. This is to clean the surface after rough milling. The process does not move a lot of material, just a light touch to the surface. Settings are mostly kept as default. I used same 3.18mm flat head mill bit.
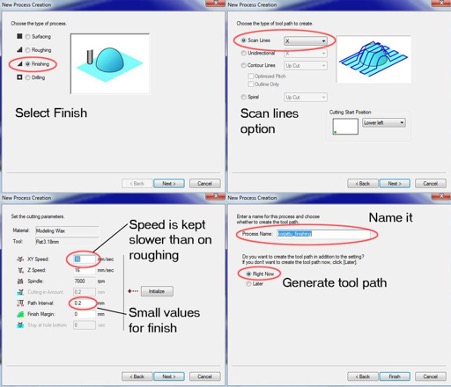
And the results for finish tool path.

Simulation for finish milling. From simulation window Simulation -> Cutting Data Information, the time for milling can be seen.
Milling took over seven hours in total for roughing and finishing millings. Here is the first roughing milling in progress. All the milled wax is collected for future use, as I can be melted back to a block.

After about 8 hour run, here is one ready side of the mold. Then I run the mirror image on the other side of the wax block. It took about the same time. It ran over night and in the morging here was the result.

And the final product has one mold on both sides mirroring each other.

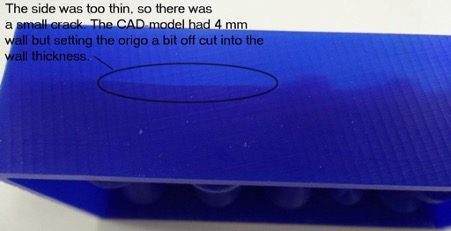
When designing the model, I made 4 mm thick walls, that seemed to be enough but at the end it was a a bit too thin. Also when defining the origo on the wax block I should have defined it from the middle of drill bit to the actual corner of the block. I made the origo over the block corner. That moved the center of the milling to the right top direction. On the picture the crack can be seen from outside.
Now it was time to cast the actual mold for my chess pieces. As I wanted to make food products, I used Smooth-Sil 940 Silicone. It is two component stuff (as most that we use). The mixing ratio is 100:10. What was a suprise for me was the cure time that was 24 hours. So basically that would mean that, as I had the two molds on same block I would take 24 hours to make two pieces. Pot time (that is the time from mixing the components to the point you should cast them latest) was nice 30 min. so what would not be a problem.
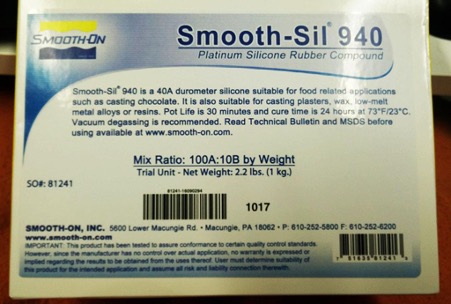
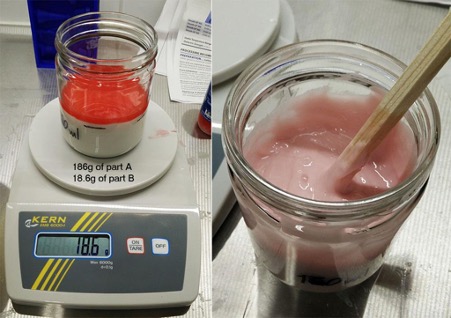
The process of casting the mold is: 1. Measure quantity needed 2. Mix both components on their own. 3. Mix right amounts of each of the materials in one pot. 4. Mix them well! 5. Use our vacuum system to get most of the air out from the silicone material. 6. Cast the mold i.e. pour the silicone into the mold. 7. Let it dry given time. The components come in two containers. The mixing ratio is 100 parts of other and 10 parts the other. Part 1 is white low viscosity stuff and the part 2 is bright red liquid in a class bottle. On the picture you can see that there is some of the material on the treats, you want to clean them before closing it, as the stuff will dry out and make it harder to open.

Mixing it in correct ratio outcomes this pink stuff.
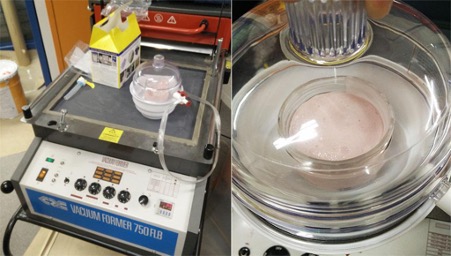
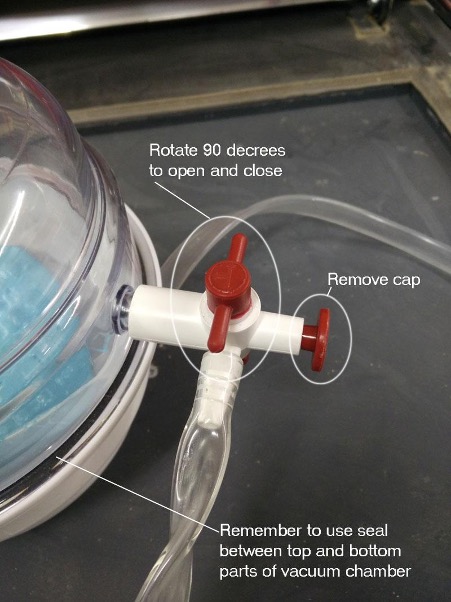
Then I used our vacuum system to get as much air out as possible. First we did not have seal between top and bottom parts of the vacuum chamber and did not get good vacuum. After adding the seal, it worked really nice. After 20 minutes in vacuum, there was still some air coming out, but I am sure most of the air gone. The limitation for vacuuming is the pot time of the material.
The lever to control vacuum in the chamber was a bit of a mystery at start but at the end we solved that as well. See the picture.
After vacuuming and pot time getting closer, it was time to pour the stuff in the mold. Viscosity was quite ok to get the stuff in the mold. After casting the first part, I waited for about 5 hours, turned the mold around and casted the other side. I used some tape to support the bottom side. As I found out next day, it was long enought for the cast to cure as the casted part turned out really good.

