
Interface and Application Programming
INTERFACE & APPLICATION PROGRAMMING
This is the content we had covered this week:
W14 - Interface & application programming
This is the content we had covered this week:
- Languages
- Device Interface and Application Programming
- Data Interfaces
- User Interfaces
- Graphics
- Video
- Audio
- VR/AR/MR/XR
- Math
- Performance
- Deploy
- Security
Assignment
-
Group assignment: compare as many tool options as possible.
-
Individual assignment: write an application that interfaces a user with an input &/or output device that you made
HOW TO CREATE INFERTACES AND APPS
This week we’ve seen so many things, I didn’t even have time to summarize them. However I’ll use the group assignment to provide some useful insights from some tools I know.
GROUP ASSIGNMENT
For the group assignment I decided to analyze tools that I’m familiar with which give me enough context to try to provide some added value to the class’ conversation.
For each tool I’m going to evaluate these categories:
1) Language:
2) Learning Curve:
3) Versatility:
4) Compatibility:
5) Dependencies:
OPENFRAMEWORKS
For me OpenFrameworks is a super powerful and versatile tool that can be sometimes frustrating because of C++. I encourage people to explore it, but it should be the first creative coding frameworkd that you try as I consider it quite complicated.
Fins here some examples that I’ve developed myself before the Fabacademy.

"Co-Individuality. OpenFrameworks Networked project Gif"
CO-INDIVIDUALITY - occupy earth from Carla Molins (Krly) on Vimeo.
Lastly, early this year I tried to resucitate my OpenFrameworks skills and I participated at the Genuary challenge. Unfortunately when I started the Fabacademy I wasn’t able to keep up with everything.
Link to Genuary’s challenge done in openFrameoworks
1) Language: C++.
2) Learning Curve: Very steep. C++ is quite a low level language and at the same time some of the OpenFrameworks documentation can be very dated so it might be difficult to start.
3) Versatility: It’s extremely powerful and there’re multiple addons to make it even more powerful.
4) Compatibility: As OpenFrameworks (on Mac Os) uses some of XCode capabilities there has been lots of issies every time a new OS appeared, making some creative coders reluctant to keep using the tool. It’s not a straightforward process to have a standalone application ( at least on Mac).
5) Dependencies: lots of dependencies to be taken care of.
PROCESSING
Processing for me is a very accessible tool with a super wide community that shares lots of knowledge both online and offline in many events.
I consider to have improved a lot my coding skills while using processing as most of its syntax is quite clear and on the easy side to debug.
Omnipresence, The Odyssey About Unknown Dark Matter from Carla Molins (Krly) on Vimeo.
In this project I used processing to read information from a kinect and program a user interface within the space that would trigger a physical mechanism.
1) Language: Java.
2) Learning Curve: Smooth. There are a lot of examples and resources to learning by doing.
3) Versatility: There are so many libraries to input and/ or output data to/from Processing that makes it an excellent box of resources. 4) Compatibility: In general there’s no problem with its compatibility. Its also very easy to export a processing application to make it standalone..
5) Dependencies: easy file structure.
Best Resource to learn Processing: The Nature of Code by Dan Shiffman.
P5.JS
P5 js is quite similar to processing, but for starters I find Processing easier as you don’t need any server to run your program. It’s true that there’s an online IDE that lets you preview your code but I personally prefer working on local as I don’t need to rely on an stable internet connection.

"Creative Coding drawing."

"Capacitive Touch visual audio"
Finde here a collection of code sketches done using P5.js by myself in 2018
1) Language: Javascript.
2) Learning Curve: Smooth. .
3) Versatility: It’s nice to have a snippet of code that it will run on your website. 4) Compatibility: it usually works on every browser as far as the libraries are properly linked.
5) Dependencies: Needs some dependencies to work
UNITY
I could barely say that I know how to use Unity as it has so many possibilities. But within my very specific use-case, see this project below, I can say it’s a very rich tool.
Galaxy Beta Maker from Carla Molins (Krly) on Vimeo.
1) Language: C#.
2) Learning Curve: Depending on starting point with 3D softwares and coding. It could be quite tricky starting both from scratch.
3) Versatility: Nowadays there are so many resources and tools adapted to work with unity. Lots of VR, AR and XR stuff. 4) Compatibility: No problems so far
5) Dependencies: Quite easy to export to multiple devices.
WHAT WENT WELL
Better Understanding:This week helped me to get some perspective with tools I already knew and also it allowed me see others that I might use in the future..
WHAT COULD BE BETTER
Too many tools and not enough time to try them:As the final project delivery approaches we’re on crunch time.
INDIVIDUAL ASSIGNMENT
For my individual assignment I decided to try to get a piece of the software for my final project done by a digital interface instead of a physical one.

"Sketch showing Interface proposal."
The main idea is to have 4 inputs on the interface: A,T,C,G corresponding to the letters of the genetic code. I’ll then send the letters from Processing to Arduino using serial. Arduino will output different states depending on the received letter.
STEP 1: DESIGNING INTERFACE
The proposal is very simple as I don’t want any aesthetic details for now to distract from the letters itself.
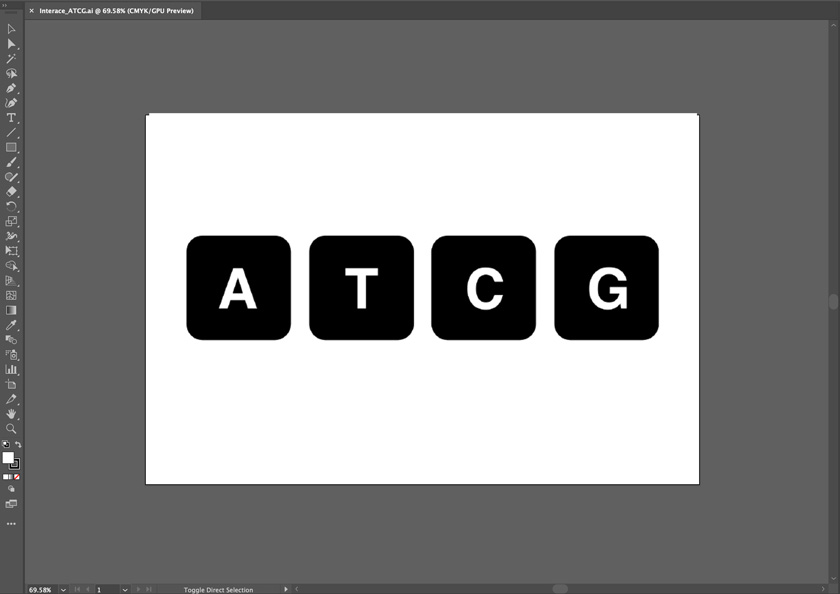
"Illustrator interface design."
STEP 2: TO TEST SENDING DATA FROM PROCESSING TO ARDUINO & VICEVERSA
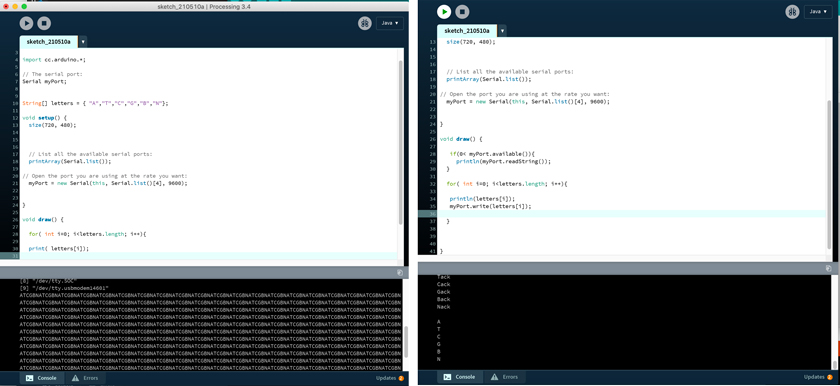
"LEFT: Testing writing Letters on the console before sending the message to Arduino. RIGHT: Processing sending letters & Receiving Letter + acknoledge from the Arduino board connected through serial."
PROCESSING CODE SENDING DATA TO ARDUINO
import processing.serial.*;

import cc.arduino.*;

// The serial port:
Serial myPort;


String[] letters = { "A","T","C","G","B","N"};

void setup() {
  size(720, 480);


  // List all the available serial ports:
  printArray(Serial.list());

// Open the port you are using at the rate you want:
  myPort = new Serial(this, Serial.list()[4], 9600);


}

void draw() {

   if(0< myPort.available()){
     println(myPort.readString());
  }

  for( int i=0; i<letters.length; i++){

   println(letters[i]);
   myPort.write(letters[i]);

  }


}
ARDUINO CHUNK THAT SHOWS HOW TO SEND BACK AN ACKNOLEDGEMENT OF RECEPTION
  if (Serial.available()) {
    byte rcvd = Serial.read();
    char rcvdAr[1];
    sprintf(rcvdAr, "%c", rcvd);
    letters = String(rcvdAr);

    Serial.print(letters);
    Serial.println("ack");
  }
STEP 3: UPLOADING INTERFACE
As I created the image on illustrator, I saved it to match the application’s window size of 720x480 pixels.

"LEFT: Image imported to Processing to act as visual Interface. LEFT: File structure showing image inside the Data folder."
PROCESSING CHUNK UPLOADING AN IMAGE
PImage img;

void setup() {
  size(720, 480);

  img = loadImage("Inteface_ATCG_S.png");
  background(img);

}
STEP 4: CREATING THE DIFFERENT AREAS OF INTERACTION FOR THE INTERFACE
I wanted to be able to click on the 4 letters’ buttons. So I designated 4 different areas of interaction. As I only have 4 buttons in a row I’m only taking into account X dimensions for this test.
In here you can see that depending on which button you press, it will send a letter from the letters[], A, T, C, G.
"Testing Processing Interface."
PROCESSING CHUNK MAPPING MOUSE POSITION TO EACH LETTER POSITION
void mousePressed()
{

  if( mouseX > 50 && mouseX< 170){

   println(letters[0]);
   myPort.write(letters[0]);

  } else if ( mouseX > 205 && mouseX< 350){

   println(letters[1]);
   myPort.write(letters[1]);

  } else if ( mouseX > 375 && mouseX< 505){

   println(letters[2]);
    myPort.write(letters[2]);

  } else if ( mouseX > 535 && mouseX< 675){

   println(letters[3]);
   myPort.write(letters[3]);

  }
}
STEP 5: RECEIVING MESSAGE IN ARDUINO AND MAPPING IT TO AN LED
This is the first step towards getting the full potential for my application. By using a RGB Led I can distinguish visually each of the letters.
"Sending message from Processing and Receiving it in Arduino + LED."
ARDUINO IF STATEMENT TO CHANGE COLOR OF THE LED ACCORDING TO THE RECEIVED LETTER
  if (letters == "A") {

    analogWrite(RED, on);
    analogWrite(GREEN, off);
    analogWrite(BLUE, off);

  } else if (letters=="T") {

    analogWrite(RED, off);
    analogWrite(GREEN, on);
    analogWrite(BLUE, off);

  } else if (letters == "C" ) {

    analogWrite(RED, off);
    analogWrite(GREEN, off);
    analogWrite(BLUE, on);

  } else if (letters == "G" ) {

    analogWrite(RED, on);
    analogWrite(GREEN, on);
    analogWrite(BLUE, on);

  }
Download Processing File Download Arduino File
STEP 6: RECEIVING MESSAGE IN ARDUINO AND MAPPING IT TO A SERVO
This is the closest step to my final project. I’ve been working in parallel to create this gear box that will map the 4 positions in 360º using a 180º servo and finally I can get some input and output very similar to the user experience I’d like to offer.
ARDUINO IF STATEMENT TO CHANGE SERVO POSITION ACCORDING TO THE RECEIVED LETTER
  if (letters == "A") {
    myServo.write(180);

  } else if (letters=="T") {
    myServo.write(45);

  } else if (letters == "C" ) {
    myServo.write(90);

  } else if (letters == "G" ) {
    myServo.write(135);

  }
"Sending message from Processing and Receiving it in Arduino + Servo"
STEP 7: MOVING TO THE NEW ATTINY 3216 BOARD
"Sending message from Processing and Receiving it in the Attiny3216 + Servo"
"Sending message from Processing and Receiving it in the Attiny3216 + Servo"
FUTURE ITERATION
I created a second interface that has navigation as well. I decided no to implement it for the moment to focus on some aspects for my project that need more attention.
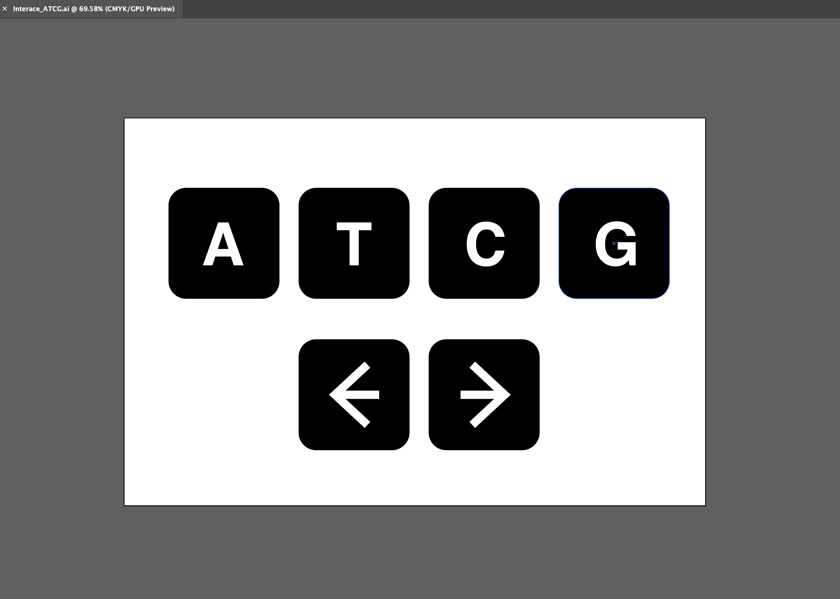
"Interface including navigation designed for a future iteration."
WHAT WENT WELL
EVERYTHING WORKED!: I can’t stress how relieved I was to see that everything I wanted to do worked. Last week was rough.
Having some background: As the pace of the Fabacademy speeds up I appreciated having some Processing background to be able to get some progress for my final project in parallel.
WHAT COULD BE BETTER
More time: I wish I could have spent more time trying new things instead of going within my comfort zone this week. However it got where I wanted it, so I was pleased to see that!
