The group assignment comparison page is here.
This week I wanted to create an interface that may take a part in my final project (update: 7/9/2020 it didn’t) However, the only user interface my project has is the screen that allows browsing the options and displaying the translated terms.
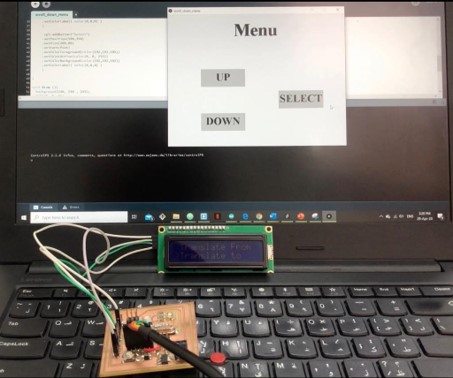
Thus, I have decided to create some navigation buttons to control a menu that I would display on the LCD screen I had!
The tool I used to create the buttons is called Processing which is a flexible software sketchbook and a language for learning how to code within the context of the visual arts.
To first understand how processing works, I read this great tutorial on how to communicate between Arduino and processing. I also used found this cheat sheet extremely helpful to keep in hand while working.
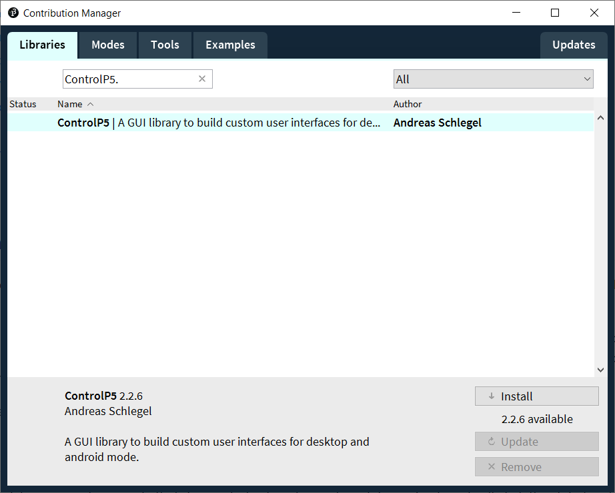
First, I went ahead and installed processing, and installed controlP5 library by going to sketches>>import library>>add library. Alternatively, this can be done by installing the zip file from the controlp5 github page.
The reason why I am using controlP5 is the fact that the library provides a wide range of controllers that can be easily generated and displayed.
Next, I need to establish a connection between processing and Arduino IDE, so I am calling processing.serial.*; library, which would help connect the two tools using the serial port I am using.
The commands I am using from this library are the following:
import processing.serial.* - Imports the library into the sketch.
Serial port - Establishes a port connection.
port = new Serial(this, "COM5", 9600) - Defines the port used for the serial connection and the baud rate.
port.write('u')- Writes data on the serial.
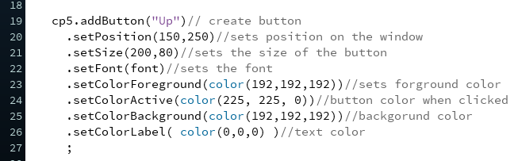
To create my navigation buttons, I called the cp5.addButton("") function to create 3 buttons that represent Up, DOWN and Select.
Each button can be assigned several characteristics, such as its position in the window created, the size, the font, the colors ..etc.
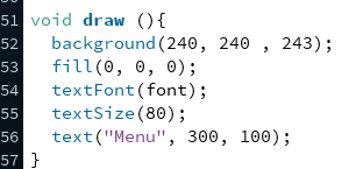
Then, draw function, where I specified the content of the window created with the help of the references page:
And finally created a function for each button. When a button is pressed, a character will be sent on the serial connection. This value can then be read in Arduino IDE, and used to control an output or initiate an action.
Full Code
//Maha Al hashimi
//Fablab UAE
//created for Fab academy 2020.

import controlP5.*; // import the controllers library
import processing.serial.*;// imports the serial conneciton library
ControlP5 cp5;// controlp5 object
PFont font; //font object
Serial port;//port object

void setup (){

 port = new Serial(this, "COM5", 9600);// establishes the serial connection

 size(800,600);// creates a window of size(width, height)
 cp5 = new ControlP5(this);//create controlp5 constructor
 font = loadFont("TimesNewRomanPS-BoldMT-48.vlw");//loads the font (tools >> create font >> select font & font size >> click ok >> copy and paste font name to import)

   cp5.addButton("Up")// create button
     .setPosition(150,250)//sets position on the window
     .setSize(200,80)//sets the size of the button
     .setFont(font)//sets the font
     .setColorForeground(color(192,192,192))//sets forground color
     .setColorActive(color(225, 225, 0))//button color when clicked
     .setColorBackground(color(192,192,192))//backgorund color
     .setColorLabel( color(0,0,0) )//text color
     ;

     cp5.addButton("Down")
     .setPosition(150,450)
     .setSize(200,80)
     .setFont(font)
     .setColorForeground(color(192,192,192))
     .setColorActive(color(255, 0, 0))
     .setColorBackground(color(192,192,192))
     .setColorLabel( color(0,0,0) )
     ;

      cp5.addButton("Select")
     .setPosition(500,350)
     .setSize(200,80)
     .setFont(font)
     .setColorForeground(color(192,192,192))
     .setColorActive(color(0, 0, 255))
     .setColorBackground(color(192,192,192))
     .setColorLabel( color(0,0,0) )
     ;

}

void draw (){
  background(240, 240 , 243); //background color
  fill(0, 0, 0);  //text color
  textFont(font);
  textSize(80);
  text("Menu", 300, 100);// display text on the window and sets its position
}

public void Up(){ //button "up" function
port.write('u'); // writes value to serial
//println('u');//check the outcome on the serial monitor
}

public void Down(){
port.write('d');
}

public void Select(){
port.write('s');
}Next, I needed to write a code for a scrollable menu to test my buttons (literally and figuratively!). I watched several tutorials on Youtube to get some ideas, and decided to create a simple menu off this tutorial and altered the original code to create the menu items I wanted, and to change status based on the clicks of the buttons on processor instead of actual pushbuttons.
For Arduino to be able to communicate with processing, we need to establish a serial connection on this side as well, hence Serial.begin(9600).
Next, I need to check if the serial connection is established, and then take action based of the value read.
if(Serial.available()){
char val = Serial.read()
full code
/* Sketch for Tutorial 14
Author: Maximilian Hentsch
Sketch zu Arduino Tutorial 14 - Displaymenü
https://www.youtube.com/watch?v=DuAG98P9Seo

Modified by Maha Al Hashimi
FabLab UAE
Fab Academy 2020
*/

#include <Wire.h>
#include<LiquidCrystal_I2C.h> // include LCD library
LiquidCrystal_I2C lcd(0x3F,16,2); // Set LCD screen (I2C address and specifications
int menu = 1;// set menu variable
void setup() {
lcd.init();// begin LCD
lcd.backlight();
Serial.begin(9600);// initiate serial connection
}
void loop() {
  if(Serial.available()){ // check if serial is available
    char val = Serial.read();// read the value on the serial connection
    if(val == 'd') // if the down button is pressed
    {
      menu++; // scroll down the menu
      updateMenu();// call the updateMenu function to show the items
      delay(100);//delay
    }
    if (val == 'u')
    {
      menu --;
      updateMenu();
      delay(100);
    }

     if (val == 's')
    {
      subMenu();
      updateMenu();
      delay(100);
    }
}
}
void updateMenu(){
  switch (menu) {
    case 0:
       menu = 1;
       break;
    case 1:
      lcd.clear();
      lcd.print(">Translated From");
      lcd.setCursor(0,1);
      lcd.print(" Translated to");
      break;
    case 2:
      lcd.clear();
      lcd.print(" Translated From");
      lcd.setCursor(0,1);
      lcd.print(">Translated to");
      break;
    case 3:
      lcd.clear();
      lcd.print(">Scan object");
      lcd.setCursor(0,1);
      lcd.print(" Settings");
      break;
     case 4:
      lcd.clear();
      lcd.print(" Scan object");
      lcd.setCursor(0,1);
      lcd.print(">Settings");
      break;
    case 5:
      menu = 4;
      break;
  }
}
void subMenu()
{
  switch (menu){
    case 1:
    action1();
    break;

    case 2:
    action2();
    break;

    case 3:
    action3();
    break;
  }
  }
void action1(){
  lcd.clear();
  lcd.print(">choose language");
  delay(1500);
}
void action2(){
  lcd.clear();
  lcd.print(">choose language");
  delay(1500);
}
void action3(){
  lcd.clear();
  lcd.print(">Scanning object");
  delay(1500);
}
Video of operation
problems with uploading: Both Arduino and processing are using the serial at the same time, if the serial window is “ON” on processor while uploading then the Arduino might not upload the program properly.
Menu not scrolling down: I tried running the original code on first, and the menu would not scroll down no matter which button was clicked. I checked the operation of the buttons by adding println() to the button functions in processing to check the outcome, which worked perfectly fine. The problem turns out to be with the code itself, as it had a de-bounce line while(val == 'u') that kept the menu from scrolling down.
