Design and 3D print an object that could not be easily made subtractively.
3D scan an object.
First I downloaded ready 3D design from Thingiverse website to try 3D printing for the first time and understand how the printer works.
I selected to print 3D Printer Test Cube, then download the .stl file.
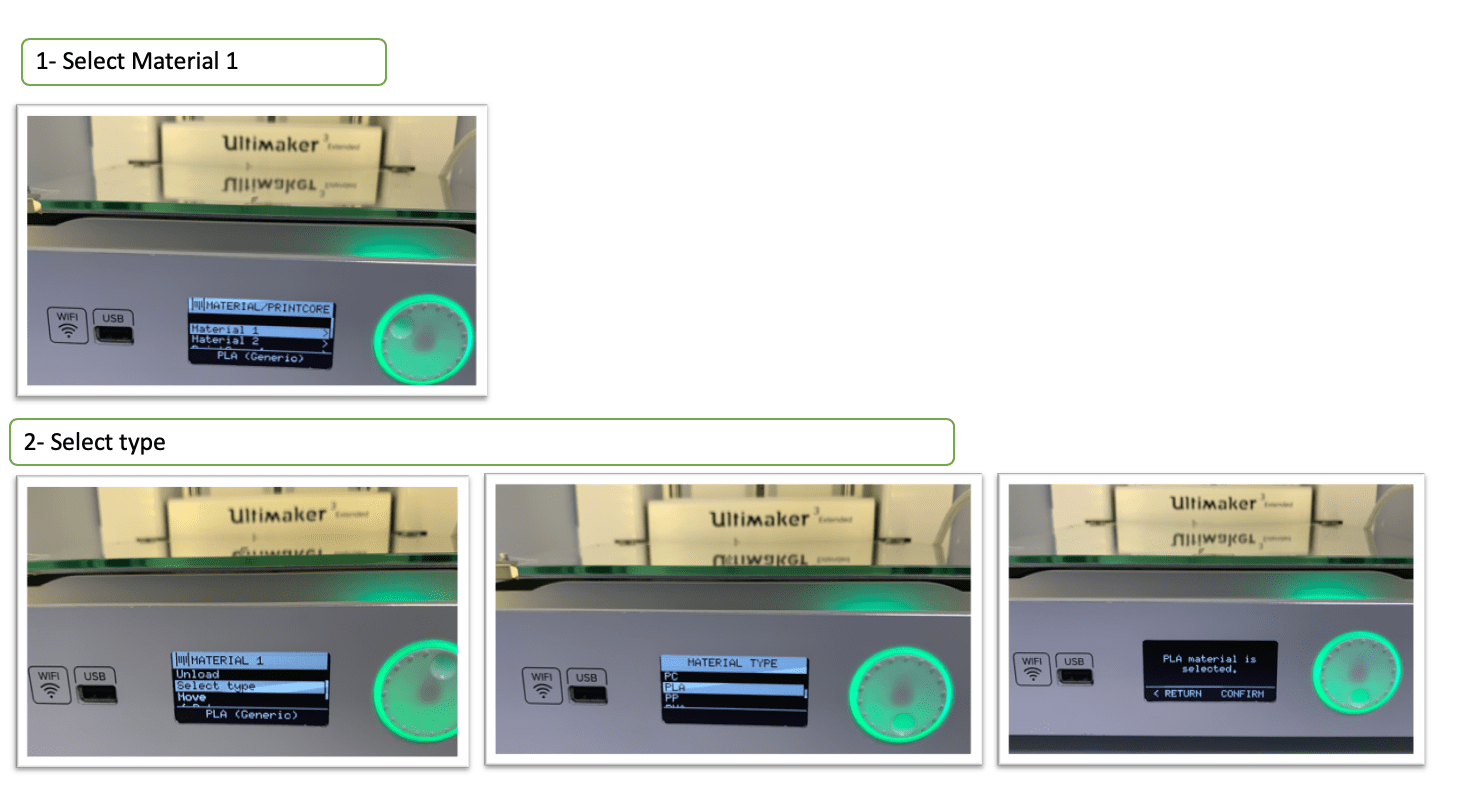
Next, I used Ultimaker 3 extended printer, to prepare files for 3D printing I used cura software which is an open-source 3D printer slicing application, works by slicing the user’s model file into layers and generating printer-specific g-code files, to be sent to the printer for the produce physical objects. Cura can work with files in the most common 3D formats such as STL, OBJ, X3D, 3MF. In addition to image file formats such as BMP, GIF, JPG and PNG.
| Material | Print core |
|---|---|
| Extruder 1 - PLA | AA 0.4 |
| layer Height | Shell | Infill |
|---|---|---|
| Fine 0.2 mm | Wall Thickness : 1 mm | Infill Density : 20% |
| - | Wall line count : 3 mm | Infill pattern : Triangles |
| - | Top/Bottom Thickness : 1 mm | - |
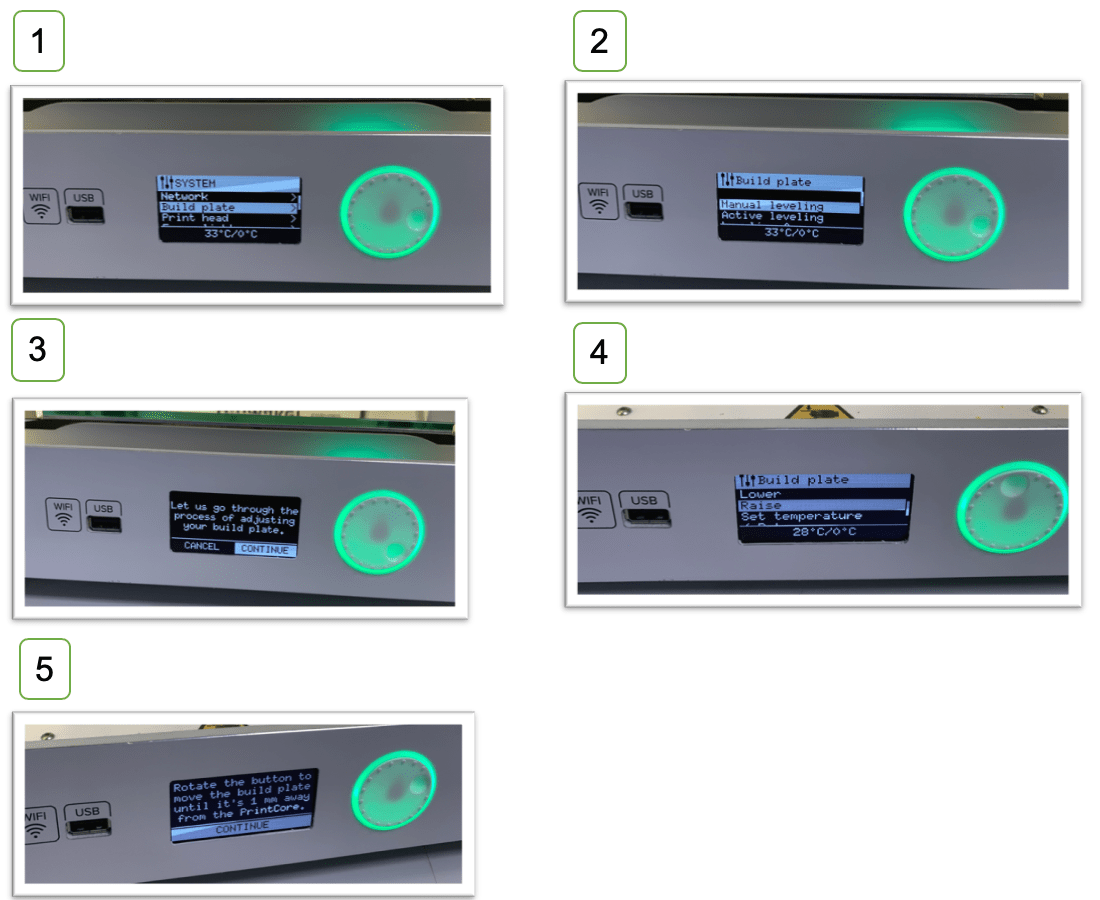
There are 3 screws on the bottom of the plate, after raising the plate I will use a paper or card for calibrating the plate.
I will move the nozzle in the 3 corners and each time I will fix on the screws until reaching the best distance between paper and plate

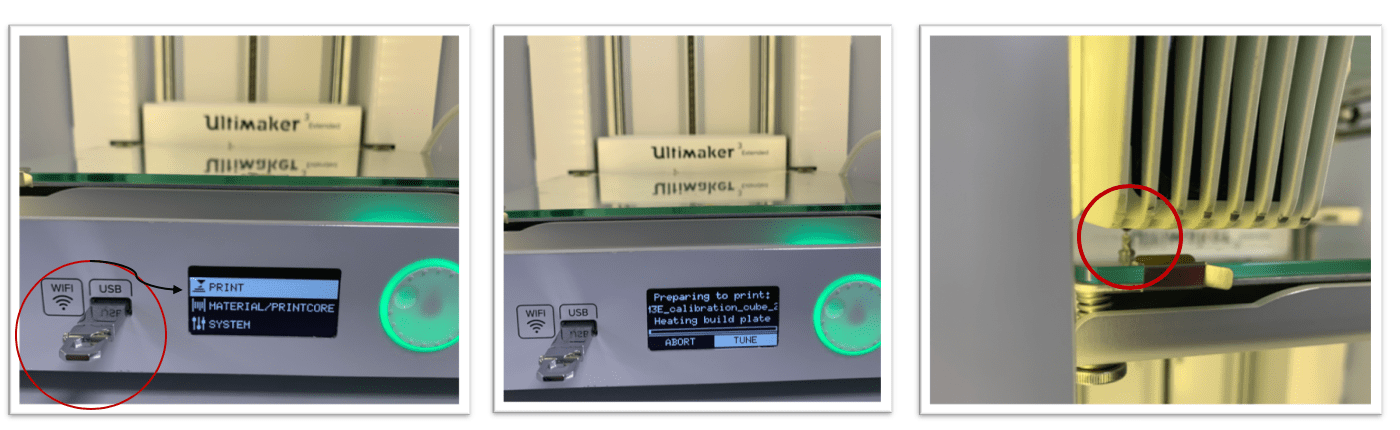
I need to ensure that the PLA coming out from the nozzle and wait for the first layer to finished, then I can leave the printer and come back when the printing is completed, It Is a good idea to take look into your printer whenever you have a chance to check that everything is good.
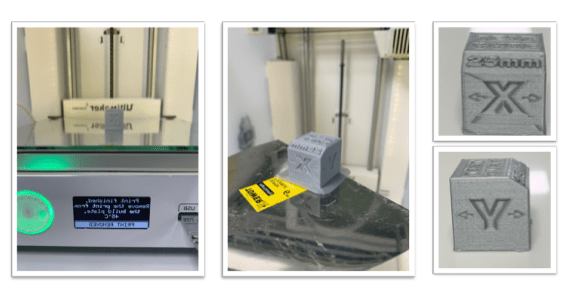
Next, when the printing is done, I removed the cube using putty knife:
It was difficult for me to choose the design I want to do, after spending a lot of time thinking, finally, I decided to design a chain, which is a series of linked rings, it could not be done easily using subtractively technique such as milling using CNC machine. Since there is an intersection between the rings and the parts supposed to move.
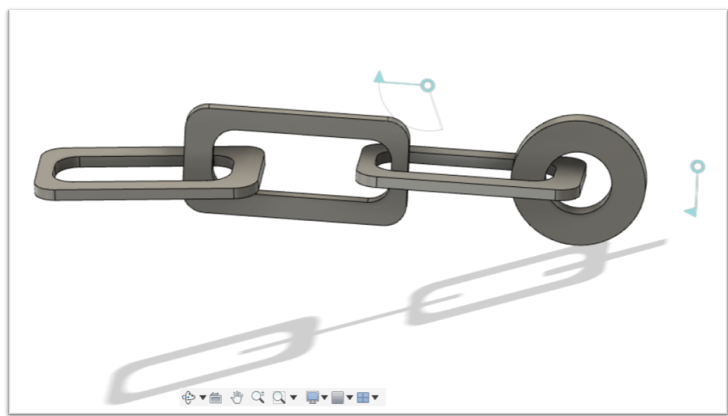
The image above shows the design I did, I used Autodesk fusion 360.
| Material | Print core |
|---|---|
| Extruder 1 - PLA | AA 0.4 |
| Extruder 2 - PVA | BB 0.4 |
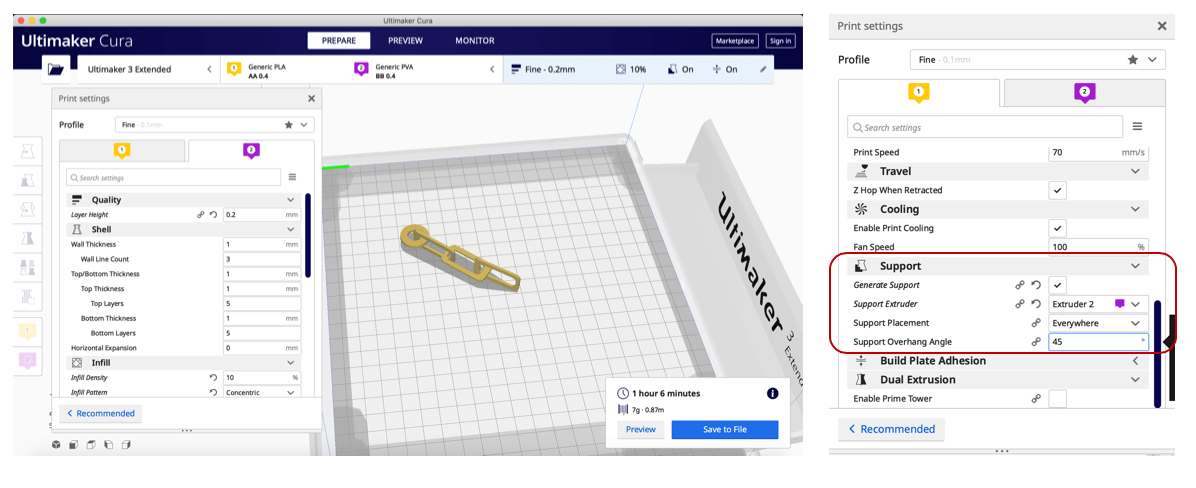
| layer Height | Shell | Infill | Support |
|---|---|---|---|
| Fine 0.2 mm | Wall Thickness : 1 mm | Infill Density : 20% | Support extruder : extruder 2. |
| - | Wall line count : 3 mm | Infill pattern : Triangles | Support placement: Everywhere. |
| - | Top/Bottom Thickness : 1 mm | - | Support overhang angle: 45 degree. |
I added support for this design, So I needed to insert two filament in the printer:
PLA - used for the original design.
PVA - used for support.
| layer Height | Shell | Infill |
|---|---|---|
| Fine 0.2 mm | Wall Thickness : 1 mm | Infill Density : 10% |
| - | Wall line count : 3 mm | Infill pattern : Concentric |
| - | Top/Bottom Thickness : 1 mm | - |
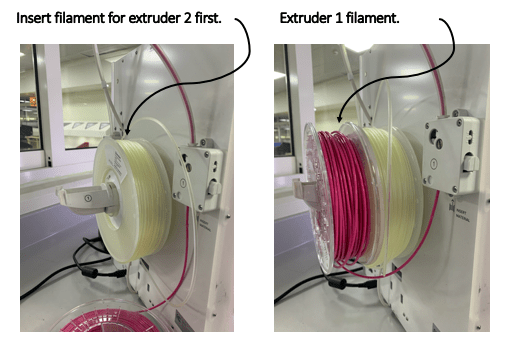
Note: The filament in extruder 1 is pink, because first I was going to use it, then I changed the printer and the filament and I forgot to took a photo for this step with the red filament ^^.
The process of leveling the nozzle is the same as before, but there is an addition step before we need to do which is XY offset calibration, because I used two material, This calibration only needs to be performed once, a proper XY calibration will ensure that the two materials align well.
First, to do the calibration I will need the XY calibration sheet XY calibration sheet
Calibration steps at Ultimaker 3 extended printer:
System > Maintenance > Calibration > Calibrate XY offse
The Ultimaker will print a grid structure on the build plate as shown below.
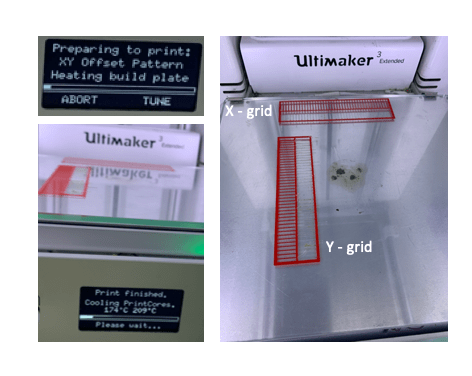
located the aligned lines on the printed X grid and look which number belongs to these lines.
Enter the number as the X offset value on the Ultimaker.
Found the aligned lines on the printed Y grid and look which number belongs to these lines.
Enter the number as the Y offset value on your Ultimaker.
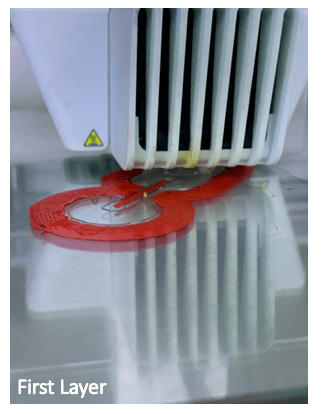
As usual in 3D printing after clicking on print, we need to check the first layer printed completely, Thereafter, we can leave the printer and come back when the printing is finished.

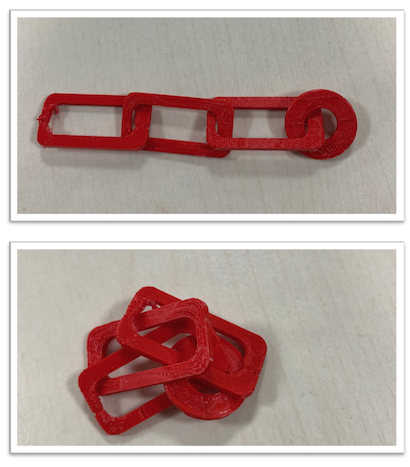
After the printing is finished you can see how the chain looks in the above image, I need to put it in the water for around 5 hours until all PVA material (support) decompose.
Finally, the images and video below show how the chain looks in the end:
After testing the printers in the lab, I learned that 3D printing not that easy, it’s not a direct process as it seems.There is a lot of problems may occur while printing.
Although it’s not that hard if we follow the rules and make sure everything is good, here some important helpful rules for 3D printing:
Make sure you did select the correct settings in the printer and add support if needed.
A lot of the problems happened from the filaments so we must ensure:
To cut the end of the filament.
Open tangled filament.
There is enough of filament to complete the selected file.
one of the advantage I like about 3D printing, it can produce really complicated designs that may take a lot of time if we decide to use a different fabrication technique. Moreover, some designs can produce only with it such the chain I did in this assignment.
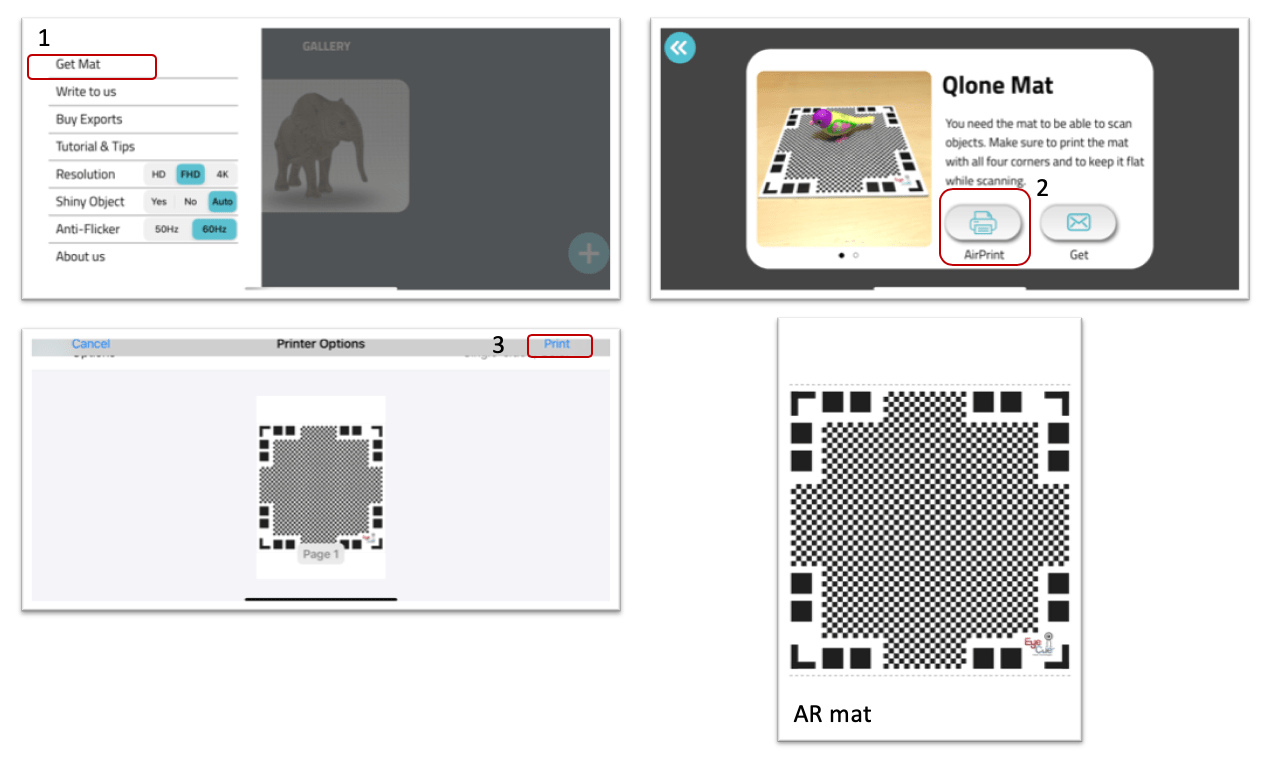
For 3D scanning, I did decide to use iOS application at my phone I did download it from apple store its called Qlone to download the application please click, I did try few other applications, but I like this one the most because it was the most accurate one in scanning and easy to use, Moreover, I did try the 3D systems cubify sense scanner available in the lab, but it was not accurate, and, it takes a long time to process also it was difficult to process all the sides with it.
Next, I did print the included AR mat in the application, without this mat we will be unable to scan.
I decided to scan the artificial potted plant as shown below, I did place it in a round table where is enough space to move around it, so I can scan the objective from all sides easily,
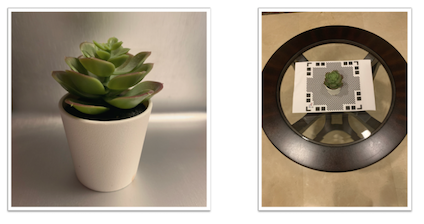
I placed the potted in the middle of the mat and let the augmented reality dome guide me through the scanning process, and it’s done by placing the phone camera toward the object and turn around the object from all the sides until the software reorganizes the object and stops scanning automatically. all processing is done live on the phone in seconds as shown below the steps of scanning:
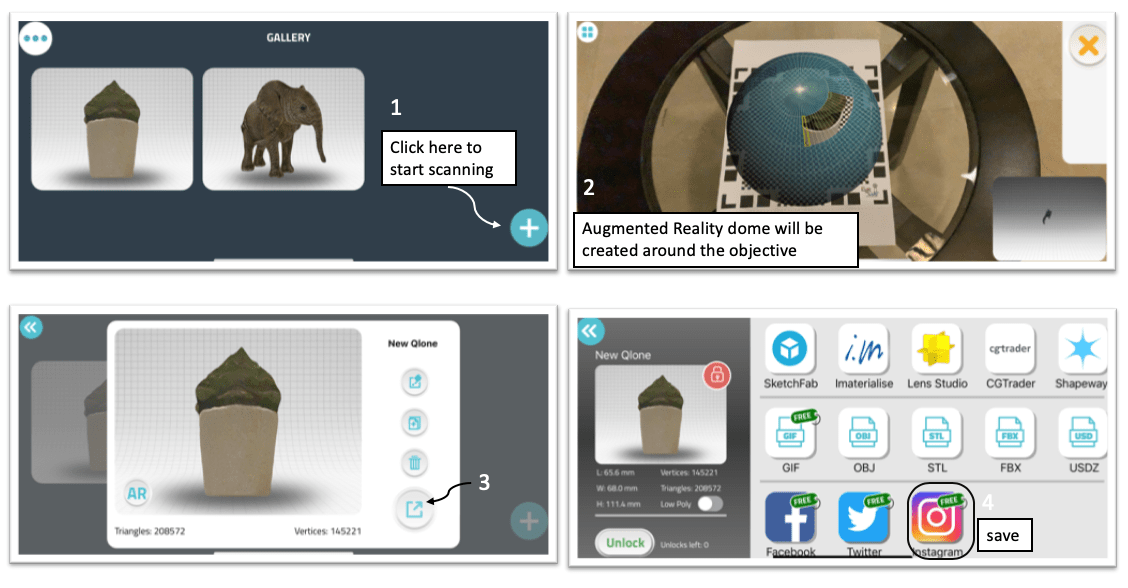
I could download the .STL file to prepare it for 3D printing, but I need to subscribe, so I did only download a video of the scanned objective which is free to have.
The 3D scanned plant shown below:
What I like about 3D scanning, it can convert any real object we would like to print into a ready model for 3D printing, but sadly, from my experience with this technology, it’s not that accurate. What I get from it an estimated shape for the scanned object.
| Files | Link |
|---|---|
| Chain- Autodesk fusion 360 |
