
Fab Academy 2020
16. Wildcard Week : Machine Embroidery
16. Wildcard Week : Machine Embroidery
Assignment:
(incorporating computer-aided design and manufacturing) not covered
in another assignment, documenting the requirements that your
assignment meets, and including everything necessary to reproduce it
Possibilities include (but are not limited to) composites, textiles,
biotechnology, robotics, folding, and cooking.
The Singapore Polytechnic Fab Lab has two embroidery machines and over the years had conducted a number of 'half-day' embroidery classes for the SP Staff. Therefore, for this week, I decided to select 'machine embroidery' (or sometimes refer to
'digital embroidery') for my wildcard week topic. I am also excited as having an opportunity to work with fabric material. This is not covered in any other assignments and it is my first-time doing embroidery.
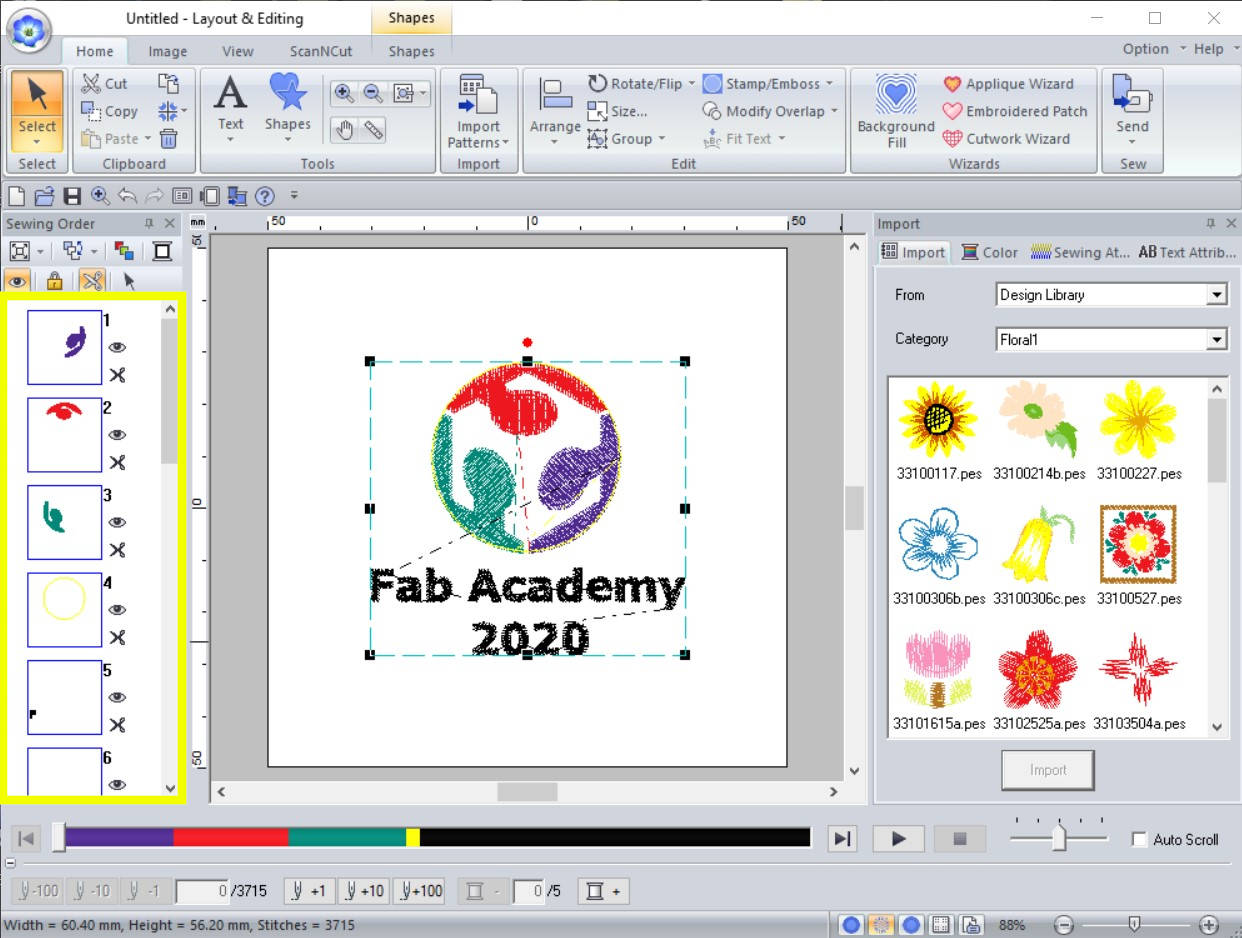
I am making a Fab Academy 2020 polo-tee. The embroidery design would include the Fab Lab logo, a basic drawing shape as well as some text. Making a Fab Academy 2020 polo tee is practical as you can wear it, as well as memorable in
remembrance of the Fab Academy 2020 course.
Embroidery is the craft of decorating fabric or other materials using a needle to apply thread or yarn. In the past (but also relevant now), people had used a wooden embroidery hoop, sewing needle and thread and manually hand stitches
the pattern onto a piece of fabric.
In modern days, embroidery artworks can be commonly seen on caps, hats, bags, denim, shirts, etc. Embroidery is available with a wide variety of thread or yarn color. ~
Wiki
The development of machine embroidery and its mass production (of these machines) came about in stages during the Industrial Revolution. Modern computerized embroidery machine takes in pattern (or design) that was digitized with a
embroidery software, using a needle (which is the main stitching tool in embroidery) and uses rayon or polyester embroidery thread to stitch out the pattern into
a finished work. ~ Wiki
Machine embroidery (or digital embroidery) uses an embroidery machine or sewing/embroidery machine that is controlled with a computer that embroiders the stored patterns (or a computerised image). More modern or advance machines may have
multiple heads(needles) and threads.
|
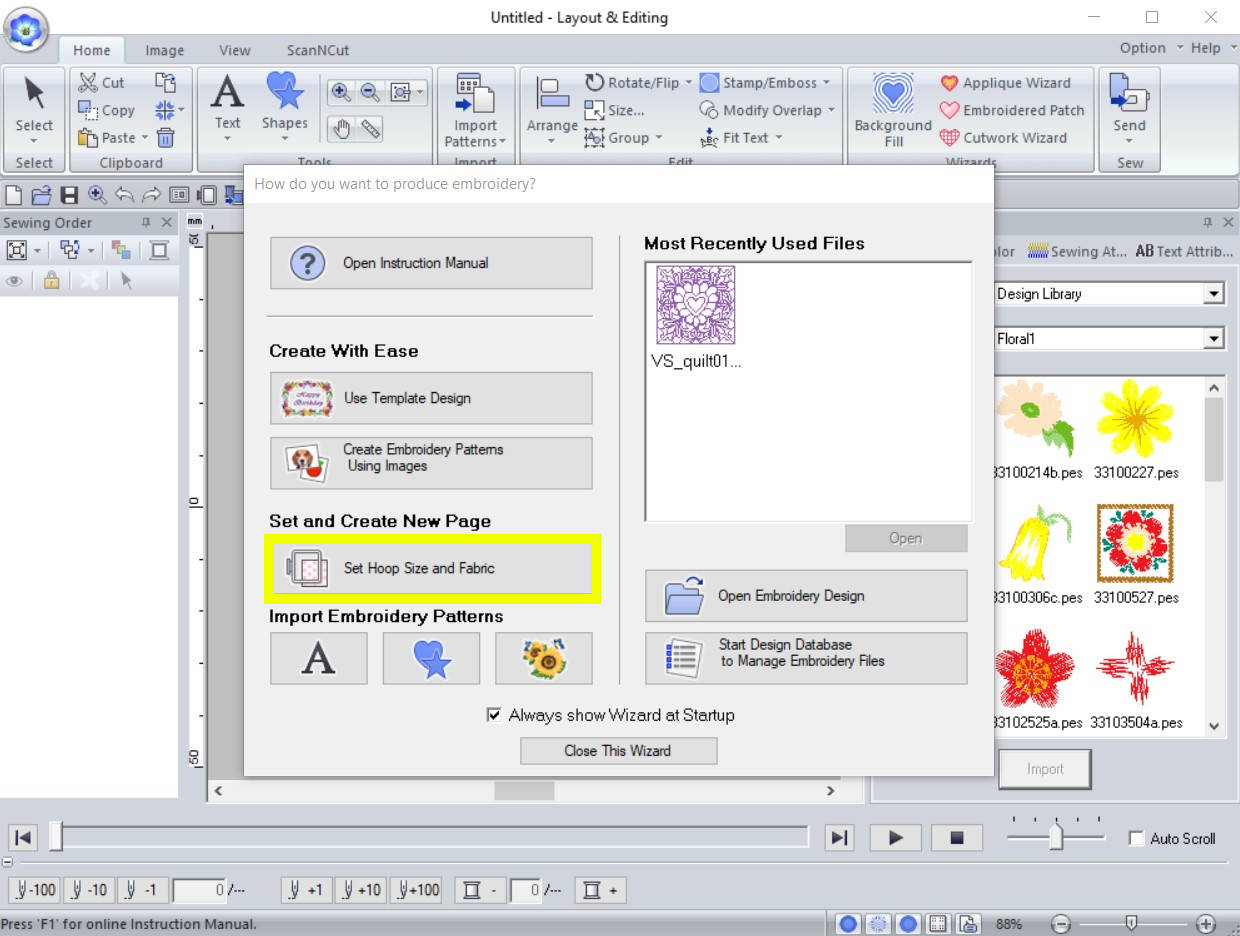
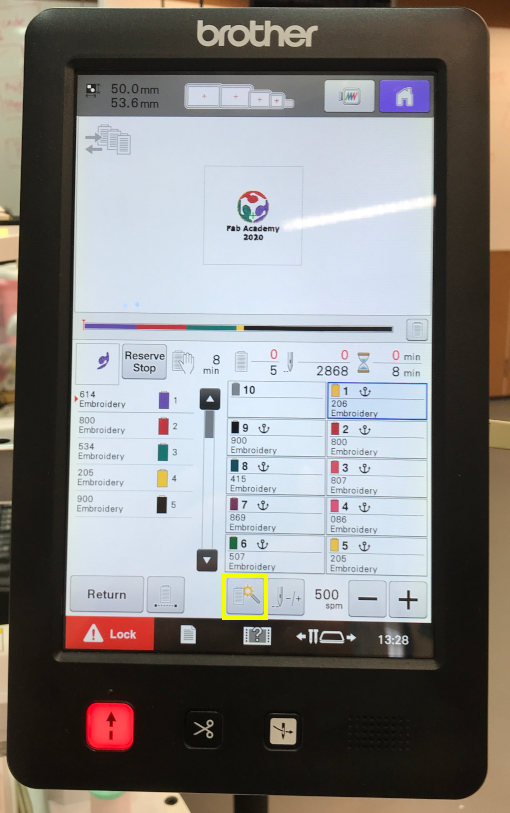
General workflow of machine embroidery : 1. Creating the design : I am using Inkscape (a vector drawing software) to design my artwork. As I found the the Brother 'PE-DESIGN' version 11 has very limited features in term of drawing and designing, but you could use PE-DESIGN software directly. 2. Convert to embroidery vectors and parametize : The second step is to use an embroidery Software called Brother 'PE-DESIGN' version 11 to convert my design into an embroidery object/format (embroidery vectors and parametize). Saved the embroidery file (.PES) into a usb thumbdrive. The .PES file is the machine code for the embroidery machine. Note: you might like to use a smaller storage size empty thumbdrive, just in case the machine does not read your thumbdrive with larger capacity or you forgotten to remove the thumbdrive from the machine after use. 3. Conduct test embroidering of design (optional) 4. Preparation and begin embroidering of design using PR-1050X Sewing Machine : Basic operation PR-1050X (extracted and modified from operation manual) : Step 1 : Install the bobbin. Step 2 : Turn on the machine. Step 3 : Insert usb thumbdrive with .PES file. Select the embroidery pattern. Step 4 : Check the previewed image. Step 5 : Hoop the fabric in the embroidery frame. Step 6 : Attach the embroidery frame to the machine. Step 7 : Check the embroidering settings. Step 8 : Check the embroidery area. Step 9 : Thread the upper threads. Step 10 : Unlock the machine, then press the start/stop button to start embroidering. Step 11 : Remove the embroidery frame, and then remove the fabric from the frame. Step 12 : Turn off the machine. Remove usb thumbdrive. |
The SP Fab Lab has two embroidery machines. The Brother Innov-Is 800E which is a single needle embroidery machine while the other is the Brother PR-1050X Sewing Machine, which is a 10-needle embroidery machine. The smaller Brother NV800E
Embroidery Machine look like
a sewing machine, but it only does embroidery. Both machines come with automatic needle threader feature, a full colour touch screen LCD display, etc.
The Brother PR-1050X embroidery machine also comes with an integrated camera and is able to scan an image or clipart into the machine directly (require the Brother Scanning Frame Kit).
I am using the Brother PR-1050X Sewing Machine. It save me the trouble of changing the thread after stitching each color.

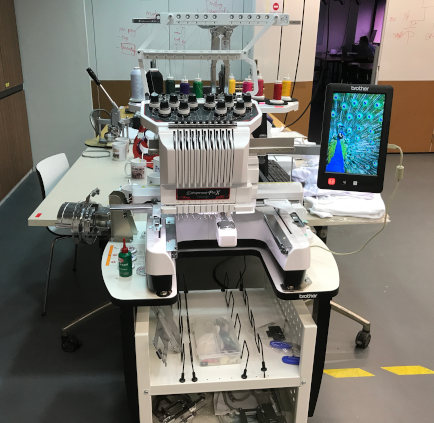
Brother PR-1050X Sewing Machine
The Brother PR-1050X Sewing Machine is an easy-to-use high performance 10-Needle machine with advanced automatic needle threader. It comes with a 10.1” High-resolution IPS LCD Touch Screen for easy operation of the machine. The machine also
has
a built-in camera for scanning and previewing the surface of the fabric. The price of this machine as listed on the website is SGD $19,888.
Links for Brother PR-1050X Sewing Machine :
- Brother PR-1050X Sewing Machine webpage
- Brother PR-1050X Operation Manual
- Video tutorials of how to use the Brother PR-1050X
Parts of the Brother PR-1050X Sewing Machine :
Always read the operating manual of the machine to get yourself familar with the machine before you starts.
Extracted from page 20 of the Brother operation manual. Photo of machine from Brother.com.sg website.


Accessories : Brother Bobbin Winder set (Model : PRBW1)
The PR-1050X is not equipped with a bobbin winder (unlike the Innov-Is 800E), therefore you should purchase pre-wound (L-type/ Tru-Sew polyester "filaments") bobbin. OR you can purchase the Brother Bobbin Winder set (Model : PRBW1) and wound
the bobbin thread yourself.
Bobbin thread is a lightweight thread specially design for machine embroidery. It is strong enough to withstand the high-speed stitching. Bobbin thread allows the back of the embroidery design to be less dense than the front.
The machine does not indicate how much bobbin thread is remaining Before starting to embroider, always check the bobbin case inside the 'hook cover' beam to make sure there is enough bobbin thread for the embroidering.

Accessories : Brother embroidery frame (PR Multi-needle Series)
Embroidery frames comes in different sizes. I am using a 100mm x 100mm Brother embroidery frame which provides an embroidery area of 100mm x 100m (or 3.9" x 3.9").
After creating your design, select the appropriate size embroidery frame to be use to 'hoop' the fabric and the stabilizer in the embroidery frame.


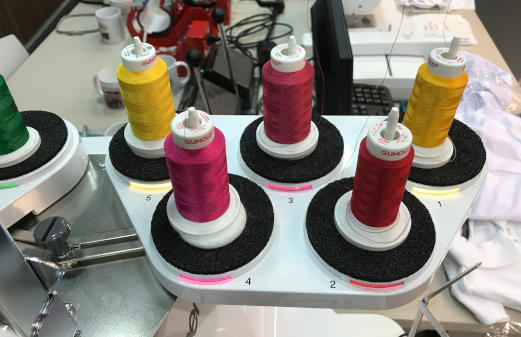
It is recommended to use either rayon or polyester embroidery thread (120 den x 2 / 135 dtex x 2 / 40 weight (in Americas and Europe) / #50 (in Japan)). Polyester thread is a strong all-purpose thread that has a slightly elasticated feel. Do
not use cotton thread, slik thread or other type of thread that are not certified for machine embroidery.
A fabricated wooden thread rack for easy organising the various color embroidery thread spools for anyone to use for embroidery with the single needle Brother Innov-Is 800E. The Brother PR-1050X Sewing Machine can hold up to 10 thread spools
on it, and support much bigger spool size.


Threading the needle is done automatically by the embroidery machine, however you have to follow the sequence in laying the thread into position first as shown in the video.
- Youtube : Threading a Brother embroidery machine from scratch (by Bee 'So_Sew_Beejeu')
Supplies : Embroidery stabilizer
You will need embroidery stabilizer (or backing) to support the fabric during the high speed stitching process to avoid puckering or over stretching and it is one of the most important thing to buy.
Stabilizers are classified by the method used to remove the excess from the back of the embroidered design after the design had been stitched. The three most common types are:
1) Cut-Away
2) Tear-Away
3) Wash-Away (or also called water soluble stabilizer)
The 'cut-away' stabilizer which can be used on any fabric type. I am using 'cut-away' stabilizer as the 'Dri-Fit' polo tee fabric is quite thin and this type will provides better support.
I downloaded the Fab Lab Logo from Wikipedia web page and used inkscape to create my logo design rather than using the Brother 'PE-DESIGN' software which is quite limited in features for
drawing function or tools.
Note : You can also import your image directly into 'PE-DESIGN' software and use it's 'Auto Punch' method to manually digitize it (to create embroidery pattern). This way, you just used one software and it saves time, but provided that you do
not require much editing.


The next step is simply to create the embroidery file that is readable by the Brother PR-1050X. Sort-of like generating the 'machine code' for the Brother embroidery machine.
Here I used Brother 'PE-DESIGN' version 11 to import my vector file (.emf) and saved the .PES file to my usb thumbdrive.
I referred to the 'PE-DESIGN' user guide from Brother website for reference.
Note : You can download 'PE-DESIGN' version 11 trial version from Brother website to try it out, but the trial version does not allow you to save the file into (.PES) format. In order to save the file, you would require a 'PE-DESIGN software
key' which is a small USB dongle. It is recommended that you obtain the original PE-DESIGN software and the software key from the Fab Lab, as the software key might not work with the latest trial version.


I had done a test embroidering of design, so that I would not ruin the new polo tee. From the testing, you can determine whether the machine is working properly, and how the finished embroidery pattern will turn out to be, like the color,
size of the logo, etc.
I had ordered two different types of polo tee; a cotton one and a 'Dri-Fit' one. But found that the cotton polo tee is a bit 'porous' and not suitable for embroidery, as it contains minute interstices (tiny holes in the textile) through which
air may pass through. Therefore I used the 'Dri-Fit' polo tee which is made up up of high-performance, microfiber, polyester fabric.
Next I will attach the embroidery frame (or hoop) to the polo tee and starts embroidering my design using PR-1050X.
There is a video demostration on the operating the Brother PR-1050X at the bottom of this section.


Duration : 3 mins 41 secs
No Audio
This is my first-time doing machine embroidery and I find the whole expreience fun and easy with using the Brother multi-needle PR-1050X sewing machine. But the Brother multi-needle PR-1050X machine would be too costly for normal home use. The smaller
single-needle Brother Innov-Is 800E machine would be more affordable and suitable for home (for it's smaller size).
The whole embroidering processs was quite fast on the PR-1050X. It took me less than an hour, from hooping the frame onto the fabric to the finish. The thread spools were all setup and you do not need to manually change the thread color, as
it has a few common colors available.
Area of improvements and on mass production of polo tee
Nice time I would look for a chalk pencil or a water-soluable pen to mark out the position of my design on the polo tee. I would also use a flexible measureing tape that tailors used, instead of a normal ruler. It better to first get hold of the polo-tee and measure the dimensions first.
There are many functions / features in the PE-DESIGN software as well as on the 'Design Center' software on the LCD display of the Brother PR-1050X machine. Example, you can adjust the position of the embroider design or do the rescaling of
the design just by the LCD screen on the machine. But I do not have much time to explore further.
My design file :
- Fab Academy 2020 polo tee design (vector drawing) : emf or
svg format
- Brother embroidery file : fab_lab_logo_polo_tee.pes
- What is Embroidery? - www.mostcraft.com
- Brother PR-1050X Sewing Machine webpage
- Brother PR-1050X Operation Manual
- Video tutorials of how to use the Brother PR-1050X
- PE-Design Manual
- Youtube : Threading a Brother embroidery machine from scratch (by Bee 'So_Sew_Beejeu')
- eBook : Just embroider it : All about stablilizer