
Fab Academy 2020
01. Principles and practices, Project Management
01. Principles and practices, Project Management
- Read up Fab Academy Student Handbook
- Setting up a Ubuntu Linux virual machine and leaning basic linux commands
- Learning about what Git is? like git repositories, ssh, etc
- Learning webpage design using HTML + CSS + javascript
and building a responsive web site that can be view on smaller screen size like tablet/smartphone
- Learning to use a text editor call "Atom" to edit my web pages
- Start to explore around for potential project ideas
Mr Steven Chew, one of our Fab Lab Singapore Polytechnic instructors had met up with me before the course commences and briefed me on what to expect. In addition, he had also shared with me some tips later on via follow-up emails.
One of the tips is to have our own notebook dedicated solely for the course. Other advices inlcudes start to explore and download a 2D software like GIMP, Inkscape, etc and 3D software like Autodesk Fusion 360. Look at the video Tutorials on
Youtube to learn web page design, etc.
After attending my very first Fab Academy lesson online in a conference room in school late at night, as lesson started at 10pm local time, my first thought would be to set up a virtual machine (VM) running Linux operating system (OS) on my personal notebook, so that I be able to
have a virtual machine for testing without affecting my personal stuff. I decided to play around with Ubuntu and learn a bit about Linux OS.
I decided to install Ubuntu Linux OS on the free VMWare Workstation 14 Player.
Ubuntu has a much user friendly interface, a nice "Ubuntu Software Center" to browse for some of the popular software and ease of setting up a network share folder.
Virtual Machine Setup:
- VMWare Workstation 15.5 Player
- OS : Ubuntu 18.04.3 LTS (Long Term Support)
- Number of Processor Core allocated : 1
- Amount of Memory allocated : 5GB
- Amount of Harddisk Sspace allocated : 45GB
Learning to use Ubuntu :
1. Press [Ctrl] + [Alt] + T to open the Terminal windows
2. Run “ sudo apt update “ to update the Package Index (essentially a database of available packages from the repositories) immediately after setting up Ubuntu OS and before installing git or other software.
sudo apt update

Photo of my Linux VM
Other useful commands :
3. [Ctrl] + c to kill the current running process in terminal
4. [Ctrl] + o to open a file
5. [Ctrl] + s to save a file
6. [PrtScn] to save a screen shot of whole desktop
7. [Alt] + [PrtScn] to save a screen shot of current windows
8. The "chown" command can be used to change ownership of file.
To take ownershp of folder including the files in the sub-folder and set ownsership to the current user, type the following command
sudo chown -R $USER {folder name / filename}
Being a Safety Officer and currently working in the woodworking workshop in the school, I am curious to find out the dust particle concentration in the air in the workshop.
Some of the application of dust particle sensor to measure of amount of dust in the Saw Room, proof of justification to purchase air purifier machines for the Project Lab, data logging to access which area (or corner) and which period of time
of the workshop is the most dusty, etc.
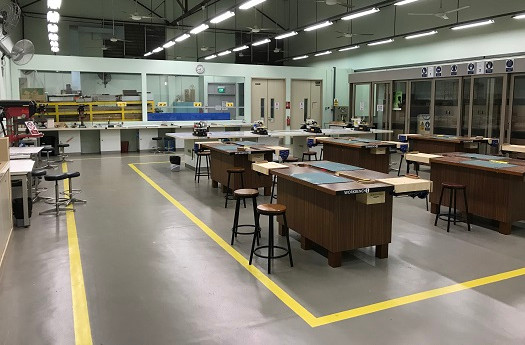
Photo of the Project Lab
Being totally new to electronics, I would like to start on something of a smaller scale which could be easily accompished in the next 5 months. Other consideration factors influencing my final project include keeping the project cost to not
exceeding USD $300.
Therefore building a dust particle sensor for my wood workshop is found to be a suitable final project for my Fab Academy course. This benefit my employer and the place I am currently working in now.
In the future, the knowledge gained from doing my final project and the prototype that I build, can be expanded to become a smart monitoring device (IoT devices) which can provide logging capabilty and notification alert to my email/mobile
phone.
Final Project Idea :

Sketch of a dust particle sensor as a potential final project
I have followed the recitation lesson as well as refering to the Pro Git ebook by Scott Chacon, as refered during the recitation lesson.
From a beginner's view, “Git” to me, it is a version control system which keep track of all the changes you have made. Git is also a synchronization system between a local repository (on your notebook) and a remote repository (on Fab Academy
GitLab/class site). As I continued to learn more about Git, it can be a very powerful collaboration system between multiple versions (creating branches) and between multiple people. Git is useful for software development.
1. Installing "Git" by running the following command using the Terminal application in Ubuntu:
sudo apt-get install git-all

2. Before you can start using Git, you need to config Git first by typing in the following user information :
git config --global user.name "Lucas Lim"
git config --global user.email "{my email}"

3. We need to generate a "SSH" security key, so that we can easily upload our files to gitlab without the need to enter any username and password each time.
Type ssh-keygen to generate the ssh-key. You can provide a name for your ssh key file as well as set a password for the ssh key :
ssh-keygen

4. Two files were created; one is the ssh 'private key' and other one is the ssh 'public key' (xxx.pub) with a .pub file extension. To view the content of the newly generated ssh public key, at the Terminal screen, type the following command "gedit" which is the default text editor installed on Ubuntu OS.
gedit ~/.ssh/gitlab.pub
5. Type the command "chmod go-rwx ssh_key_name" to deny read, write and execute permission for group, others. At the ssh folder, you can type the command "ls -l" to view the key file and its' permission.
chmod go-rwx ssh_key_name
ls -l
6. Type the command "gedit ~/.ssh/gitlab.pub" to open the ssh 'private key' file and copy the content.
Login to your Gitlab account -> User Settings -> select "SSH Key" -> Copy the content of your public SSH key into the box. You can double-check on the content of your public key, as at the end of the ssh key, it
will display your name.

You can continue the same steps to add in multiple SSH keys for each of your PC/notebook, so that you can access or work on the git repo from different PC/notebook. When working from multiple location, always start with using the git fetch or git pull command to check on the gitlab files to see if there is any changes...
7. Verifiying the SSH key is able to connect to gitlab by tying :
ssh -T git@gitlab.fabcloud.org

Note: If there is an error like "Failed to connect to ... port 22: Connection refused", please check connectivity, example check firewall/VPN setting that might be interfering with the connection.
8. Next step is to copy down the content of the Git repository from Gitlab server (remote server) to your local machine. Since we have a few class files on Gitlab.
Run the command "git clone {repo} {folder name}". The git clone command will copy down an existing repository (repo) into a specific folder, initiate and sync between the two locations (local copy and remote server).
Git clone command to copy down the Git repository from Gitlab: :
git clone git@gitlab.fabcloud.org:academany/fabacademy/2019/.....git {new folder name on PC Eg. "myproject"}


9. After I had successfully cloned my repository, I went to the local (copied) Git repository folder and run the "git remote command and I am able to see the word "origin" that is the default name of my local repository as well as representing my current connection to the remote server at Gitlab. The name for Git respository on the remote server is call "master. During the clone/copying process, these names are automatically created.
git remote

10. If you had edited any file or add new file to your local respository, and now you want to upload the changes to Gitlab. The first step is to use the "git add {file name}" command. Git will check the files and add any modified
file(s) to the staging area. A shortcut is to type "git add * (everything)" command, which is a handy tool to allow user to stage all changes done to one or multiple files which also include modified files in sub folder(s) too. Take
note of this important information, to include changes done in project root folder as well as sub folders, you have to run "git add *" at the main project folder, or root level.
The "git add " command is to store all the modified files (changes) to the staging area. The second step is to save all these changes to the local Git respository and do to so by typing "git commit -m "log message"" command. The
"-m" flag allow you to type in a meaningful comment/message to identify each saved or commit process.
To publish to Gitlab, use "git push {remote} {branch}" command to push changes up to the (master) Git respository at gitlab. A remote name for example "origin", and a branch name for example "master". For advance software development,
you might have more than one branch, for example "develop", "chinese", etc.
git add *
git commit -m "update operation"
git push origin master

11. Type the "git log" command, and you can see the past previous commits carried out. If you really "messed things up" and need to restore to back to a point of time before your changes are carried out, you are able revert back all your project files by reverting back to any of the previous "commits". However, performing this will detached from the current path/snapshot. The "git log" provide the information of previous commits and your message that you typed-in are displayed here.
git log

If you accidentally delete some files and don't know what are the files deleted, or you just want to restore the whole branch (from the last commit), you can run the “git checkout {branch name}“command.
git checkout {branch name}

If you just want to restore one or two files, you can run the “git checkout {filename} “command. Example I had accidently overwrite a file, I immediately restored just this file by using the git checkout {filenmae} command.
git checkout {filename}

Checking Git repository storage space, run the linux command "du -s -h". Overtime, you will make lots and lots of commits to the Git repo, each commit increate the project size as Git keep track of changes made. Soon it will take up lots of storage space as "objects" directories in your local git repo. You might have to restart a Git repo. One way is to make a backup of the local git repo, re-clone from GitLab and run a "git init" command again. A warning is that this will erase all your git history.
du -s -h (display total size of local git repo) du -a -h (display storage space of each file and directory)
Gitlab, that the class site for Fab Academy and where our files or web site is stored, is similar to Github. Github is a popular platform for many programmers to share their files.
Playing with sharing image file from GitHub. After I uploaded my image file to Github, I move my mouse and hover the filename in the list and right click to select "copy link address" to get the file's URL. However I would need to append
"?raw=true" to the end of the URL adress to get a downloadable / embeddable version.
Reference :
How to Use Github for Hosting Files
I have tried out a few website templates from the Fab Academy as well as some templates found online at w3schools.com, but was overwhelmed by the large amount of coding found in all these templates. Therefore I decided to build my web site from scatch. tarting with learning the basics (basic html and css), then continue to explore around and integrating more advanced web design techniques/coding like the use of javascript, etc.
Planning for my web page taking into consideration of the need for documentation of my weekly progress and the weekly assignment (that will include codes, CAD files, etc)..

Folder structure :
A "myproject" folder (which is also my local Git respository) will contain the weekly assignment sub-folders. In each weekly sub folder, I will place my images, codes and videos.
Handling of images and videos :
As the Gitlab has limited space, so all images uploaded to web site has to be kept to a minimum size, especially photo taken on my iPhone which is hi-res and take up a lot of space. This goes for video, try to speed up the video so that it shorten the overall duration, and export the video to a small resolution. For videos of larger size, I will have to host them on my GitHub account.
Draft of first web page design (main page - index.html) :

Having the main page (index.html) up, I began to explore, learn and add in codes from w3schools like for the responsive navigation bay (w3school : How TO - Responsive Top Navigation).
I designed my first web page using "Sublime" text editor which is free to edit my html files. Sublime also allow installation of addition package like "View in Browser" which allow me to preview my currently opened .html file in a web browsers by using shortcut key "CTL + ALT + V". Go to main menu bar of sublime -> Preference -> Package Control -> Install Package -> search for package(add-on) that you like to install.

However later on, I switched to using "Atom Editor" which I find it to be much user friendly and I particularly like the "tree view" which is like a folders/files listing as well as the Git integration feature.
1. Go to "Ubuntu Software" and install Atom.
2. At Atom main menu -> Packages -> Open the "Command Palette" (by Pressing "Cltr+Shift+P" in Atom).
3. Type "Github: Clone" to pull your fab academany repo down. everything is automatically done.

4. The "Tree view" panel on the left is very useful. By clicking on the "Git" button on the bottom-right of the screen will open the Git interface and you can push your works up to the Fab Academy repo to publish your website.
5. I also installed two essential packages to help me with the web site design. They are "atom-live-server-plus" to preview your web page live and "atom-beautify" to tidy up your codes. Go to Main Menu -> Package tab -> Setting View -> Install packages/themes.

6. Git integration :
With the git integration feature, this makes uploading of your website easier and fast.
On the bottom-right corner, you can click on the "Git" button and the Git panel will appear on the right side. The top portion is similiar to you using the "Git Add" command. You can Git add a single file, two or more files or all the edited files to the staging area. The portion below is similiar to "Git commit -m" command where you can enter a short little message/text. When you ready to Git push your work up to the repo, you just click the "Push" button at the bottom.

While designing my website, I am also learning to make my website responsive, so that my web site would not look out-of-alignment on a small screen like a mobile device. Example I noticed that my <h2> title text does scale down on small
screen, it look large on my iPhone screen.

I had used a lot of <div> tags in my website as a container for each section. I prefered <div> tags over "grip" and "table" tags. Another way is the use of "width:50%"" over static "height=xx px width= xx px" for image.
Adding a responsive meta tag “<meta name="viewport" content="width=device-width, initial-scale=1">“ in the header section of all my web pages to tell the web browser to auto-scale to device size :

Using a responsive/dynamic html tag for displaying images instead of the static/fixed width and height :

Choosing a color scheme is important. More info online on colur scheme on www.canva.com website.
The white background and black-color font text allows easy reading.
I choosen the variant colours of blue for my color scheme as it project a comfort and smoothing emotion, and a clean and neat presentation.
Reference :
Website Color Schemes: The Palettes of 50 Visually Impactful Websites to Inspire You
A Practical Guide For Creating the Best Website Color Schemes
Color picker : #ffffe6 Color Hex
The "convert" command is available on many Linux distributions, as it is installed as part of the "ImageMagick". I used the convert command to resize most of my screen captures as well as photos taken by my iPhone, into smaller file size for
uploading onto my website.
Converting a .png image into .jpg using a compression ratio of 80 and resize to a width of 600px
convert photo.jpg -quality 70 -resize 600 photo.jpg
Here's the bash code to run mass convert all the jpg files in the directory to a compression ratio of 80 and resize to a width of 600px
for file in *.png; do convert "$file" -quality 80 -resize 600 "${file%.*}.jpg"; done
or you can set a percentage for the resize
for file in *.png; do convert "$file" -quality 80 -resize 70% "${file%.*}.jpg"; done
Reference :
How to Quickly Resize, Convert & Modify Images from the Linux Terminal
The Fab Academy Diploman course is fast-pace programme with a new topic introducing each week, along with a weekly assignment, so project management skill and self-discipline is extremerly important.
My typical "Weekly cycle", I hope I will not fall behind... :
I hope to be able to adopt a "Spiral Development" approach to your weekly assignment as well as Final Project. Spiral Development approach is to starts with small managable portions and get it completed first, before attempting more complex
design or to "loop-back" to the portion later on to imrpove or add-on more features...
- Fab Academy - Tutorials : http://fabacademy.org/2019/docs/FabAcademy-Tutorials/
- Pro Git ebook by Scott Chacon, download from
https://www.gitbook.com/book/gitbookio/progit/details
- 3 Feb recitation: Git and version control
- VMware Workstation 15.5 Player download : https://www.vmware.com/sg.html
- Ubuntu Download : https://www.ubuntu.com/
- Learning html and CSS : https://www.w3schools.com/
- Learn CSS in 12 Minutes (bty Jake Wright) : https://www.youtube.com/watch?v=0afZj1G0BIE&t=13s
- HTML Responsive Web Design : https://www.w3schools.com/html/html_responsive.asp