1.5. Project Management
For this part of my week, I worked on making and personalizing my website. I also worked through a Git tutorial.
GitLab and Getting Started
For my website, I familiarized myself with GitLab and markdown– working through the two was not too difficult. For markdown, I used this cheatsheet to help along the way. I first started on GitLab after I received an email from Academy IT with access to my account and logged in after I reset my password. My classmates and I explored GitLab for a while and learned that we could edit my site using the Web IDE.

Then I opened the about folder and started with copying and pasting the Student Agreement. After reading it and signing my name, I clicked commit.

I quickly realized that committing a change automatically sets to being committed in a new branch that prompts a merge. When I first committed my Student Agreement, I had done so to a new branch. Luckily, I figured out that I could go to the main home page and delete any branches that were accidentally made (I saved any changes made on a separate Google Docs page just in case anything would have been lost before deleting the branch). I will pay attention to click the commit to **master** branch selection from now on.

I also read the Fab Charter.

Troubleshooting
Images
Aside from learning not to commit changes to a new branch every time, one of the most important and used thing I learned was how to save photos as JPG’s on a MacBook and how to compress them. Previous Fab Academy students informed me that it saves much more storage space to use JPG files than any other files. Below are methods that worked for me, although there may be more efficient ways out there.
Saving images as JPG files:
Sending pictures from your phone to your MacBook:
- After you take a picture, screenshot it and crop the screenshot to how you want your picture to be.
- Airdrop the screenshot to your MacBook. (If you airdrop the original photo, it will usually save as a HEIN file.)
- Or, you can also text the image to yourself and save it from the iMessages app on your MacBook, but my iMessages was not syncing up with my phone during the course.
Taking screenshots on your MacBook:
- Screenshots (
shift + command + 4) will usually save as PNG files. To save it is a JPG file, right click on the pop up that appears on the bottom right corner of the screen after you screenshot something. - Click the “Open in Preview” and option and a pop up of the picture in Preview should appear, and the name of the picture should be “Untitled”.

- Close out of the preview tab, and a prompt should appear to save the picture. Here, you can rename the picture and save it as a JPG file.

Compressing Images:
- Open up the picture on your MacBook and click the “Tools” tab at the very top of the screen.
- Click “Adjust Size..”

- On the second drop down prompt, select “pixels”.
- If you are trying to fit the image on the screen of a GitLab website, I usually keep the maximum width 600 pixels.
- Keep all the other boxes checked
- Click OK.
![]()
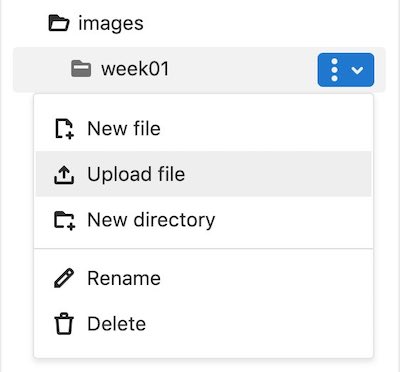
Uploading Images and Files
- When you want to upload a picture or a file, scroll on the side navigation to the folder you want to import into.
- Hover over the name and click on the three dots

- Click Upload File
- A drop down will appear, and you can choose the picture you want to import.

- Then, in the place you want to put the picture on the actual website, type this to import the file:
 - What you type in between each forward slash depends on the location of the file. For example, I typed
, since the picture, called pic1.18uploadd (with the file type of jpg), was in the week01 folder in the images folder. There are two periods in the beginning because it is two folders into the navigation tree (the images folder is in the docs folder of my master branch). If you want to add a file that is directly in the docs folder, only use one period.
Personalizing My Site
Afterwards, I started personalizing my website. I found the mkdocs.yml page and changed my font to Roboto and my website’s color to light blue with blue accents. In order to see what the colors would look like beforehand, I used the link provided on the page.

This is what a part of mkdocs.yml looked like after I changed my website’s color.
theme:
  name: material
  # see https://squidfunk.github.io/mkdocs-material/getting-started/#color-palette
  palette:
    primary: "light blue"
    accent: "blue"
  font:
    false
    # text: "Roboto"
    # code: "Ubuntu Mono"
I also explored various themes that I could used, but I ended up sticking with material because of its style and simplicity.
This is what my page ended up looking like:

I then further personalized my About Me page, adding a photo and more text, and documented my work on this Week 2 page.
Git Tutorial
In order to learn more about Git, I used this helpful tutorial. After going through and doing it, I learned more about creating branches, replacing local changes, and overall working more with the Mac Terminal. Much of the information in the tutorial I had figured out the GitLab parallels to them, like pushing and committing changes, but it taught me more about each topic on a deeper and conceptual level (especially creating and merging branches).