Using MQTT
For this week's assignment and to make the best out of a bad situation (not having designed boards or direct access to classmates), the entire class decided to work together using an MQTT server.
Our instructure, Oscar Gonzalez, set up a respberry pi in his house, connected it to his wifi server and the idea is that we all would connect, send and receive data.
The way that this works is that the the MQTT protocol uses a an architecture that allows publishing and subscribing to "topics" through the broker. The topics are the information sent for the broker, where it then delivers all the messages within a certain topic to a subscriber of that topic.
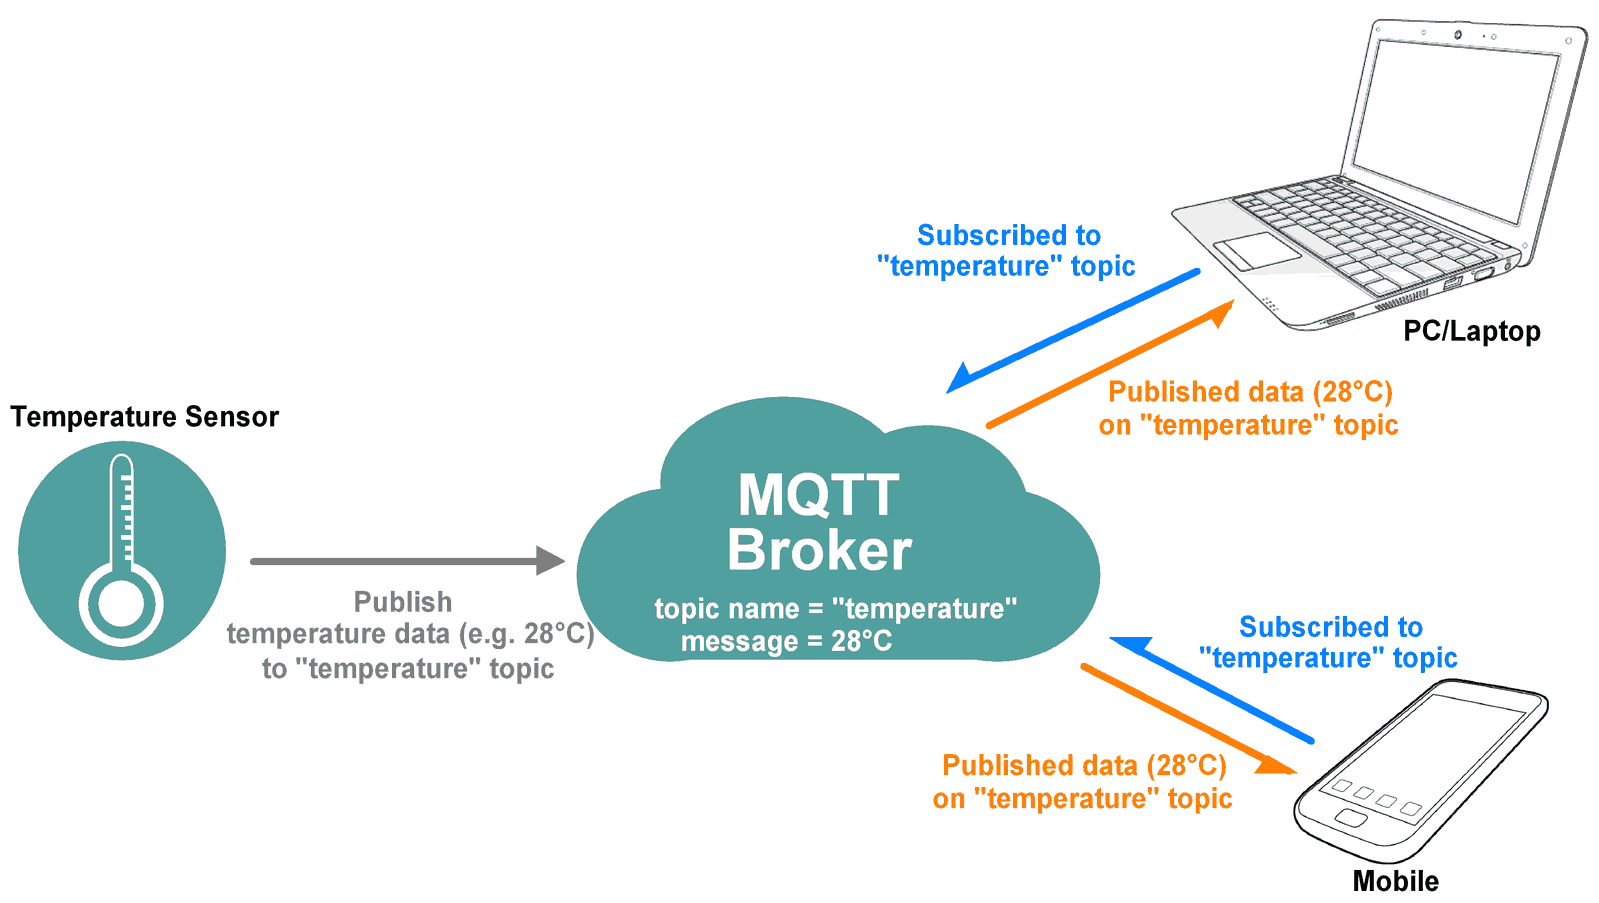 here is a simple example how the mqtt broker works, in our case we all sent inputs and then subscribed to different topics allowing us to send data and receive data from different inputs
There are options to subscribe and receive individual "topics" or you can ask to receive all data related to a certain topic from whichever input or you can even receive all the data sent by everyone connected.
The simple method to send or receive data that you have made is by using this code:
  client.publish("input/hala", msg);   //to publish
  client.subscribe("output/hala");     //to subscribe
Arduino IDE
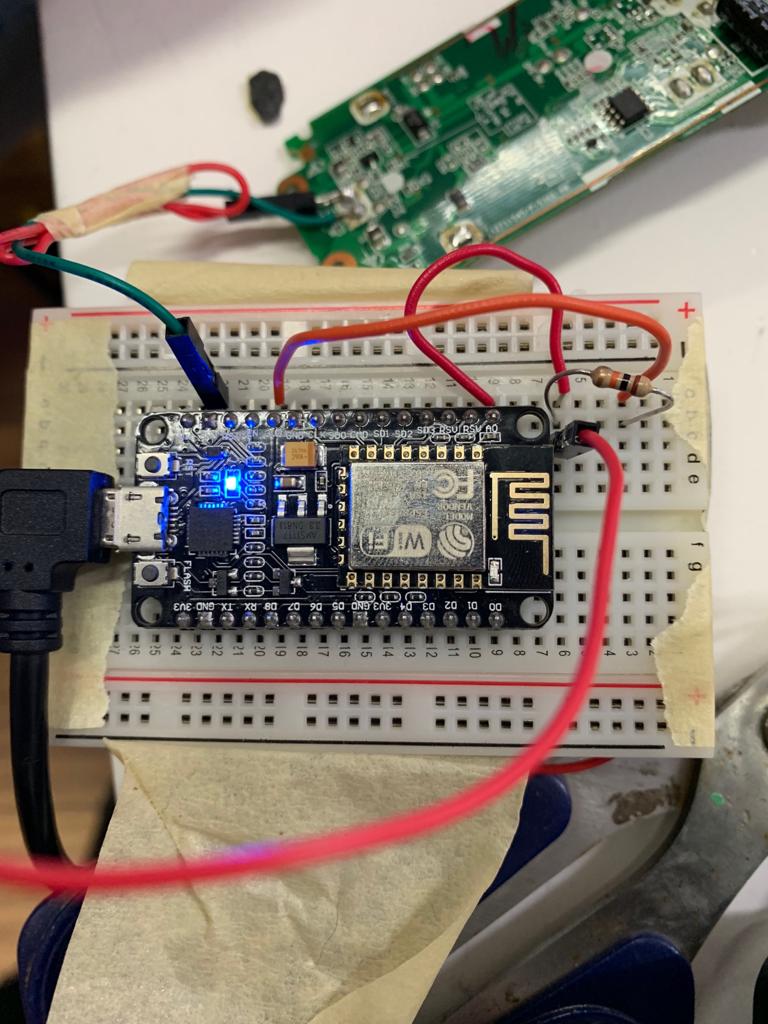
As I do not have any of the boards I previously designed I will be using an ESP8266 to connect. To download and install ESP8266 Arduino Core follow this tutorial. Once you have your ESP8266 board available and your .json file connected you can begin installing the libraries needed to continue the assignment. The library needed is the PubSubClient. (full documentation on this library is available here)
Once that is set we will need to setup the WiFi with the mqtt_server address, the address is the one provided to us by Oscar from his connection.
   const char* ssid = "my wifi network name";
   const char* password = "my wifi password";
   const char* mqtt_server = "the server name from Oscar";
   const char* mqtt_user = "Oscar's wifi name";
   const char* mqtt_pass = "Oscar's wifi password";
Code
The code used was provided as an example code by the lab team to make sure that we are able to send and receive data to start off with
      #include <ESP8266WiFi.h>
      #include <PubSubClient.h>

      // SETUP WIFI CREDENTIALS
      const char* ssid = "xxxxx";
      const char* password = "xxxxx";
      const char* mqtt_server = "xxxxx";
      const char* mqtt_user = "xxxxx";
      const char* mqtt_pass = "xxxxx";

      //input setup

      const int analogInPin = A0;  // Analog input pin that the potentiometer is attached to
      int sensorValue = 0;        // value read from the pot


      WiFiClient espClient;
      PubSubClient client(espClient);

      void setup() {
        pinMode(BUILTIN_LED, OUTPUT);
        Serial.begin(9600);
        setup_wifi();
        client.setServer(mqtt_server, 1883);
        client.setCallback(callback);

        // PUT THE CODE TO START YOUR SENSORS HERE

      }

      void loop() {

        if (!client.connected()) reconnect();
        client.loop();

        // Publish every 1000 milliseconds
        if (millis() % 1000 == 0) {

          // READ YOUR SENSOR DATA HERE
        float value = analogRead(A0);

          // Send value as characters
          char msg[50];
          snprintf (msg, 50, "%f", value);
          Serial.print("Publish message: ");
          Serial.println(msg);

          // SET THE TOPIC TO PUBLISH HERE
          client.publish("input/hala", msg);
        }
      }

      void callback(char* topic, byte* payload, unsigned int length) {

        Serial.print("Message arrived [");
        Serial.print(topic);
        Serial.print("] ");
        for (int i = 0; i < length; i++) {
          Serial.print((char)payload[i]);
        }
        Serial.println();

        String strPayload = String((char*)payload);

        // Serial.println(strPayload.toFloat());
        // Serial.println(strPayload.toInt());

        // USE RECEIVED DATA HERE
        if (strPayload.toInt() > 5) digitalWrite(LED_BUILTIN, LOW);
        else digitalWrite(LED_BUILTIN, HIGH);

      }

      void reconnect() {

        // Loop until we're reconnected
        while (!client.connected()) {

          Serial.print("Attempting MQTT connection...");
          // Create a random client ID
          String clientId = "ESP8266Client-";
          clientId += String(random(0xffff), HEX);

          // Attempt to connect
          if (client.connect(clientId.c_str(), mqtt_user, mqtt_pass)) {
            Serial.println("connected");

            // SET THE TOPIC TO SUBSCRIBE HERE
            client.subscribe("output/hala");

          } else {

            Serial.print("failed, rc=");
            Serial.print(client.state());
            Serial.println(" try again in 5 seconds");
            // Wait 5 seconds before retrying
            delay(5000);

          }
        }
      }

      void setup_wifi() {

        delay(10);
        // We start by connecting to a WiFi network
        Serial.println();
        Serial.print("Connecting to ");
        Serial.println(ssid);

        WiFi.begin(ssid, password);

        while (WiFi.status() != WL_CONNECTED) {
          delay(500);
          Serial.print(".");
        }

        Serial.println("");
        Serial.println("WiFi connected");
        Serial.println("IP address: ");
        Serial.println(WiFi.localIP());
      }
The first time running this code I realized that there was no data being sent and so I opened the serial monitor and realized that the connection was not working. The "reconnect" loop was constantly trying to reach the connection but it was coming back as a failed connection.
The problem was not within the code nor with the wifi credentials, a classmate pointed out that the problem might be with the characters within the wifi setup like the quotations. As I have copied the mqtt_server along with the quotations It had pasted them as a character not recognized by the IDE. silly problems.
To be able to visualize all the data sent we used Node-Red Dashboard. It is a module that provides a set of nodes to quicly visualize live data. You are required to download and install it and then you can play around with the settings as necessary.
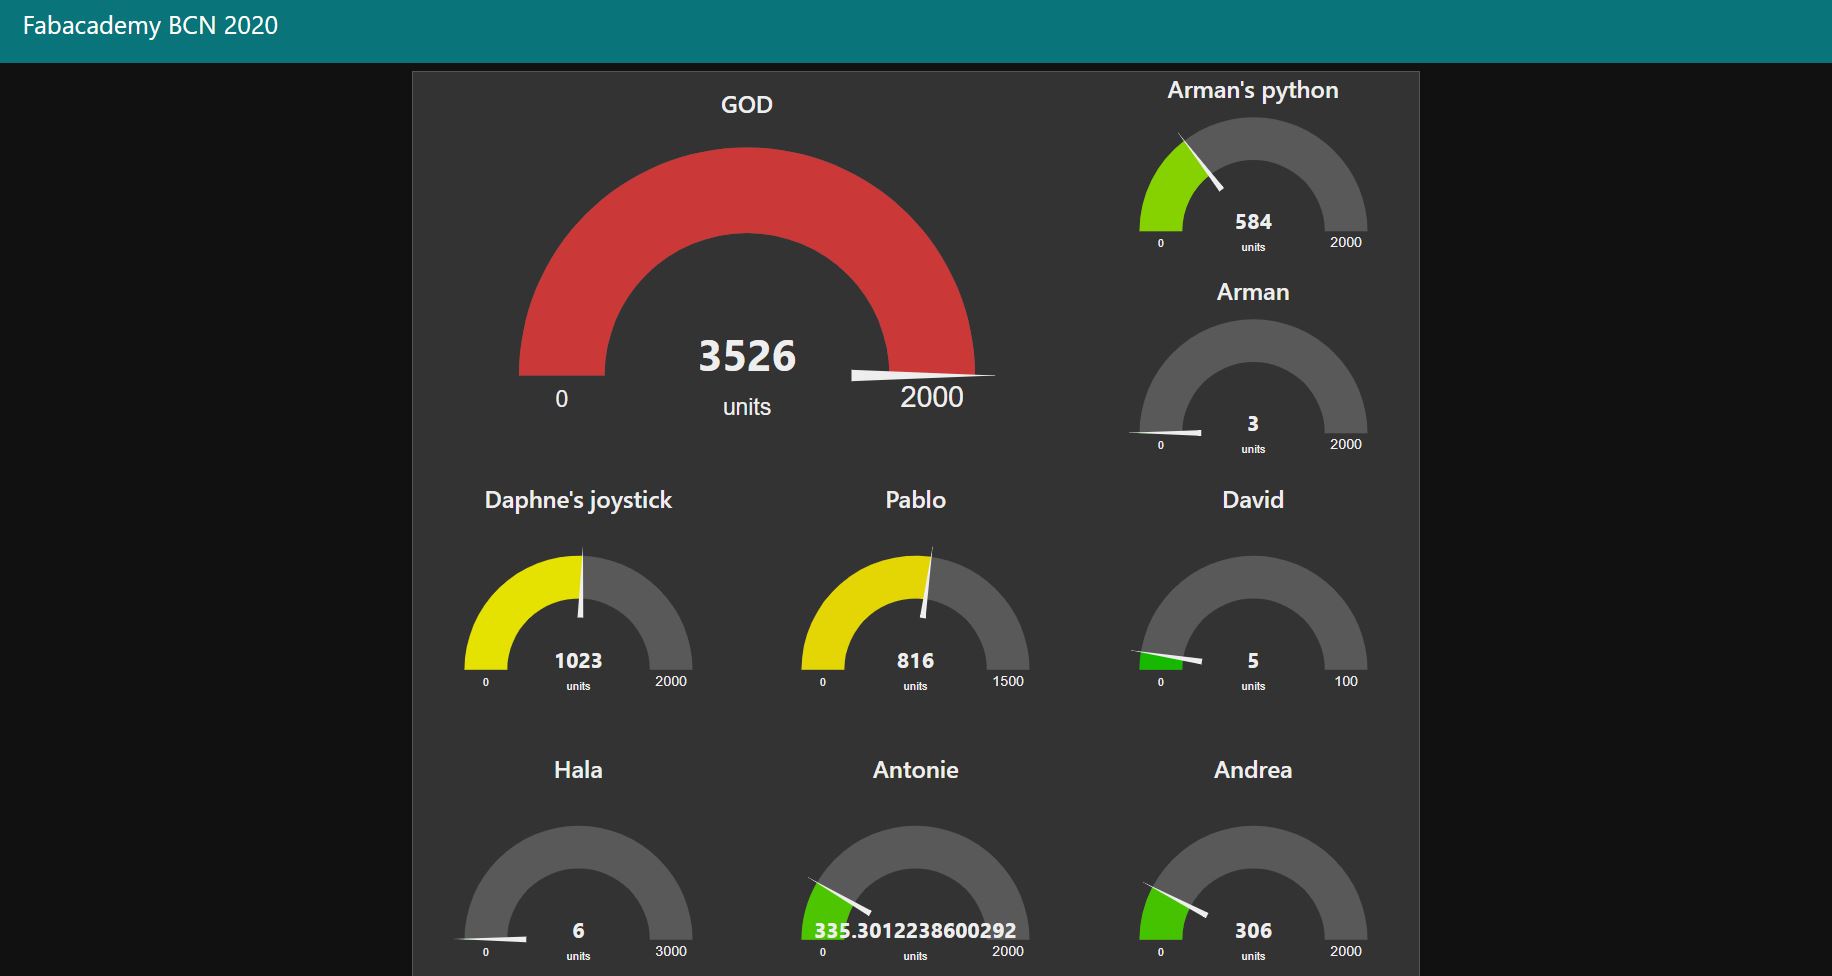 A screenshot of the different data being sent by the class
The data that I was sending was from a potentiometer connected to the ESP8266 through the only analogue pin A0. I was having troubles with the values that I was receiving as the range was always between 500 and 700 no matter the direction of the turn or the speed of it. debugging for another time
Previous Work
Unpacking Intelligent Machines
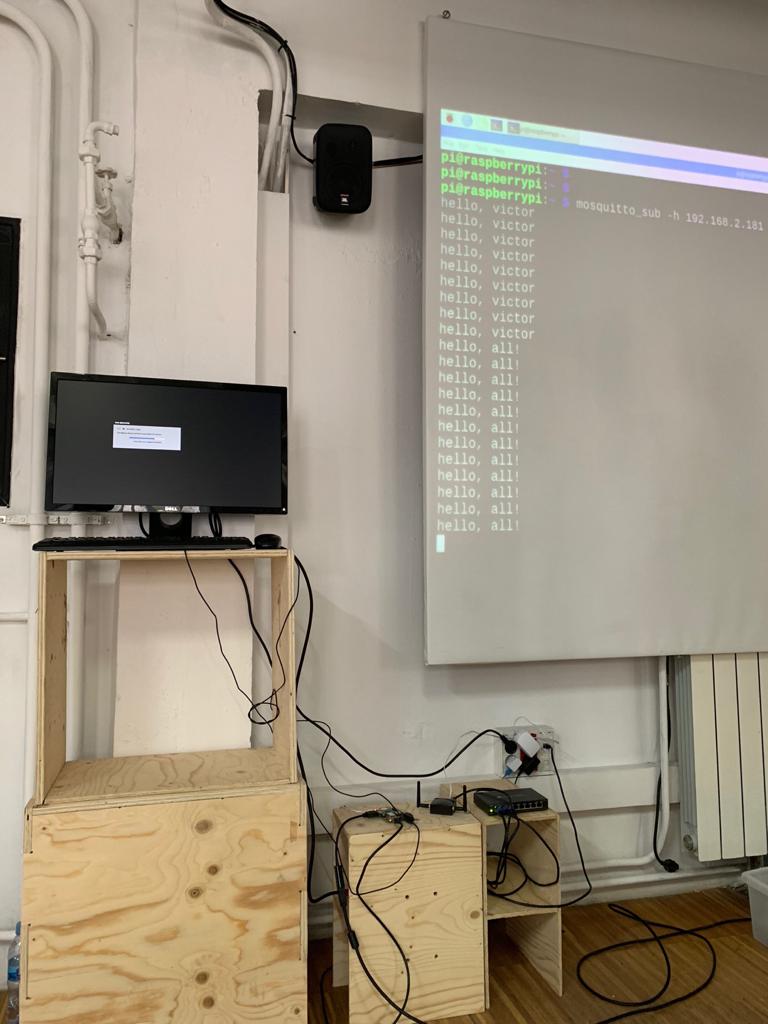
In a class given in November, by GUILLEM CAMPRODON and VÍCTOR BARBERÁN the FabLab Barcelona Team, we reused old machines to create inputs and outputs with the functioning components and parts. My group and I unpacked an old landline phone and a paper shredder. From the phone we used the mic as the input and from the shredder we used the motor and kept the shredding mechanism. Once each group had unpacked, reused, and were able to send and receive data throught their inputs and outputs we began connecting to one another's projects. The setup included a raspberry pi connected to a wifi router.
class setup
esp setup
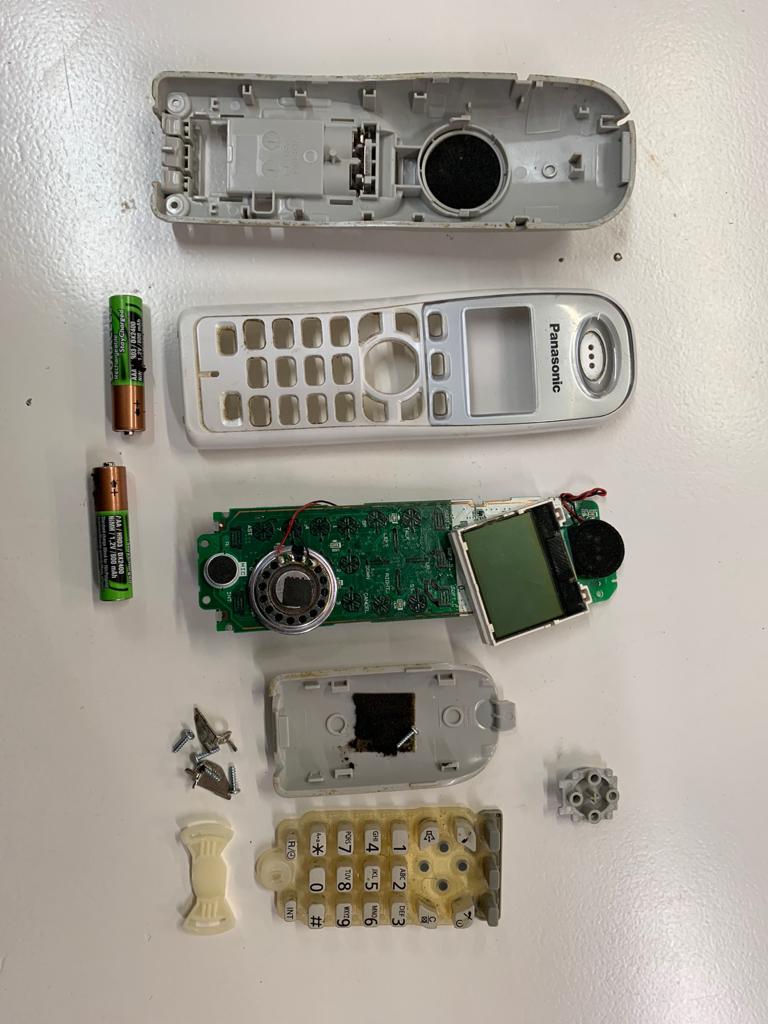
phone unpacked
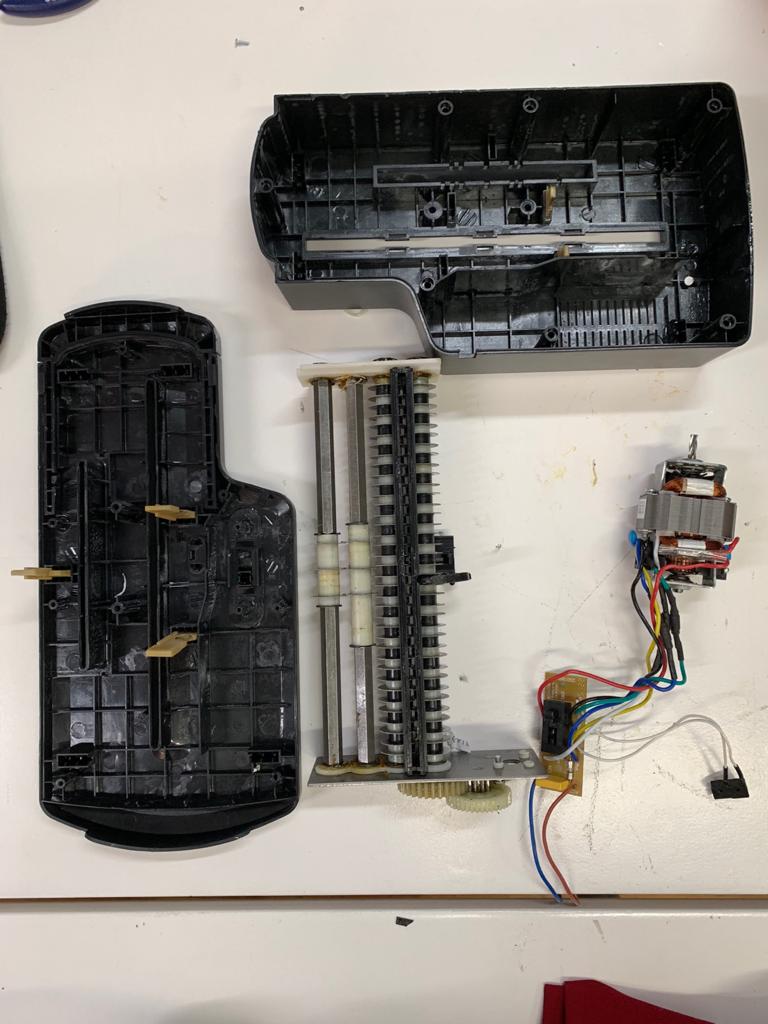
shredder unpacked
Our group first began by creating the code and setting up the Microphone from the phone and the motor from the Shredder in one code as both input and output through the arduino simply:
        const int outputpin= 4;
        const int threshold = 12;
        float value = 0;
        // the setup routine runs once when you press reset:
        void setup() {
          // initialize serial communication at 9600 bits per second:
          Serial.begin(9600);
          pinMode(outputpin, OUTPUT);
          digitalWrite (outputpin,HIGH);
        }


        // the loop routine runs over and over again forever:
        void loop() {
          // read the input on analog pin 0:
          int sensorValue = analogRead(A0);


          // print out the value you read:
          //Serial.println(sensorValue);
          value = abs(sensorValue-330);
          //Serial.println(abs(sensorValue-300));
          //Serial.println(value);

          if (value > threshold)
          {
            digitalWrite (outputpin,LOW);
            //delay(5000);
            }
          else {
            digitalWrite (outputpin,HIGH);
          }


        // this is not showing negative values in the serial.
          if(value >= 0 ){
            Serial.println(value);
          }
          else{

          }

          delay(200);        // delay in between reads for stability
        }
The next step was to divide the inputs and the outputs so we can separately connect them as topics on Node-Red.
Mic Input
The code used for both is similar to the code shown above with Oscar's MQTT boroker. Below is the code for the input
        #include <ESP8266WiFi.h>
        #include <PubSubClient.h>

        // Update these with values suitable for your network.

        const char* ssid = "Sensors Network X";
        const char* password = "sensors4ever";
        const char* mqtt_server = "192.168.2.181";
        const int outputpin= 4;
        const int threshold = 12;
        int micvalue = 2;

        WiFiClient espClient;
        PubSubClient client(espClient);
        long lastMsg = 0;
        char msg[50];
        int value = 0;

        void output() {
           if (micvalue > threshold)
         {
           digitalWrite (outputpin,LOW);
           }
         else {
           digitalWrite (outputpin,HIGH);
         }
        }

        void input() {
         int sensorValue = analogRead(A0);
         micvalue = abs(sensorValue-330);
         if(micvalue >= 0 ){
           Serial.println(micvalue);
         }
         else{
         }
         delay(200);
        }

        void setup_wifi() {

         delay(10);
         // We start by connecting to a WiFi network
         Serial.println();
         Serial.print("Connecting to ");
         Serial.println(ssid);

         WiFi.begin(ssid, password);

         while (WiFi.status() != WL_CONNECTED) {
           delay(500);
           Serial.print(".");
         }

         randomSeed(micros());

         Serial.println("");
         Serial.println("WiFi connected");
         Serial.println("IP address: ");
         Serial.println(WiFi.localIP());
        }

        void callback(char* topic, byte* payload, unsigned int length) {
         Serial.print("Message arrived [*");
         Serial.print(topic);
         Serial.print("*]");
         for (int i=0; i< length; i++){
           Serial.print((char)payload[i]);
         }
         Serial.println();
         if ((char)payload[0] == '1') {
           digitalWrite(outputpin, LOW);
         } else {
           digitalWrite(outputpin, HIGH);
         }
        }

        void reconnect() {
         // Loop until we're reconnected
         while (!client.connected()) {
           Serial.print("Attempting MQTT connection...");
           // Create a random client ID
           String clientId = "ESP8266Client-";
           clientId += String(random(0xffff), HEX);
           // Attempt to connect
           if (client.connect(clientId.c_str())) {
             Serial.println("connected");
             // Once connected, publish an announcement...
             client.publish("outTopic", "hello world");
             // ... and resubscribe
             client.subscribe("mdef/output/shredder");
           } else {
             Serial.print("failed, rc=");
             Serial.print(client.state());
             Serial.println(" try again in 5 seconds");
             // Wait 5 seconds before retrying
             delay(5000);
           }
         }
        }

        void setup() {
         pinMode(BUILTIN_LED, OUTPUT);     // Initialize the BUILTIN_LED pin as an output
         Serial.begin(115200);
         setup_wifi();
         client.setServer(mqtt_server, 1883);
         client.setCallback(callback);
         pinMode(outputpin, OUTPUT);
         digitalWrite (outputpin,HIGH);
        }

        void loop() {

         if (!client.connected()) {
           reconnect();
         }
         client.loop();
         input() ;

         long now = millis();
         if (now - lastMsg > 100) {
           lastMsg = now;
          // ++value;
           snprintf (msg, 50, "%ld", micvalue);
           Serial.print("Publish message: ");
           Serial.println(msg);
           client.publish("mdef/input/mic", msg);
         }
        }
Testing the threshold which is why in the code we have the data subtracted by 330 to account for the ambience noise.
Shredder Output
Below is the code for the shredder motor, the code allows the shredder to wait for 5 seconds befor turning on for safety measures and then stays on for the required time.
Unfortunately I did not have the documentation skills at the time and did not document the shredder working
Other Groups
If you're interested in checking another groups project, take a look at my classmate's documentation, Pablo Zuloaga.
Final Thoughts
I enjoyed the idea that it is possible to send data and connect to a completely different output and have someone else'es inputs connect to your output. It is a completely different way of designing when designing for this setup. For my final project I would like to know whether using this method as the broker between my phone and the lighting system is the best option or if there are easier methods for the simplicity of the project.
Files