
15.
Molding and Casting
Assignments
individual assignment
design a mold around the stock and tooling that you'll be
using,
mill it (rough cut + (at least) three-axis finish cut),
and use it to cast parts
group assignment
review the safety data sheets for each of your molding and
casting materials,
then make and compare test casts with each of them
Download files
Here are the STL file of the mould and the .pnr files for the milling
Download all filesGroup assignment
As always, Tue is the best at documenting group assignments. I am planning to use a few different materials so I'll make my own comparison of materials further below, but for now check Tue's awesome work.
What I am going to make
For my final project I need to make quite a few little pieces that hook on the intersections of the slices so that I can hang up the pots from.
I originally was planning to 3D print them, but as I need to make around 10 or more of them I thought it’d be better to cast them instead.
Intersection hooks
I bought a graphic tablet, so I’ve been playing around with it, hence the colors and the straight(-ish) lines.
I had an initial idea as a design, it would be flat on top but hooks below for strings to grab the pot. I think it’s nice because the top is flat and doesn’t look bad.

Then I came up with a different design which is more functional and can look equally good. It doesn’t have hooks below and is simpler. You just loop the string on a protruding square above the piece and that’s it. I like it because you could easily make a cap that fits on top to make it look sleek, or design a different cap to do something different, like hold a pipe or just have a different pattern.

The inside of the squares could be rounded so that the string doesn’t rub and deteriorate. Can also make the top cap just have the corners rather than whole squares. It means you push it down completely and it isn’t blocked by the string… it makes sense in my head and will do in the CAD design further below.
UPDAAAAAATE: Found new object to make
Those intersection hooks I wanted to make was to hold the plant pots, but since then I came up (well, Mathilde came up) with a better solution for that.
So, scrap those ugly ass intersection hooks (even the name is bad) and let’s make something useless!
The elected useless object
I am a fan of memes, and lately a lot of these little characters appeared… for some reason. I don’t get the excitement but oh well, welcome to the 21st century.

I found a 3D version of it on Thingiverse, so I downloaded it and got down to doing the positive design of the mould that will make the negative mould for making the positive object... easy.
Designing the moulds
That’s the easy step (well, they are all more or less easy). You just have to import the 3D model you made (or downloaded) in your favorite 3D software (Rhino) and fit it in a cube that’s smaller than the block of wax you will mill it from the boolean difference them.
Creating the block of wax virtually
The standard block of wax is 146 x 88 x 36 mm. Those tiny spacemen seem like they’d be tiny in real life, so I’ll try to make them quite small. That also saves a lot of material and milling time.
First let’s create a cube the size of the block of wax.

Easy enough…
Import the positive shape we’ll want to make
In Rhinoceros I transformed the STL mesh of the little spaceman into a polysurface with MeshToNURB, so that I could cut it in half with a boolean difference (the character is symmetrical) and lay it flat. As the shape is symmetrical no need to design two moulds for both sides but...

I realised there was an overhang where the legs are… ouch. That’s where molding and casting loses to 3D printing. It has a nicer finish but it can’t do shapes that are too complex, or at least not with simple 2 parts mold.
The overhand makes it impossible to mill, because the endmill can’t drill under material.
Instead I decided to the 😍 emoji. I do 😍 it, so why not? Then I can make magic chocolates with it 😍😍😍
I downloaded an emoji from Thingiverse once again, but as it’s a simple shape I remade it to have a clean version.

It’s already brown like chocolate!

I scaled the bottom of the mouth down and the top of the eyes up so that the mill wouldn’t hit the material, but to be honest it’s going to be so small that it probably won’t change anything. Better be safe though!
Create some bounding box with margins
I am a hardcore non-waster, and I might regret this later if I have to redo everything, but I want to try and fit both mold on a tiny piece of wax.
Here I put both my half emojis looking up and then created a bounding box with some margin around it that I will then subtract from the block of wax.

too*
After lowering the bounding boxes down into the wax I then scaled up the top face of the cubic rectangle (what’s the name of a 3D rectangle? ... a cuboid apparently) so that the mill can go deep enough without the rest of the tool hitting the material.

Again, the total depth of the mold is around 15mm, so not deep at all, but bettteeeer beeee saaaaaaafe.
Adding alignments and doing booleans
Almost ready to send to the milling machine. I have added some alignments to both molds. I made sure they are aligned by creating them on one mold, then selected all of them and used the Copy command, which allows you to choose from which point you want to copy. I select one of the corners of the mold, and then copy using the same corner of the other mold. Keep in mind they have to have the exact same dimensions.

Adding the pouring and air vents
I almost forgot to add the pouring and air vents.

Error - emoji not aligned.
I just realised I hadn’t perfectly aligned the two halves of the object to the center of the cube. That alignment helpers wouldn’t be very useful if the two half shapes weren’t aligned themselves.
It was pretty well aligned, within 0.2mm, but not perfectly… so I started again.
This time I overlapped both halves of the shapes by doing the Move command from the center of the flat face of one half to the center of the flat face of the other half.
Then I created a bounding box cuboid around both, and finally duplicated that cuboid so we have two exact versions.
Ok, they are now all perfectly aligned. I stopped being cheeky and gave myself more margin on the sides. I’m using most of the wax block now.
Make sure to add the pouring tunnel as well as an air vent. I created one, then mirrored it so it’s perfectly the other side. This means I can select both, do Copy and then select a corner of the mold and copy it to the same corner of the other mold, as we did for the alignment helpers.

Oooookkkkkkk. Now let’s export this as an STL file and head to mods to create the G-code files.
Making the .rml files in mods
The new mods?
I was following Antoine’s documentation for Fab Modules. He’s been using the new version (I think it’s the new one?), or at least the one I’ve not been using this year.


This one. I like the idea of the workflow. What file are you gonna give me? STL? Cool, you can do that with it… blablabla. Roland mill? Nice one bruv. Wanna do some wax rough cut? Yep, let’s do it.
It’s cool, but when it was calculating it was suuuuuper slow. I wasn’t 100% sure either of the settings and what you need to click first, some menus would appear at the top, then disappear then reappear...
Na, the old mods - doing the rough cut
I checked the fab academy page for molding and casting, and you can see Neil’s using the old mods to do the rough cut… and it’s so much faster. So I decided to stick with it. It’s got a few cool little features as well which we can check together, like moving the modules, saving to file, seeing what the STL looks like at different depths.
Note //
I really like this mods website, it’s genius. There’s also a community version which seems to be exactly the same, except it has different fonts and colors...
Anyways, here we go. I followed Neil's video for the rough cut, but there’s a few things to change.
Add the program and delete the WebSocket module
First let’s add the workflow.
Right-click > programs > open server programs > Roland > mill > SRM-20 > mill 2.5D STL
Before anything let’s go to the bottom of those modules and as always delete the WebSocket device module.
From what I understand it uses the WebSocket protocol to save it to a device (USB), or possibly even another computer.
Add the file save module
Then right-click > modules > open server module > file > save, and click on the input of the new module then click on the output of the Roland SRM-20 milling machine module. That means that when you click calculate in the next steps, it’ll download/save the file.
Change the settings of the milling machine
While we are down here, let’s also change the setting of the Roland SRM-20 milling machine module.
I use:
- speed 20mm/s (normally is 4 for PCBs, but this is wax, it’s soft)
- origin x, y and z to 0mm
- z jog height to 5mm
- home to x, y and z 0mm
Upload your STL file and check the slices
Now head to the first module, the read stl, and upload your stl file.
You shouldn’t need to change anything in the next module. An interesting feature in the other one though, the one called mesh slice raster, is that below with the slice Z depth, you can see what your stl file looks like at a certain depth.
For example, thanks to Rhino I know that my mold isn’t deeper than 27mm. If I type 27mm the square at the top is blank, but if I type 20mm, I can see the slice 20mm deep. I used that to make sure that in the next module I select the right max depth.

Also, in the same tab, make sure you have the right units. I know I do because my block of wax is 36mm high, and you can see 36mm in the mesh size.
Finally edit the mill raster 2.5D module and calculate
Let’s head to the next module. In the video Neil uses a tool that’s 1.5875mm in diameter. In the other Fab Modules, the one Antoine’s uses, the default is 3.175mm. I’m going to stick to that. Change the tool diameter to 3.175mm. I’m not sure how you say if it’s a flat or ball end…
Same, in Fab Modules the cut depth is 1mm, so I’m going to use that.
And the max depth is the max depth of your mold, in my case I deduced from the previous modules that it was 27mm.

Leave the rest as it is, so, offset number is 0 (so it fills), the offset stepover is 0.5 because we are doing the rough cut, and blabla.
Finally click calculate. That’s when it goes through the entire pipeline and saves the file at the end, hence why it’s preferable to change the setting of the SRM-20 before this step.
And that’s it! Rough cut done.
Update, I’m looking at the finish cut video, and Neil uses the Shopbot > mill raster 3D. It seems it has a stripped down version of what we looked at, and the end mill is already 3.175mm. Interesting. There’s also a Shopbot > mill 2.5D stl which seems to do what we want. I guess I used the Roland SRM-20 workflows because that’s the machine I was going to use, but it could be using the ShopBot workflows? Would the Roland machine work with .sbp files?
The finish cut
Well, again, watched Neil’s video. Even easier and faster, somehow!
Right-click > programs > open server programs > Shopbot > mill 3D raster
You pretty much just need to upload the STL.
There’s one thing to do though! The stepover. As this is the nice, finish staged, the stepover (overlap) should be 90%, so I typed in 0.9. The preview looked doubtful… mmmh that doesn’t look very finished at all.

... but actually that was an overlap of only 10%. 1 means the diameter of the tool, in other words an overlap of 1 x 3.175mm, 100%. We want an overlap of 90%, so 0.1 x 3.175mm.
I changed stepover to 0.1 and the file size was 10x bigger, which makes sense. The preview is also much more detailed.

Kind of looks like a rabbit.
Cool, that’s the finish finished!
Noooo!
Apparently ShopBot files don’t work with the Roland SRM-20, as I feared. I’m going to have to prepare the files with Modela Player 4, the software that comes with the SRM-20.
I’m not sure why mods can’t do the mill 3d stl for the Roland SRM-20… isn’t it just the same as for the ShopBot but just with a few different G-code lines?
Redoing it in Modela Player 4
It’s super easy to use and much faster than fab modules.
Importing model
First import the stl model with the little folder at the top left, then set the origin with the compass on the top right. That means on the machine you’ll 0 to the bottom left, not to the center of the block of wax.
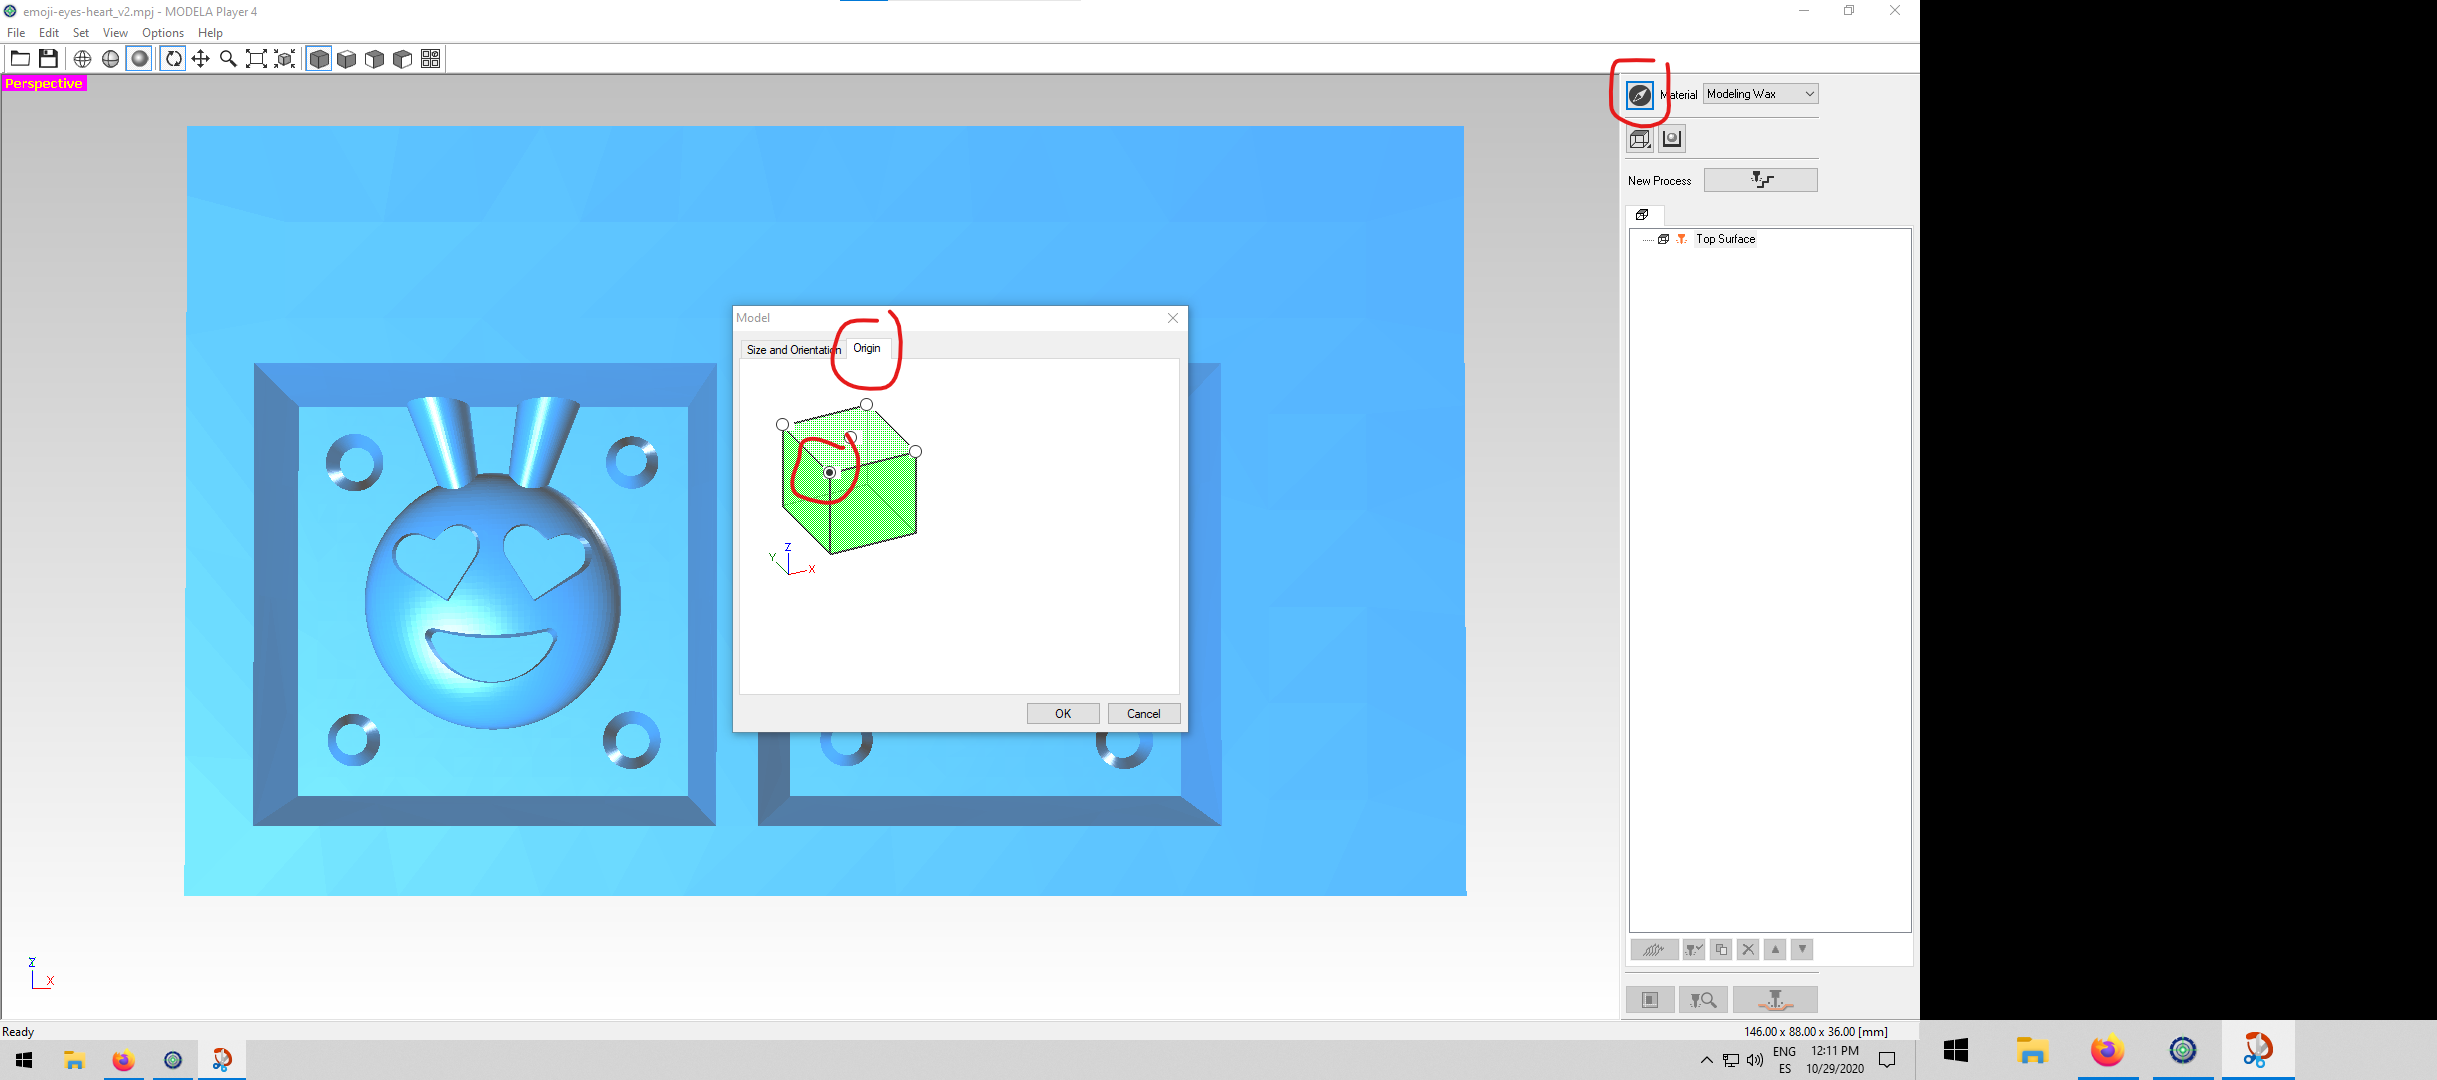
Roughing
- Click in the icon with the endmills and step, then select Roughing. I don’t need to do surfacing as the block of wax is new, and therefore it is flat.
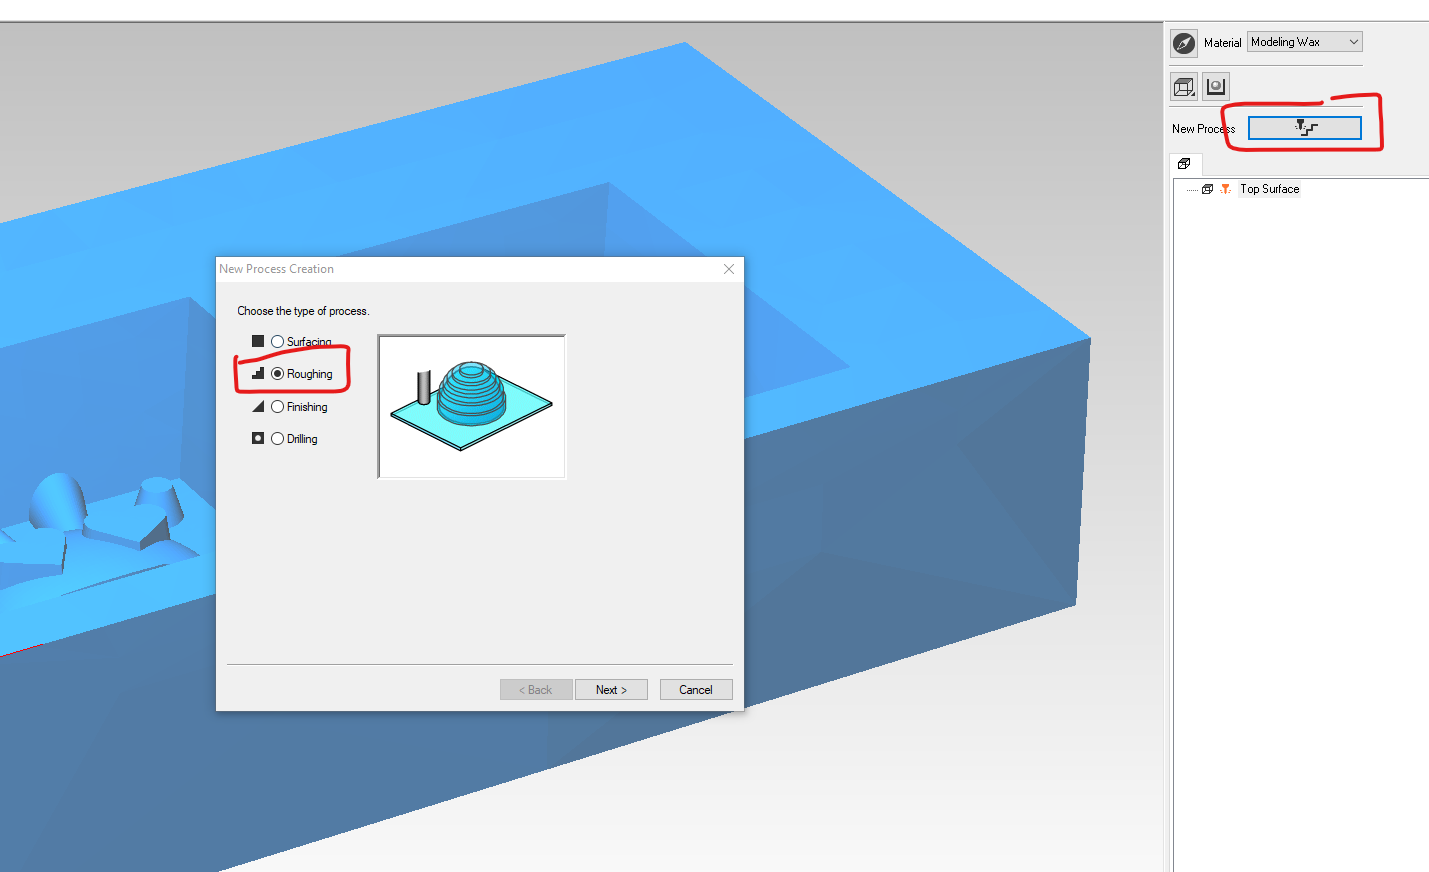
- Click Next. Keep the cutting surface to Top [+Z].
- Click Next. The tool is already defined. It is 3.175mm in diameter and is flat.
- Click Next. You can leave the cutting area to the entire block of wax, or, like I did, set one. It just means there’ll be less calculating to do as we can ignore the rest. It’s probably a minor thing in my case, but let’s do it.
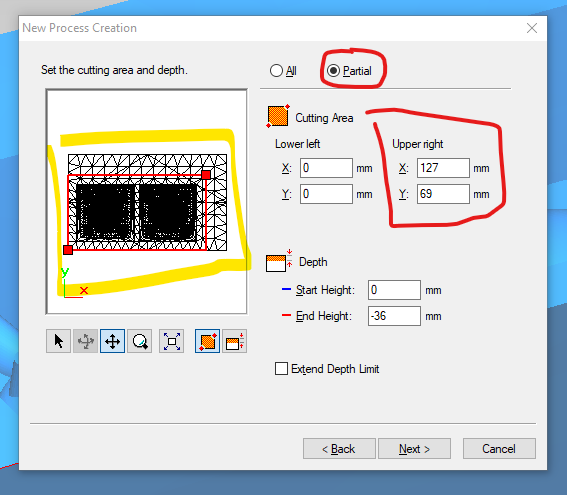 I used the icons below to drag the red box to roughly my mold size, and then rounded the numbers on the right so that I can enter them again in the finish process. They are 127 x 69mm.
 - Click Next. Select Contour Lines. I’m not sure what would be the difference in quality, it could be interesting to test one day.
- Click Next. Leave the speed as it is, and all the other settings.
- Click Next. Give it a name.
Finally you can preview what your roughing looks like with the button at the bottom right of the screen.
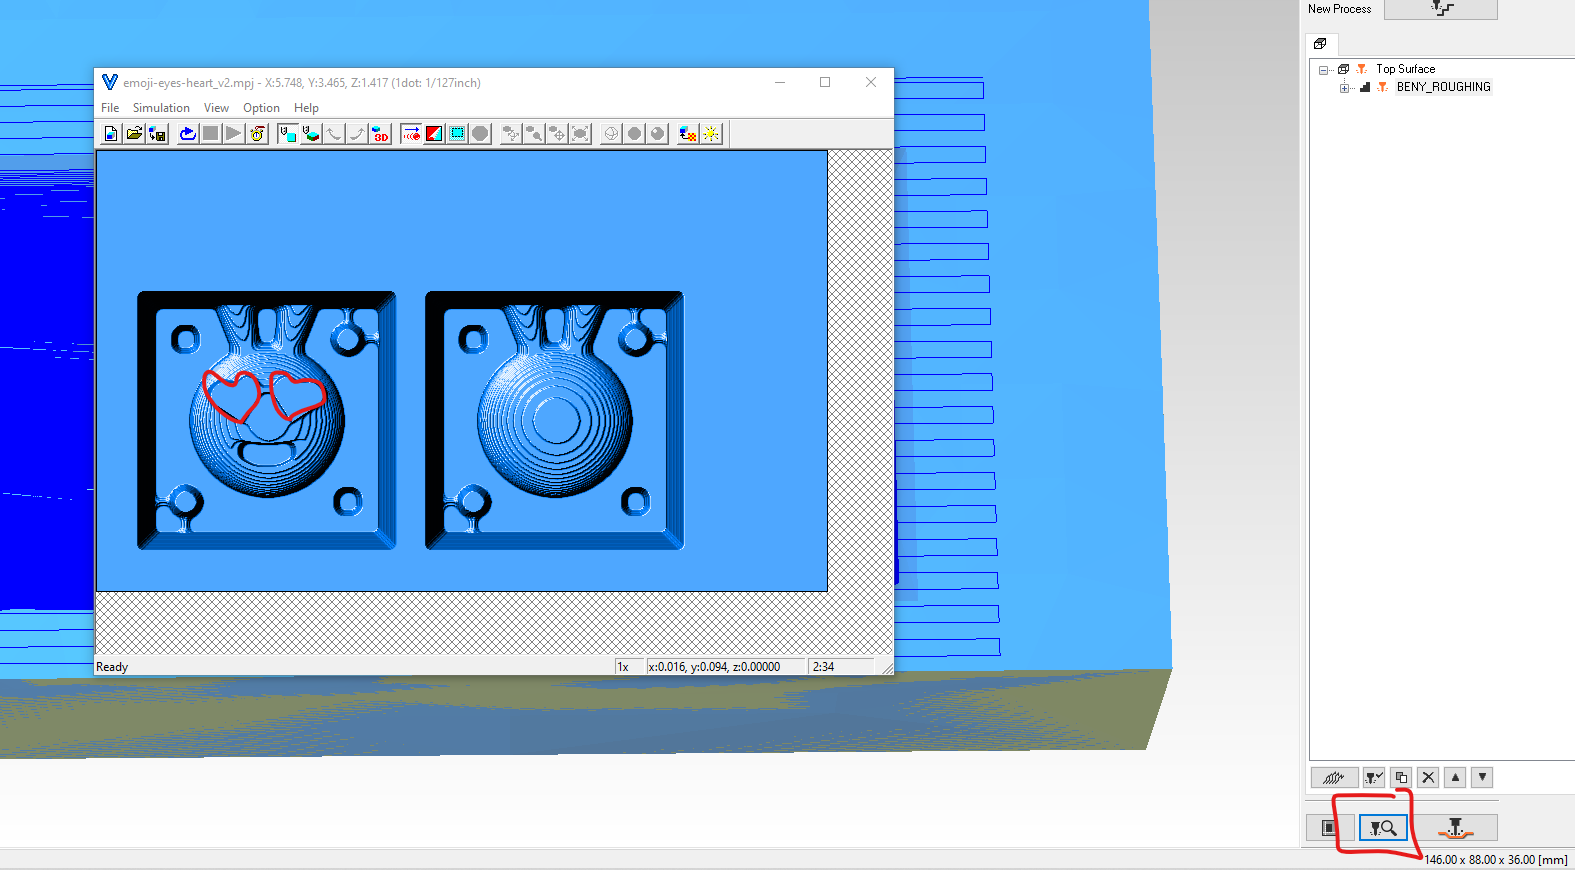
Finishing
Do the same as above, except that for step 1 select Finishing, and in step 5 you can select X+Y as Scan lines. It’ll take longer but will give a better finish.
Notice that the speed set up for the finish is a bit faster. It is now 19.49mm/sec rather than 17.74mm/sec with roughing. My theory is that it can go faster because there’s less material to cut now. Just trimming stuff.
Preview it.
I realised that I put the alignments too close to the edge, and the tool can’t go in between, therefore creating this bump, which will get in the way when we try to put the two halves together.
I have to modify my design and have a spacing of at least 3.175mm. I went through all the steps again (quickly, but safely).
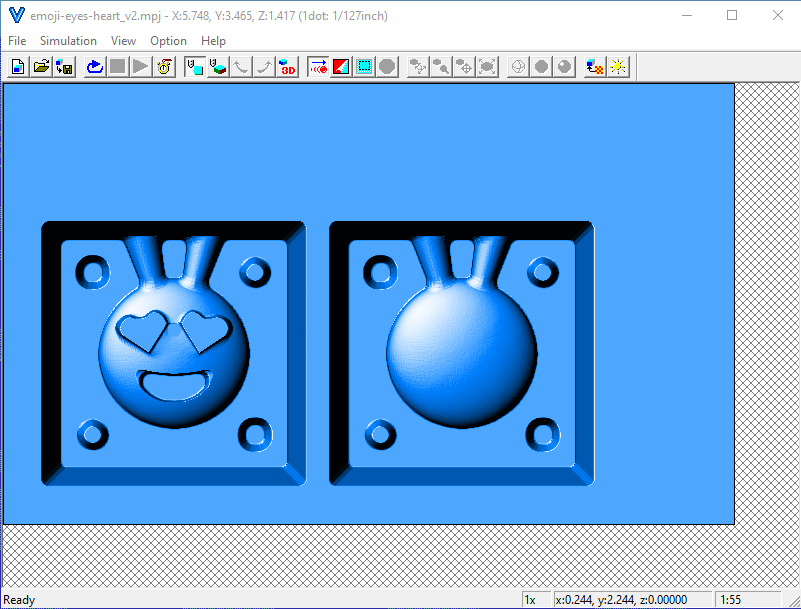
Boom! Done.
Saving the files
Click on the button at the bottom right with the endmill and orange material under. Click Output to file. Choose your location. Don’t worry that the extension is .prn, that’s meant to be.

Now, to the physical world, the milling. Tam tam!
Milling the moulds
Very similar to when we milled PCBs. Double tape the wax to the base of the machine.

Insert the flute into the machine. I am using a 4 flutes 3.175mm flat endmill.

Launch the software, set the X, Y and Z 0 to the bottom left corner of the wax block.

Then simply launch the roughing file we generated earlier. When it’s done there’s no need to change the endmill or redo the X, Y and Z origin set, you can just launch the finishing file.
Note //
I could have reduced the area of finishing (and even of roughing), as now I’m looking at it milling, it is doing the finish on the top of the wax block, as well as on the sides. It is not necessary and could easily have saved some time.
Here’s the result! Sexy 😍

I also noticed when I created the files that there was a line between the two heart-eyes, and that’s because they are less than 3.175mm apart. It isn’t too noticeable though, so it’s ok.
Making the negative mould
Food safe moulding material - Easyl 940-FDA
Information about it
I want to make chocolates out of this emoticon so I need some food safe silicone. Fab Lab Barcelona has this one: Easyl 940-FDA -Silicona Alimentaria. It’s apparently not viscous at all (for a rubber silicone) and therefore is great for precise moulds and being free of bubbles (they can float to the top easier).

You have to mix one part of A and one part of B for the silicon to be material. An imbalance in the parts could affect the viscosity or the durability of the mould.
It says to put it in a vacuum machine for 10 mins, then leave it to rest for 24 hours. After 24 hours you have to heat it to 100ºc for 4 hours… it’s weird because the technical characteristics says it takes 3-5 hours to cure… in the same document. Which one to listen to? The shorter one.
- Name: EASYL 940-FDA
- ShoreA hardness: 25
- Shrinkage: ≤0.1%
- Color: Translucent
- Tensile Strength: 8 MPa
- % Elongation: 400%
- Working Time: 30 min (time you have to pour the liquid after you mix the two parts)
- Tear resistance: 32 kN / m
- Curing Time: 3-5 hours (that’s how long until it’s ready to be unmoulded)
- Viscosity: 6000 mPa
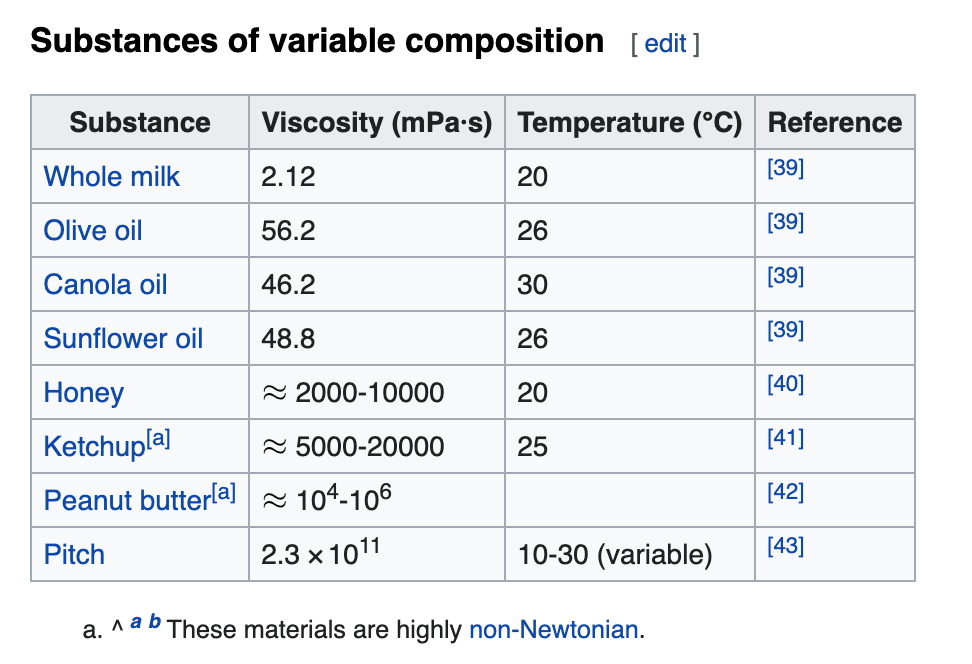
Interesting comparison of viscosity (from Wikipedia)
It has roughly the same viscosity as some runny honey or shaken ketchup.
Pouring it
First I measured the volume needed by pouring water into the two moulds and then pouring that water into a measuring cup. That filled up to 100mL, which means I’ll need to pour 50mL of part A and 50mL of part B.
When poured together I have from 30 mins up to an hour for it to start curing properly, that is plenty of time.
I poured both part and mixed by fixing one of those flat wooden stick to a drill and mixing thoroughly for a minute. That process introduced a fair amount of bubbles in the mixture which isn’t great, but the datasheet said that because of the viscosity the bubbles go away quite well... so we'll see.
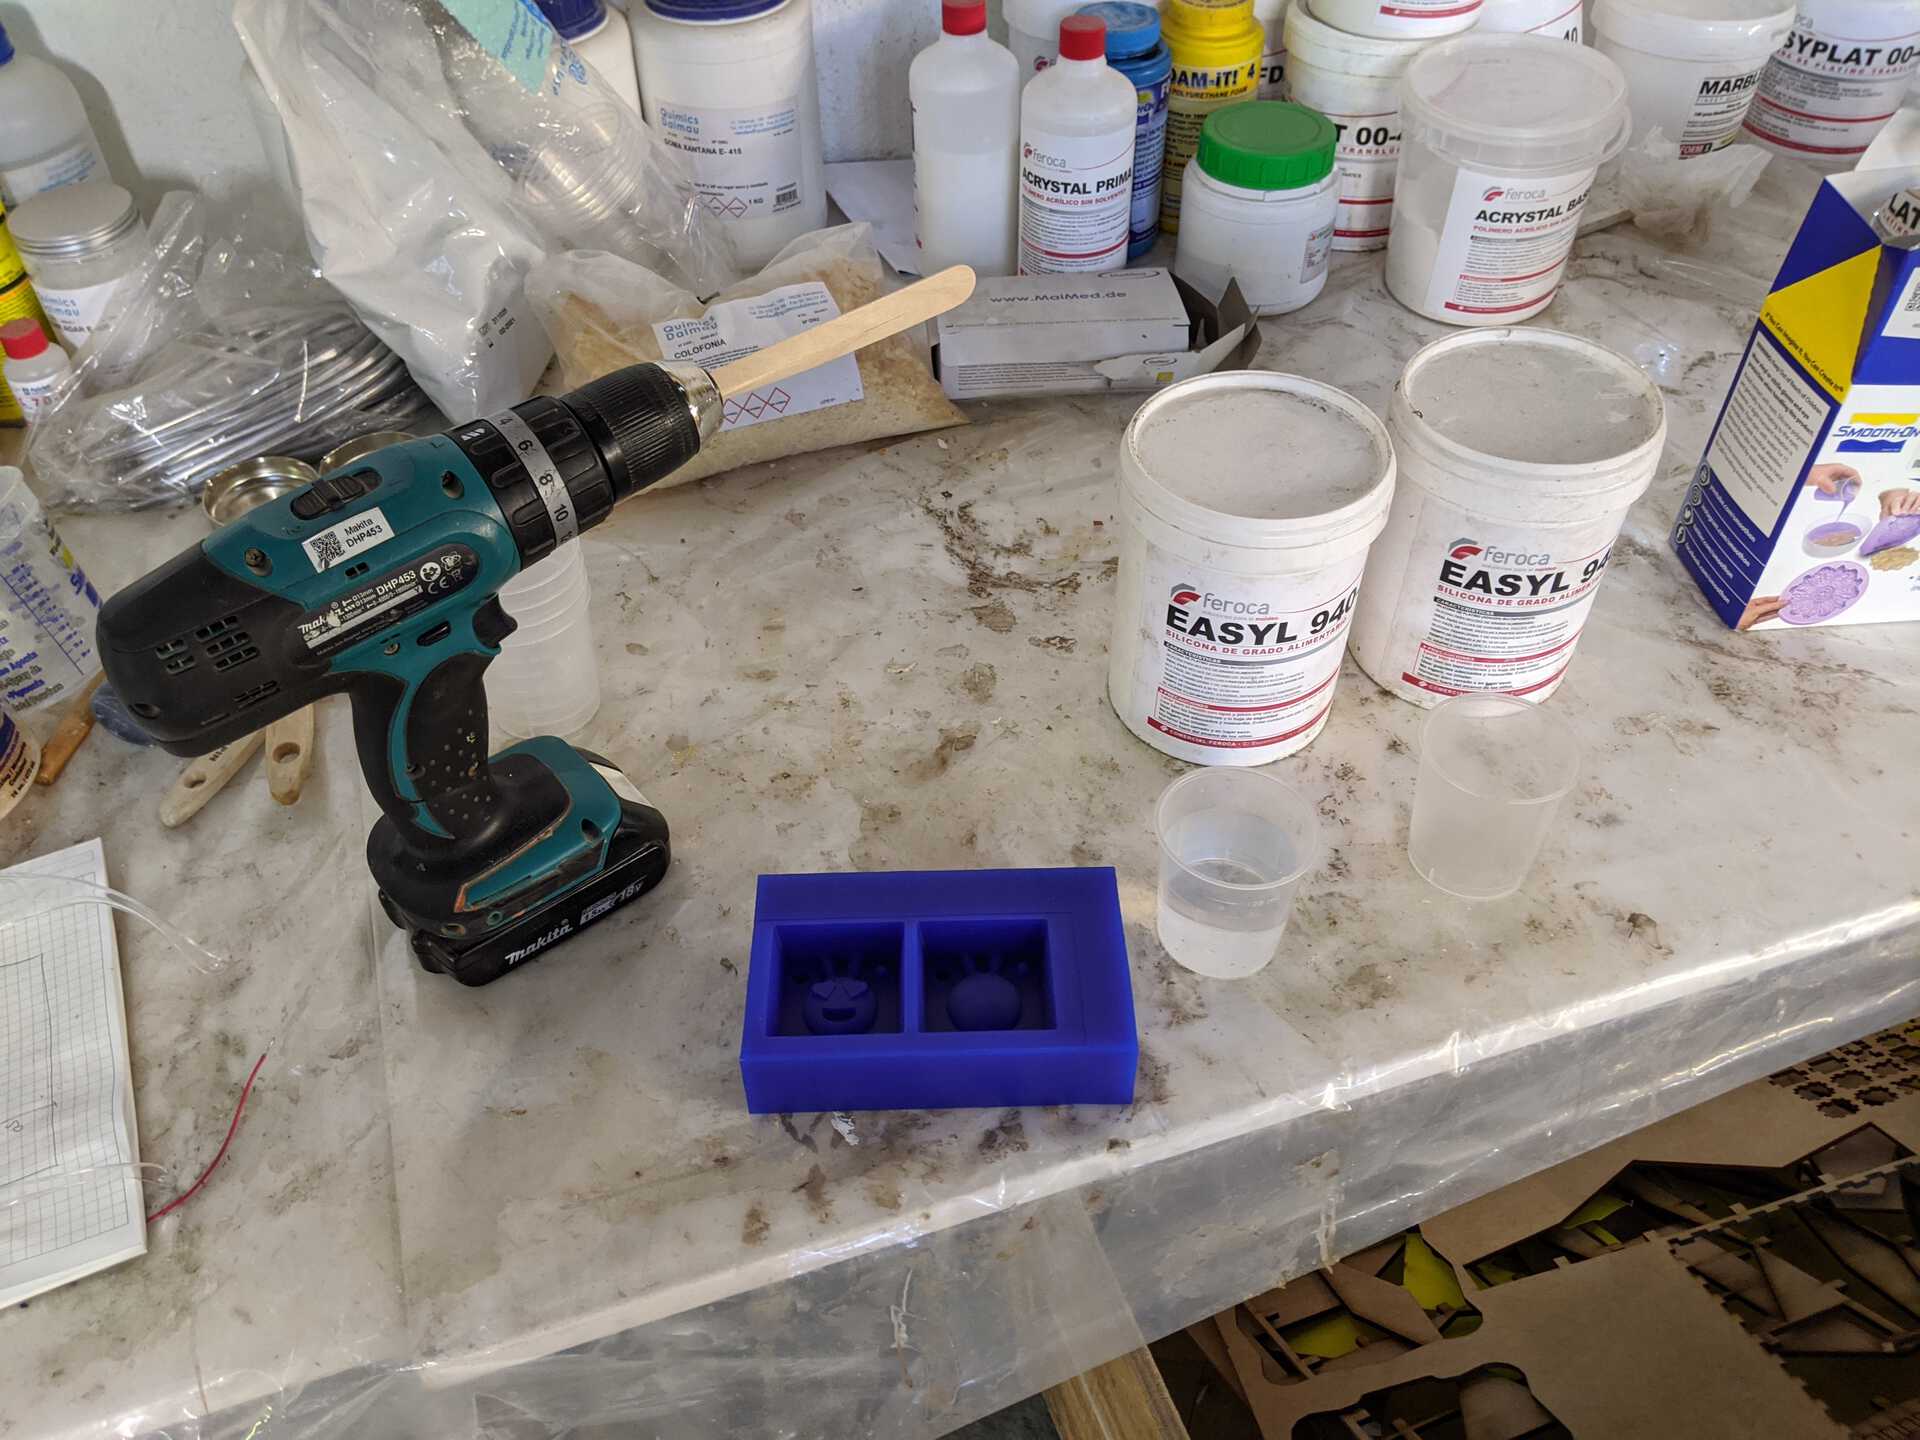
I poured it in, not doing a great job at doing a thin strip in the first place, but then managed to bring it back under control. I think the vacuum process will be essential.
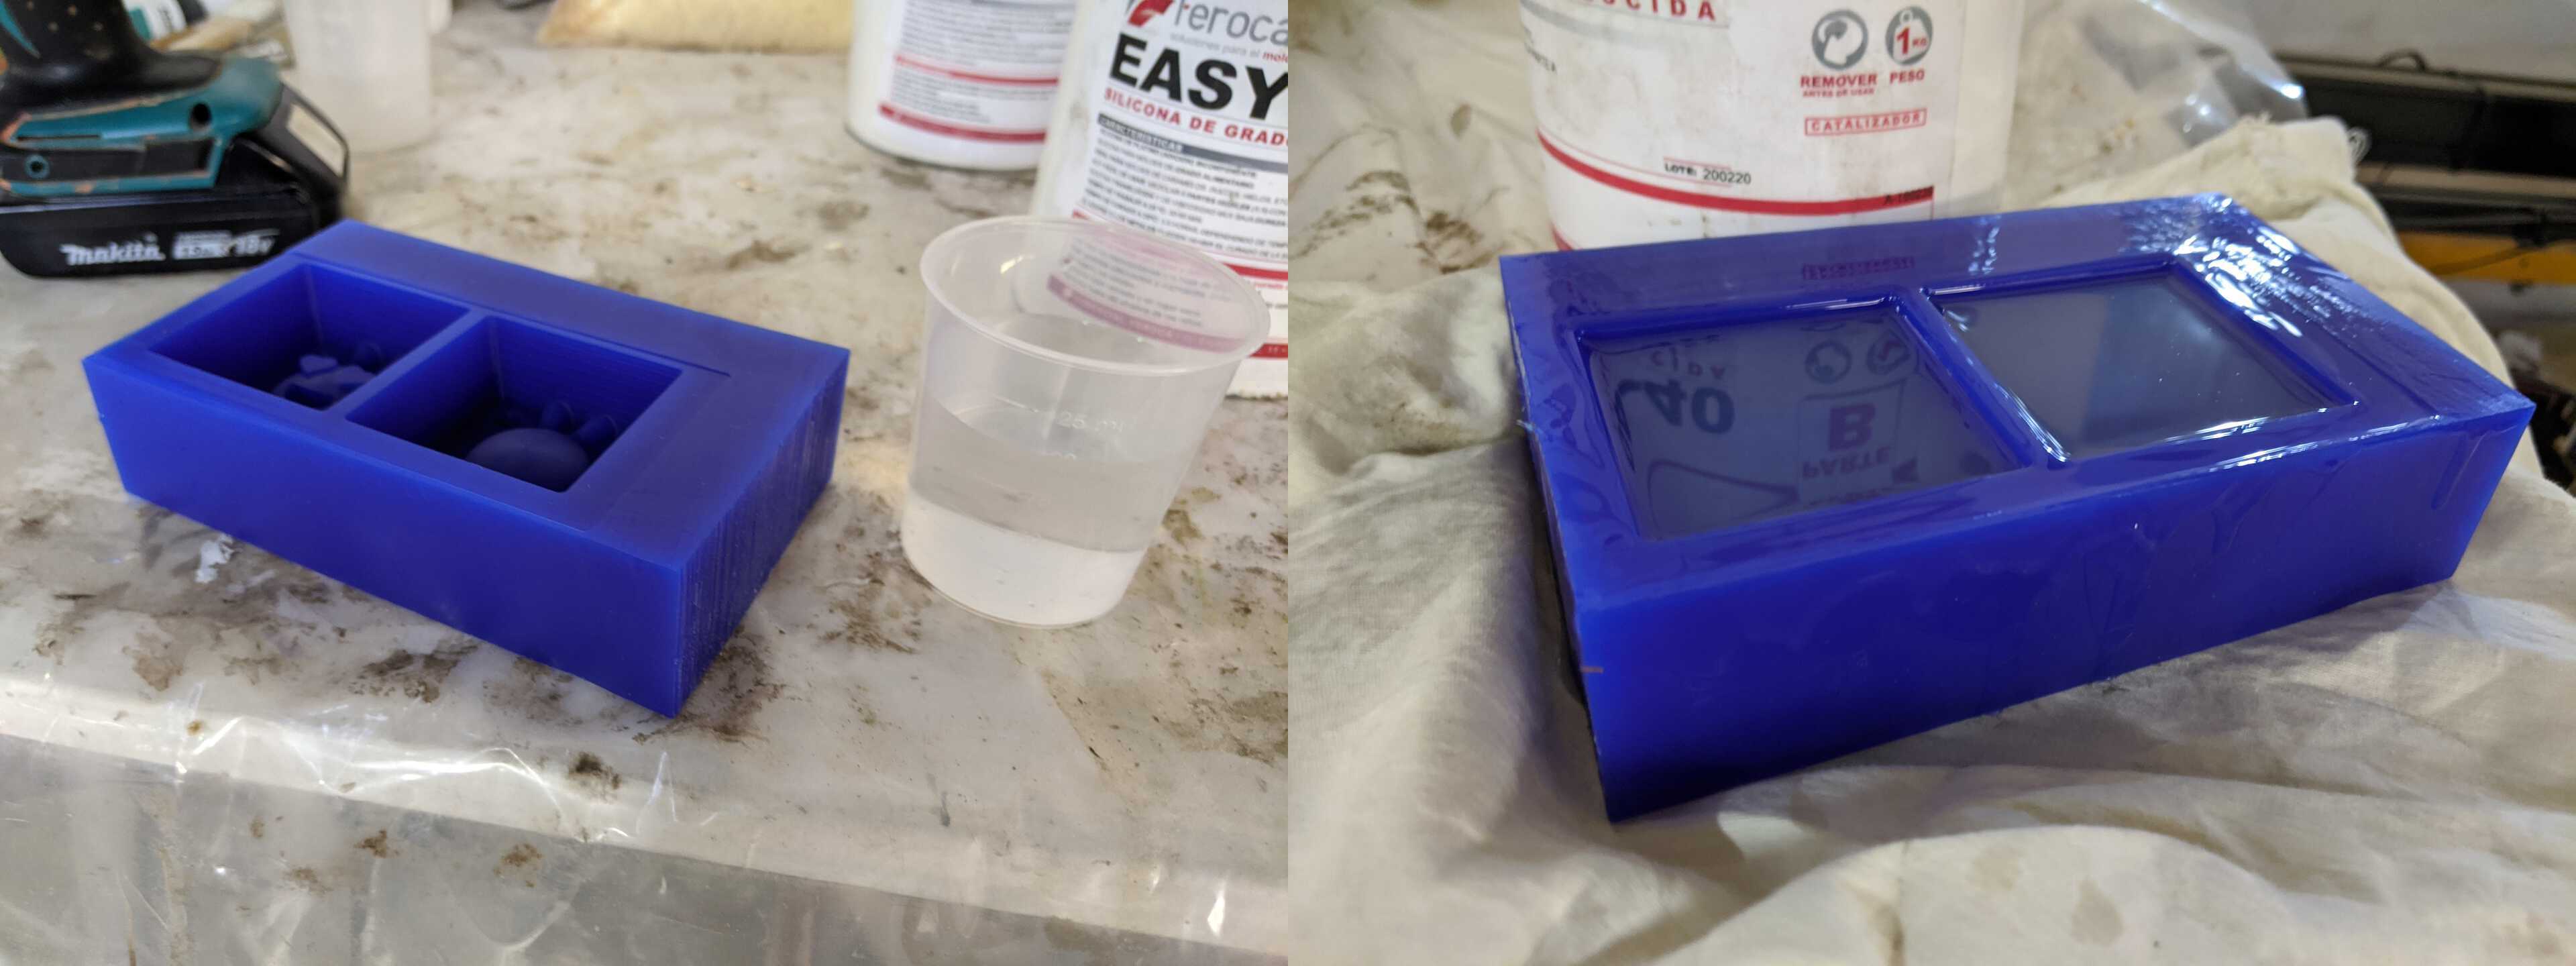
After pouring it in I was quite happy because it arrived perfectly at the top of the mould which means my measurements were good.
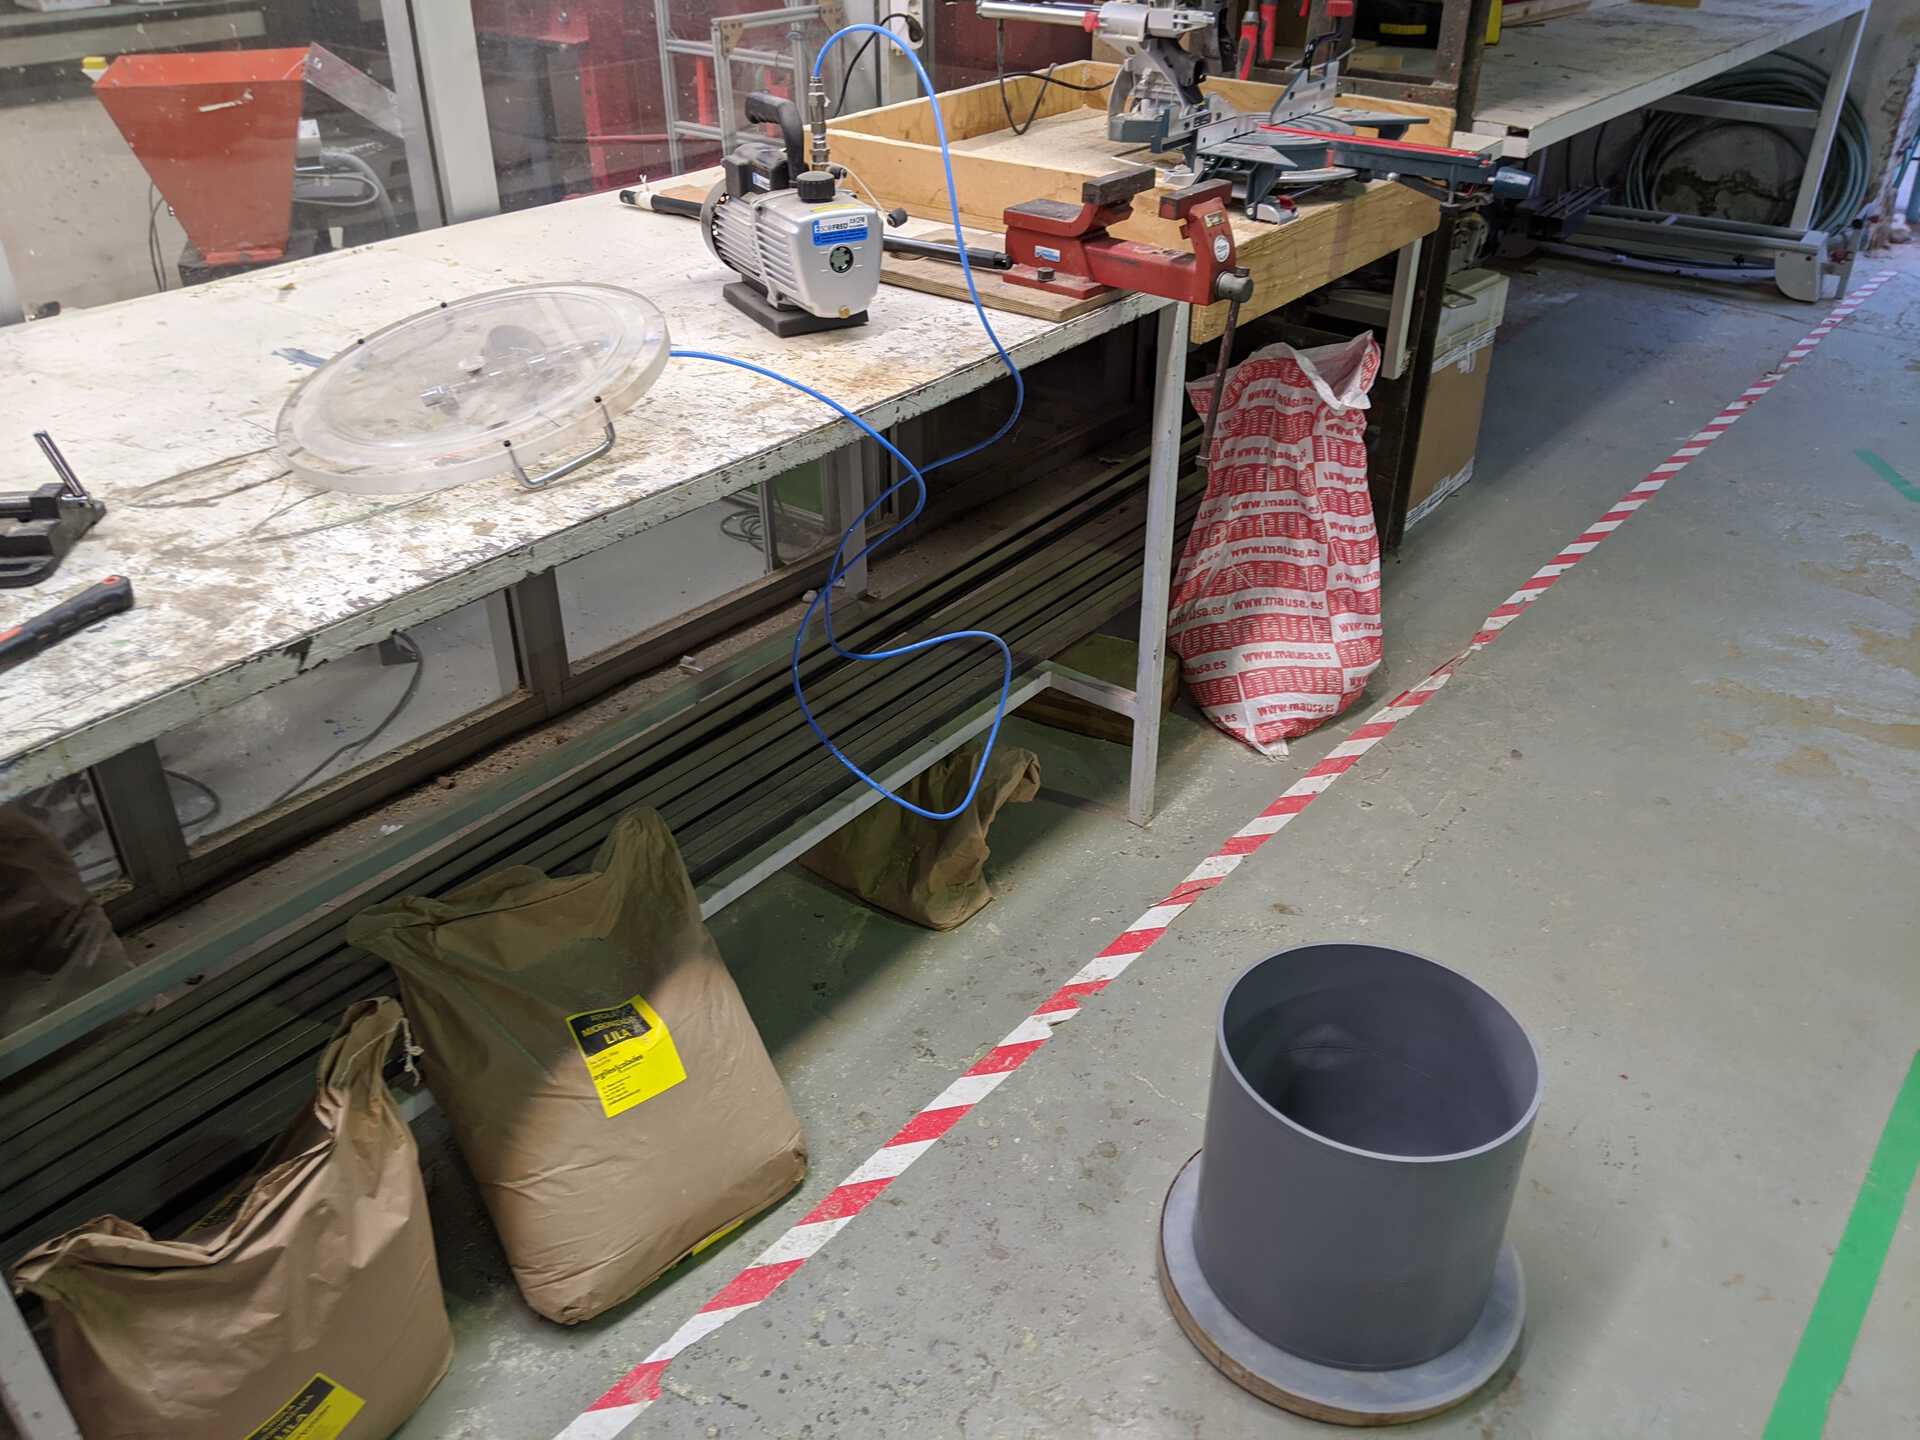
But… when I put it in the vacuum chamber all the bubbles surfaced, bringing the silicone with it and it overflowed over the edges. It did so for a while, but I didn’t think it was too bad, it wasn’t a lot, and I had made the mould quite deep so even if the silicone wasn’t up to the brim it’d be fine.
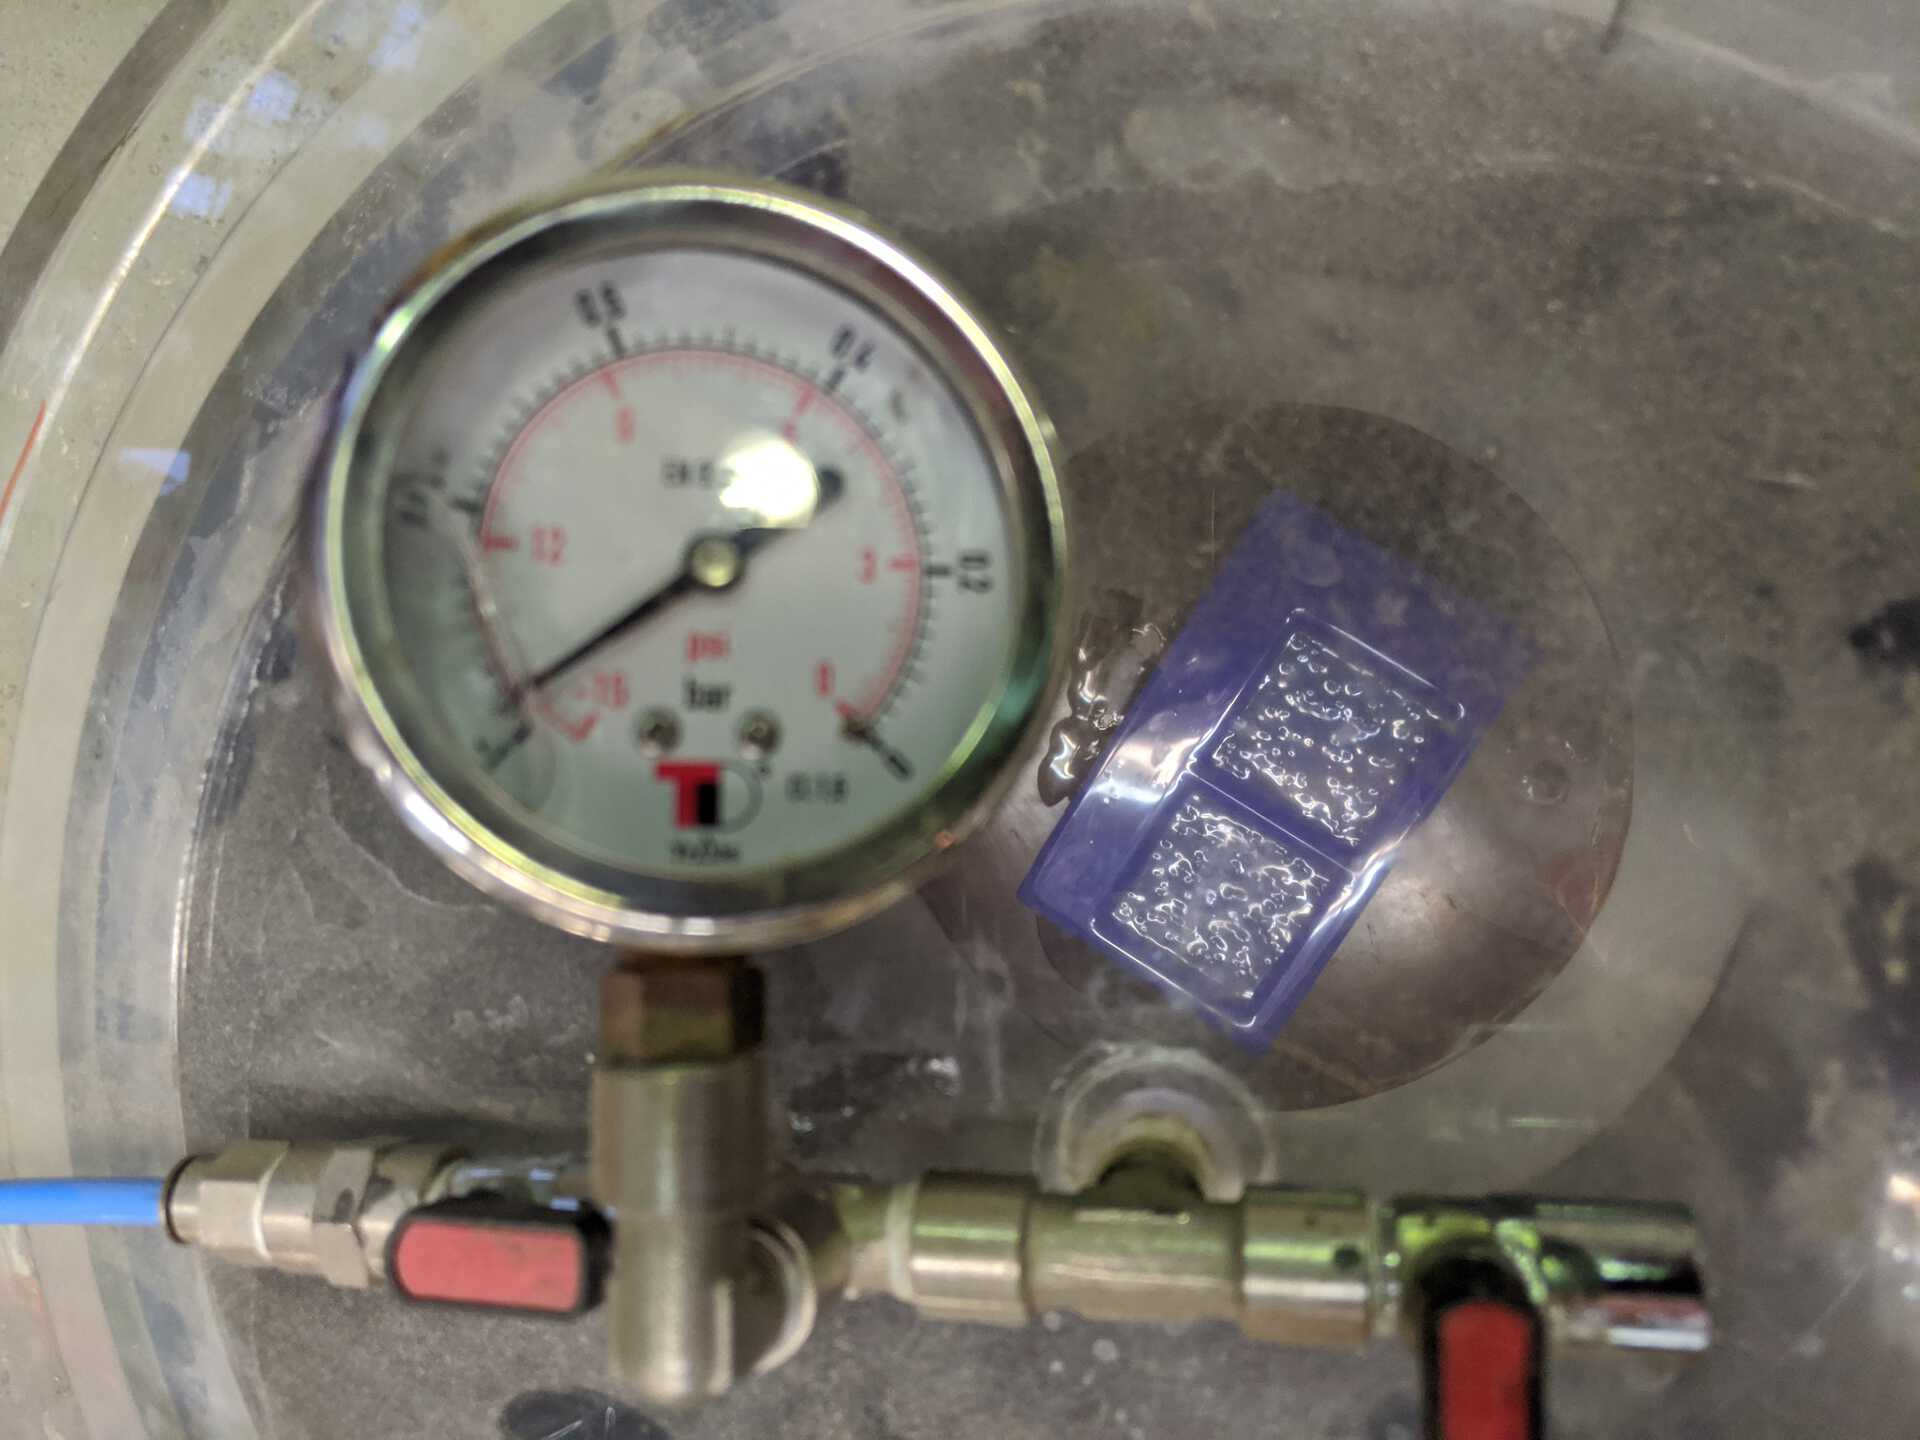
After 5 mins I evacuated some air and re-created the vacuum, all while shaking everything to try and get more bubbles out.
Another 5 mins in and I took it out. It looks pretty good! Now I have to wait until tomorrow to take out and see what it’s like. I’m quite excited!
Unmoulding the mould
To unmould you can slide a flat ice cream stick between the edges, or just pull it away with your fingers. The stick comes in handy to lift the mould though.
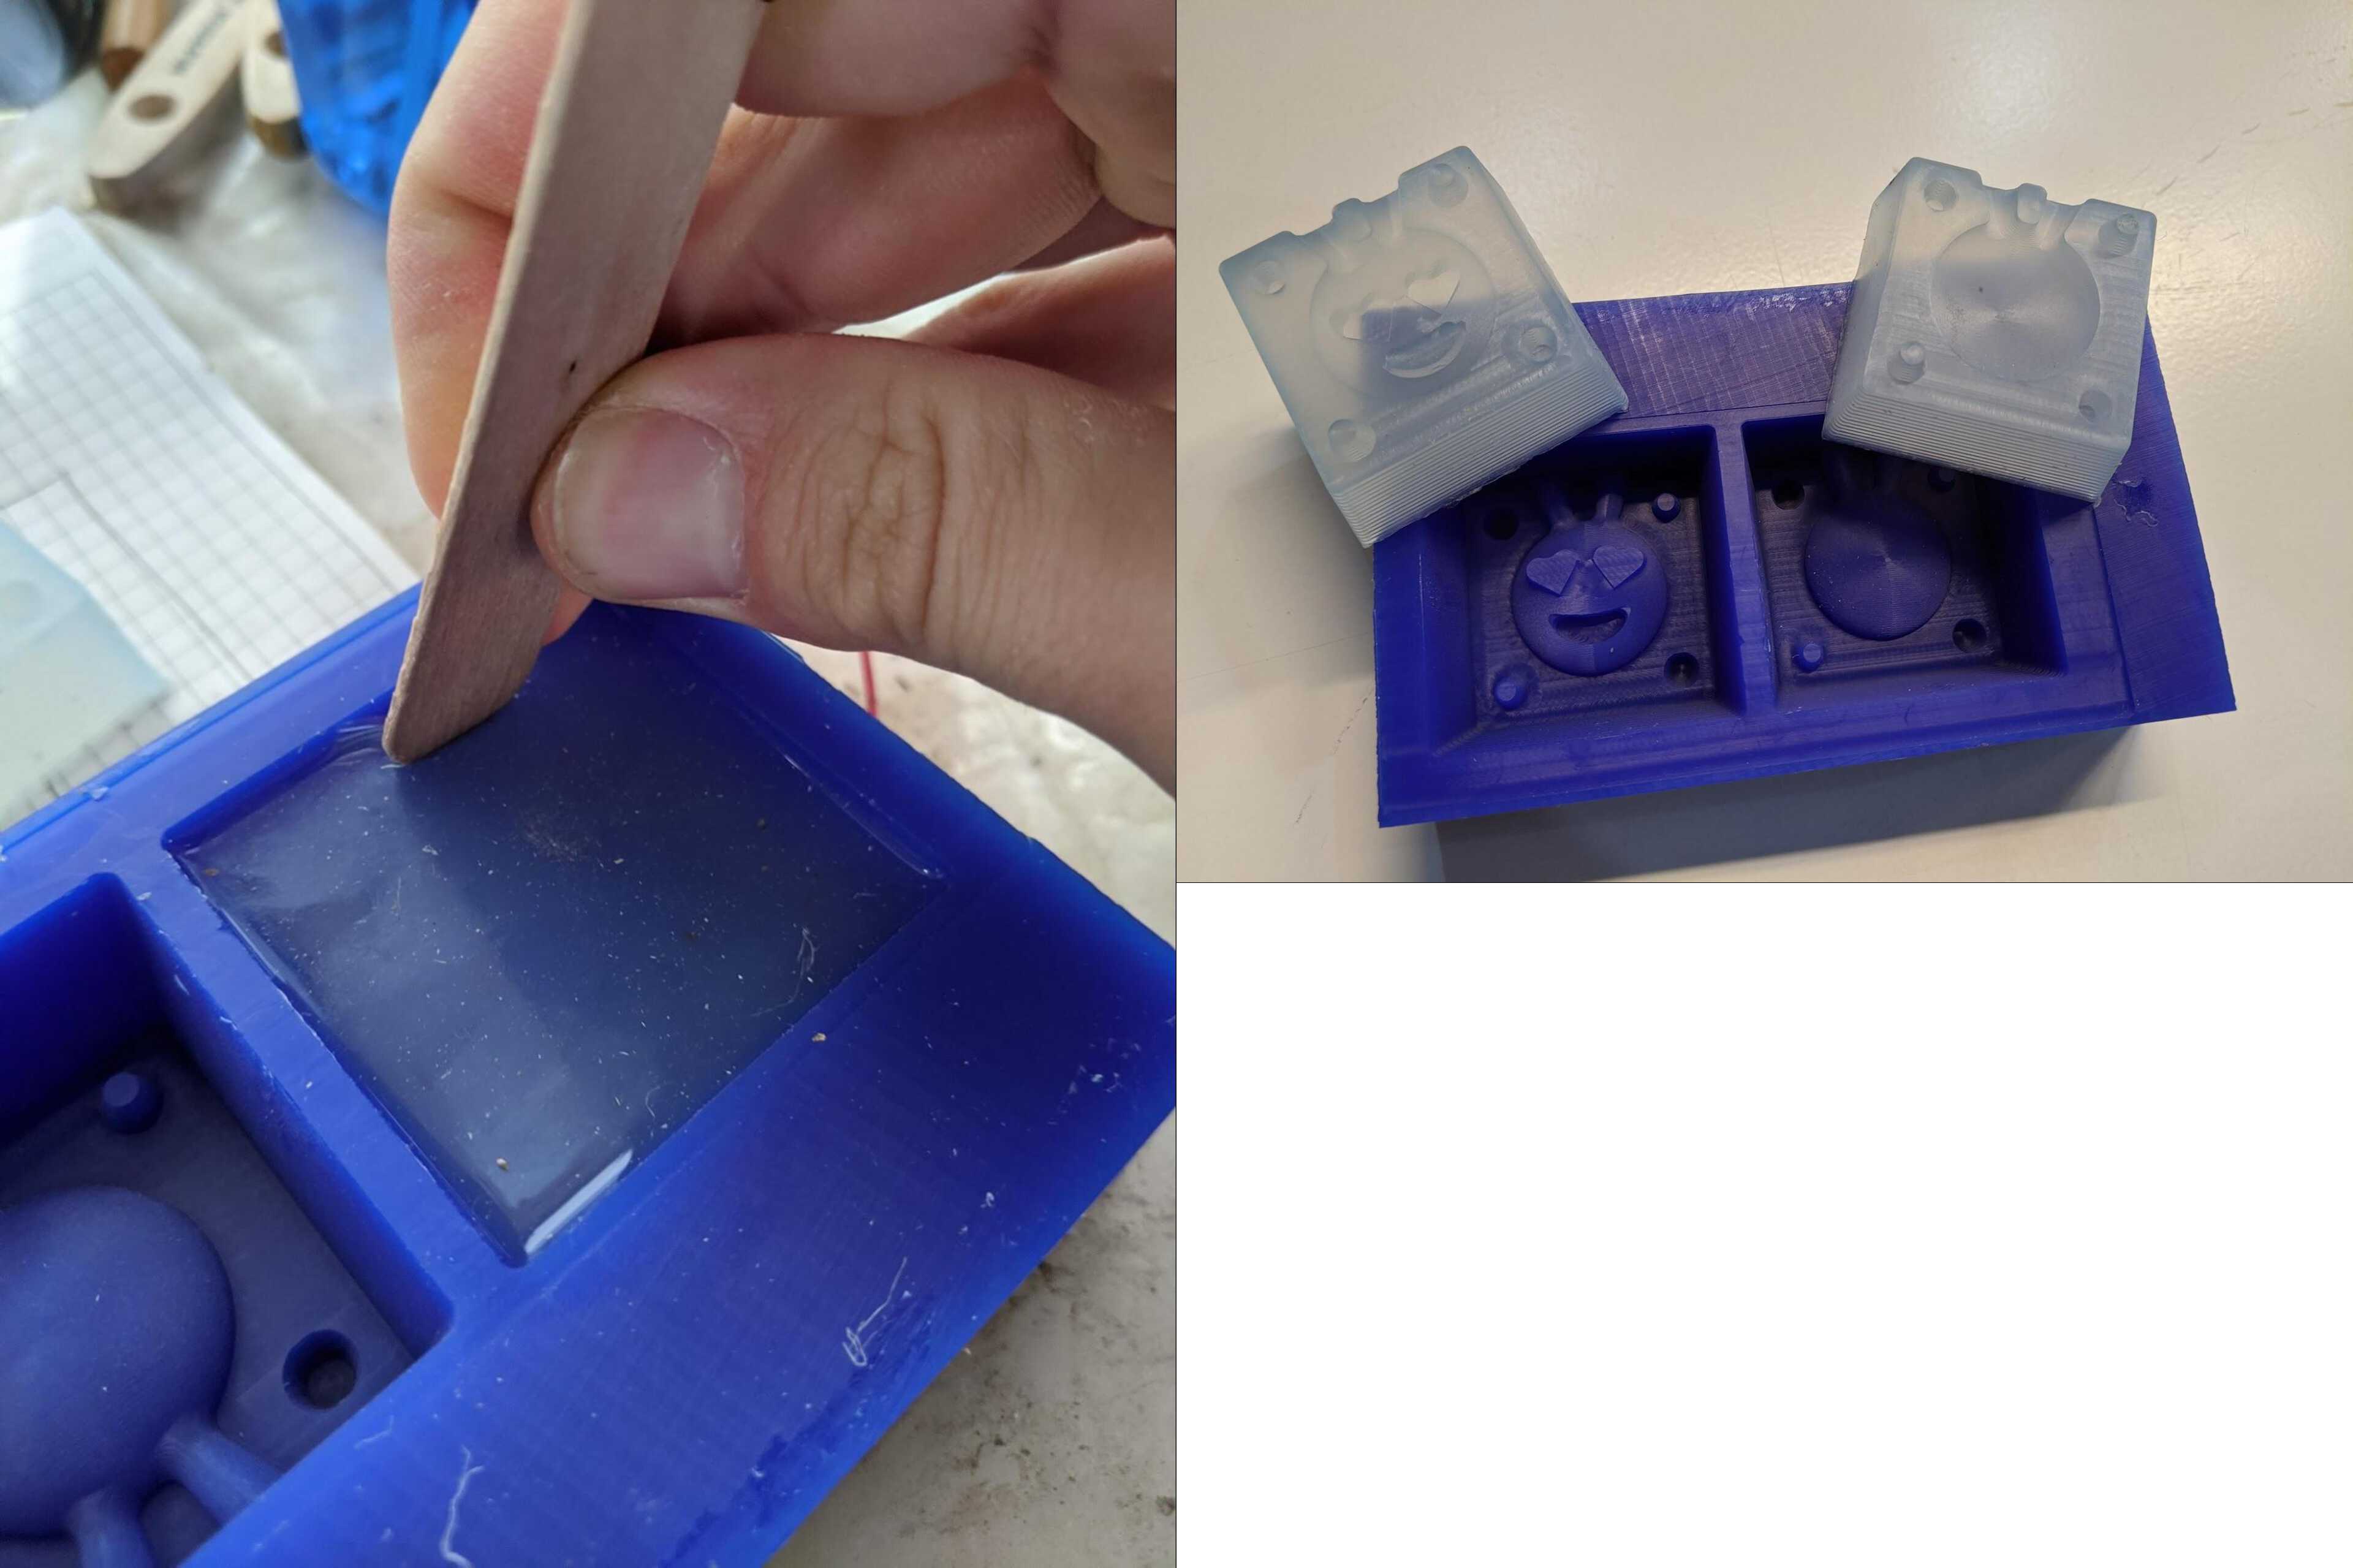
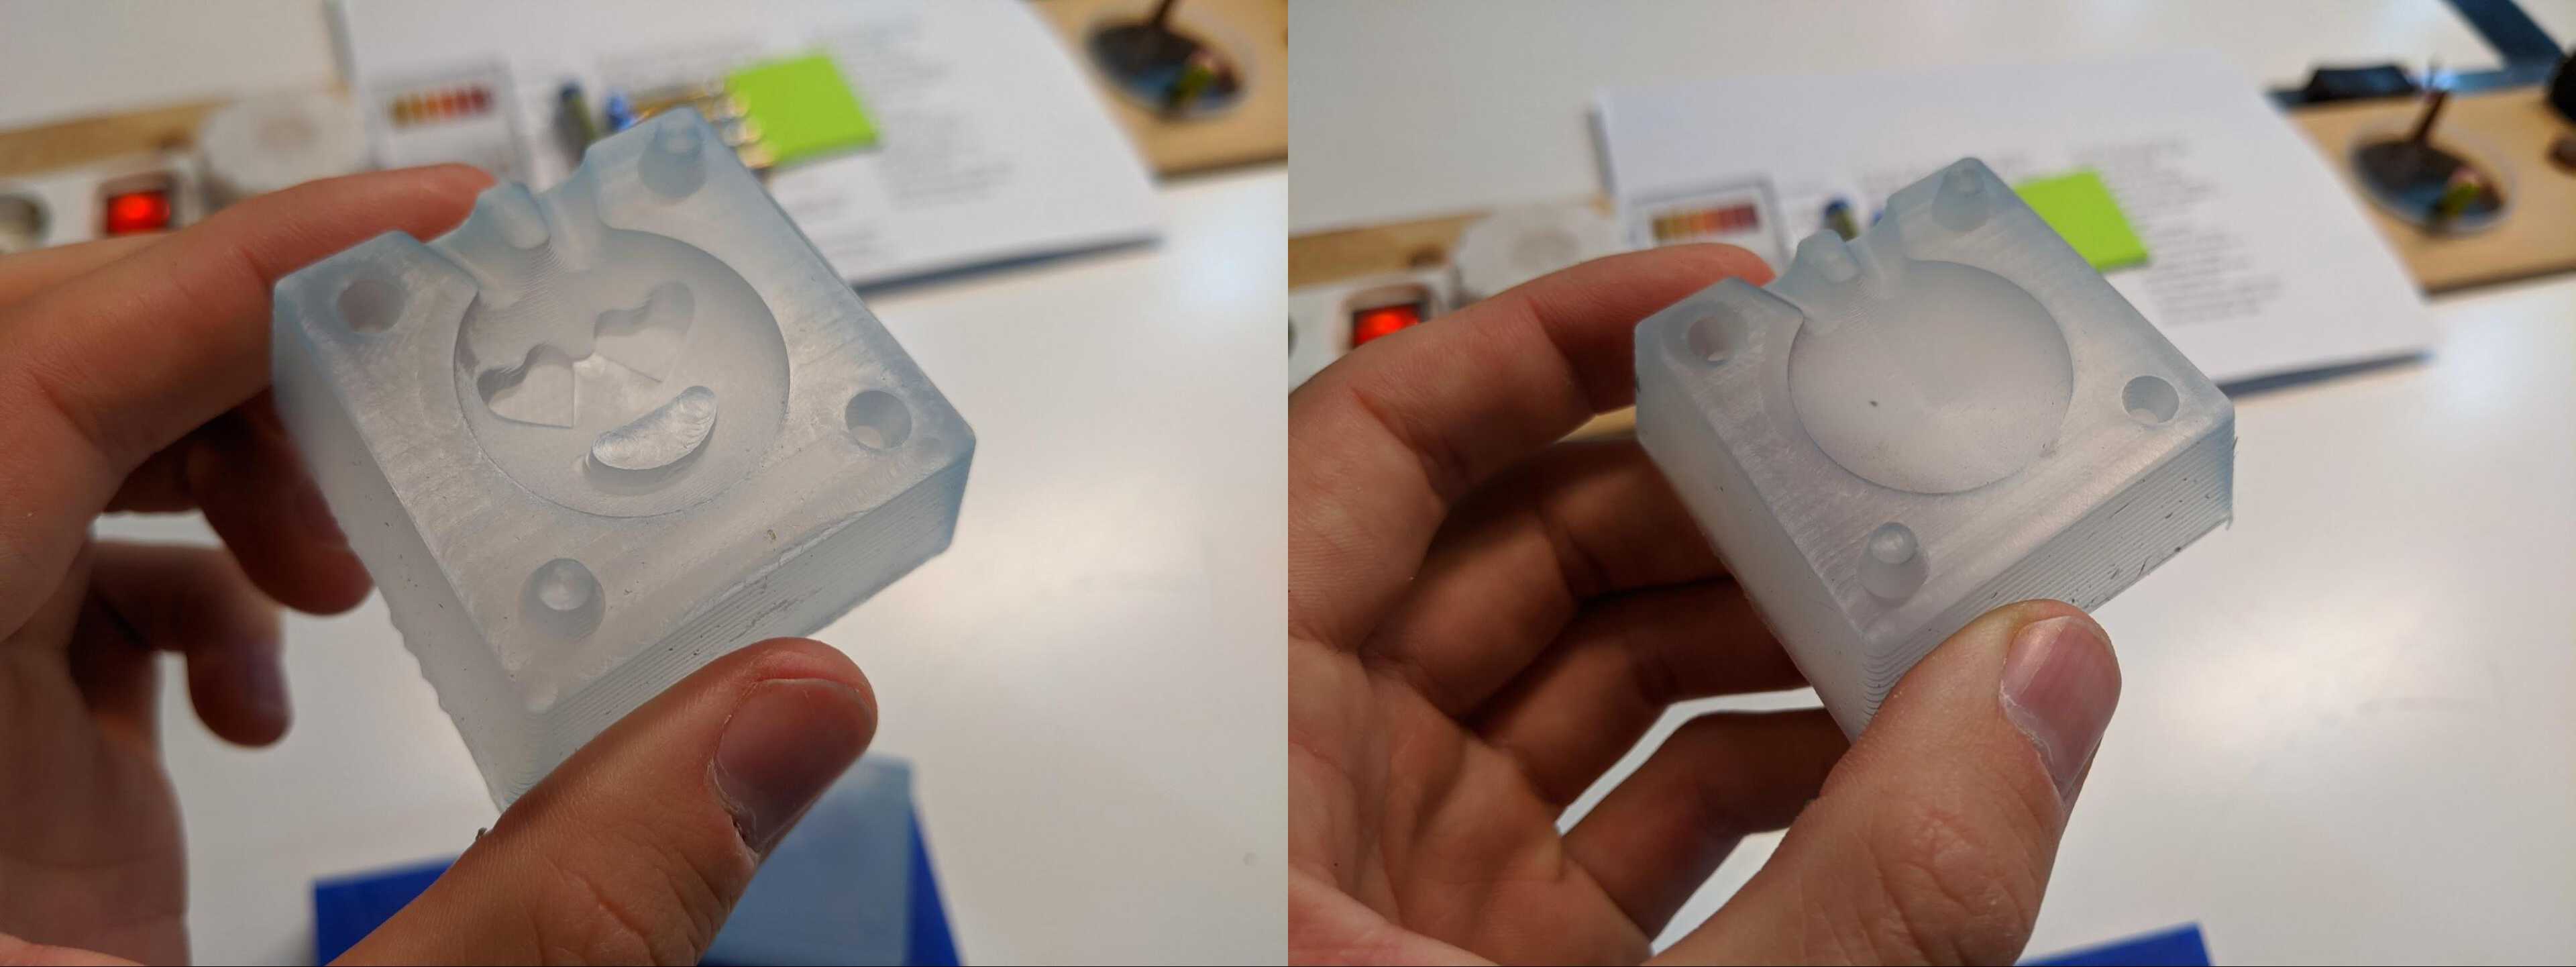
It has been unmoulded… and it looks great! No apparent bubbles or deformities, I’m happy.
Rubber silicon for a flexible mould - Smooth-On Mold Star 20T
The Information about it
Mold Star™ 20T Product Information
This moulding material allows for casting hard parts as it’s flexible enough to take them out of the mould, same as the food-safe mould. The general rule being, if you are casting something soft use a hard mould, if you are casting something hard, use a soft mould.

I used this one to cast a second mould for chemical materials and not soil the food-safe one.
The work time was only 6 minutes, so it had to be done quickly! I poured both equals parts and mixed it by hand this time to try and avoid bubbles. I poured it in the mould trying to make a thin strip although I still did quite fast as it sets quickly. I also wanted to put it in the vacuum machine so I had to be even quicker.
I did and a fair amount of bubbles came up. After a while they were all frozen in space so I emptied the tank and the bubbles pretty much disappeared, collapsing on themselves as mini Bang-Bigs (opposite of Big Bang). The destruction of universes.
The cure time for this mould is only 30 mins which is impressive! Enough for me to go and get a coffee and cast some chocolate with the other mould.
P.S. To unmould, do the same as before, slide a little flat stick and get it out.
Casting materials
Milka chocolate
Like I said, I want to make chocolates. It’s fun because there’s no datasheet for chocolate, it’ll just have to be a lot of messing around.


I bought some Milka chocolate and melted in a bain-marie - that is boiling water in a pan and then melting chocolate in a plate that is sitting in the boiling water. It allows for smoother, less harsh melting technique than straight fire. It melted but was visibly too thick to be poured in the small holes of the mould, so I added water to the chocolate. Hopefully it won’t affect it when it comes to hardening back into chocolate, although Milka is already quite soft chocolate without water in… let’s see.

The melting temperature of chocolate is only around 30-32ºC (hence why it melts when you hold it). A bain-marie, by definition, is 100ºC, as it is the boiling point of water.
When I poured it in it quickly blocked the pouring vent as it was a bit too viscous (or the holes were too small), so I had to push it down with a little stick. After a while it seems like it was full.
There’s no set curing time, but it’s just chocolate and it needs to cool down enough to harden, so I put it in a refrigerator for 30 mins. After 30 mins the left over chocolate on top of the mould wasn’t dry, I could easily scoop it up with my finger, which is not great, because it means the voluminous emoticon inside must be super gooey… Let’s put in the freezer instead then.

It failed. I think the Milka chocolate is already by nature super liquid and gooey and melts as soon as you touch it, so there’s no chance to get it to harden, especially after adding water to it.
Dark chocolate
I also bought some dark chocolate for making cakes. This one will dry for sure, the question is, will I be able to pour it? I might have to fill both half at the same time and then stick them together.

I wasn’t able to pour it in, the melted chocolate was super thick, but I spread it on both half of the mould and then brought it together… It worked!

Pine resin
Not too different from the chocolate. Different sources online say it’s melting point is around 100ºC. It also says it’s flammable so you have to be careful how to heat it.
I like all these organic materials and not wasting chemicals to make useless stuff. If I melt too much resin it just hardens again and you can put it back in the bag!
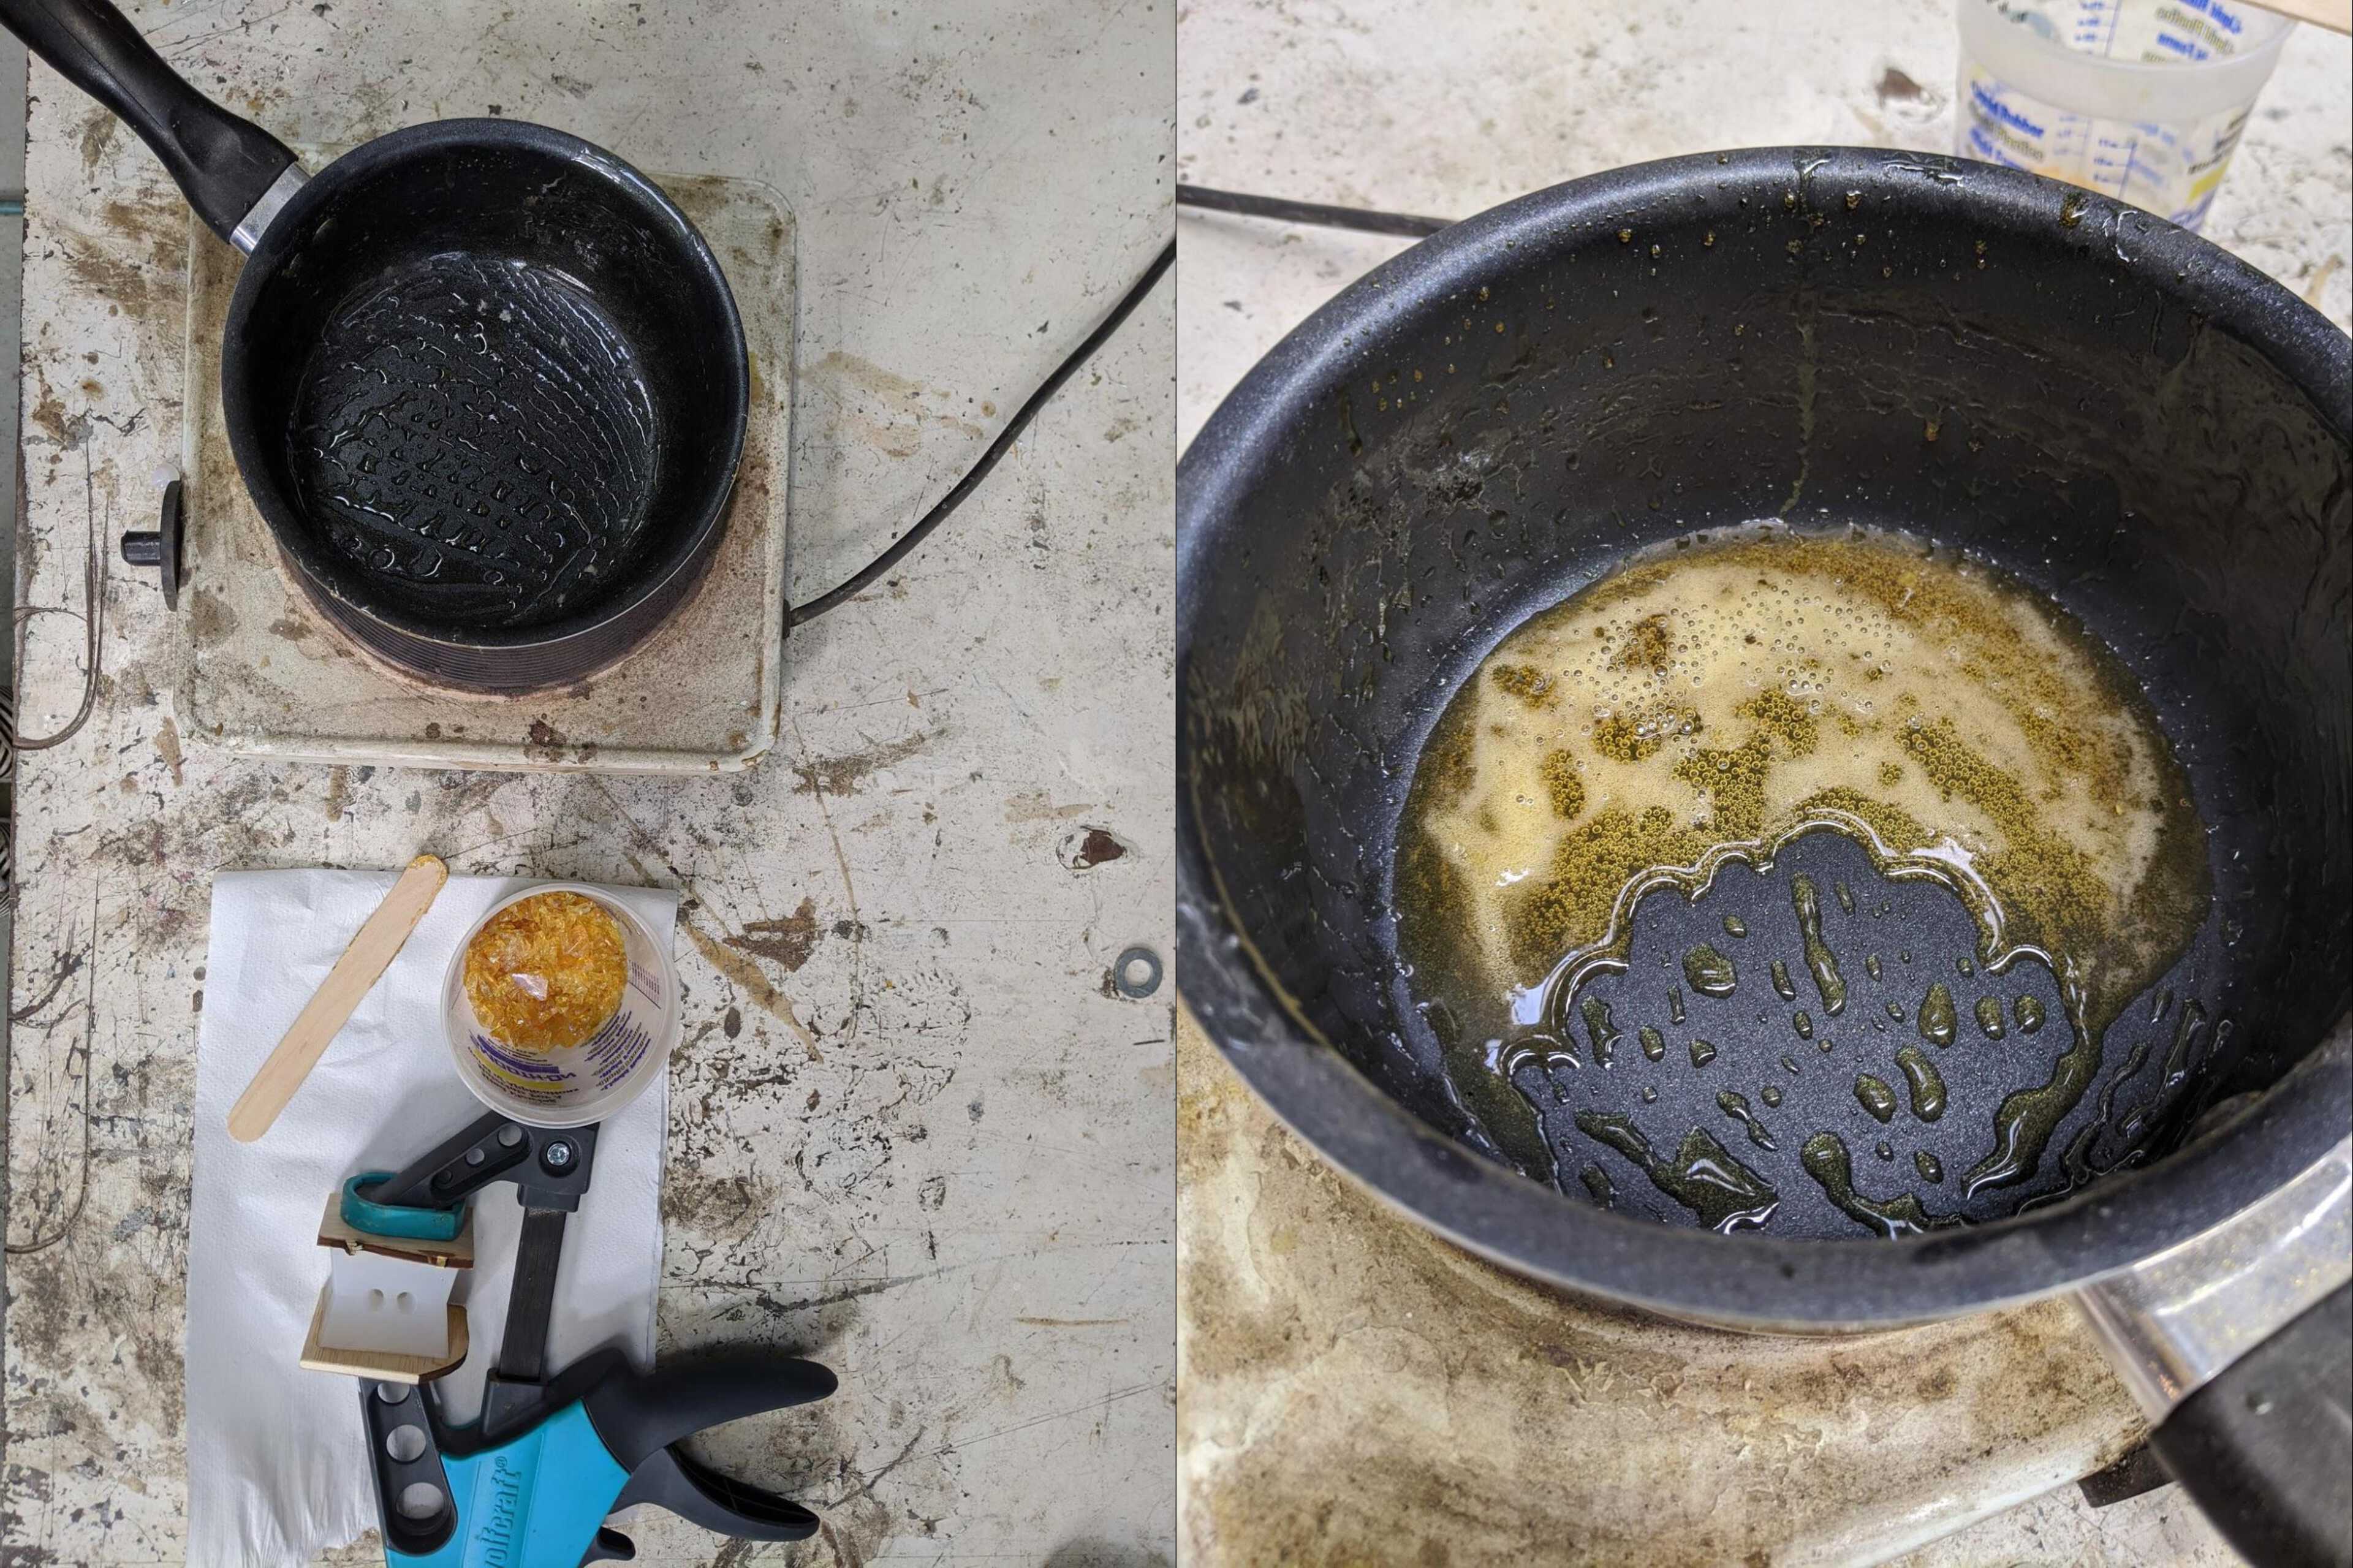
The pine resin at high temperature becomes very liquid which is great for pouring.
I tried once but a gap created itself in the middle of the mould and the piece collapsed on itself when I held it a tiny bit too hard.
The great thing with resin is that it hardens in 5 mins, so you can do a few tests quickly and not have to wait hours for it to cure.
The second test was great. I made a thinner drip when I poured it, and poured it just next to the hole, so that after it just falls into the hole and doesn’t get obstructed. It worked super well!
Looks good :)
Acrystal basic
The Acrystal Prima Polvo + Emulsión Acrílica doesn’t have a crazy name like the other chemically stuff.
This one has kind of a plaster finish. I didn’t do a great job with this one as I didn’t mix enough and ran out half through. A feat that is impressive as all I need to fill my mould is about 5mL… (I poured water in my mould and then in the measuring cup).

Also, as I was making a tiny amount it was very hard to calculate correctly the 2.5 PART A to 1 PART B ratio. I think I may have put a bit too much of PART A (powder) as it wasn’t very liquid and therefore made it hard to pour it in.
It takes roughly 8 to 10 mins for it to start to harden, and I took a little while to pour it in. I’m not expecting any great results, I’ll have to try again.
The datasheet says you can start unmoulding after 20 mins to 2 hours depending on the complexity of the shape. The example they give is a brick that uses roughly a 1kg of material, so I’m guessing my 5mL would probably dry quickly.

I unmoulded it and as expected half was missing, I like the definition of it though, it’s super smooth (although it could be even more if I had left the milling finish it’s job). As it was quick to set I decided to make another one, hoping for better results.
I poured it again, I tried to do as thin as possible but it was taking too long and drying. At the end I had to actually push the material in with a little piece of wood. It filled the entire mould though, and looks good!

Conclusion
I really liked this assignment!
In general I’d do two things different:
- Minimise the roughing and finishing areas when creating the files
- make the vents bigger
- make them vertical to be able to pour the material straight into the mould rather than having it flow on the wall and possibly obstruct the way
I’d like to explore more complex mold and more casting material, stuff like soap for example.
Picture of the entire family!

Download files
Here are the STL file of the mould and the .pnr files for the milling
Download all files