 WELCOME TO MY
  WEEK 3
RETURN TO HOMEPAGE
Computer-controlled Cutting
Hi all?..It has been a rainy week in Nairobi nevertheless we enjoyed working with the Laser cutter and Vinyl Cutter in the lab.This week was all about intergrating Computer-Controlled cutting into practice with a variety of processes and tools.
Before you check out what we did this week, i`ll point out a few important hands-on in computer-controlled cutting...
Below are the basic knowledge and guidelines to keep in mind while dealing with Computer-Controlled Cutting as recommended by the Fab Academy.
applications
signs, pop-up cards, books, screen printing, flex, multi-layer circuits, antennas
knives, vinyl, masking tape, transfer adhesive, copper, epoxy film, (carpet tape),(sandblast stencil)
force, speed, cut depth, temperature, humidity, ... rollers, feeding, weeding, adhesion, lift vs shear
applications:
marking, engraving, raster, vector,grayscale,svg,path,png,path,screen printing,halftone,holes, path,press-fit construction ,stick-slip, bistability, clearance,
chamfer, parametric design, GIK, gik.cad, gik.sb, gik.math, gik.png, flexures, living hinges, mechanisms, joints
state diagram,population inversion,gain medium,lasing threshold, output coupling,beam mode, profile, waist,diffraction limit.
CO2 (10.6 u), InGaAsP (1-2 u), AlGaAs (600-900 nm), Nd:YAG (1064, 532 nm), Ti:sapphire (650-1100 nm), excimer (100-300 nm).
burning, melting, evaporation, ablation,
assist, exhaust, filter,
Epilog, Universal, Trotec, GCC, Full Spectrum, Lasersaur, Coherent/Beam, Resonetics, Oxford, KM Labs.
Class 1, venting, cleaning optics, supervision, air/gas flow, fires.
materials
cardboard, Edge Crush Test (ECT) 44,wood,acrylic [polycarbonate] [metal] flame test
power, speed, rate, coordinate system, origin, vector, raster.
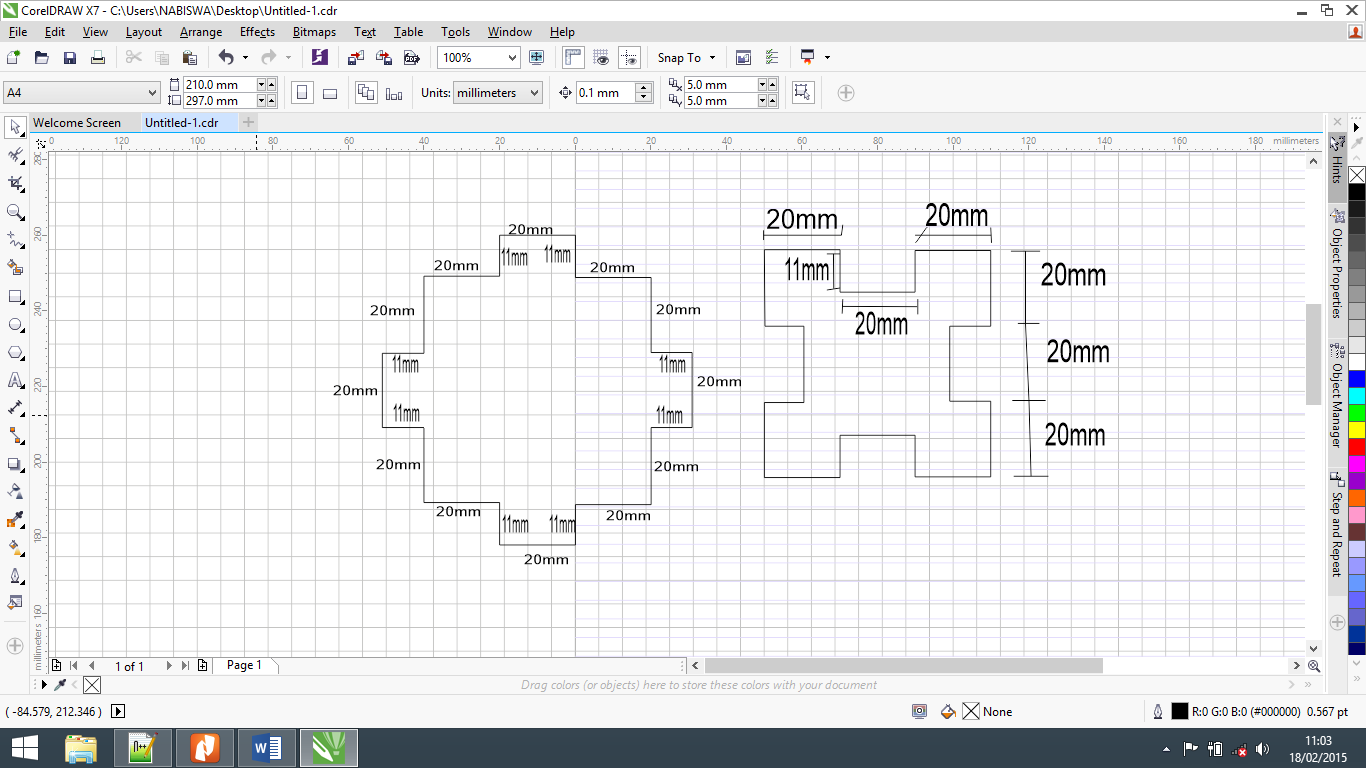
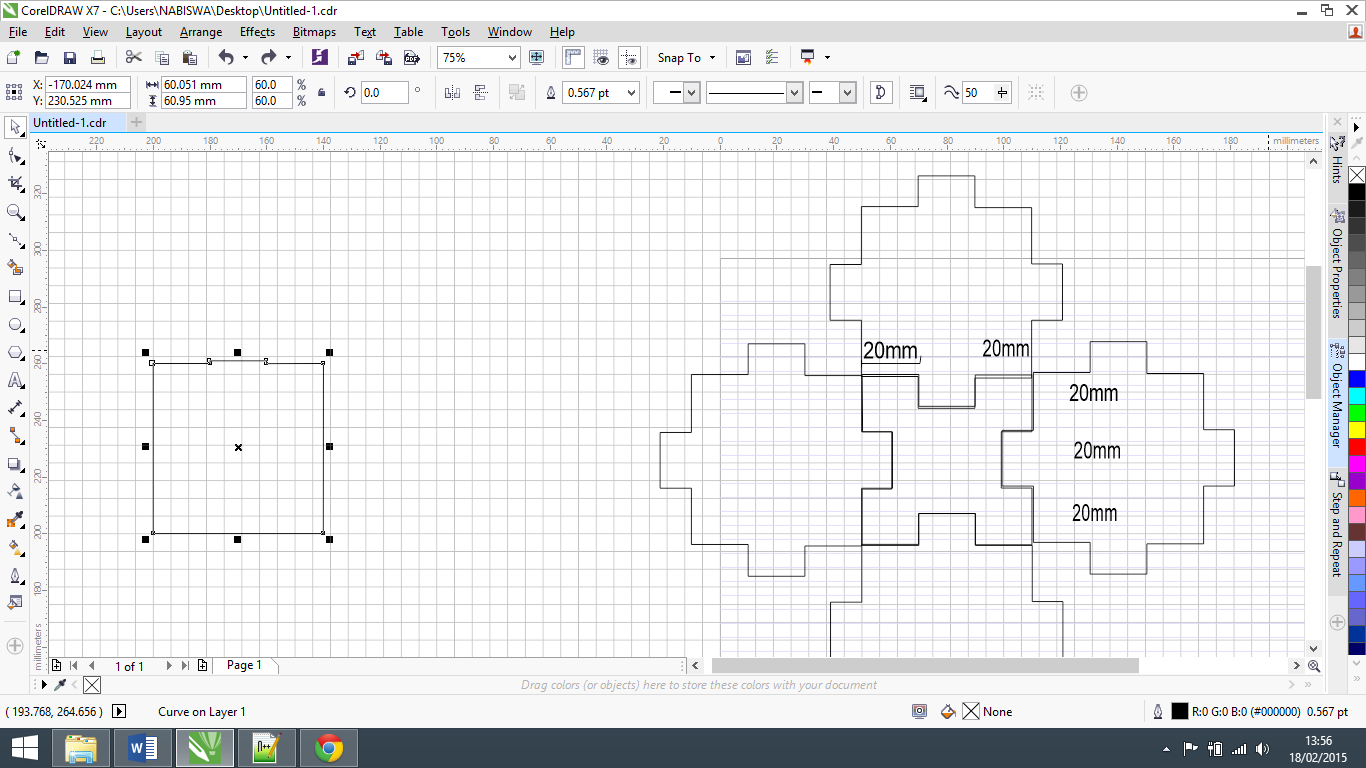
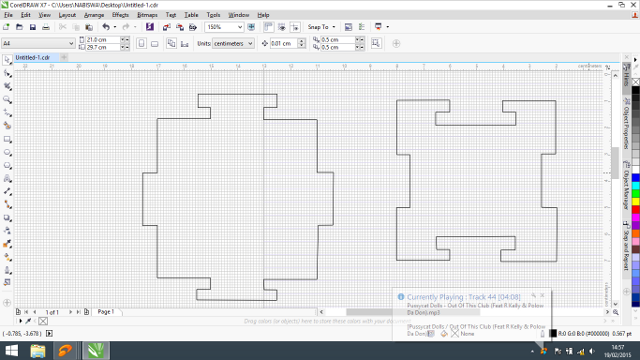
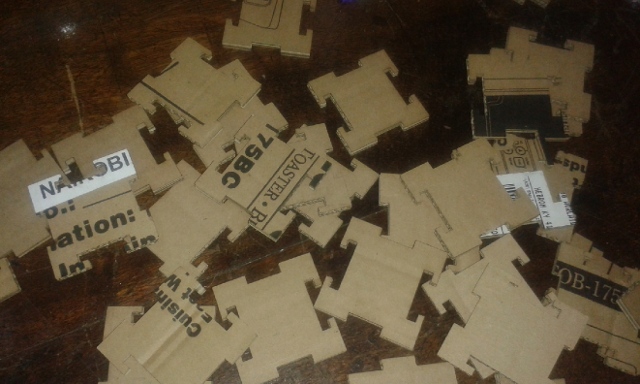
Alright now to the task which was creating a Press-fit Construction Kit using either cardboard,Edge Crush Test (ECT) 44,wood,acrylic etc. ...I settled on creating a jigsaw pattern made of cardboard,,and I chose Corel Draw for designing purposes:
Please don`t celebrate coming up with a random idea of fitting patterns off head,,it takes quite an effort in actual designing..That`s why after coming up with the first models which seemed to fit into each other,, it hit me I had to modify the design a bit for actual fitting through compressing.
Alright before proceeding check out my original WEEK 3 design files for downloading:
>>> Download My model 1 press-fit files >>> Download My model 2 press-fit files
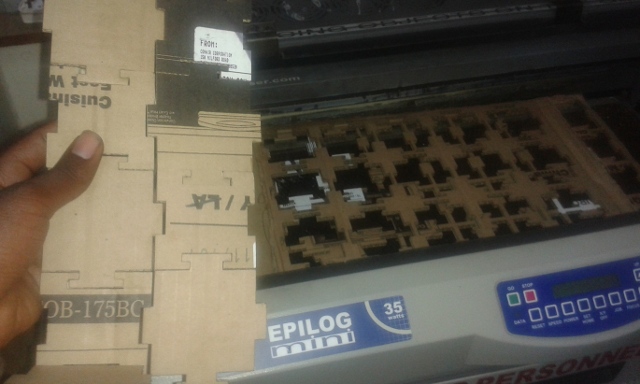
This is how I went about the production using a Laser Cutter:
I learnt the basic operations, settings and precaution measures while using the Laser Cutter through apprenticeship from local fablab gurus..It took several man hours so as to acquaint myself with the skills before I got entrusted with doing the assignment individually without supervision.
NOTE: a list of settings for selected materials is provided in all cases,,luckily for me the term "Cardboard" wasn`t listed......guess what happened?? NECESSITY is the mother of INNOVATION...I decided to interrogate the Epilog Mini(laser cutter) over its requirements on Speed, Power and Frequency incase its presented with Cardboard as material for cutting...after few thoughtful moments..Cardboard was admitted with a Speed of 25%, Power of 50% and a Frequency of 500 hertz...please memorize the fire brigade hotline incase the interrogation backfires..hehehehe.

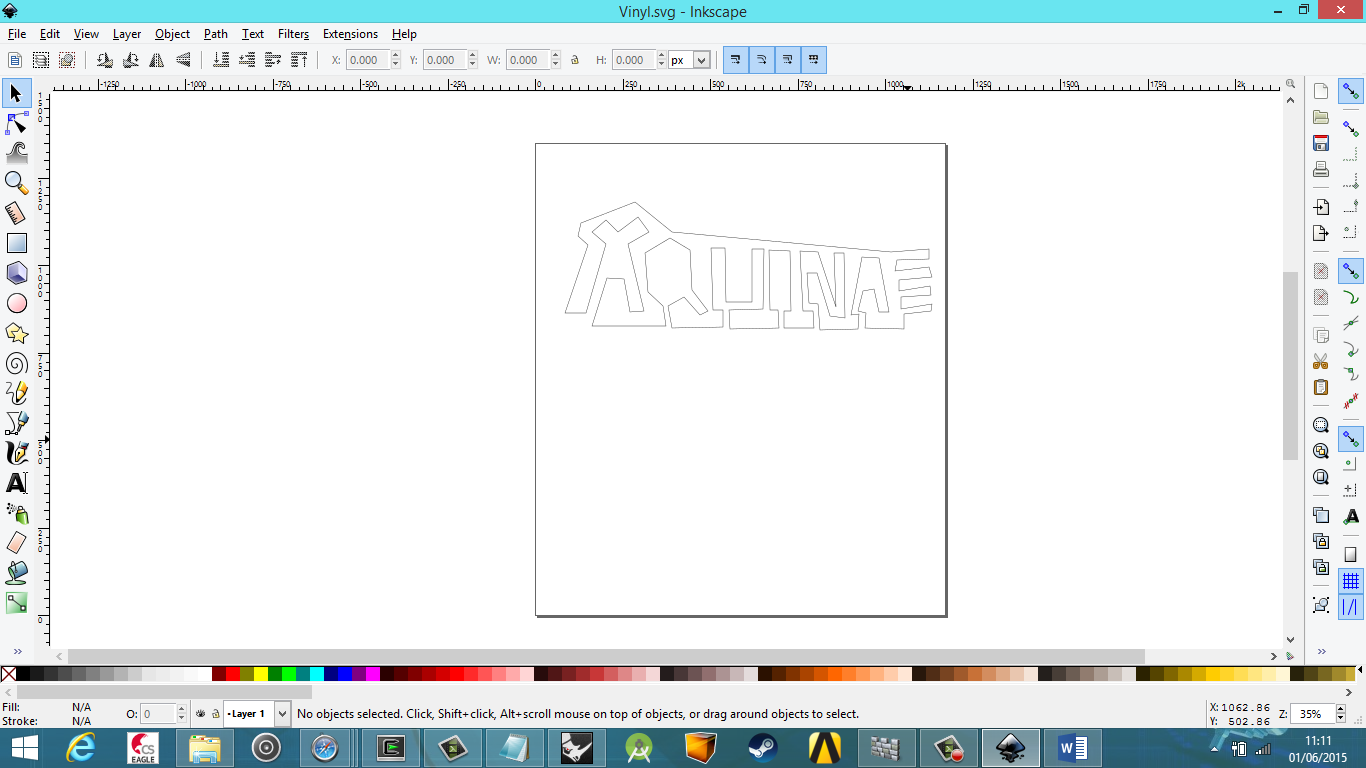
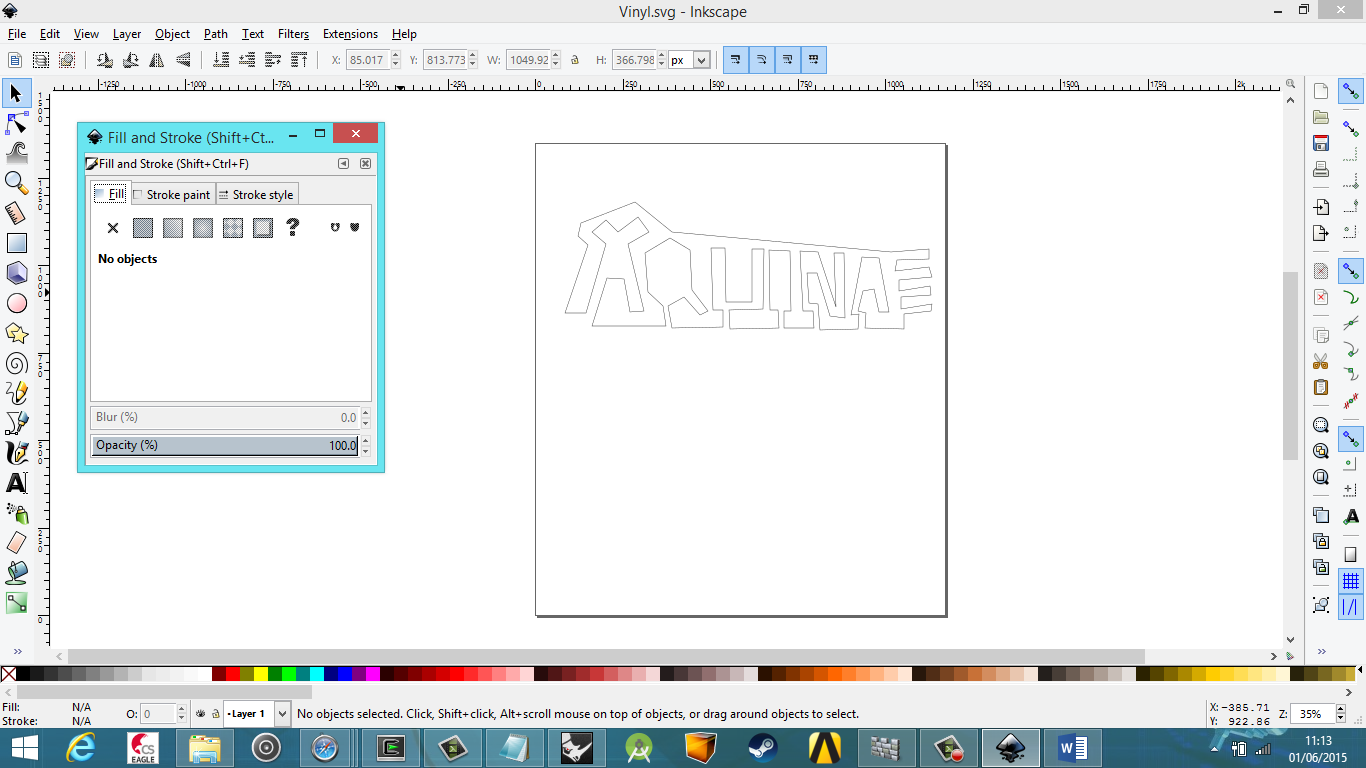
Ok pals,, in the vinyl cutter section I designed my name Aquinas in Inkspace using simple vector form...First its preparing the document and this will basically depend upon the width of the Vinyl cutter in use mostly 24" and 15"..furthermore the design should only contain vectors(specifically lines and no fills) as a preference to the cutter.
Basically that cuts out 3D designs...Ok so the machine rollers take upto 1" on either side of the vinyl cutter and when setting the document width use i.e 22" or 13" and height use 23" or 14" respectively..Height must be larger than width lest the vinyl wil rotate design by 90 degrees.
>>> Download My model 2 press-fit files
This is how I went about it:..I set the document properties and changed width and height to 13" and 15" respectively.

Then I created my design using the bezier tool which generates curves and straight lines...I thought of many things but I settled on my name....This is only to show you`re conversant with the vinyl cutter and ways of producing output from 2D/3D design tools..
In finishing I had to ensure the Fill and Stroke properties in the Object menu are set out correctly...hence I changed Fill value to no fill by clicking on X,,and on the Stroke Tab made sure R value is set maximum max -"255"..finally Stroke Style set to 0.500pt.
After finishing design I followed the Precise steps of loading,operating,setting and output of the vinyl cutter as provided by Fab Academy Coordinator Anna Kaziunas as follows....
Loading Vinyl
- Select a roll of vinyl and place it on the rollers behind the machine.
- On the back right of the machine you will see a lever; place it in the "down" position so you can load the vinyl.
- Make sure the vinyl side is facing up as you feed it through the rollers into the vinyl cutter.
- Under the rubber wheels there is a white sticker indicator.
- Ensure that the vinyl is aligned properly under the rubber wheels.
- The left wheel must always be under the wide white sticker on the left.
- The right rubber wheel must be under any one of the three white stickers on the right, depending on the width of your vinyl.
- Make sure your vinyl is straight and about 2-3 inches past the rubber wheels.
- After inserting the vinyl into the machine, pull up the lever at the back of the machine to ensure that the vinyl is securly loaded.
Turn On the Vinyl Cutter / Final Steps
On the left side of the vinyl cutter is the power button.
Turn it on.
Now you will notice on the screen it says "select roll".
Press the enter button.
The vinyl cutter will measure the width of the roll (in mm). Take note of the measurement, you many need to adjust the width of your file depending on the measured width of the vinyl.
Set the origin by pressing the "Origin" button on the control panel.
Print to the Vinyl Cutter
To print the file, go to File > Print > select the "vinyl cuter" driver from the print menu.
Hit the "print" button to send the file to the vinyl cutter.
The vinyl cutter will begin printing once you send the print job.
After the vinyl cutter is done cutting your file, use scissors to cut off the section with your cut design.
Weed the Vinyl
"Weeding" the cut vinyl is the process of removing the unwanted areas from the final cut design.
Gather Your Tools
- Transfer Tape
- Scissors
- X-Acto knife
- Tweezers
Trim
After cutting, trim area you want to keep with scissors.
Weed
Then remove the unwanted parts of vinyl with an X-Axcto knife and / or tweezers.
Transfer to the Desired Surface
Carefully apply transer tape to the surface of the weeded vinyl. Rub the transfer tape onto the vinyl to form a strong bond between the tape and the top surface of the vinyl design.
After rubbing, carefully pull the transfer tape (with the vinyl adhering to it) away from the vinyl paper backing.
After you have removed the vinyl from the paper backing and it is attached to the transfer tape, apply it to the desired surface. Rub the surface of the transfer tape to ensure that the vinyl will adhere to the new surface.
Carefully pull the transfer tape away from the vinyl, leaving the vinyl attached to the desired surface.
Troubleshooting
The vinyl pressure must be adequate to cut through the vinyl, but too much force will tear up the paper under the vinyl.
The thicker the material, the more pressure (force) you need to apply to cut through it. However, if you are ripping up the vinyl or paper under the vinyl, your force setting is too high.
There are two factors that affect your cuts: force and speed.
To adjust the force:
- Rotate the wheel under the LCD screen on the vinyl cutter to the right.
- When the menu reads "Force", then press the menu buton.
- To reduce / increase the force setting, rotate the wheel up or down, you will see the values change in the LCD screen.
- When finished, press the enter button.
- Next, preform a test cut by pressing the "test" button on the vinyl cutter.
To adjust the speed:
If your file has lots of small curves or tiny details, you may need to slow down the speed. The slower the speed of the machine, the more precisely it will cut.
- Rotate the wheel under the LCD screen on the vinyl cutter to the right until the the menu reads "Speed", then press the menu buton.
- To reduce / increase the speed setting, rotate the wheel up or down, you will see the values change in the LCD screen.
- When finished, press the enter button.
- Next, preform a test of a small section of a file with tiny details or small curves to test your settings.