11/ output devices
For this week, instead of focusing on one paticular type I tried (and will try more) different output sensors to see the possibilities of integrating them in my final project:
1. LCD display
2. Servo motor
3. Piezo
4. RGB LED
5. LED matrix/array
← previous
→ next
⋯ assignment list
🏁/ final project
LCD display
I first tried a 16x2 LCD display with a Hitachi HD44780 driver attached on its back. The driver simplified the process a lot by reducing the pin number to 5.
Here is the code to run in Arduino IDE:
#include <LiquidCrystal_I2C.h>

// set the LCD address to 0x3F
// for a 16 chars and 2 line display
LiquidCrystal_I2C lcd(0x3F,16,2);

void setup(){
  lcd.init();  // initialize the lcd
  lcd.backlight();
}

void loop(){
  lcd.setCursor(1,0);
  lcd.print("hey!");
  lcd.setCursor(1,1);
  lcd.print("how you bean?");
  delay(2000);

  lcd.clear();
  lcd.setCursor(16,0);
  lcd.print("I bean good :D");
  lcd.setCursor(16,1);
  lcd.print("HBU?");

  lcd.clear();
  lcd.setCursor(0,0);
  lcd.print("BUSY :'(");
  lcd.setCursor(0,1);
  lcd.print("doing fabacademy");
  delay(2000);

  lcd.clear();
  lcd.setCursor(16,0);
  lcd.print("hang in there :D");

  for (int positionCounter = 0;
  positionCounter < 16; positionCounter++) {
    lcd.scrollDisplayLeft();
    delay(50);
  }
  delay(2000);

  lcd.clear();
  lcd.setCursor(0,0);
  lcd.print("will get busier");
  delay(2000);

  lcd.setCursor(0,1);
  lcd.print("cheers :D");
  delay(5000);

  lcd.clear();
}
Servo motor
Then I tried using two potential meters to control two servo motors.
#include <Servo.h>

Servo myservoud; //ud = up down direction
Servo myservolr; //lr = left right direction

int meterud = A1;
int meterlr = A3;
int readingud;
int readinglr;

void setup() {
  myservoud.attach(A0);
  myservolr.attach(A2);
}

void loop() {
  readingud = analogRead(meterud);
  int valud = map(readingud, 0, 1023, 0, 150);
  myservoud.write(valud);
  delay(15);

  readinglr = analogRead(meterlr);
  int vallr = map(readinglr, 0, 1023, 30, 150);
  myservolr.write(vallr);
  delay(15);

}
Piezo
Piezo as buzzer, controlled by potential meter:
void setup() {
  Serial.begin(9600);
  pinMode(9, OUTPUT);
  pinMode(7, OUTPUT);
  pinMode(5, OUTPUT);
}

void loop() {
  int sensorReading = analogRead(A2);
  Serial.println(sensorReading);
  delay(10);
  int thisPitch = map(sensorReading, 0, 1023, 120, 1500);

  tone(A4, thisPitch, 10);
}
RGB LED
RGB LED color transition controlled by potential meter:
The code I ran was modified base on a sparkfun example:
//change LED color with potential meter

const int RED_PIN = 9;
const int GREEN_PIN = 10;
const int BLUE_PIN = 11;

const int METER = A0;
int DISPLAY_TIME = 10;  // In milliseconds

void setup() {
Serial.begin(9600);
pinMode(METER, INPUT);
pinMode(RED_PIN, OUTPUT);
pinMode(GREEN_PIN, OUTPUT);
pinMode(BLUE_PIN, OUTPUT);
}

void loop() {
int reading = analogRead(METER); //0~1023
Serial.print(reading);
Serial.print(" color value: ");

int colorRange = map(reading, 0, 970, 0, 768);
showRGB(colorRange);
Serial.println(colorRange);
delay(DISPLAY_TIME);
}

void showRGB(int color){
int redIntensity;
int greenIntensity;
int blueIntensity;

if (color <= 255){
redIntensity = 255 - color;    // red goes from on to off
greenIntensity = color;        // green goes from off to on
blueIntensity = 0;             // blue is always off
}
else if (color <= 511){
redIntensity = 0;                     // red is always off
greenIntensity = 255 - (color - 256); // green on to off
blueIntensity = (color - 256);        // blue off to on
}
else{
redIntensity = (color - 512);         // red off to on
greenIntensity = 0;                   // green is always off
blueIntensity = 255 - (color - 512);  // blue on to off
}

analogWrite(RED_PIN, redIntensity);
analogWrite(BLUE_PIN, blueIntensity);
analogWrite(GREEN_PIN, greenIntensity);
}
I also tried to blink the LED with different colors according to a piezo's reading. The piezo is attached to a violin to receive the vibration of the strings as input.
The outcome was not as good as I imagined :/ One problem was my LED did not show color correctly (green light part usually went off) due to unstable wire connection or insufficient power. The other problem was that the range of piezo reading was a bit random and not so precise, sometimes from 0~20,30 sometimes went up to 500,600, and it was hard to set color range accordingly :/
Note to myself: to find the way to read pitch value.
LED matrix/array
I got a 8X8 LED matrix. Ideally it would display pixel patterns and run small animations, but I had problems matching pins on the board with the ones on the module, and it did not display correctly :( Will try again with LED matrix that comes with chip module.
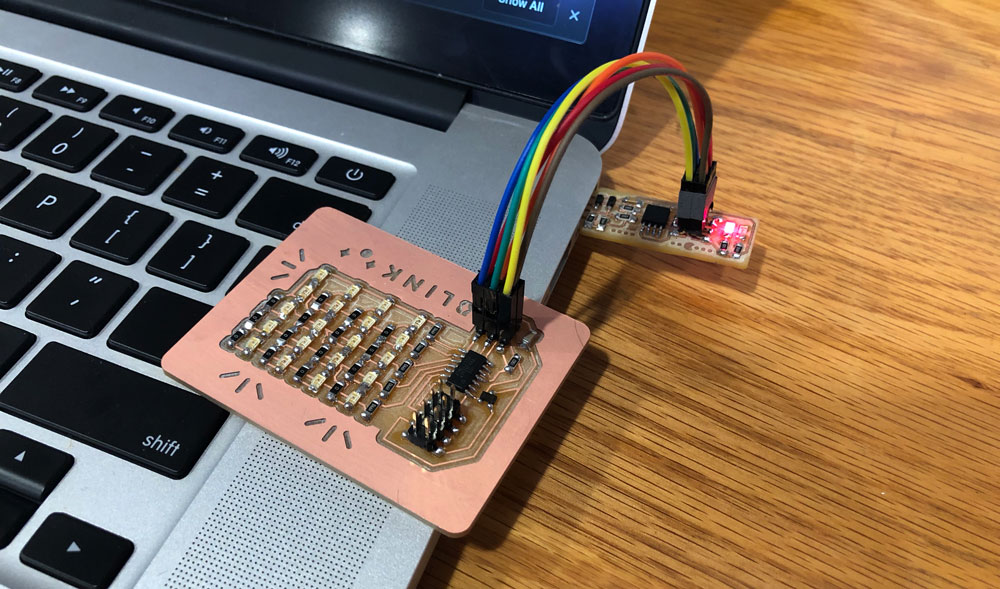
While waiting for the arrival of my matrix module, I tried to make a LED array board basically copying Niel's example. It was not hard to understand charlie plexing but took extremely long time to sort out the arrangement in Eagle. I also find this former student's documentation on LED array very helpful.
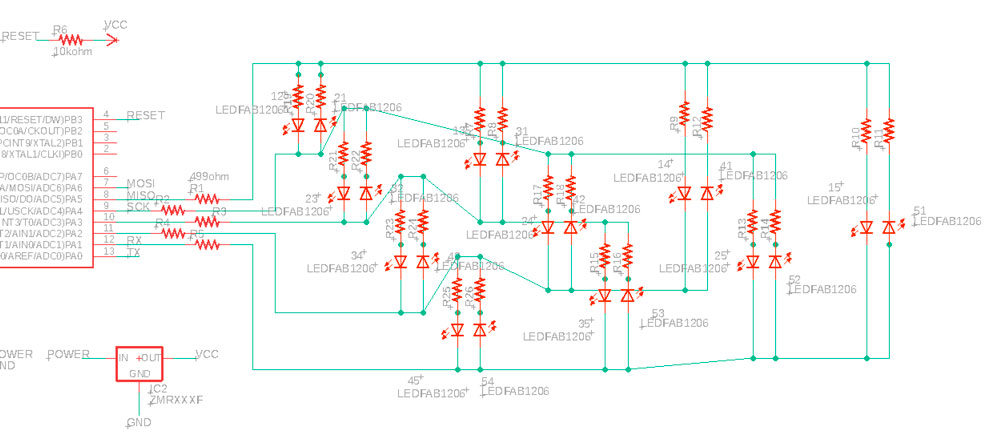
The schematic above shows how charlie plexing works in a clear way. To pick 2 pins out from 5 input pins, there are 10 different possibilities of combination (12, 13, 14, 15, 23, 24, 25, ...) Each of these 2 input pins' combo can control 2 LEDs, placing in opposite directions. (When pinA gets high signal and pinB low, one LED of two lights up and the other one is reversed so will not react.) Alltogether 5 pins can control 20 LEDs.
But this clear schematic did not translate well into boardview in Eagle and created a huge mess... one main reason is that the RX/TX pin side which is the lower part in schematic gets flipped to the upper part in board view, resulting in a super painful sorting process...
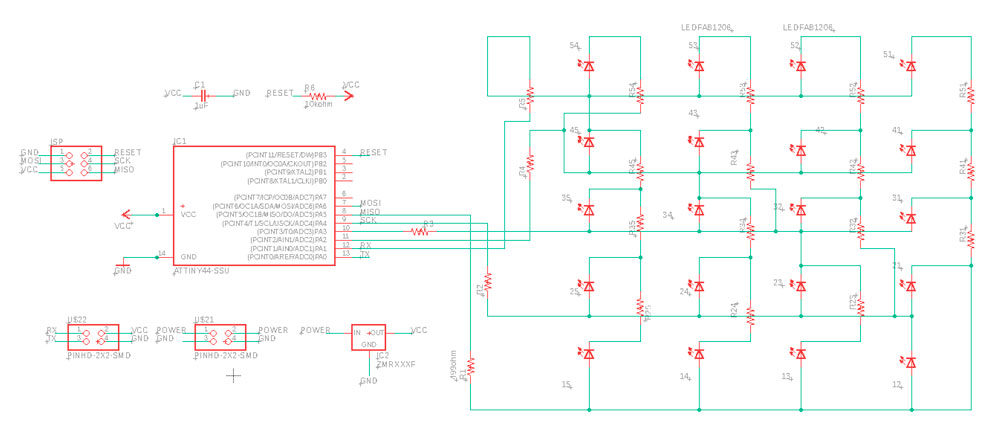
I have 5 499ohm resistors connected with each control pin, and the rest resistors are 0 ohm, working as bridges for the wires to cross through. It will be less overwhelming for the layout if you arrange the LEDs first and add the 0 ohm resistors later only when you need a bridge.
With the help of refering back to Niel's trace map and the former student's schematic, I finally rearranged the position of LEDs and resistors in schematic view to the image above. This new arrangement made sorting in boardview fast and smooth :D
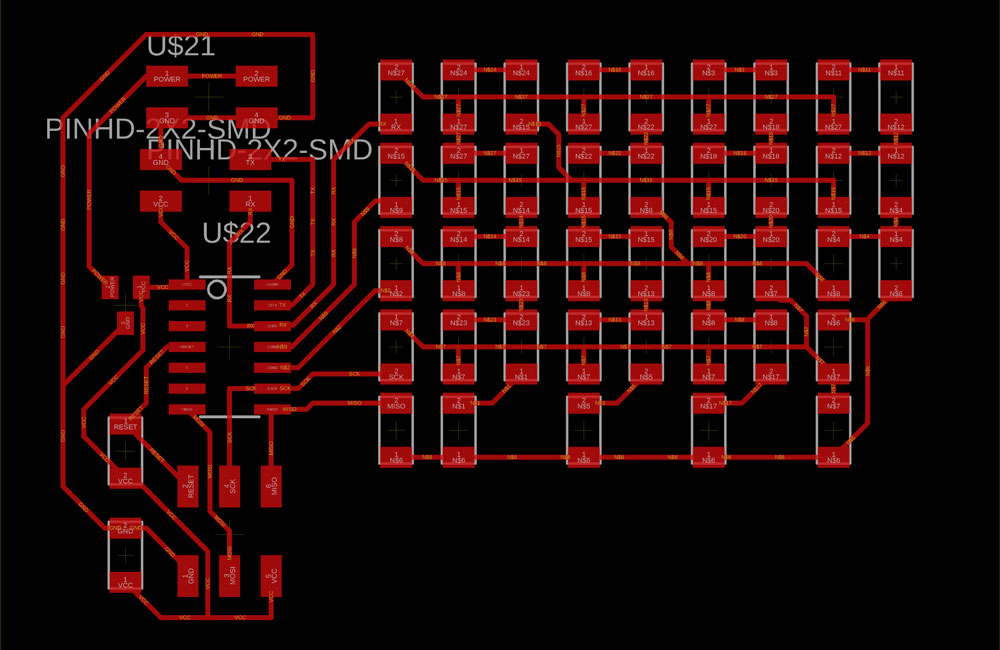
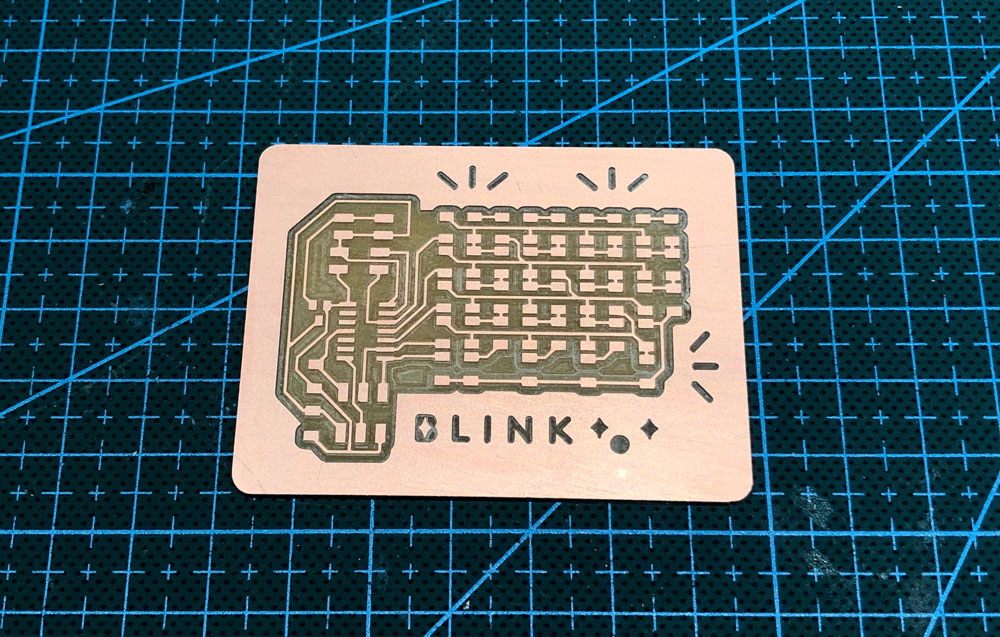
↓ download eagle file: LED_array_brd.sch, LED_array_brd.brd
Since my FabISP kept the jumper soldered, I connected the blink board to the ISP directly to my laptop and both boards got powered up. Then I noticed there was smoke coming out of my blink board!!!???? I disconnected both boards and found the ATtiny44 chip on blink board to be super hot. I checked the connection around chip again with multi-meter and they seemed to be fine. There was no more smoke/heat problem once I connected them again, and I was able to run "make" and "make program-usbtiny" with Neil's makefile and C file. The board started to flash right after that :D
↓ download Neil's makefile and C file: hello.array.44.c, hello.array.44.make
Later Saverio suggested I might try unsolder the jumper and provide the board with external power source. I did so and the board still flashed happily. There was no more heating problem from the board until this moment. I would like to understand what the reason might be for the smoke and hot ATtiny.
Then I tried to burn bootloader or upload code from Arduino IDE. It did not work :( I kept getting "initialize failed" or "check connection" error messages. Need to work on trouble shooting for that.
(Updated 04.09.2019)