14. Networking and communications
For my final project my goal is to use the ESP8266 to read sensor value from an ultrasonic sensor and turn on leds and motors. For this board I am going to attempt to build a PCB for the ESP8266 that has a transistor to control the motors or LED and pins for the ultrasonic sensor.
Files
ESP8266 Ultrasonic/LED output board Board: Eagle: Schematic | Board
Designing ESP8266 Board
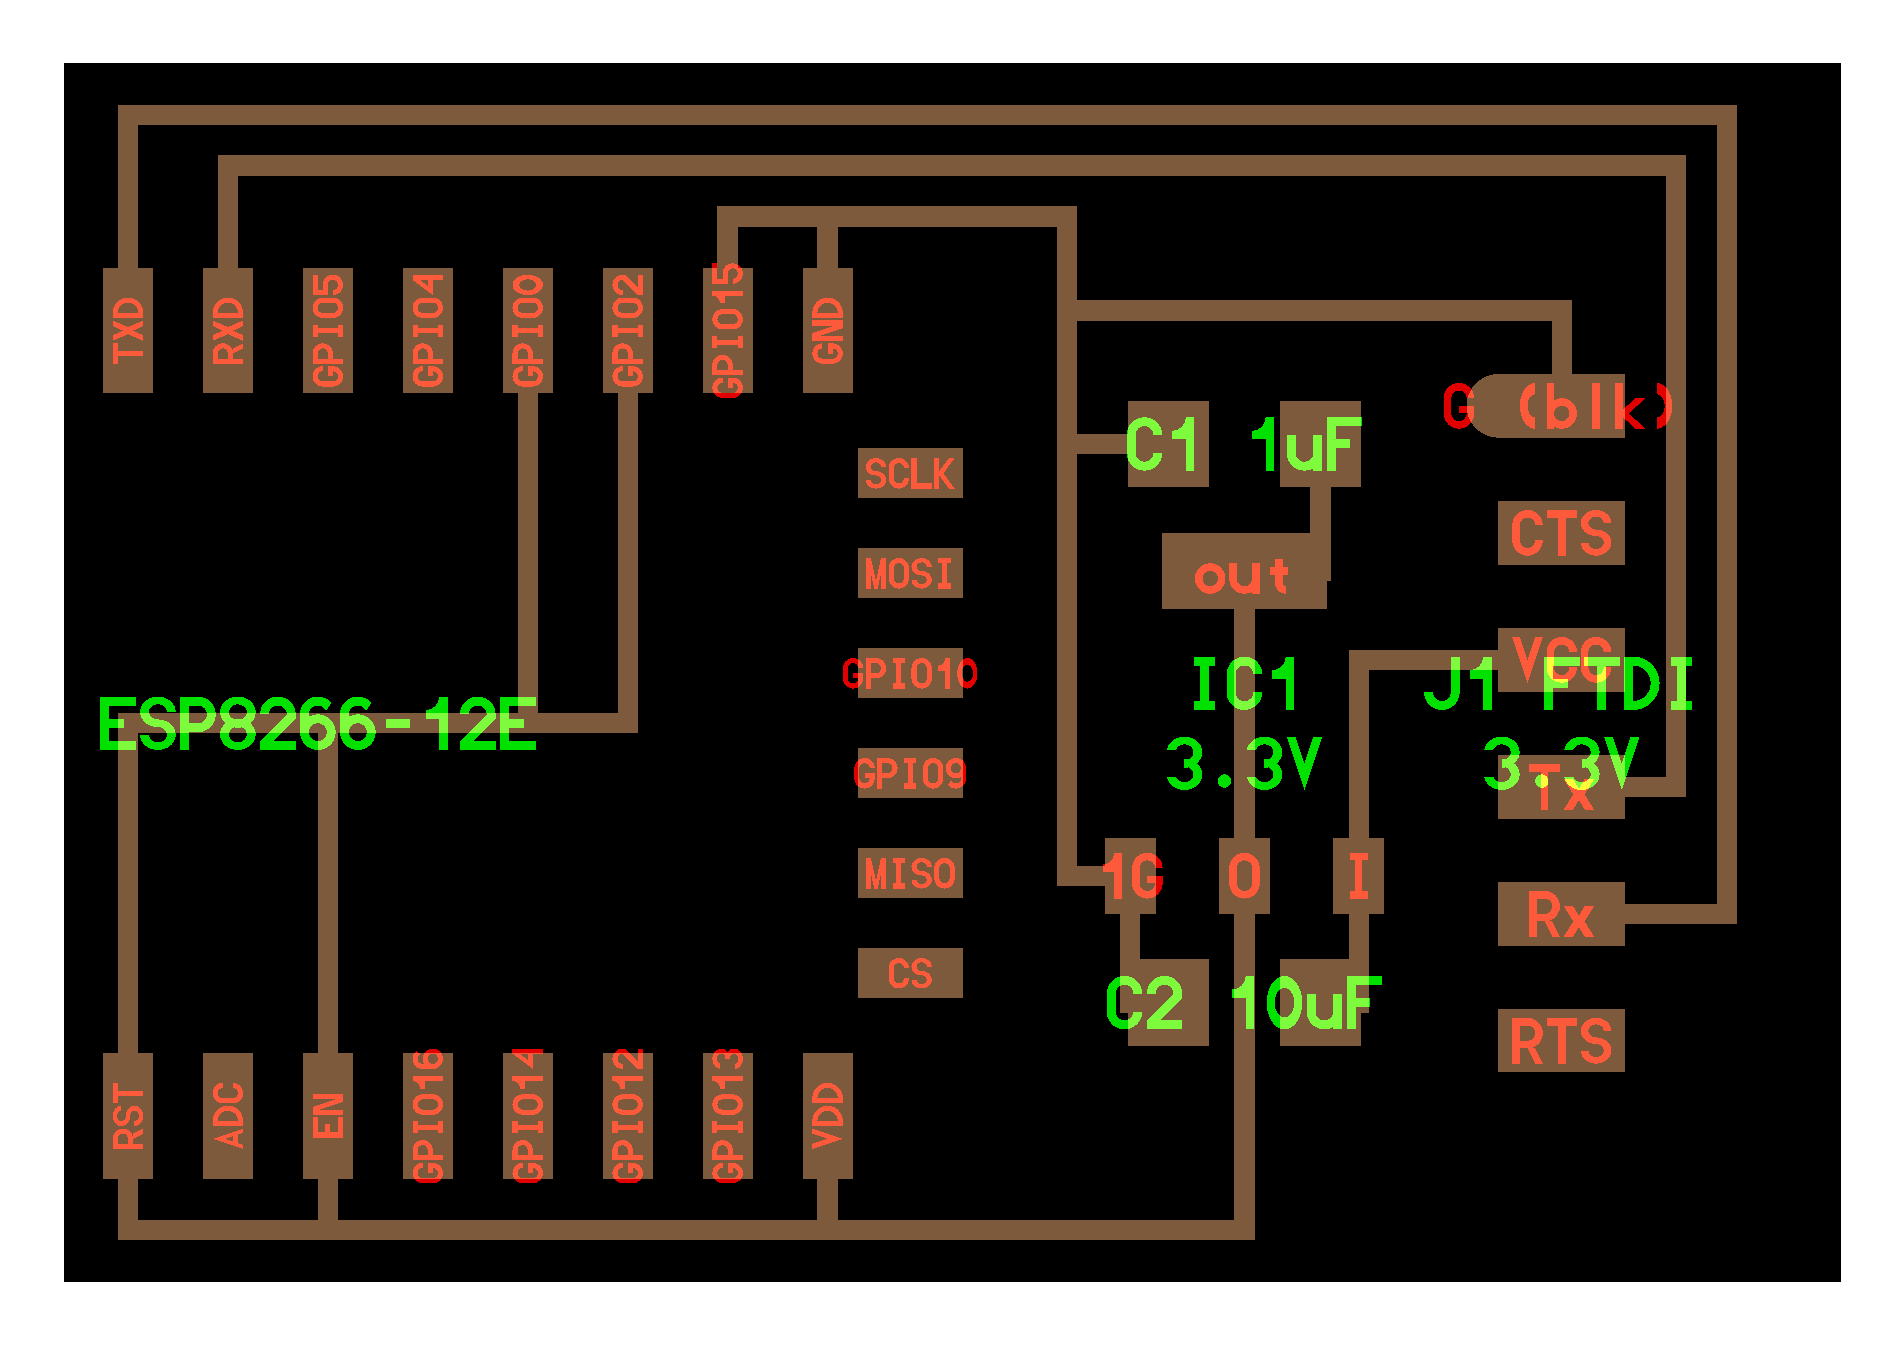
I started the week by building Neil’s ESP8266 board. I also added an ICSP header to make programming easier and consistant with the other weeks. The circuit is really basic. There is a 3.3v voltage regulator to ensure that all voltage hitting the ESP8266 is 3.3v since that is what the chip is rated for.
Several of the pins a connected to VCC CH_PD pin to enable the chip, GPIO0 to select normal boot mode, and the RST (reset) pin to prevent random resets.

Once the schematic was arranged I moved over to the board view and moved the components and routed the wires.

Adding a Transistor for Motor/LED control
I added a PNP transistor to the circuit to allow me to control a output over 3.3volts. The transistor is hooked up to the 3v3 volt but it could be routed to a pin to connect external power isolated from the ESP8266.

Adding Pins for Ultra Sonic Sensor
At the bottom you can see the pins added for the ultra sonic sensor. Two of the pins are for power and two of the pins are for the trigger and reciever pin.

Fabricating and Stuffing the Board

What is UDP
UDP stands for User Datagram Protocol and is simplar to TCP protocal like computers use. The main difference is that it has no error checking like TCP. The UDP packets are sent out without any care if they were recieved. You can see this in the test I did where I send a string of character via serial and if the string was really long and too close to the previous one some might be missed. TCP actually waits for a handshake back from the recipient before sending the next packet. The good thing about UDP is it is fast because of the no error checking. The code below sends the reading over and over again. If one packet is missed it is no big deal because it can catch the next one.

How UPD Client & Server works
So, I’m using the UDP library to send packets from one ESP8266 board to another. The board I made reads the distance from an ultrasonic sensor and if the distance is less than 10cm the LED starts flashing. At the same time the board sends the value from the client board to the server board. The value can be read over serial on the server board.

Client Code
/*
    Wireless Serial using UDP ESP8266
    Circuits4you.com
    2018
    Slave Board connects to Access Point

    Edited by Brent Richardson 7/8/19
*/
#include <ESP8266WiFi.h>        //Libraries
#include <WiFiUdp.h>

const char *ssid = "brentwifi";     //This SSID is being created in the server code
                                    //the client must match to communicate This code doesn't actually use the internet
const char *pass = "password";

unsigned int localPort = 2000; // local port to listen for UDP packets

IPAddress ServerIP(192,168,4,1);   //This is the IP address of the server and client being hard coded
IPAddress ClientIP(192,168,4,2);

// A UDP instance to let us send and receive packets over UDP
WiFiUDP udp;

char packetBuffer[9];   //Where we get the UDP data

#define LEDpin 4 //make a pin to send signal to speaker

#define trigPin 14 //pins for ultra sonic sensor
#define echoPin 16

long duration, cm, inches;

//======================================================================
//                Setup
//======================================================================
void setup()
{
    Serial.begin(9600);
    Serial.println();

    WiFi.begin(ssid, pass);   //Connect to access point

    Serial.println("");

  // Wait for connection
  while (WiFi.status() != WL_CONNECTED) {
    delay(500);
    Serial.print(".");
  }
  Serial.println("");
  Serial.print("Connected to ");
  Serial.println(ssid);
  Serial.print("IP address: ");
  Serial.println(WiFi.localIP());

    //Start UDP
    Serial.println("Starting UDP");
    udp.begin(localPort);
    Serial.print("Local port: ");
    Serial.println(udp.localPort());

       pinMode(trigPin, OUTPUT); //Set pins to input and out for sensor
  pinMode(echoPin, INPUT);

  pinMode(LEDpin, OUTPUT);
}
//======================================================================
//                MAIN LOOP
//======================================================================
void loop()
{

    digitalWrite(trigPin, LOW);  //this code send voltage down the trigger pin and causes the sensor to emit an ultrasonic wave for 10 microseconds
  delayMicroseconds(5);
  digitalWrite(trigPin, HIGH);
  delayMicroseconds(10);
  digitalWrite(trigPin, LOW);

  // Read the signal from the sensor: a HIGH pulse whose
  // duration is the time (in microseconds) from the sending
  // of the ping to the reception of its echo off of an object.
  pinMode(echoPin, INPUT);
  duration = pulseIn(echoPin, HIGH);

  // Convert the time into a distance
  cm = (duration/2) * .0343;     // Divide by 29.1 or multiply by 0.0343
  inches = (duration/2) *.0343;   // Divide by 74 or multiply by 0.0135

  Serial.print(inches);
  Serial.print("in, ");
  Serial.print(cm);
  Serial.print("cm");
  Serial.println();

  if(cm>=25)
  {
  analogWrite(LEDPin, HIGH );
  delay(1000);
    analogWrite(LEDPin, LOW );
  delay(500);
    analogWrite(LEDPin, HIGH );
  delay(1000);
    analogWrite(LEDPin, LOW );
  delay(500);
    analogWrite(LEDPin, HIGH );
  delay(1000);
    analogWrite(LEDPin, LOW );
  delay(500);
}
  //----------------------Below sends the measurement to the server board over UPD
   int cb = udp.parsePacket();
    if (!cb)
    {
      //If serial data is recived send it to UDP
      if(Serial.available()>0)
        {
        udp.beginPacket(ServerIP, 2000);  //Send Data to Master unit
        //Send UDP requests are to port 2000

        char a[1];
        a[0]=char(Serial.read()); //Serial Byte Read and add the character to the array
        udp.write(a,1); //Send one byte to ESP8266
        udp.endPacket();
        }
    }
    else {
      // We've received a UDP packet, send it to serial
      udp.read(packetBuffer, 1); // read the packet into the buffer, we are reading only one byte
      Serial.print(packetBuffer);
      delay(20);
    }


}
//=======================================================================
Server Code
Use the three backticks to separate code.
/*
    Wireless Serial using UDP ESP8266
    Circuits4you.com
    2018
    Master Board creates Access Point

    Edited BY Brent Richardson
    7/8/19
*/
#include <ESP8266WiFi.h>
#include <WiFiUdp.h>

const char *ssid = "brentwifi";
const char *pass = "password";

unsigned int localPort = 2000; // local port to listen for UDP packets

IPAddress ServerIP(192,168,4,1);
IPAddress ClientIP(192,168,4,2);

// A UDP instance to let us send and receive packets over UDP
WiFiUDP udp;

char packetBuffer[9];   //Where we get the UDP data
//=======================================================================
//                Setup
//=======================================================================
void setup()
{
    Serial.begin(9600);
    Serial.println();
    WiFi.softAP(ssid, pass);    //Create Access point

    //Start UDP
    Serial.println("Starting UDP");
    udp.begin(localPort);
    Serial.print("Local port: ");
    Serial.println(udp.localPort());
}
//======================================================================
//                MAIN LOOP
//======================================================================
void loop()
{
    int cb = udp.parsePacket();
    if (!cb)
    {
      //If serial data is recived send it to UDP
      if(Serial.available()>0)
        {
        udp.beginPacket(ClientIP, 2000);
        //Send UDP requests are to port 2000

        char a[1];
        a[0]=char(Serial.read()); //Serial Byte Read
        udp.write(a,1); //Send one byte to ESP8266
        udp.endPacket();
        }
    }
    else {
      // We've received a UDP packet, send it to serial
      udp.read(packetBuffer, 1); // read the packet into the buffer, we are reading only one byte
      Serial.print(packetBuffer);
      delay(20);
    }
}
//======================================================================