For this weeks group assignment we compared multiple tools for creating GUIs. The documentation can be found at the group assignment page.
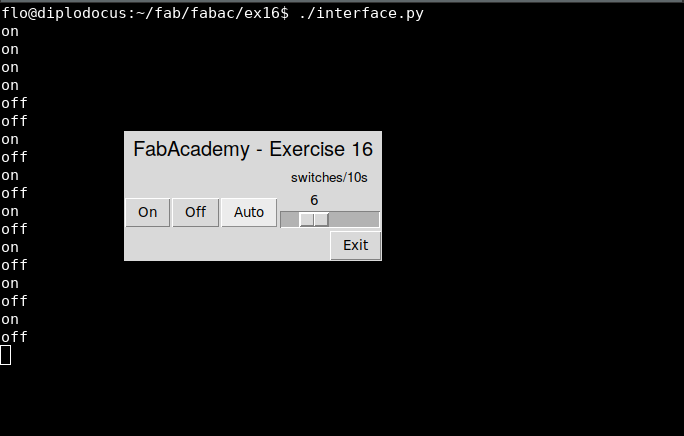
For this weeks assignment I decided to create a graphical interface to control the relay I used in the assignment for output devices.
I used Python with the TkInter library, which comes with all standard Python distributions. The other to libraries I used are "time" and "serial" for serial communication. The commented code can be read here:
#! /usr/bin/env python3
from tkinter import *
from time import sleep
import serial

manual = True # Is used to decide if autoWorker() terminates or loops
autoStatus = True # In auto mode start with sending the "on" signal
ser = serial.Serial(
    port='/dev/ttyACM0', # Adjust accordingly, easiest way might be to check the Arduino IDE
    baudrate=9600,
    parity=serial.PARITY_ODD,
    stopbits=serial.STOPBITS_TWO,
    bytesize=serial.SEVENBITS
)

def autoWorker():
    global autoStatus # Global variables have to be marked with the "global" keyword
    if not manual:
        if autoStatus:
            sendSerial('1')
        else:
            sendSerial('0')
        autoStatus = not autoStatus
        # In order not to block the thread running the GUI, TkInters after() method is used
        # The multiprocessing library can not be used here
        # The lambda expression just recursively calls this function to create a loop
        root.after(10000//sspeed.get(), lambda: autoWorker())

def auto():
    global manual
    manual = True # I don't remember why I did this and I'm not sure if it even makes any sense ¯\_(ツ)_/¯
    manual = False
    autoWorker()

def sendSerial(signal):
    print(signal) # This is for debugging
    ser.write(str.encode(signal))

def on():
    global manual
    manual = True
    sendSerial('1')

def off():
    global manual
    manual = True
    sendSerial('0')

# Here the GUI is created and all the previously defined functions are bound to the control elements
# pack() is used to define the relative placement of the elements
root = Tk() # Create the base window
ltitle = Label(text="FabAcademy - Exercise 16", font=("Helvetica", 15))
ltitle.pack()
bon = Button(text="On", command=on)
boff = Button(text="Off", command=off)
bauto = Button(text="Auto", command= lambda: auto())
bon.pack(side=LEFT)
boff.pack(side=LEFT)
bauto.pack(side=LEFT)
lscaledesc = Label(text="switches/10s", font=("Helvetica", 10))
lscaledesc.pack()
sspeed = Scale(root, from_=1, to=20, orient=HORIZONTAL)
sspeed.pack()
bexit = Button(text="Exit", command=sys.exit)
bexit.pack(side=RIGHT)
root.mainloop() # Everything is prepared and we can pass the control to TkInter
To test the code without having to connect a device I printed the text that is going to be send over the serial connection.
The recipient is running a very simple program, only switching the pin on and off according to the ASCII strings it receives.
char input;

void setup()
{
    Serial.begin(9600);
    pinMode(8, OUTPUT);
}

void loop() {
  while (Serial.available() > 0) {
    input = Serial.read();
    Serial.print(input);
    if(input == '1'){
      digitalWrite(8, HIGH);
    }
    else{
      digitalWrite(8, LOW);
    }
  }
}
Because I couldn't find the relay I had used before I just connected the LED I had integrated in the case of my final project. The necessary resistor is connected directly to the LED.
⬅ Back to overview