This website is created in plain HTML and CSS. As an editor for web development I use Brackets, which has a nice preview feature, an inline view of images, autocompletion and some helpful error highlighting. My go to alternative if Brackets is not available or I'm doing non web-related programming is Vim, which is a bit harder to use at first but available nearly everywhere.
I started with an index.html file, which just redirects to the actual main page. That can be done with the line
<meta http-equiv="refresh" content="1; URL=./web/html/index.html">I did this to maintain a directory structure where all the documentation I might change at some point is in one directory which I can use as a working directory in my editor. Otherwise all the the directories that hold assets like gerber files or schematics would have shown up in the editor.
Because there is not a huge amount of different pages and I wanted to avoid any unnecessary JavaScript solutions I seperatly pasted the menu as list into every page:
<ul class="nav">
            <li><a class="nav" href="index.html">Home</a></li>
            <li><a class="nav" href="about.html">About</a></li>
            <li><a class="nav active" href="exercises.html">Exercises</a></li>
            <li><a class="nav" href="project.html">Final Project</a></li>
</ul>
In the CSS file the list elements with the "nav" class are moved to the left side of the screen like this:
ul.nav {
    left: 0;
    top: 0;
    list-style-type: none;
    margin: 0;
    padding: 0;
    width: 200px;
    background-color: #222222;
    position:fixed;
}
The relevant parts here are "left:0" which moves the element to the leftmost border, "top:0" which moves it to the top and "postition:fixed" which makes it stick to it's position on the screen even when the user is scrolling.
Other important html tags are <p>foo</p> for a paragraph, <h1>foo</h1> for a level one heading, <a href="http://example.com">foo</a> for a hyperlink, <img src="image.jpg" height=80% width=80%> for an image, <b>foo</b> and <i>foo</i> for bold and italics, <code>foo</code> for marking text as code and the often used <div>foo</div>, which can be used to divide the document into multiple sections, that can then be seperately styled using CSS.
I used Googles code-prettify for optional syntax highlighting.
This part of the assignment had the topic of version control systems, more specifically git. The task was to follow a git tutorial and document the steps. I decided to follow the official git tutorial from https://git-scm.com/docs/gittutorial, for git version 2.19.1 - I have version 2.20.1 installed.
The very first step was an introduction to the internal help and the man pages. After that the username and e-mail adress are configured.
This is done using the commands git config --global user.name "Florian Schäfer" and git config --global user.email florian.schaefer@hsrw.org
It should be noted that this information will show up in every commit, so it should be changed before working in contexts where anonymity is desired.
A commit describes a set of changes made to the project. If ever something goes wrong, you can revert a commit or discard all changes up to a certain commit.
Next I moved the website template into a new folder and initialized the repository with git init, added the new files using git add . and commited the files with git commit. Because I did not enter a commit message using the -m flag, my default editor popped up, prompting me for a commit message.
The next step introduced the diff and status commands, which make it possible to see which contents changed and what their current status in the VCS is. Afterwards I commited all changes using git commit -a.
The log command shows which commits have been made up to the current moment.
With the flags --stat --summary one can see a summary of the changes that have been made in each commit. With -p a complete diff is printed.
Branching is a very important feature of git. It's especially helpful when collaborating with multiple people or wanting to test out things without messing up the original work.
Following the tutorial i created a new branch named "experimental" using the command git branch experimental.
With git branch one can see all branches of the current repository, in this case the master branch and our newly created "experimental" branch. The current branch is marked with an asterisk.
Using git checkout experimental we can switch to the newly created branch and start working on it.
I created a new file and commited it. Afterwards I switched back to the original branch and looked at the directory. The file now was not visible anymore, because it exists only in the experimental branch. Next I created and commited another test file on the master branch, letting the two branches diverge.
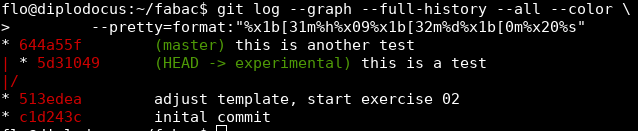
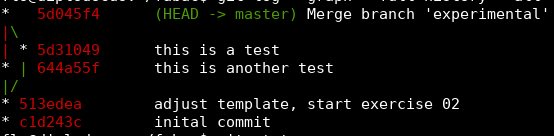
Now I merged the two branches with git merge experimental. Because there where no conflicts to resolve I could simply enter a commit message and the merge was completed. Otherwise I would have had to resolve the conflict according to the markers left in the problematic files and manually commit afterwards. Now the branch could be deleted using git branch -d experimental, as all changes have been merged to the master. If the changes are not wanted one can use the flag -D instead, deleting the branch without checking if all changes are merged.
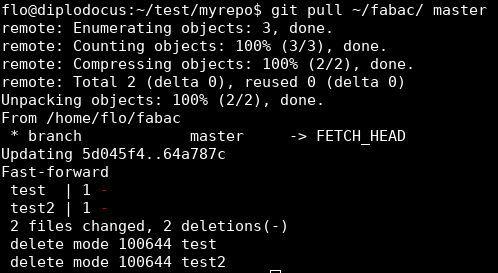
To test gits collaboration features I cloned the repository to a different directory using git clone ~/fabac myrepo.
Then I made a change in the original repository by deleting the test files from before, commited that and pulled it to the newly cloned repository. git pull ~/fabac/ master
Before pulling any changes one might not even want to include in their own repository the changes can be reviewed using git fetch ~/fabc master and git log -p HEAD..FETCH_HEAD, which shows everything that is included in FETCH_HEAD but not in HEAD.
To make these operations quicker, a "remote" can be defined, so the full path or url doesn't have to be included in every command. This can be done by executing the command git remote add foo ~/fabac/, now the repository under ~/fabac/ can be referenced by the short name 'foo'.
The command git show takes the name of a commit - or even only the first few letters of a commit as long as they uniquely identify the commit - and prints information about that commit. Another way to identify a commit is using HEAD or using ^ to get the parent of a commit, e.g. git show HEAD^ to get the parent of the HEAD. A short way for writing HEAD^^^^ is HEAD~4. Merge commits have two parents, which can be referenced by using 1 or 2 as a suffix.
Commits can be tagged with an easy to remember name using git tag foo [commit]. Now the commit can be refernced using the name "foo". It's also possible to search for strings in a commit, using git grep "hello" [commit]. You can search only the current directory by omitting the commit.