Embedded programing
Group assignment
Compare the performance and develpment workflows for other architectures
C programming
For this week it is decided to use a board manufactured in the laboratory, said board has 3 buttons as inputs and 3 led as outputs both being digital.
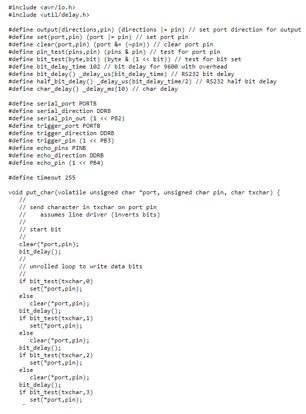
A better way to optimize the memory of the microcontroller is programming the code in C, since we include the necessary libraries for its correct operation. The basic structure that the programming in C has is the following:
1. Inclusion of libraries: The necessary libraries for its operation are added using the #include command
2. Definition of variables: here we identify the variables that we will use during programming, such as defining what is an entry or exit, delays, set, clear, etc.
3. Definition of the input and output ports: The operating mode of each pin is defined, either type A or type B according to the microcontroller
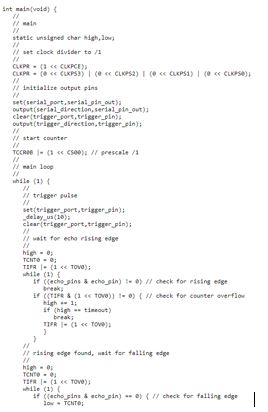
4. Creating subroutines: if necessary, the operation of a subroutine is defined, such as the definition of the serial port.
5. Main loop: In this loop, the program that will work in an infinite loop is created.
In order to load the code, we need the plate, our ISP and the FTDI to upload the code, we must also configure our microcontroller with its features, the ISP and how to upload the code.
Arduino programming
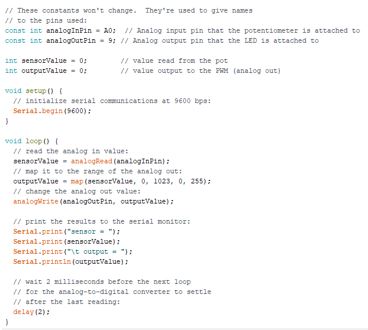
For the use of an Arduino, the programming language is with a language similar to C. In this case the structure is as follows:
1. Inclusion of libraries: With some devices it will be necessary to use libraries for its proper functioning.
2. Definition of variables: Variables are created and the type of variable that can be used (integer, floating, constant, etc.)
3. Setup: We set the pins of the arduino as inputs or outputs.
4. Subroutines: only if programming with subroutines is required, these functions are created to be called in the main loop.
5. Main loop: Execution of the program in a single main loop.
To upload the code with an Arduino, it is much simpler since only the type of board is defined, the serial port to which it is connected and the code is loaded. It is the simplest way to work.
Raspberry
To work with Raspberry, we must use Python as a programming code. It is a language that is beginning to be used for several applications, being the raspberry the most used for applications of the internet type of things. The basic structure of the programming is the following:
1. Import the libraries: Raspberry works in an optimal way using libraries to define variables, times, etc. The one that is used is the GPIO Zero library that was created with the intention of making simpler codes to read and write.
2. Definition of pins: It is detailed which pins are going to be used and the names that we are going to place.
3. Main loop: In this section, the created code is executed constantly and repetitively.
In this case no code is uploaded to the board, since we use an operating system of the same Raspberry, which is necessary for the operation of this. The workflow for the operation of the code is as follows:
1. We create a new file in Python3.4.2 Shell.
2. We write the raspberry code, in this case we have a blink and lit a led with a push button.
3. The code with the .py extension is saved.
4. The code is executed by pressing f5 or in the Run / Run Module option
Blink
Button
Comparison of architectures
The problem of using the raspwberry architecture is the incorporation of libraries to use their ports, while in the arduino libraries are used to improve and summarize the code.
On one side of the raspberry if it allows to perform tasks in parallel to have a microprocessor, while the arduino is not necessary to use libraries unless they are peripheral sensors or actuators.
For costs, the arduino is the best option while by code, only the raspberry would be used if we want to use multitask functions.