Welcome to Berytech Fab Lab

+961 4 533 040 ext. 1029 9:00 AM - 5:00 PM (Mon-Fri)

Interface and Application Programming

So the objective of this week is to get introduced to using Code to Create Applications that Interface with input and output devices. According to Wikipidia, "In computer programming, an application programming interface (API) is a set of subroutine definitions, protocols, and tools for building application software. In general terms, it is a set of clearly defined methods of communication between various software components. A good API makes it easier to develop a computer program by providing all the building blocks, which are then put together by the programmer. An API may be for a web-based system, operating system, database system, computer hardware or software library. An API specification can take many forms, but often includes specifications for routines, data structures, object classes, variables or remote calls. POSIX, Windows API and ASPI are examples of different forms of APIs. Documentation for the API is usually provided to facilitate usage and reimplementation." There are many laguages that could be used to build applications that interface with Input and Output devices. Out of which are C++, JAVA, Python, Arduino, and Processing. In this section, we will learn on how to collect data from sensors through a microcontroller, and how to use coding to Simulate and Visualize the measurements in Graphical representations.

Group Assinment
The group assginment was to Compare as many tool options as possible.

An application program interface (API) is a set of routines, protocols, and tools for building software applications. Basically, an API specifies how software components should interact. Additionally, APIs are used when programming graphical user interface (GUI) components.

Compare as many tool options as possible

The assignment this week was to Compare as many tool options as possible.

So our idea was to compare the various options we can use to interface with out inputs and otputs.

Test 1 - Testing Processing

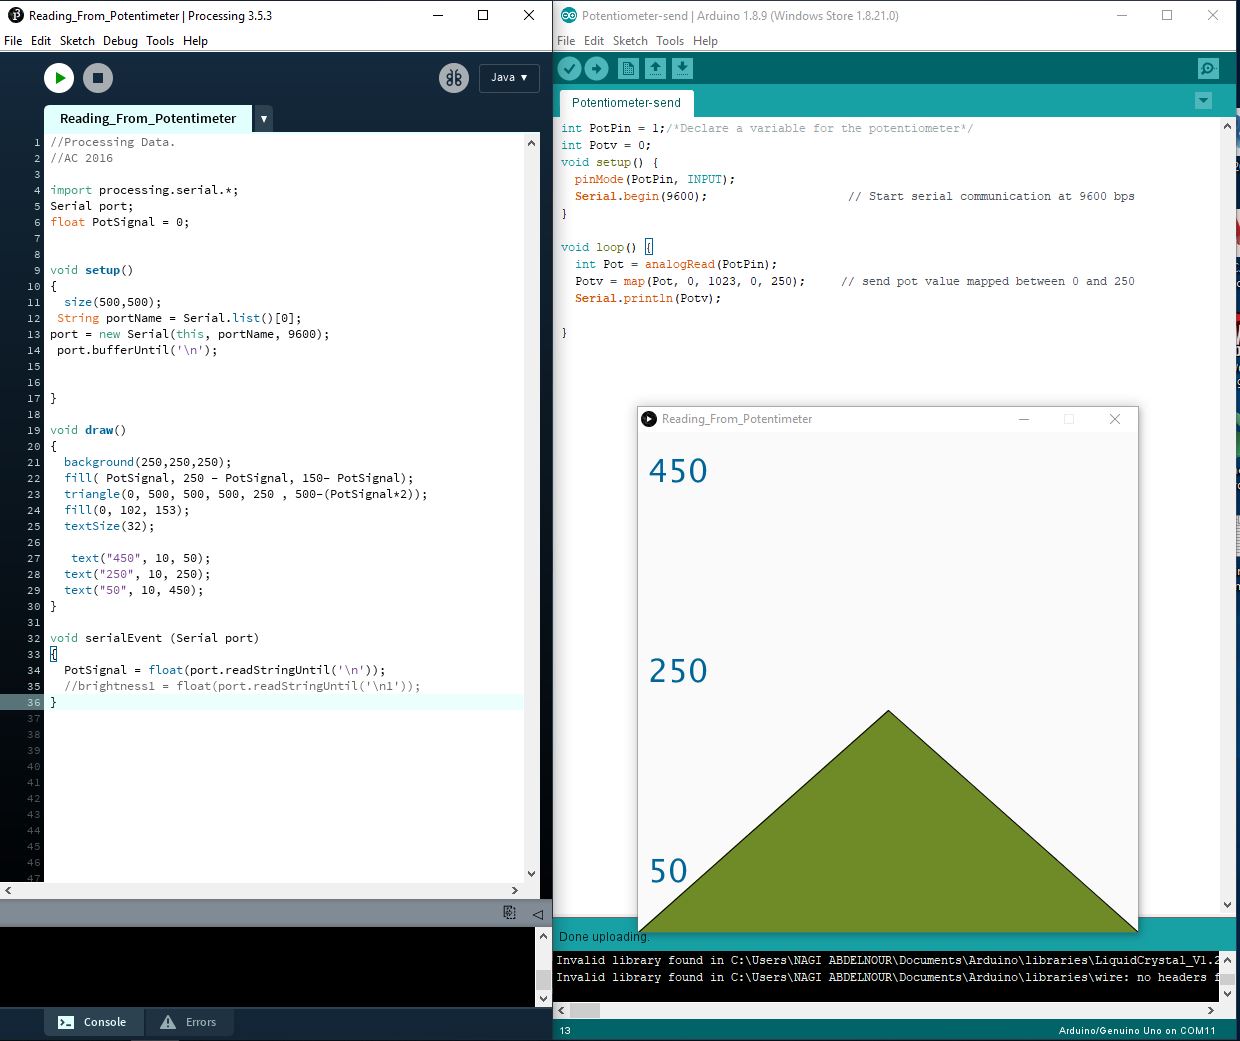
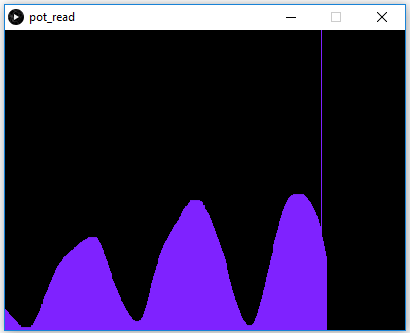
We tested the Processing language with an input such as a potentiometer. The code plots the variation of the potentiometer. We also tried the same application with Python. Many examples of similar codes are available online, such as in the arduino Library: Arduino tutorial

Arduino code

void setup() {
Serial.begin(9600);
}

void loop() {
// send the value of analog input 0:
Serial.println(analogRead(A0));
delay(2);
}

Processing code

import processing.serial.*;

Serial myPort; // The serial port
int xPos = 1; // horizontal position of the graph
float inByte = 0;

void setup () {

size(400, 300); // set the window size:

println(Serial.list()); // List available serial ports

myPort = new Serial(this, Serial.list()[0], 9600); // Open port in use

myPort.bufferUntil('\n'); // don't generate serialEvent until new character

background(0); // set background:
}

void draw () {

stroke(127, 34, 255); // line style
line(xPos, height, xPos, height - inByte); //line position

if (xPos >= width) {
xPos = 0; // at the edge of the screen, go back to the beginning:
background(0);
} else {
xPos++; // increment the horizontal position:
}
}

void serialEvent (Serial myPort) {

String inString = myPort.readStringUntil('\n'); // get string

if (inString != null) {
inString = trim(inString); // trim off any whitespace:
inByte = float(inString); // convert to an int and map to the screen height
println(inByte);
inByte = map(inByte, 0, 1023, 0, height);
} }

Board

photo

Processing plot

photo


Test 2 - Testing Python

Controlling stepper motor with Python

Given that the stepper motor is my main output device, I tried to write an application to interface a stepper motor to my computer through my board. I used Python to write a small application That send the pulse rate to the microcontroller which will make the motor turn accordingly. A counter is incremented at each iteration and printed on the screen. The microcontroller code is written in Arduino language.

The python codes require installing the serial and wxPython libraries with commandes: pip install PySerial

The board is connected to the PC with an FTDI cable. The port number can be read in the Device Manager in the Control Pannel

photo

Arduino code

const int DIR_1 = 5;
const int STEP_1 = 6;
const int STEP_REV = 200;
int PULSE=1000;

void setup() {
pinMode(STEP_1, OUTPUT);
pinMode(DIR_1, OUTPUT);
digitalWrite(DIR_1, HIGH);
Serial.begin(9600); // opens serial port, sets data rate to 9600 bps
}

void loop() {

if (Serial.available() > 0) {
PULSE = Serial.read(); // read the incoming byte
stepper1_on();
}}

void stepper1_on(void)
{
digitalWrite(STEP_1, HIGH);
delayMicroseconds(PULSE);
digitalWrite(STEP_1, LOW);
delayMicroseconds(PULSE);
}

Python code

import serial
import time
serialInterface = serial.Serial('COM9', 9600)
text = ''
counter = 1

while True:
time.sleep(0.5)
serialInterface.write(100)
counter = counter + 1
text = str(counter)
print("send "+text)

Running first code


Python code with graphic interface

After getting started with a simple Python code I tried to write a more complex code with a graphic interface using the wxPython library. The code take as input a pulse number and sends it to the microcontroller via serial which turns the stepper motor one step according to the value of the pulse. The Arduino code is the same.

The python codes require installing the wxPython library with commandes: pip install -U wxPython

Python code with graphic interface

import serial
import time
import wx

serialInterface = serial.Serial('COM9', 9600)

class MyFrame(wx.Frame):
def __init__(self):
super().__init__(parent=None, title='Pulse input')
panel = wx.Panel(self)
my_sizer = wx.BoxSizer(wx.VERTICAL)
self.text_ctrl = wx.TextCtrl(panel)
my_sizer.Add(self.text_ctrl, 0, wx.ALL | wx.EXPAND, 5)
my_btn = wx.Button(panel, label='Pulse')
my_btn.Bind(wx.EVT_BUTTON, self.on_press)
my_sizer.Add(my_btn, 0, wx.ALL | wx.CENTER, 5)
panel.SetSizer(my_sizer)
self.Show()

def on_press(self, event):
value = self.text_ctrl.GetValue()
pulse_byte=value.encode("utf-8")
serialInterface.write(pulse_byte)


if __name__ == '__main__':
app = wx.App()
frame = MyFrame()
app.MainLoop()

Interface

photo

Running second code

Test 3 - Testing BLYNK

Blynk is a simple and easy to implement user interface, it facilitates the access to our project via mobile phone.

    In order to use it:
  • I downloaded the Blynk application on my Iphone,
  • I included the Software Serial, and installed the Blynk Library in Arduino,
  • In order to connect the Dehumidifier via HM-10 to my Iphone to read the Humidity level and the status of the machine, I practiced "Blynk" using the Sketch Code Builder to turn a Led On and Off.
  • I opened the app and created a new account, I entered my email and a password.

  • I started a new project, named it "Dehumidifier" and selected Arduino Uno as software.


  • I selected "BLE" as communication type, BLE stands for "Bluetooth Low Energy" is a form of wireless communication designed especially for short-range communication. However, BLE is meant for situations where battery life is preferred over high data transfer speeds.

  • then I pressed create, and inserted a simple button and set it to D13 and a inserted a BLE connection Icon to be able to connect to Arduino.
  • The wiring between the HM-10 and Arduino: Tx to Rx and Rx to Tx.

  • To get it online and connect it to Blynk Cloud, I need a device Authentication Token.
  • To receive it, I entered my email and the app had generated the Authentication Token and sent to my email.
  • Every time we prepare a new project a new Autotication code will be generated in order to connect the Application to our Arduino via the different connections type.


  • I entered the "Authentication Token" code received through email and place it in "YourAuthToken" highlighted in yellow.


Since my App will receive data from the PCB, like the Humidity level and the Dehumidifier status (On/Off), I used as a reference the below example "DHT 11" from the official Blynk website.


I included the Adafruit and DHT

Reference Blynk.