Materials, tools and software
Illustrator (Software)
SolidWorks (Software)
Fusion 360 (Software)
 |
 |
 |
 |
|---|
Illustrator (Software)
SolidWorks (Software)
Fusion 360 (Software)
A raster software is based on a matrix of square cells. Each of these cells receives a single value, in which this value
is assigned to comply with its process similar to the pixel in the images.
These types of software are used mainly to edit, correct, cut or repair an image and that is what I focus on with these
two softwares which are detailed below, one is paid and the other is free, for payment use the best known software that
is considered one of the best according to many designers who are the main ones when using this type of softwares the
software. The free one also did a little research on the internet and those on the recommended schedule all consider
this software a very good competitor against the first software.
Then we will perform the same exercise for the 2 softwares in order to be able to interpret the different behaviors with each one.
For this we will use a process of basic edition of images where we will modify an image to adapt to the parameters of my web page.
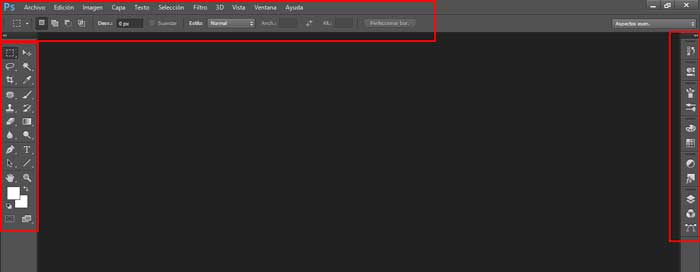
As a first step, we are familiar with the basic software management environment. It is an easy navigation software in which we can find the
toolboxes on the right hand side, a top bar with the other tools that we do not have at hand and without forgetting the configuration tables
that are also in This space.
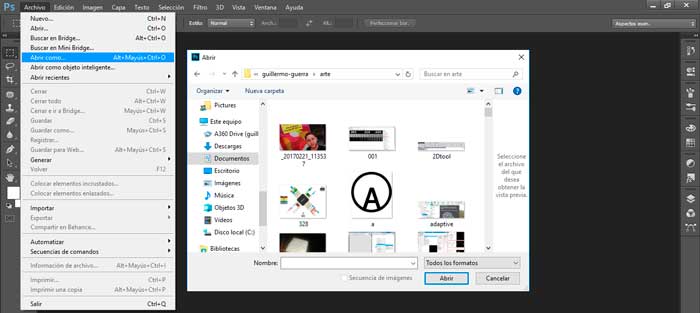
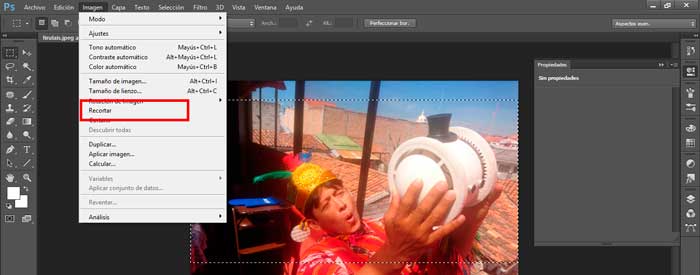
Next step we import the image to be edited in the software workbench in this case in Photoshop in the toolbar we find the FILE button from which we choose the OPEN option and select the image to be modified.
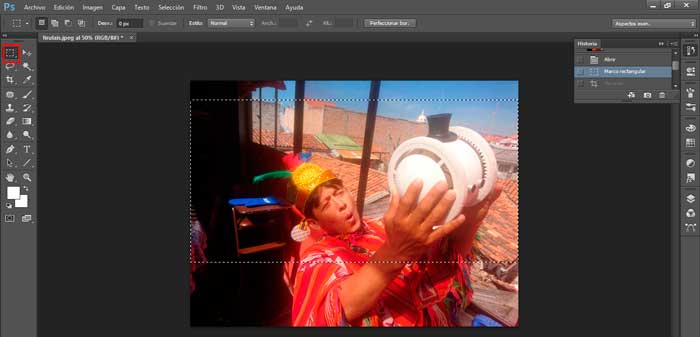
In the left sidebar we have a quick access to the RECTANGULAR FRAME TOOL with which we will select the area that is needed.
As next step we will cut the selected area for this in the top bar we click on the IMAGE button in the CUTTING option.
Then we will make a change using a black and white filter, which we will enter in the right bar in the CAPA box, we have a FILLING CAPA in which a series of filters will be displayed, of which we choose WHITE AND BLACK.

And finally to end with the tool TEXT enter the title of the image.

Advantage
-A very complete program that allows us a diversity of tools, processes to work with it.
-A very intuitive interface easy to customize in order to modify the most used tools to have them as quick access.
-Wide variety of filters, add-ons already installed of package which help us to have a better performance without installing add-ons.
-It has a large community of people who manage the program so this helps to find tutorials, supplements, sources with which we can
customize even more.
Disadvantages
-High cost in your license of use.
-Weight and need a good processing system because it has a high consumption in the computer.
A software for photo editing and digital sketching in which we will mainly use for editing, retouching and trimming images.
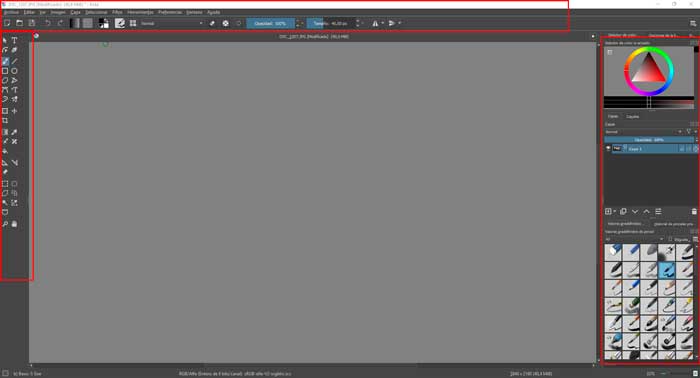
It is a program whose interface is very similar to Photoshop, which made it easier for me to learn and adapt to the use of this tool.
To use the program we use a bar with the main features at the top, as second we have the editable panels on the left and right.
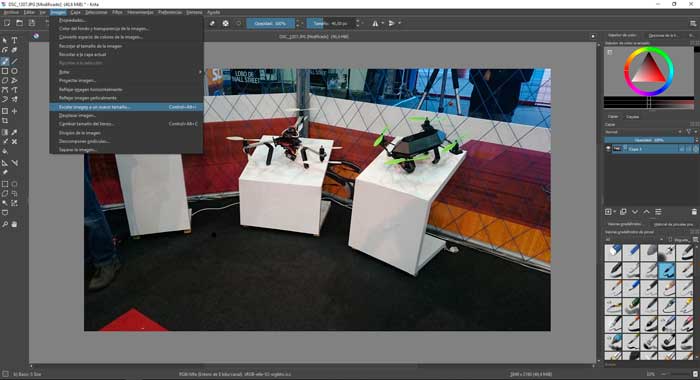
As a next step we import the image to be edited. By continuing in the upper bar on the FILE button we select the IMPORT tool.
A window will appear in which we can choose the folder and the image to edit.
We can see the image on the work table where we can use the different editing tools to adjust the image to a size, weight, add filters,
effects and many more options.
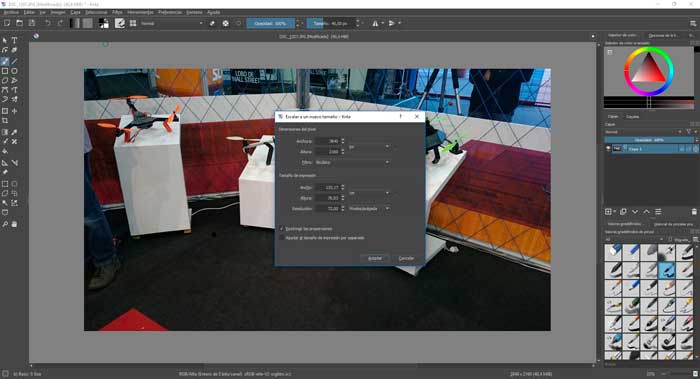
For this case we will reduce the size and resolution of the images in order to add the images to the web page. By clicking on the PICTURE button we will obtain a menu in the option we will be able to control the different configuration parameters. For the changes of the web page there was a horizontal standard of 700 pixels with an approximate resolution of 72 DPI.
The two softwares are very useful and each one has different strengths, skills for the development of different projects. In some cases Photoshop allows us to have more image editing tools and on the other hand krita allows us to generate drawings or sketches in a freer and faster way.
Is a vector graphic editor developed by Adobe Systems. Its interface, ordered and structured, contains various tools and
parameters that we can adjust for the development of all kinds of graphics such as illustrations, logos, character design,
models, icons, brochures, among others.
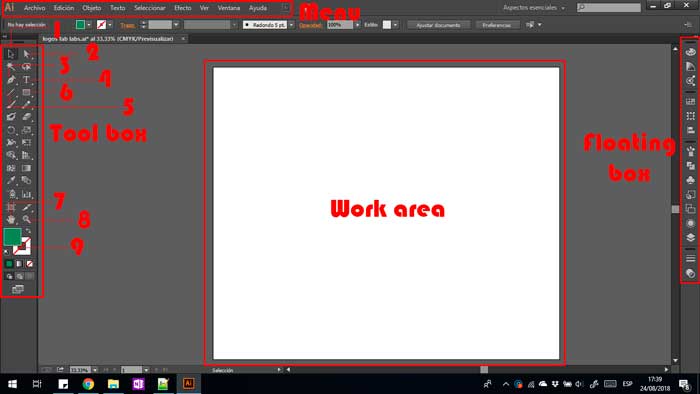
To be able to make sketches in Illustrator we need to know the main tools for creation and modification of vectors.
In the left window you can find basic tools of work.
1.- Selection tool (as its name already says it with this it helps us to select the whole object)
2.- Direct selection tool (with this we can select a specific vector to be able to modify it)
3.- Feather (with this tool we can create one or several vectors to be)
4.- Text (Enter texts)
5.- Line (create lines with different dimensions and inclinations)
6.- Rectangle (allows to obtain different geometrical figures to simplify the design process)
7.- Hand (With this tool we can move around the work area)
8.- Zoom.
9.- Palette of colors
On the right we will find a window with more tools with which we can access more easily. all these can be customized according
to the use, within these we can find tools of color, transparency, symbols, look for strokes, among others.
In the design process, it uses the "Pen" tool with which I created the vectors by creating several vectors that connect to each other creating a line which creates the shape we need.
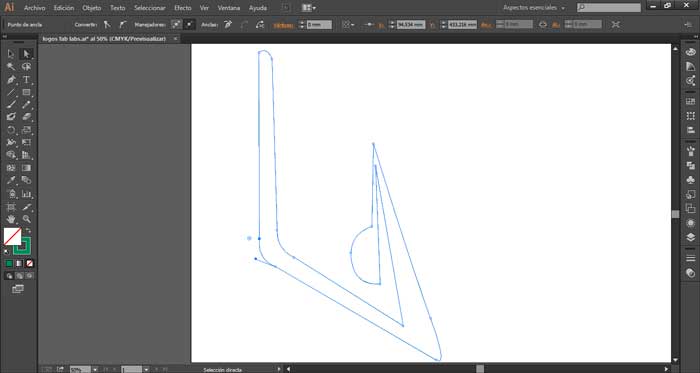
Once the shape is created, we add color to the filling and eliminate the color of the contour with the previously mentioned color tool, copy it three times until generating the simetira and with the text tool the name of the laboratory. and with these simple steps we get.

Advantage
- This software is very intuitive
- Easy to learn
- It allows us to expand our creativity
Disadvantages
- On the basis of my professional use the only limitation for a vector software is the payment of lisencia is its only disadvantage.
For the Fab Academy, we will use deferments software's but this depends on the application and the necessity.
We have different programs to the applications of the all machines. In the assignments can see the bounding
between the program and its application to a specific machine.
We can find different programs with different ways of working and application in modeling 2D, modeling 3D,
rendering, Simulation, etc.
I use SolidWorks because is a software for macanical design and is the necessity of my final project.
In my final project, I design a Ceramic 3D printer, for make this I use SolidWorks because is software for mechanical design development.
For this part, I modeling the first sketch in 2D and 3D in solidworks.
To make the modeling process, I use the sketch to make the 2D plane of the pieces with restriction to can change the size.
Them I use the 3D tools to make the complete pieces.
In this software, I can make any process for modeling, rendering and simulation of the different parts of the machine.
I generate a file technic when we can the first sketch of the machine in 2D and 3D, a simulation of and rendering of the join
to the final pieces.
In this technic file, I export to PDF or in a different format to make the pieces.
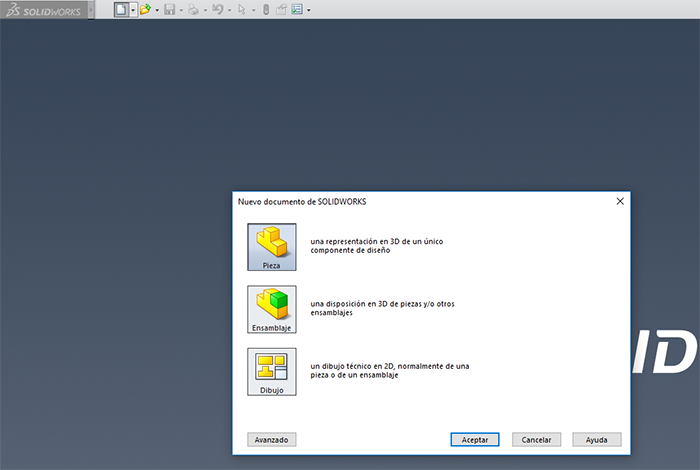
The first think to know about the software is the three different files types this has
1._ you can design a PIECE in two or three dimensions according to your need.
2._ is the ASSEMBLE; you can join two or more pieces.
3._ SKETCH is a data sheet of a piece or an assembly.
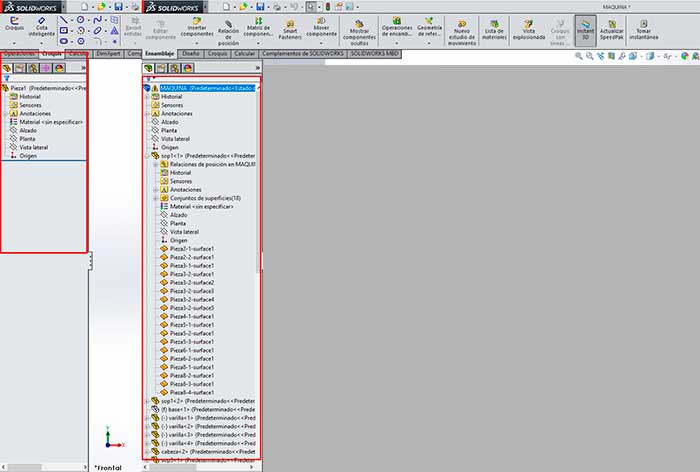
once chosen the type of file opens the window for development of the project in this case we chose to make a piece, at the top you will
find the different toolbars to work in 2D, 3D or different processes such as simulations, renders or other.
Another detail to the left of the program is the window of process flows that we make along the modeling of the part in which we can repair, edit or eliminate the different processes observing how our design varies.
For the use of this complement all, the pieces to be used are modeled. For a simple use of this process, the parts are aggravated and relations
of position are generated based on the union of their designs.
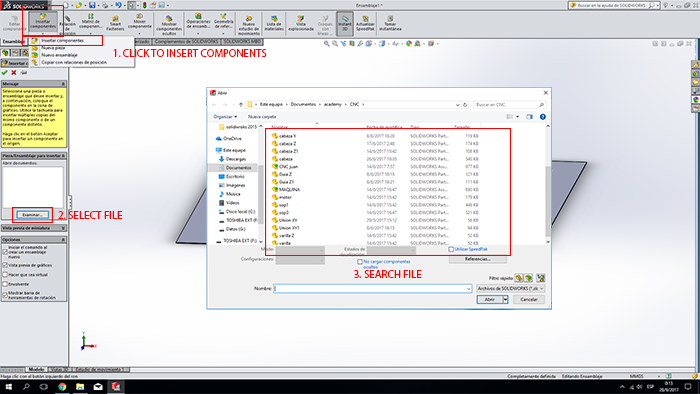
Then we can follow the steps to insert a piece for the assembly.
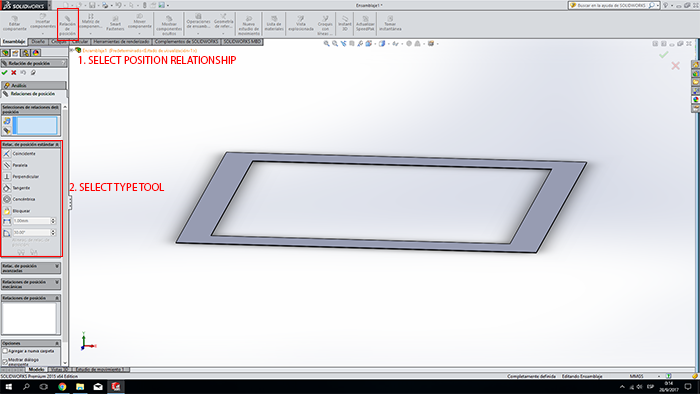
In the next step, the details of position relationships will be established.
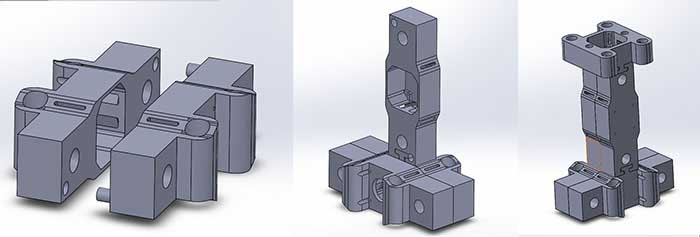
We can see some examples about the assemblies.
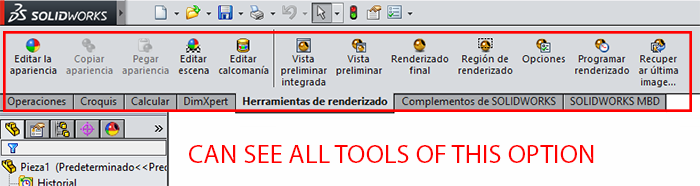
To open the rendering tool in solidworks we went to COMPLEMENTS and chose PHOTO VIEW 360.
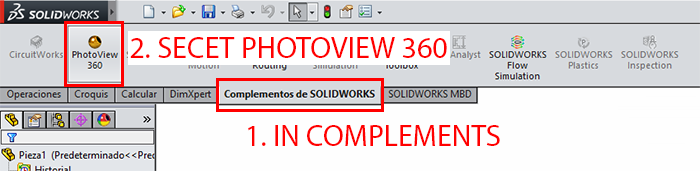
To make a render in SolidWorks is very easy, first select the materials of the pieces to the right we can find the appearance button in which we have a wide catalog of different types of materials in which we can add our piece. Them use the RENDER TOOLS, which we find in the add-ons window and selecting PhotoView 360, and select a FINAL RENDER button.
Below you can see an example of the final rendering process
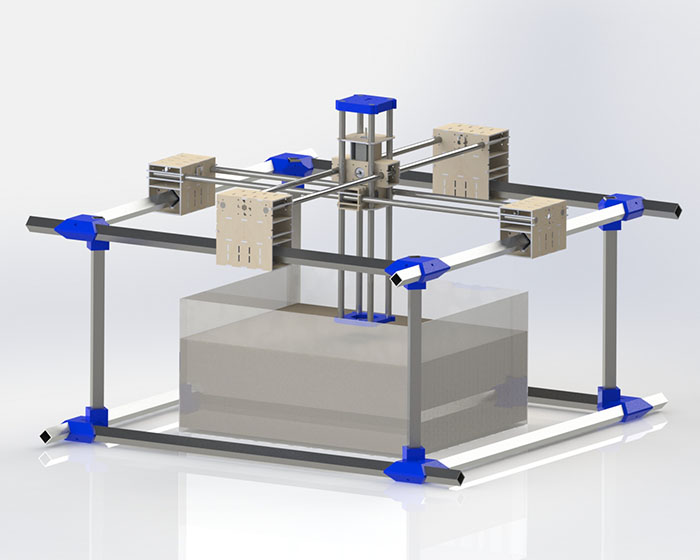
Based on the position restrictions mentioned above, we could generate the movements generated by the design in this case, the passage of the machine head over the guides.

Advantage
- It is an easy-to-use software for all its processes.
- It is the most complete that allows to expand within all the mechanical design with simulations, assemblies, renders and calculations for different uses.
- Its render engine is very good compared to others that I have had the opportunity to try in my experience as an object designer.
- All the help for calculations of tensions, structural, aerodynamic with their respective simulations.
Disadvantages
- Based on my professional use a limitation is the payment of lisencia but is understandable for all its benefits.
- The need for a high performance processing system for all its processing.
- It is a bit complicated system if you do not have the right experience in handling modeled software.
It is a software of 3D modeling and parametric design, which has surprised me with its latest updates.
It is an intuitive and very complete navigation system in which we can edit and create files with different
tools for some uses that we might need such as modeling, cam process, render, patch, sheet metal, drawing
among others.
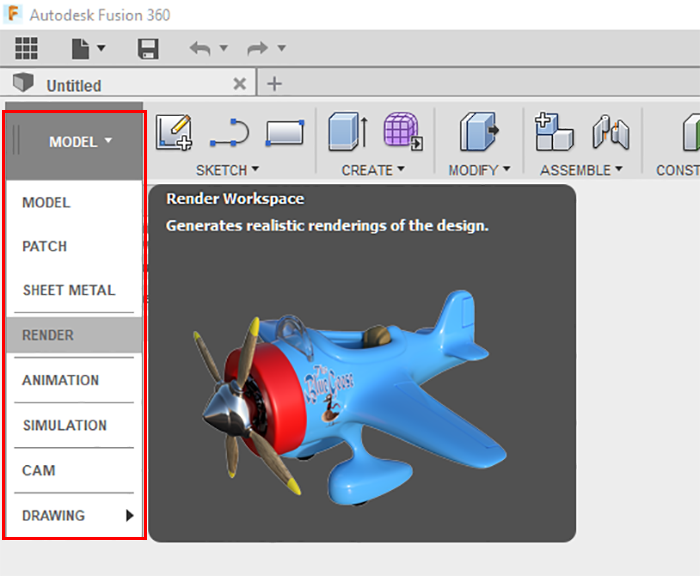
Once the type of tool is selected, it will display the different menus to carry out the work.
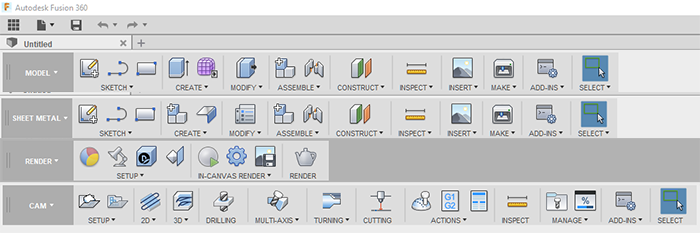
From which we obtain different submenus with which we find several processes and tools to fulfill certain functions.
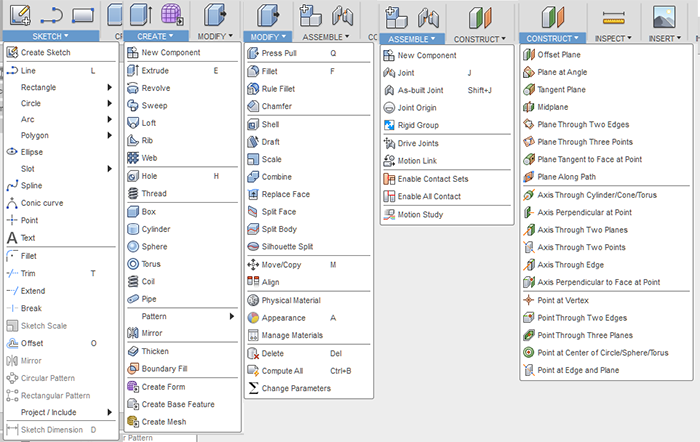
The main tool to start is that of "Model" in which it is used as a basis for several processes for the modeling process.
We noticed a software architecture very similar to Solidworks. We started in the sketch process in which we formed our
two-dimensional structure as we can observe in the next image.
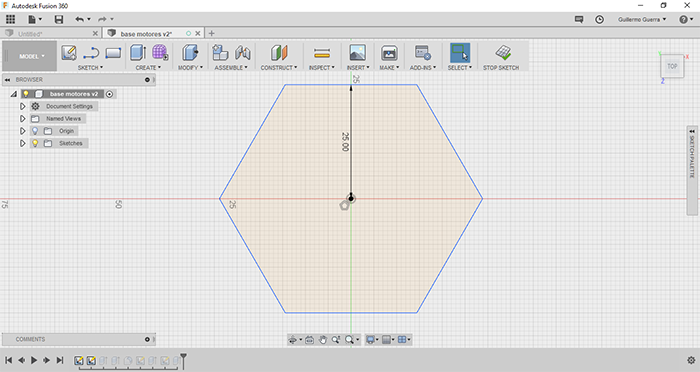
Once the 2D design is done, we use the 3D tools to modify until the final piece is obtained.
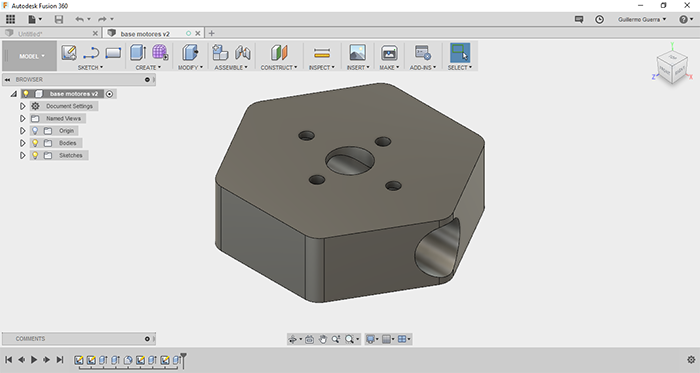
After the modeling process we can use the different tools such as Render, cam process, among
others there are other tools such as Sheel metal in which the process must be started without
linking any other.
Advantage
- The advantage is their free licenses for students.
- It is a complete Software to be able to learn all its modeling processes.
- Its render engine is external to the processing system so it is a very good help.
- The modeling process is facel and intuitive to start with a design program.
- The CAM process is one of the best tools that I could use within the whole program.
Disadvantages
- When working together with this program with SolidWorks they complement each other very well so you can create very good results.