Week 8 assignments:
Embedded Programming:
From Fab Academy 2018 assignments
1. Read a microcontroller data sheet..
2. Program your board to do something, with as many different programming languages and programming environments as possible
3. Extra credit: experiment with other architectures
Have:
Documented what you learned from reading a microcontroller datasheet.
What questions do you have? What would you like to learn more about?
Programmed your board
Described the programming process/es you used
Included your code
What is a Microcontroller?
A micro-controller can be comparable to a little stand alone computer; it is an extremely powerful device, which is able of executing a series of pre-programmed tasks and interacting with extra hardware devices. Being packed in a tiny integrated circuit (IC) whose size and weight is regularly negligible, it is becoming the perfect controller for as robots or any machines required some type of intelligent automation
Microcontroller Architectures

Types of Microcontrollers

Main Difference between AVR, ARM, 8051 and PIC Microcontrollers
|
|
8151 |
PIC |
AVR |
ARM |
|
Bus
width |
8-bit for standard core |
8/16/32-bit |
8/32-bit |
32-bit mostly also available in 64-bit |
|
Communication
Protocols |
UART, USART,SPI,I2C |
PIC, UART, USART, LIN, CAN, Ethernet, SPI, I2S |
UART, USART,
SPI, I2C, (special purpose AVR support CAN, USB,
Ethernet) |
UART,
USART, LIN, I2C, SPI, CAN, USB, Ethernet, I2S, DSP,
SAI (serial audio interface), IrDA |
|
Speed |
12 Clock/instruction cycle |
4 Clock/instruction cycle |
1 clock/ instruction cycle |
1 clock/ instruction cycle |
|
Memory |
ROM, SRAM, FLASH |
SRAM, FLASH |
Flash, SRAM, EEPROM |
Flash, SDRAM, EEPROM |
|
ISA |
CLSC |
Some feature of RISC |
RISC |
RISC |
|
Memory
Architecture |
Von Neumann architecture |
Harvard architecture |
Modified |
Modified Harvard architecture |
|
Power
Consumption |
Average |
Low |
Low |
Low |
|
Families |
8051 variants |
PIC16,PIC17, PIC18, PIC24, PIC32 |
Tiny, Atmega, Xmega, special purpose AVR |
ARMv4,5,6,7 and series |
|
Community |
Vast |
Very Good |
Very Good |
Vast |
|
Manufacturer |
NXP, Atmel, Silicon Labs, Dallas, Cyprus, Infineon, etc. |
Microchip Average |
Atmel |
Apple, Nvidia, Qualcomm,
Samsung Electronics, and TI etc. |
|
Cost (as
compared to features provide) |
Very Low |
Average |
Average |
Low |
|
Other
Feature |
Known for its
Standard |
Cheap |
Cheap, effective |
High speed
operation Vast |
|
Popular
Microcontrollers |
AT89C51,
P89v51, etc. |
PIC18fXX8,
PIC16f88X, PIC32MXX |
Atmega8,
16, 32, Arduino Community |
LPC2148, ARM Cortex-M0 to ARM Cortex-M7, etc. |
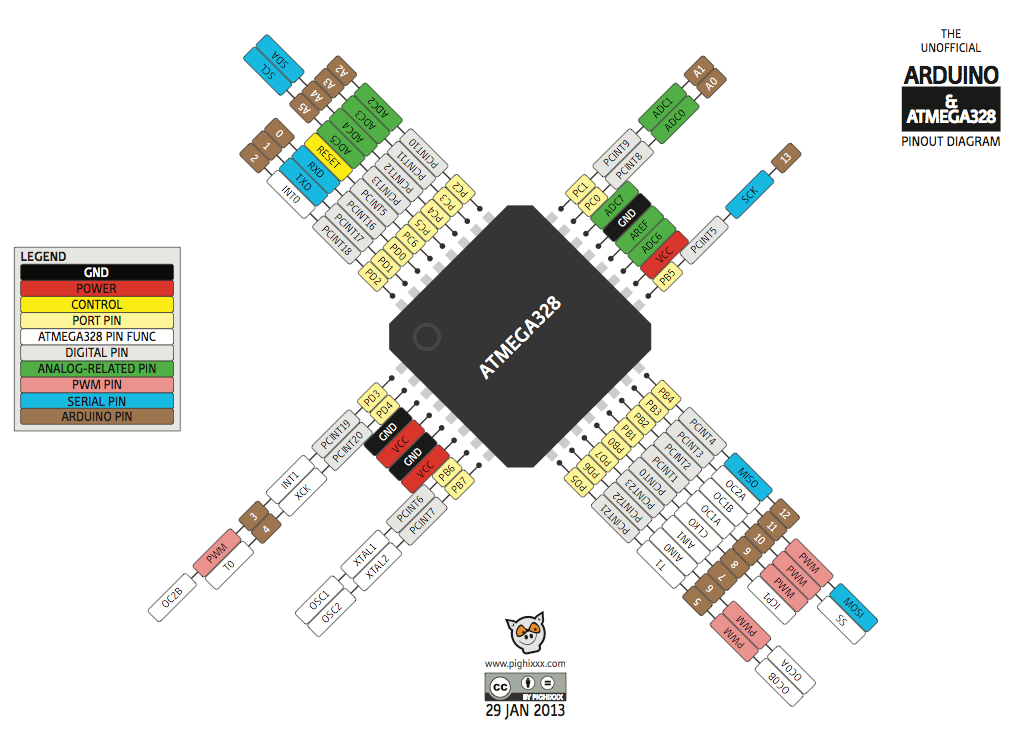
AVR Microcontroller Datasheet
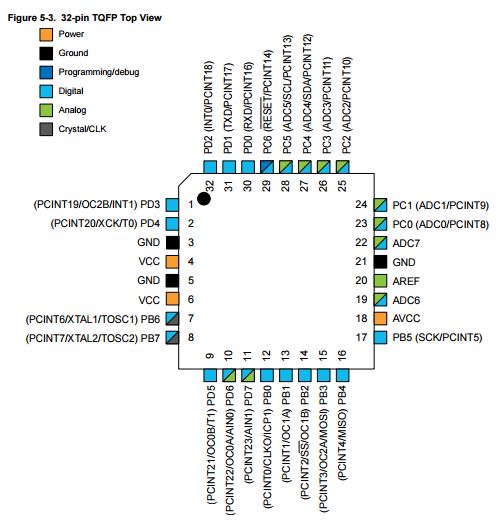
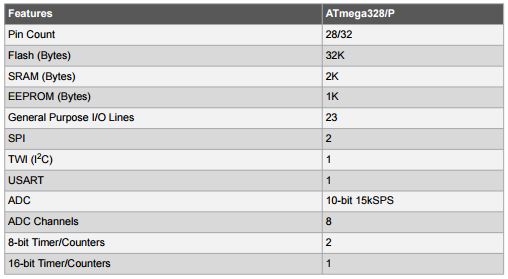
For this assignment I am using the Atmega328P AU microcontroller. Before starting to program the microcontroller, it is important to read the datasheet. Below are the key things that can be obtained from this
Pin configurations
It is essential to know the location of the ports and pins as well as the functionality of each of these. You can find the description of the functionalities of each of the ports and pins on pages 17 and 18.
Feature summary
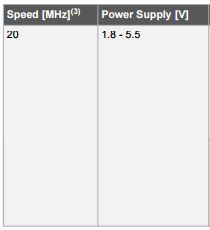
Speed and Power Supply
AVR - Fuses of AVR microcontrollers
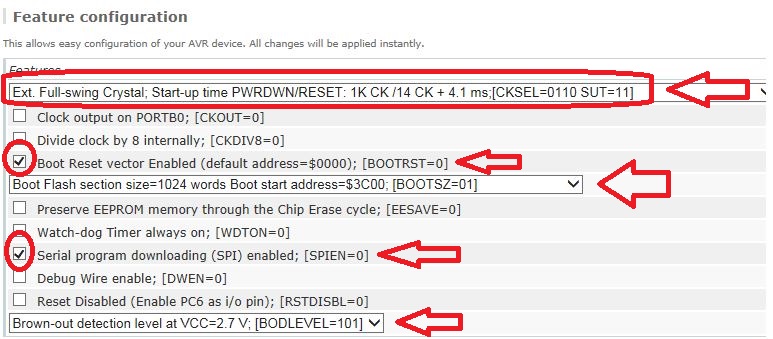
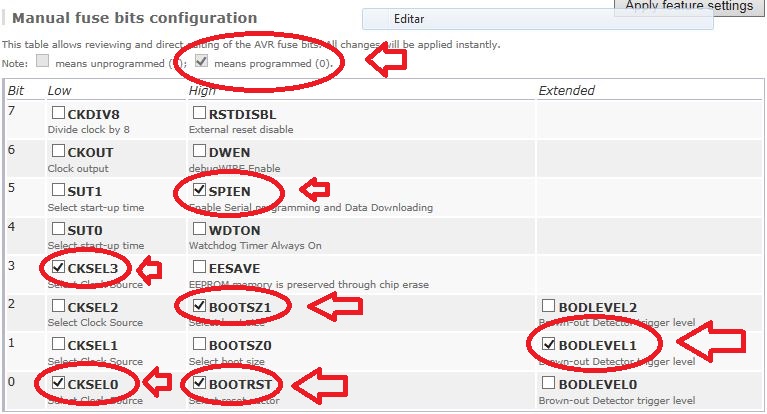
As happens in the vast majority of microcontrollers, AVR have their own configuration mechanism, as other microcontrollers have configuration files, AVR has fuses, which serve to configure important parameters of the microcontroller, such as memory, frequency of work, programming interface, the bootloader, among others.
For programming the fuses You can use Engbedded Atmel AVR® Fuse Calculator

Programming Protocols and good practices
- Write your programs as simple and direct as possible. Keep it simple .
- If you work with a compiler, adjust your options so that it throws as many errors and warnings as possible when compiling, in this way, your application will have fewer chances of getting random errors. Based on the above, check each message to take the appropriate measures.
- All programs must be previously commented, explaining the purpose, complete functioning and the expected result.
- Within the defined functions, it establishes a spacing or indentation , that highlights the functional structure of the application and facilitates the reading to the programmer to whom it corresponds to analyze the code.
- In general, an indentation level is used for each block of code (conditional statements and loops are considered as blocks of embedded code inside another, so the indentation is recommended), this indentation corresponds to an indentation that commonly has the value of a tabulation (Tab key) or three or four spaces.
- It is important that the size of the indentations are regular (consistent) and do not vary throughout the code, that is, if the first block occupies a tab as an indentation, the rest of the blocks must be indented with an additional tabulation for each level, with that the reading in any code editor is facilitated.
- It is recommended to declare variables in separate lines, since the description of each variable is facilitated through comments.
- Putting a space after each comma (,) facilitates the readability of the code.
- Do not use variables whose name does not have any descriptive meaning, a variable with significant names allows the reader to understand the context of the code and allows to decrease the amount of associated documentation, since with a readable code and significant names, the code is self-documented . For example, a variable called quantity_requires, has more meaning than a variable called c.
- Comment when it is fair and necessary, use the comments within the functions to describe the variables (only when their usefulness is potentially doubtful) and when there are blocks of code that are difficult to understand at first glance; the excess of comments renders the code illegible.
- It is recommended as a good habit, to add at the beginning of each function, a block of comments explaining the general behavior of the function, so that it can be roughly understood what it does, or is expected to do, as it is provided the search for errors, and unnecessary analysis is avoided in a large number of cases.
- In case of using binary operators (for example +, -, &&, ||, among others) it is recommended to put space at the ends of each operator, so that their presence is highlighted and the reading of the code is facilitated.
- It is recommended in some complex operations, to use redundant or unnecessary parentheses that serve to group expressions within such operations.
- Never forget to initialize counters and adders.
Programming
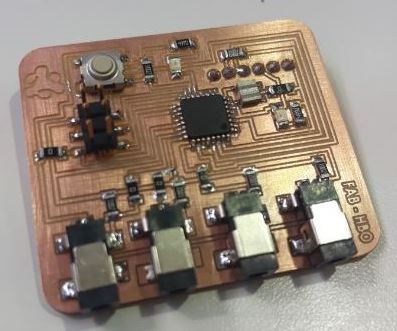
For the practice of programming I use the electronic board that I designed in the week of electronic design
Programming in Arduino
I decided first programming my electronic circuit using Arduino language, that is a simplified language makes programming AVRs and more complicated microcontrollers incredibly easy. Unfortunately, Arduino doesn’t have any built-in functionality to program some AVRs,but I going to explain how I did to be able to program in this case the Atmega328 microcontroller in the Arduino IDE.
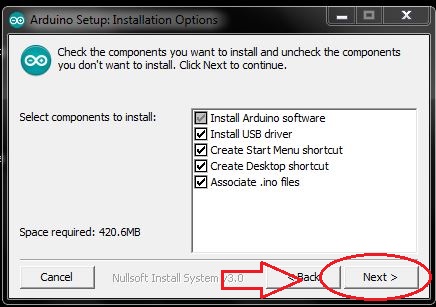
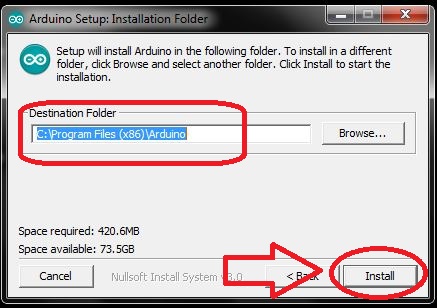
- Download and Install Arduino IDE
- Download and extract the EduAtmega328P firmware in the hardware folder located in the Arduino installation folder

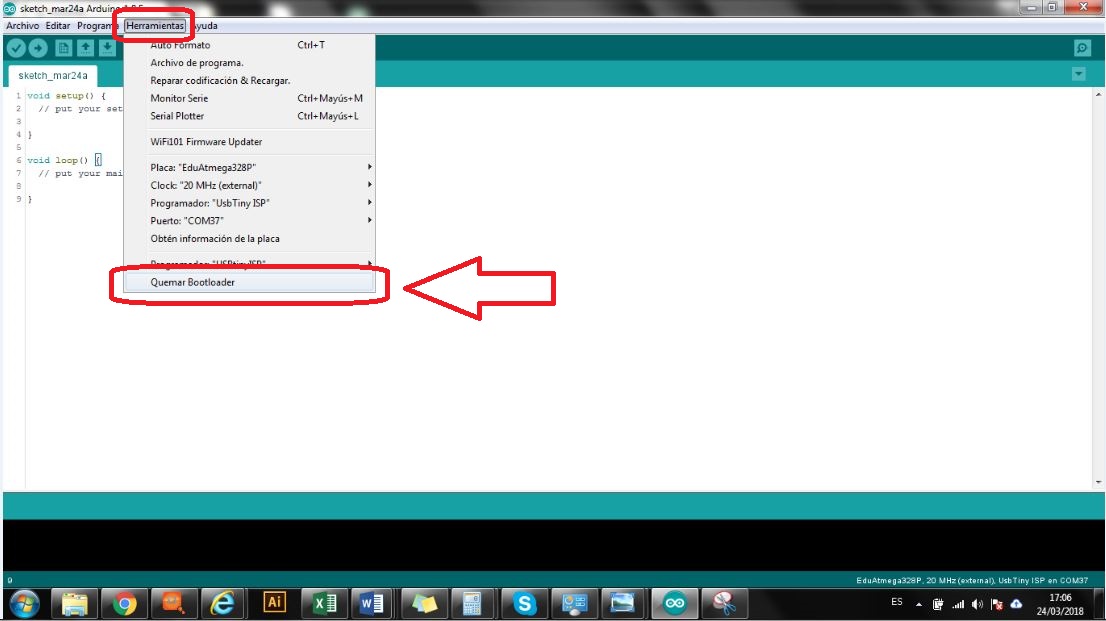
- Open Arduino IDE, select the Tools tab and in the Boards option select EduAtmega328P
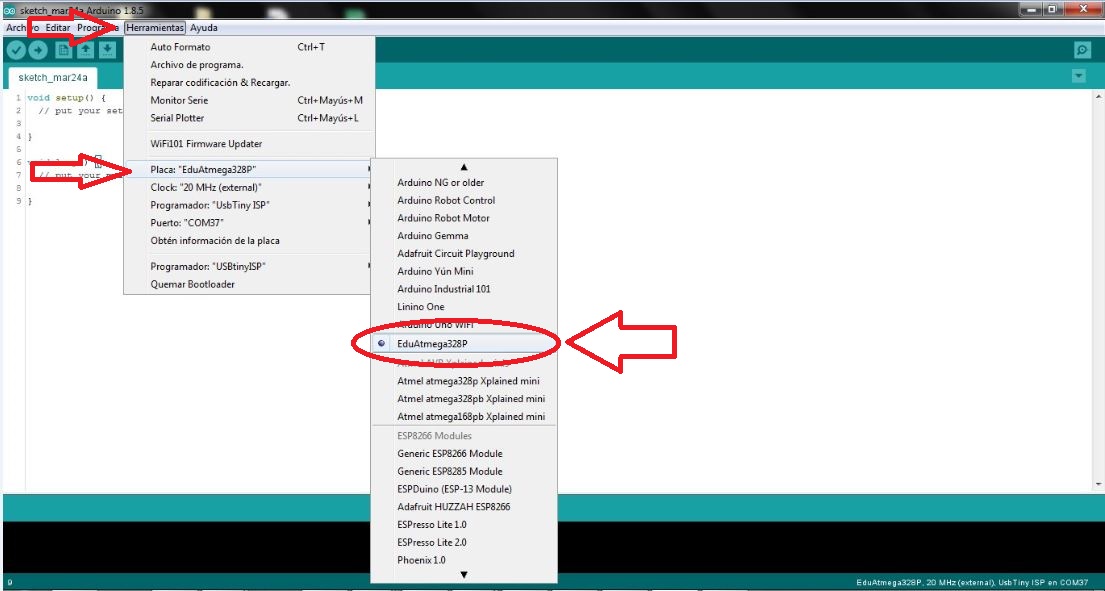
- Select Clock 20Mhz and Programmer UsbtinyISP
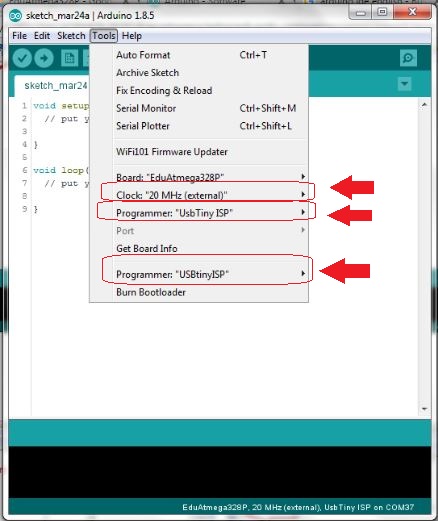
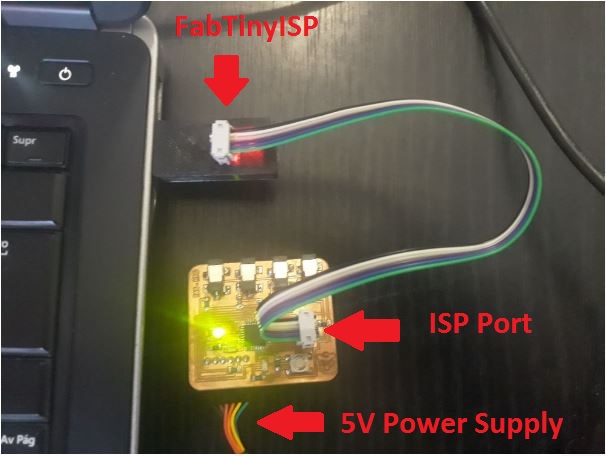
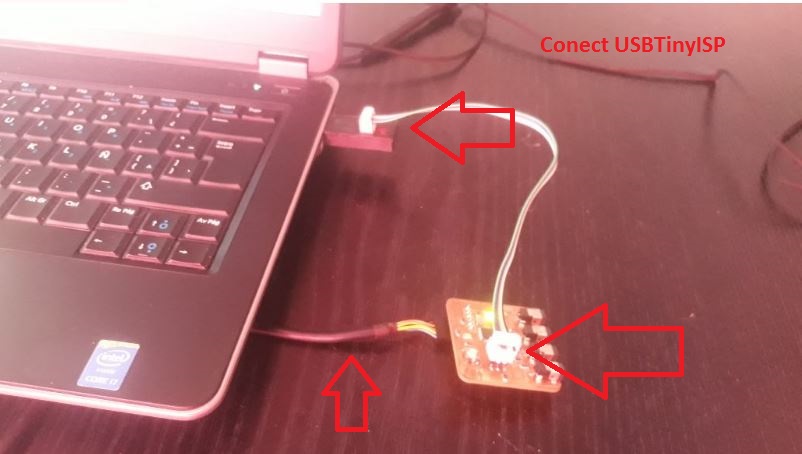
- Supply the electronic circuit with 5 volts and connect the USBTinyISP through the ISP port.
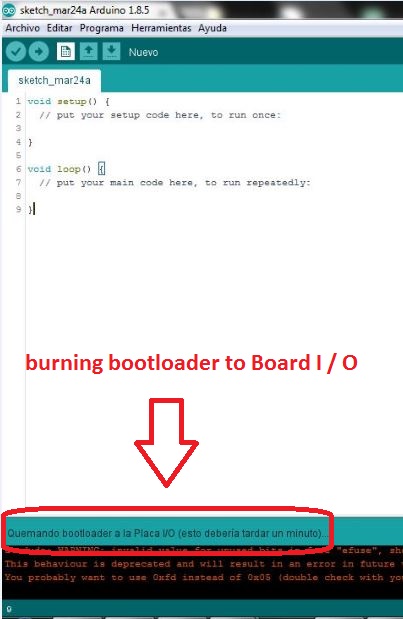
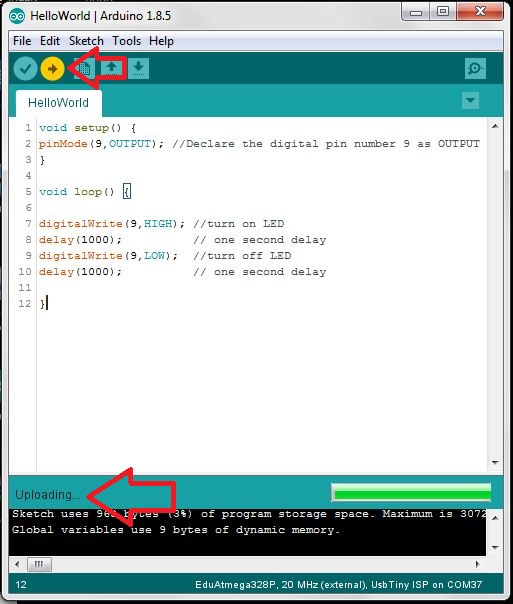
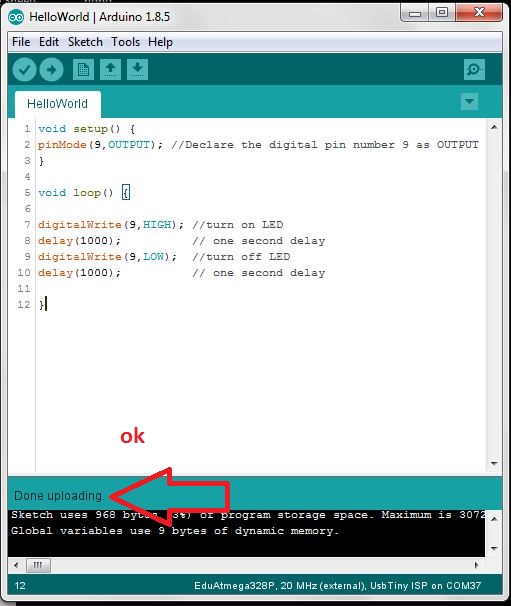
- Burn the Bootloader.
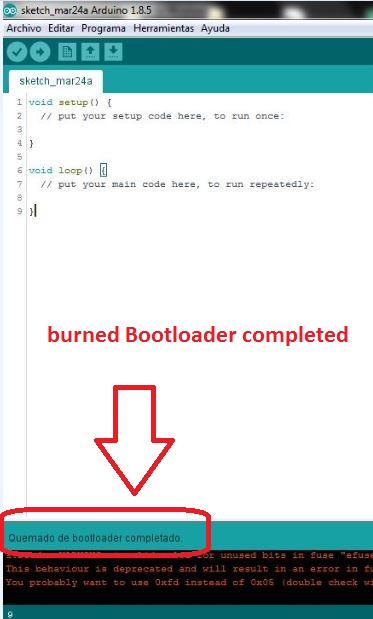
Now the Arduino IDE and the microcontroller are ready to load the programming. Before starting to program it is important to indicate that when loading the Arduino Bootloader the configuration of the pins changes, the new configuration is shown.
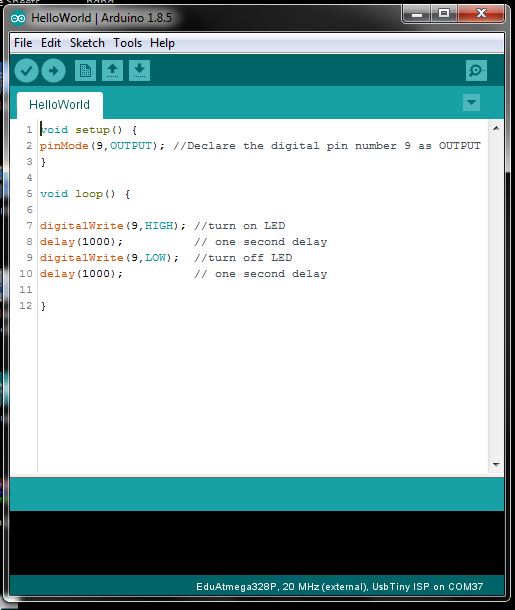
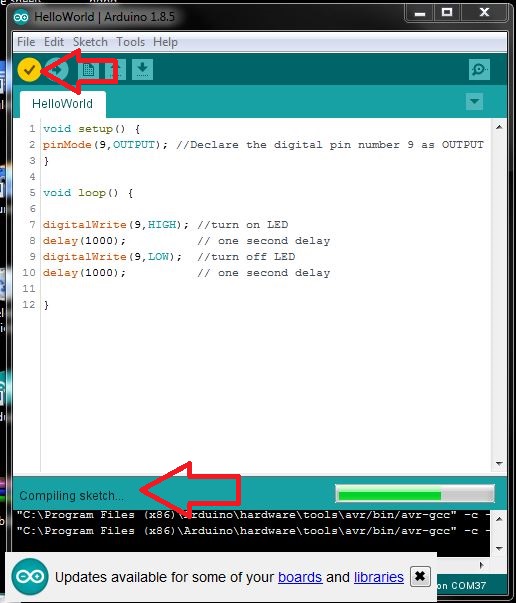
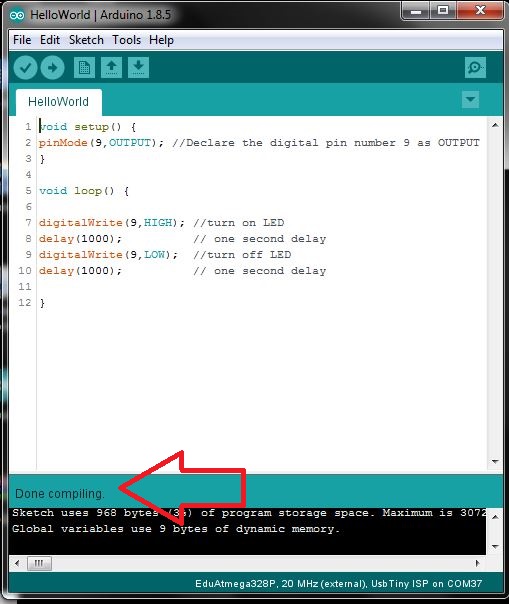
Programming Hello World
void setup() {
pinMode(9,OUTPUT); //Declare the digital pin number 9 as OUTPUT
}

void loop() {

digitalWrite(9,HIGH); //turn on LED
delay(1000);          // one second delay
digitalWrite(9,LOW);  //turn off LED
delay(1000);          // one second delay

}
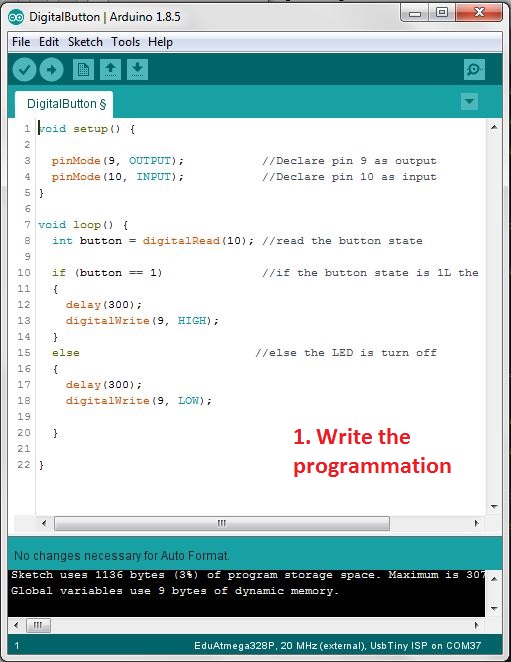
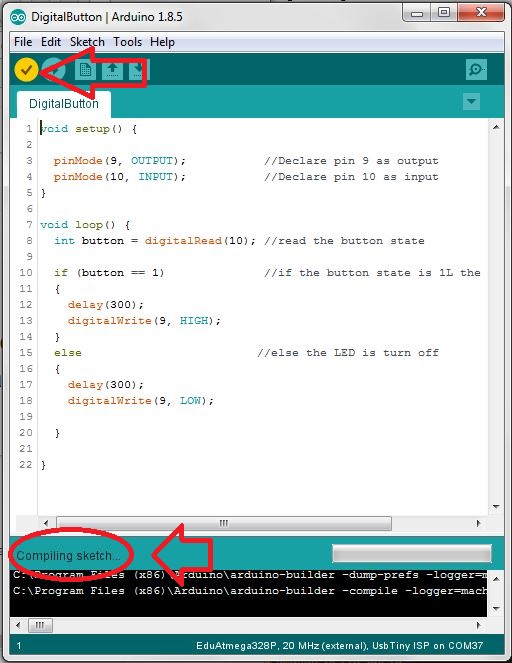
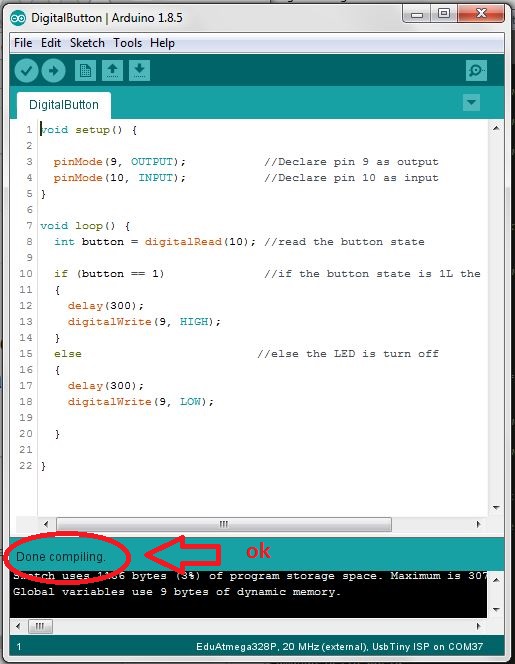
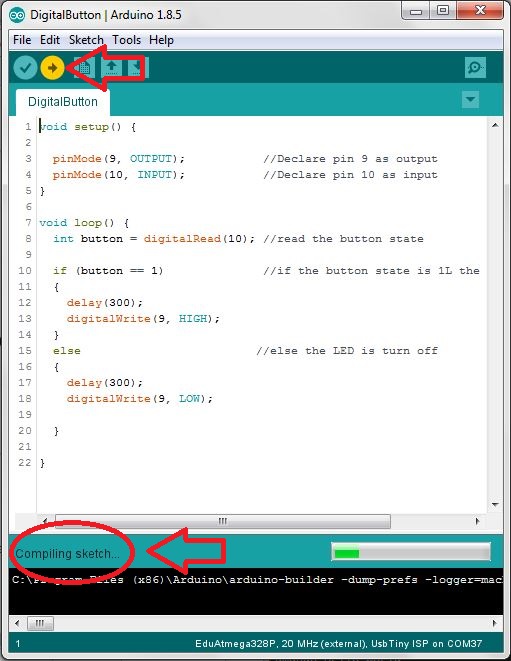
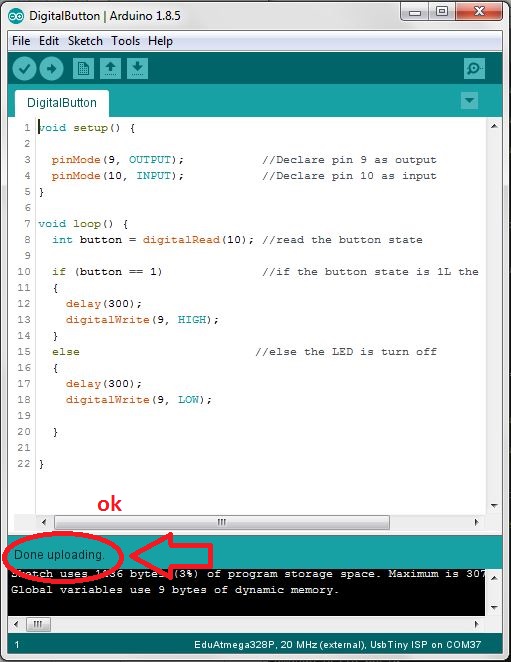
Programming to turn on a LED by pressing a push button
void setup() {

  pinMode(9, OUTPUT);           //Declare pin 9 as output
  pinMode(10, INPUT);           //Declare pin 10 as input
}

void loop() {
  int button = digitalRead(10); //read the button state

  if (button == 1)              //if the button state is 1L the LED is turn on
  {
    delay(300);
    digitalWrite(9, HIGH);
  }
  else                         //else the LED is turn off
  {
    delay(300);
    digitalWrite(9, LOW);

  }

}
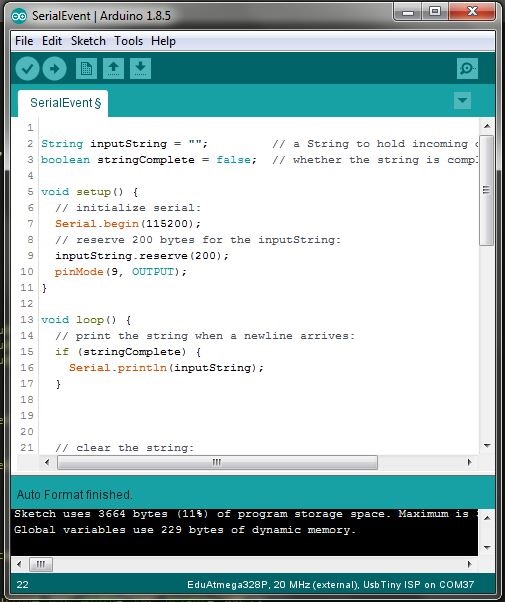
Programming to turn on led by serial communication
String inputString = "";         // a String to hold incoming data
boolean stringComplete = false;  // whether the string is complete

void setup() {
  // initialize serial:
  Serial.begin(115200);
  // reserve 200 bytes for the inputString:
  inputString.reserve(200);
  pinMode(9,OUTPUT);
}

void loop() {
  // print the string when a newline arrives:
  if (stringComplete) {
    Serial.println(inputString);
    }


    // clear the string:
    inputString = "";
    stringComplete = false;
  }
/*
  SerialEvent occurs whenever a new data comes in the hardware serial RX. This
  routine is run between each time loop() runs, so using delay inside loop can
  delay response. Multiple bytes of data may be available.
*/
void serialEvent() {
  while (Serial.available()) {
    // get the new byte:
    char inChar = (char)Serial.read();

    if(inChar=='A'){
    delay(100);
    Serial.println("Turn On LED");
    digitalWrite(9,HIGH);
    }
    else{

    if(inChar=='B'){
    delay(100);
    Serial.println("Turn Off LED");
    digitalWrite(9,LOW);
    }
    }
    // add it to the inputString:
    inputString += inChar;
    // if the incoming character is a newline, set a flag so the main loop can
    // do something about it:
    if (inChar == '\n') {
      stringComplete = true;
    }
  }
}

Programming in CODEVISION AVR
CodeVisionAVR is a C cross-compiler, Integrated Development Environment and Automatic Program Generator designed for the Atmel AVR family of microcontrollers. The program is a native 32bit application that runs under the Windows 7, 8, 8.1 and 10 operating systems. The C cross-compiler implements nearly all the elements of the ANSI C language, as allowed by the AVR architecture, with some features added to take advantage of specificity of the AVR architecture and the embedded system needs
You can download the evaluation version HERE
Steps to programming a Atmega328 with CodevisionAVR
Open the software and open the tools tab
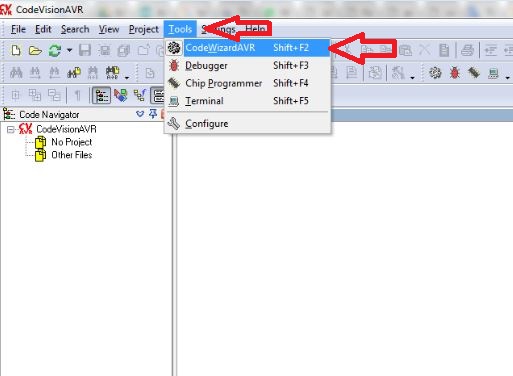
Select CodevisionAVR
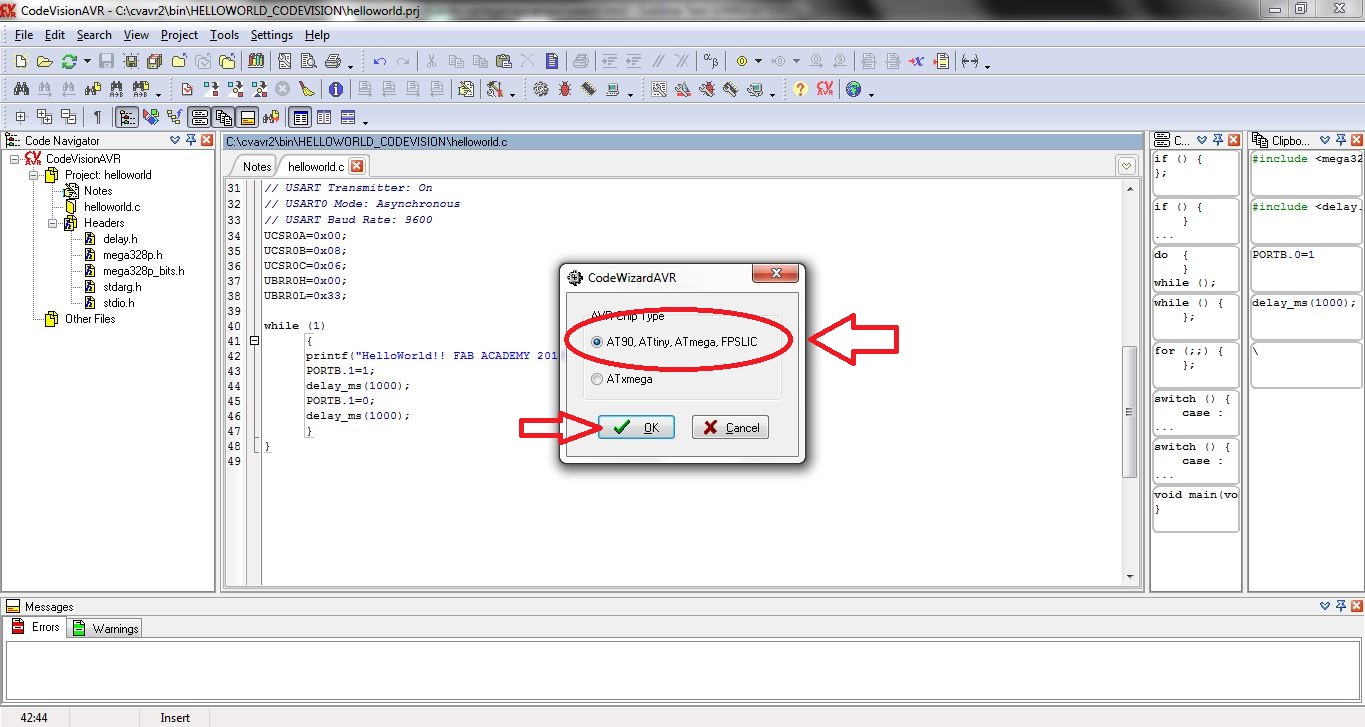
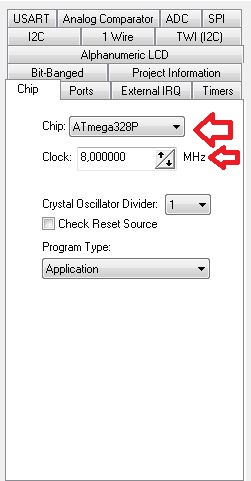
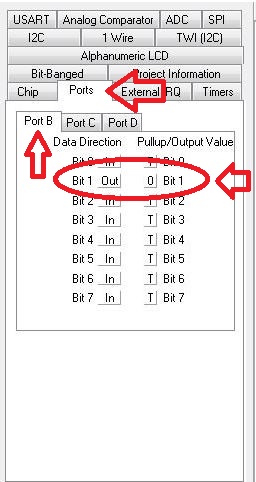
Select Microcontroller and select the programming settings

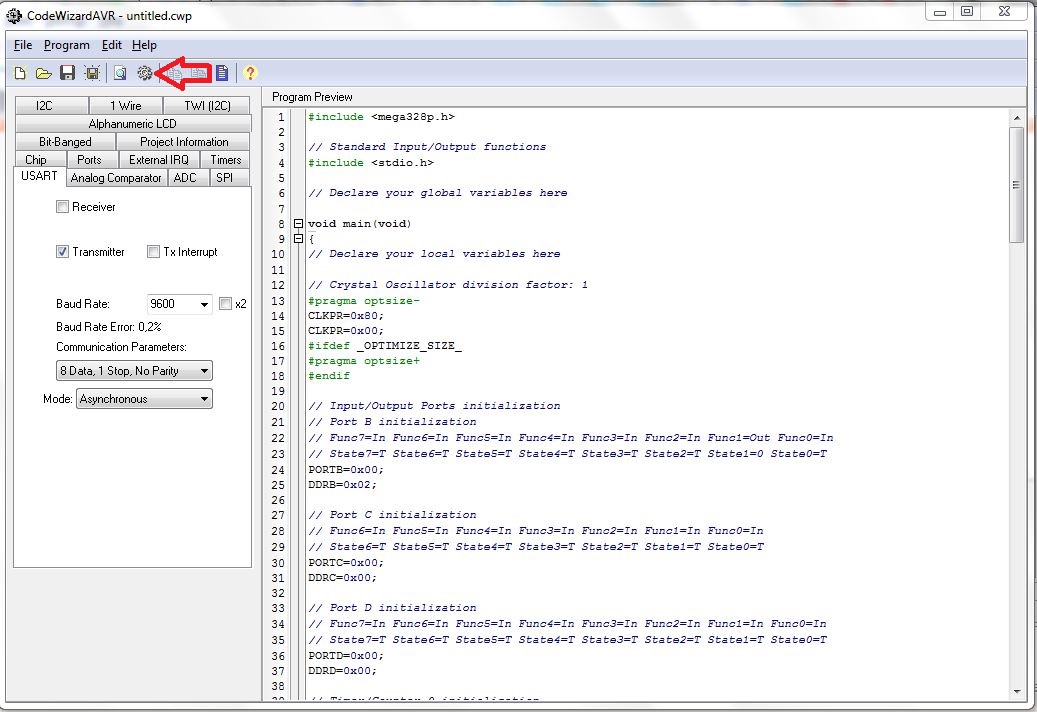
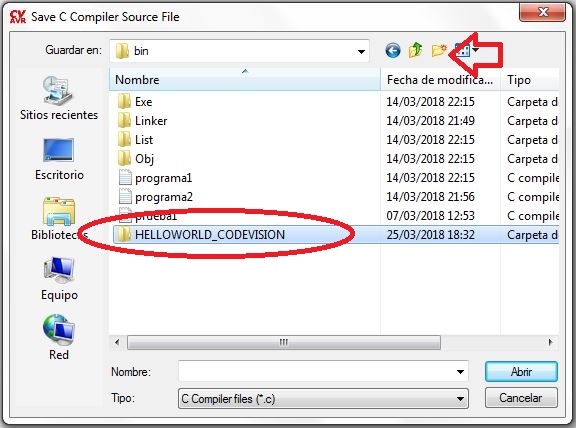
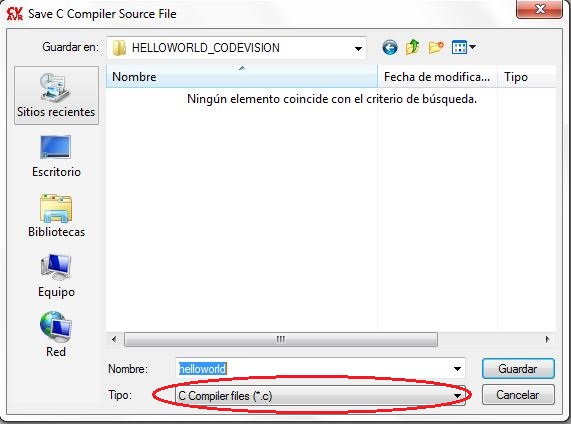
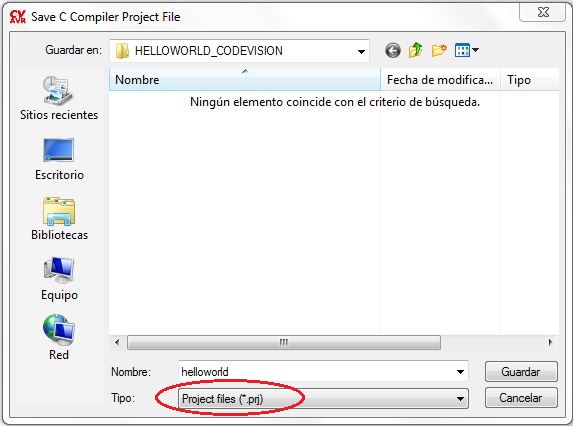
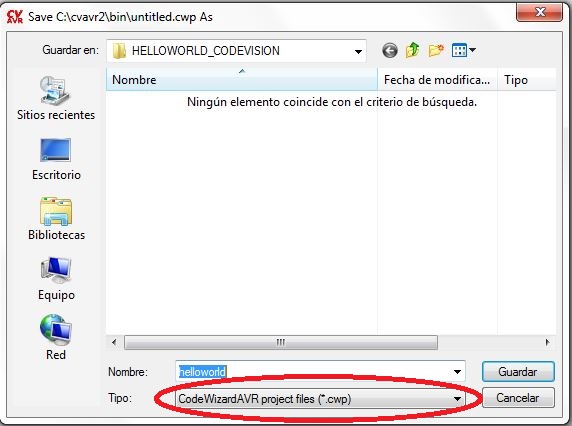
Create a new folder and save files
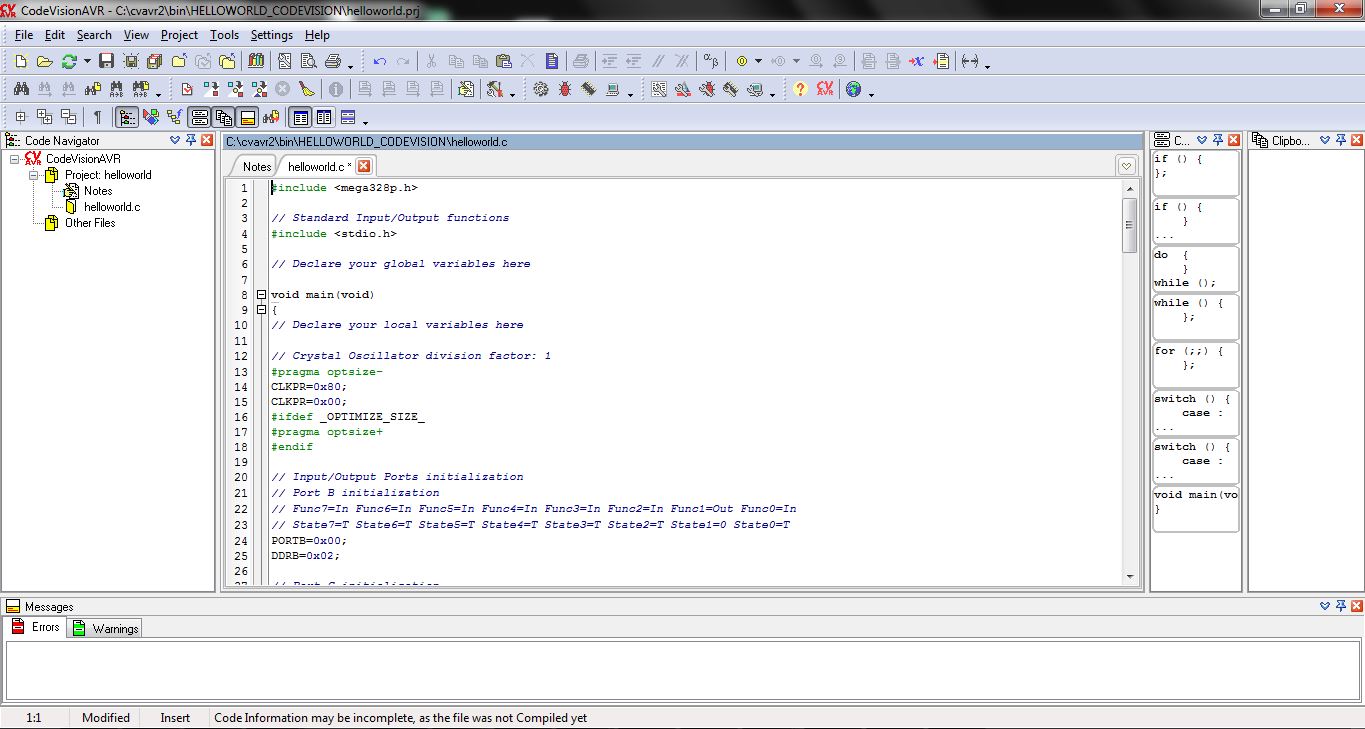
#include < mega328p.h>
#include < delay.h>

// Standard Input/Output functions
#include < stdio.h>

// Declare your global variables here

void main(void)
{
// Declare your local variables here

// Crystal Oscillator division factor: 1
#pragma optsize-
CLKPR=0x80;
CLKPR=0x00;
#ifdef _OPTIMIZE_SIZE_
#pragma optsize+
#endif

// Input/Output Ports initialization
// Port B initialization
// Func7=In Func6=In Func5=In Func4=In Func3=In Func2=In Func1=Out Func0=In
// State7=T State6=T State5=T State4=T State3=T State2=T State1=0 State0=T
PORTB=0x00;
DDRB=0x02;

// USART initialization
// Communication Parameters: 8 Data, 1 Stop, No Parity
// USART Receiver: Off
// USART Transmitter: On
// USART0 Mode: Asynchronous
// USART Baud Rate: 9600
UCSR0A=0x00;
UCSR0B=0x08;
UCSR0C=0x06;
UBRR0H=0x00;
UBRR0L=0x33;

while (1)
      {
      printf("HelloWorld!! FAB ACADEMY 2018\n\r");
      PORTB.1=1;
      delay_ms(1000);
      PORTB.1=0;
      delay_ms(1000);
      }
}
Testing the program by simulation
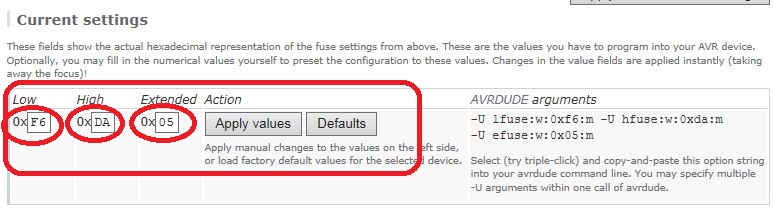
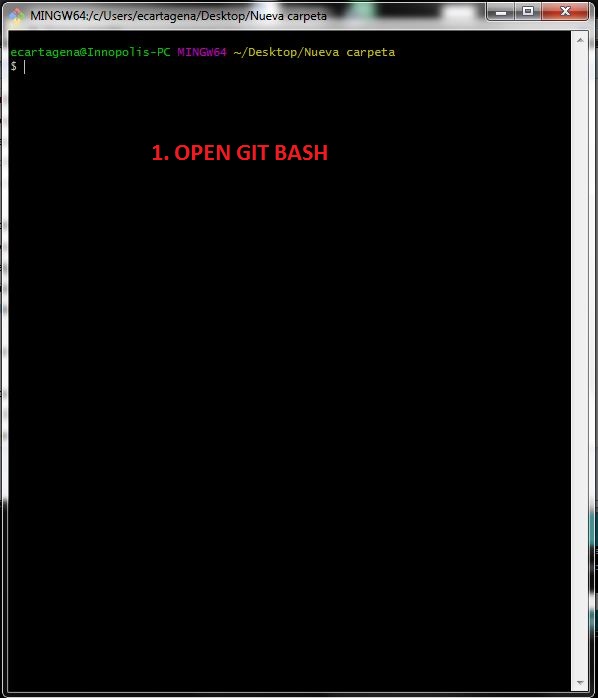
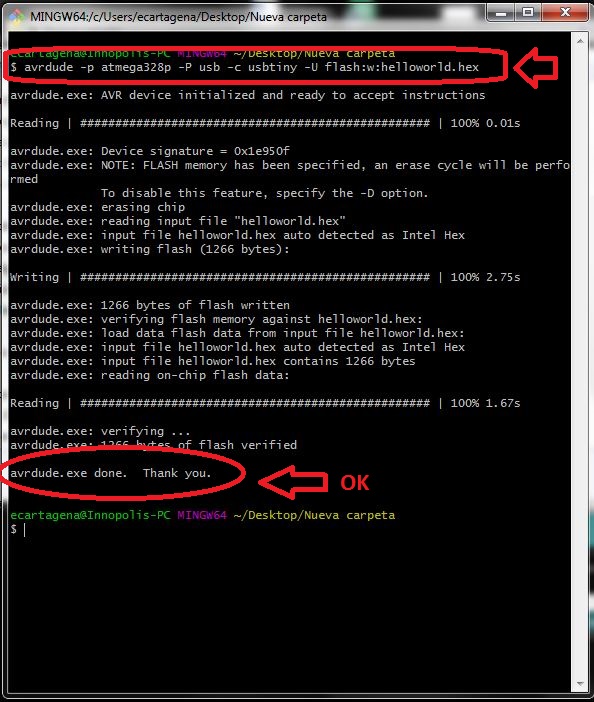
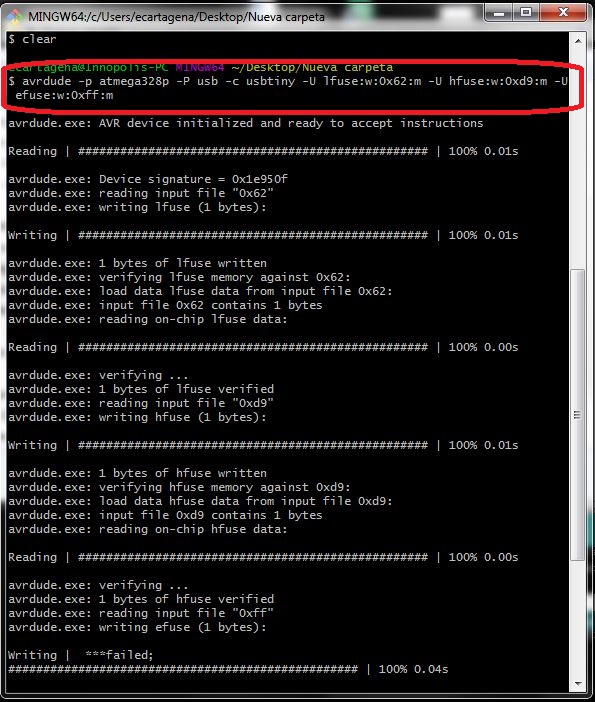
BURN MICROCONTROLLER WITH AVRDUDE
I have this issue in serial communication
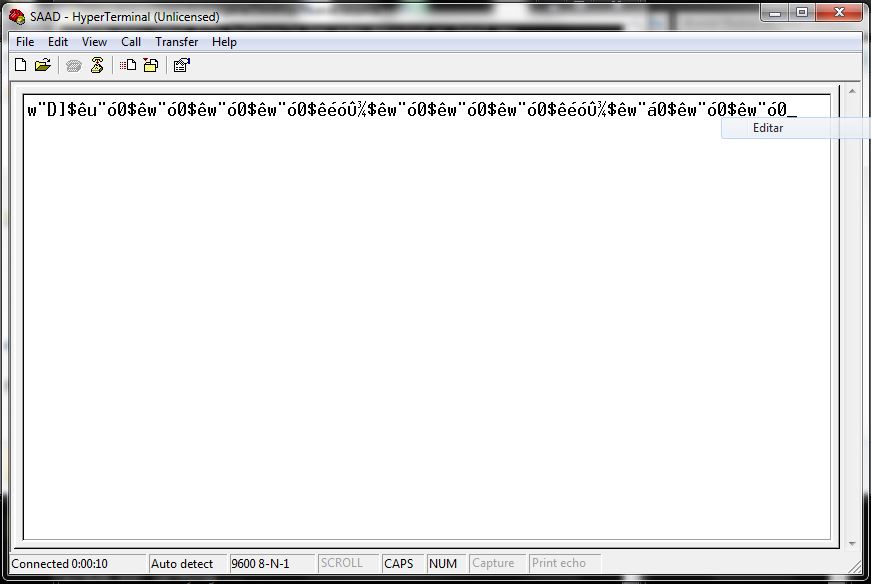
I solved the problem by configuring the fuses
EXTRA ACTIVITY
For the extra activity I am going to program a HARVARD architecture microcontroller, for this it is necessary to have an intergrated development environment that allows programming.
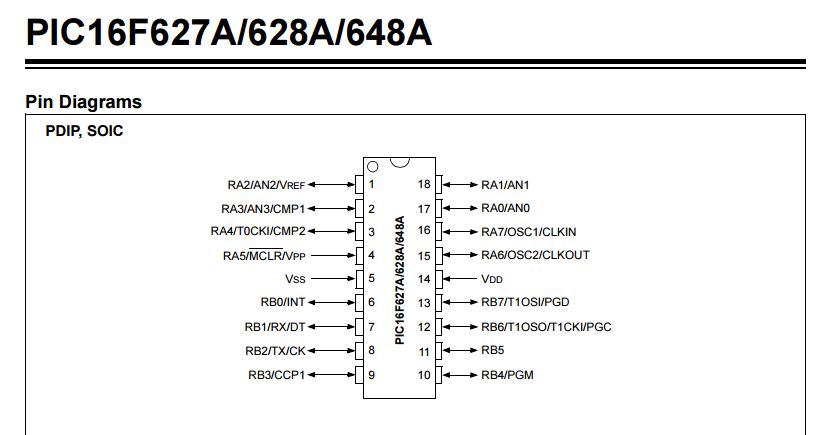
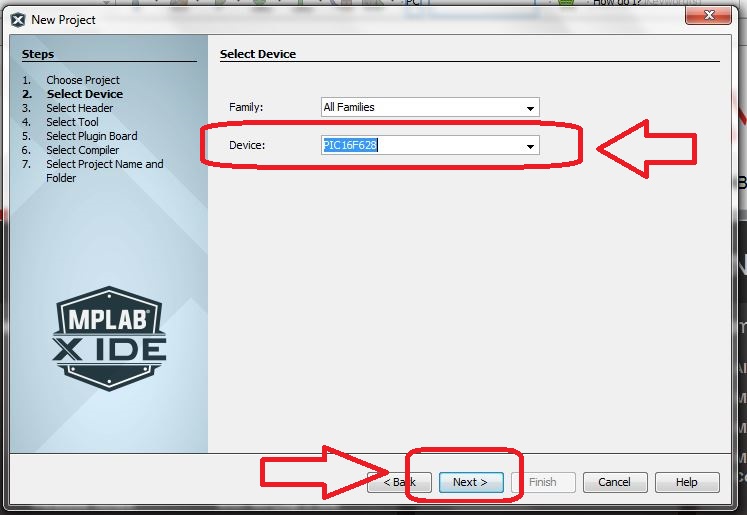
This is the first time that I have programmed a microcontroller with the Harvard architecture. For that reason I researched on the internet and followed some tutorials to learn more about the architecture, mainly of the PIC16F628 microcontroller. You can find the Datasheet in the following link
The development environment you use is MPLAB you need to download and install it in our system
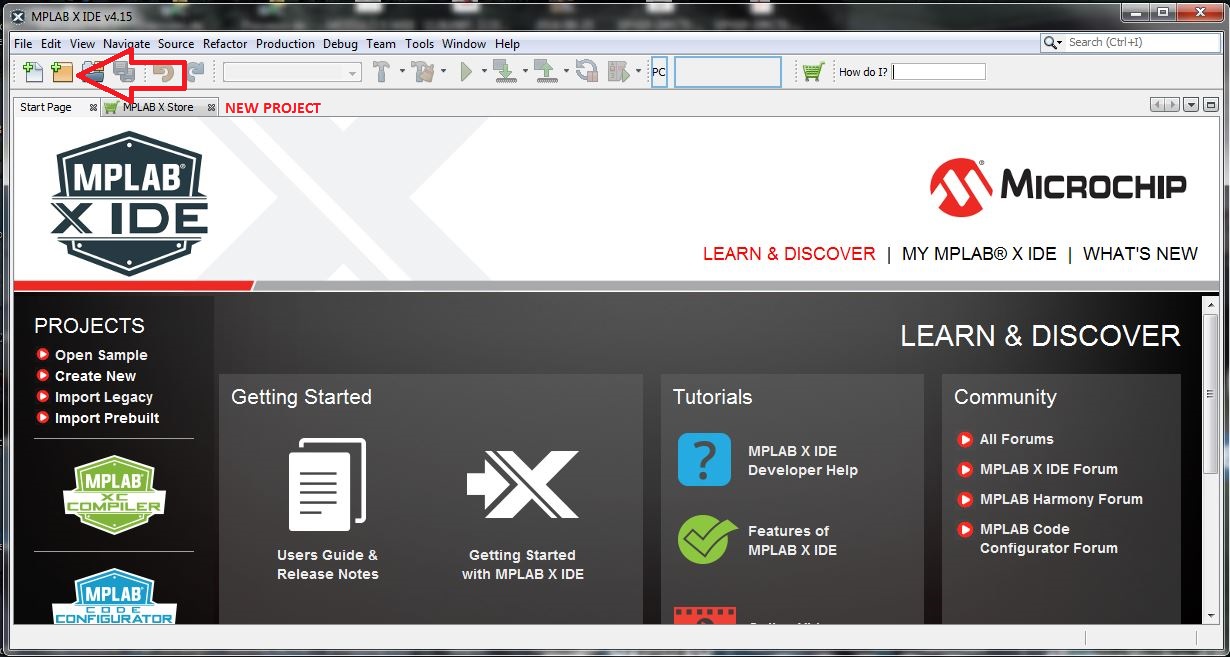
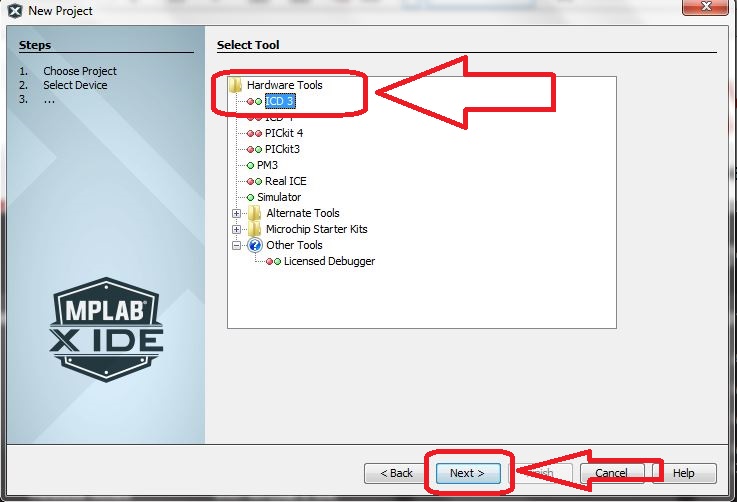
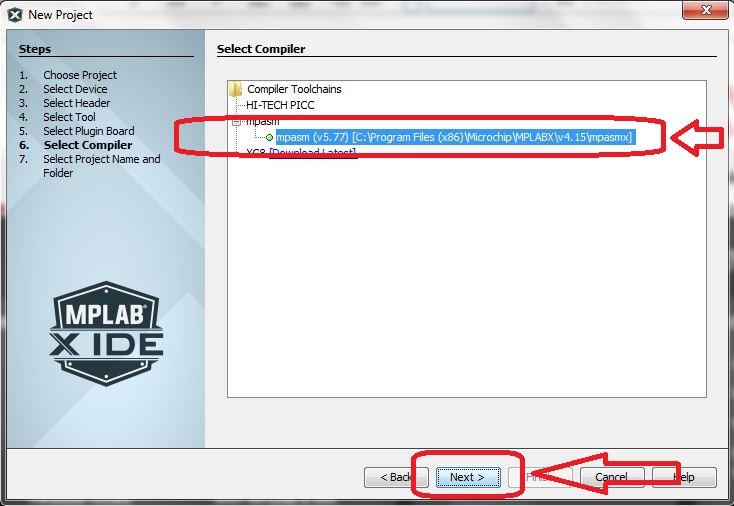
To start programming, we must generate a new project, following the steps


Now we are ready to start programming, just make a small program to turn a LED on and off
#include
void mydelay() // Approx a 0.5 second delay
{
unsigned int t, z;
for(z=0x01; z<=0x14; z++)
{
for(t=0x01; t<=0x9c4; t++);
}
}

int main()
{
    TRISC = 0x00;
    ANSEL = 0x00;   // Disable ALL Analog ports
    while(1)
    {
        PORTC = 0x01;
         mydelay(500);
        PORTC = 0x00;
         mydelay();
    }
}
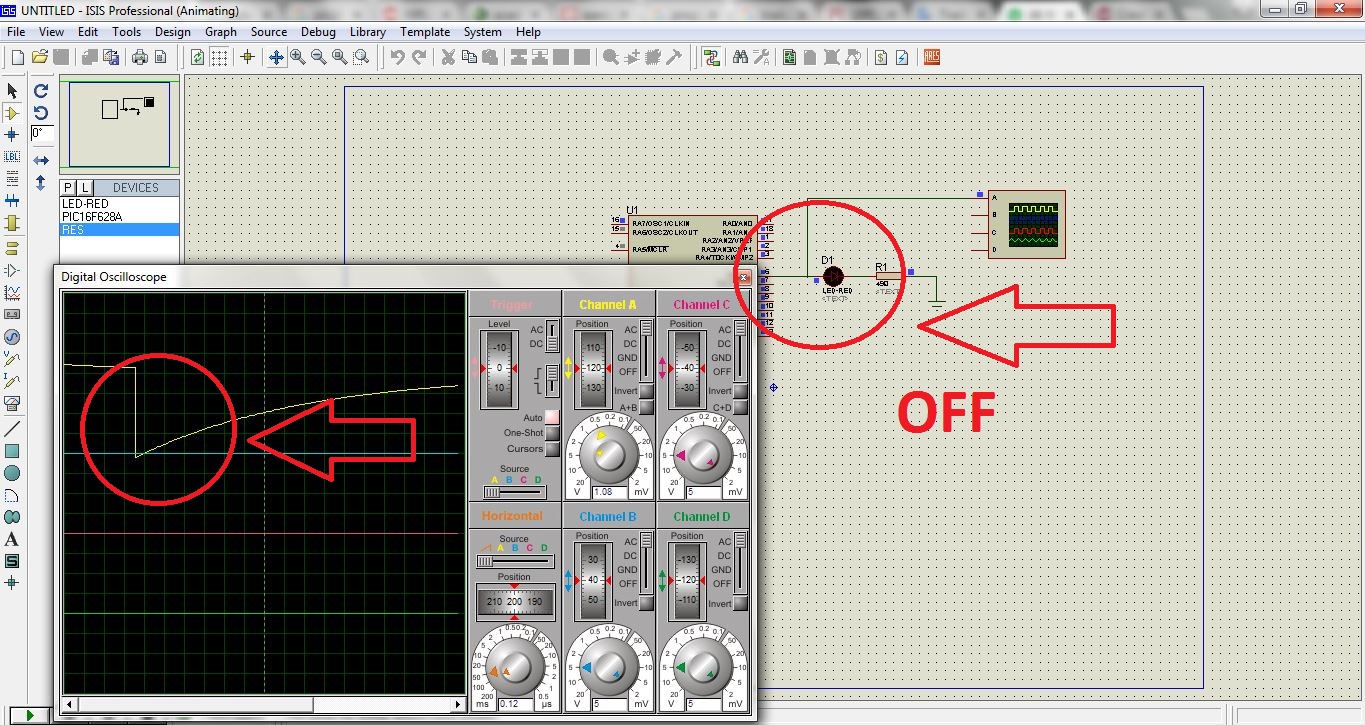
Currently I do not have a physical microcontroller HARVARD architecture, so to check the programming, the correct operation use the ISIS PROTEUS simulator


DOWNLOADS
- File 1: Codevision Programming