Assignments
- actuate and automate your machine
- document the group project and your individual contribution
Actuate and automate your machine
We completed our mechanical part we want to automate our printer,We know we are out of the time for that we want make the fuctions as faster we can , The next stage of our project is to find the board the we are going to use We have permission to use customs boards, so we are planned to use Ramps14 and Arduino Mega as our significant parts.
Ramps is short for reprap Arduino mega pololu shield, it is mainly designed for the purpose of using pololu stepper driven board (similar to 4988 driven board). Ramps can only work when connected to its mother board Mega 2560 and 4988/DRV8825.

Arduino Mega
The Arduino MEGA ADK is a microcontroller board based on the ATmega2560. It has a USB host interface to connect with computers.It has 54 digital input/output pins (of which 15 can be used as PWM outputs), 16 analog inputs, 4 UARTs (hardware serial ports), a 16 MHz crystal oscillator, a USB connection, a power jack, an ICSP header, and a reset button.
A4988 STEPPER DRIVER
A4988 microstepping bipolar stepper motor adjustable current limiting , over-current and over-temperature protection(by means of heat sink), and five different microstep resolutions (down to 1/16-step). It operates from 8 V to 35 V and can deliver up to approximately 1 A per phase without a heat sink.Major features of A4988 stepper driver is Simple step and direction control interface, Five different step resolutions: full-step, half-step, quarter-step, eighth-step, and sixteenth-step.

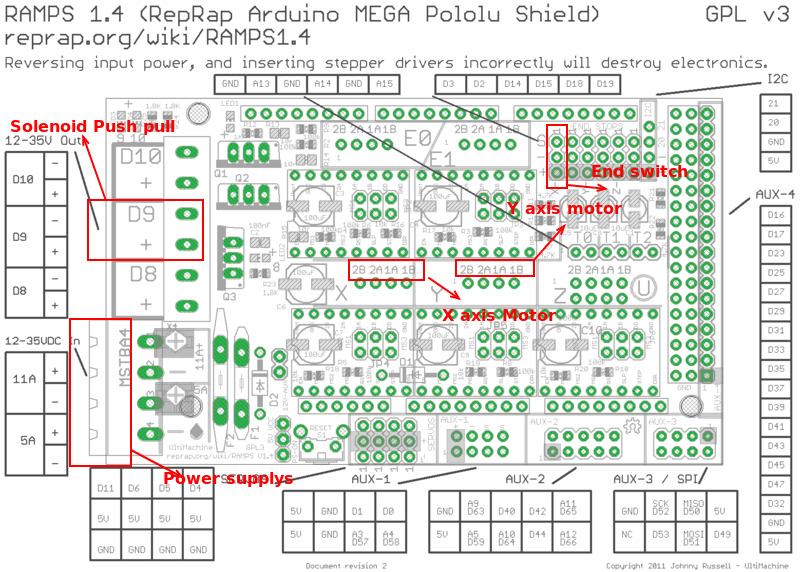
Connection diagram

Details from this source of connection
My Part
Here Acording to the group decision my task was to find the solinoid strength according to the phenomenon of the Braille printer the end effect is making dots on A4 size paper for making this dots we are using the solinoid mechanism. we orderd one solinoid online that you can see below I decide to check through giving 12v by voltage regulator in our lab by attaching needle on the solinoids the process and effects are in below
Assembly of head/ solinoid
We want the Solinod in as head ,actually in braille printer makes the dots by punching in the paper
this puching cause a projection in the paper at the backward position blind can read this dots so we think to make this punching using a solinoid
We purchaised online my duty was to measure the force that the solinoid can penitarte into the peaper
 Solinoid that we bought oline
 Through the testing I understand there is not enough power for this solinoid to make penitration on A4 size paper,we also tried it with oil paper also ,the we just disappointed
but the group decide to make a solinoid manually I take that challenge
with the help of our instructors I coiled the copper wire on a piece of plastic
 Try of first solinoid
 At that time Our Instructor Yadu bought another one so the group decided to try that one so I decided to stop this experiment but I got enough idea how to make a solinod beacause I am almost on the last stage In any other situation I can implement this idea
Here we got a perfect penitration so group decided to go with that
Assembly of Base / Rod holder
We just changed the arraignment of the Rod into a vertical way others in the group 3D printed some parts for attaching the motors and the rods in new manner ,Vishnu and me attach the belt using glue make them tight and I made the plywood base with the help of renoy Then arrainged the parts with help of othe members
 Arrainging the parts
  After Arrainging
 And also attached the connection of board to the printer ,make the wire conection clean for avoiding the from them from spredingand make the printer looking more effective

Final Testing
After programming and all We were ready to operate our machine At the time its starts working perfectly We become more happy ,because it is our 1st attempt it starts us as a successful way