Application
For this week I ll be designing a python application to control my previous week assignment the bipolar stepper motor. I have no worked with python so at the beggining I ll try to create a simple ON button and OFF button to turn an led on and off.
Python
Python 2 is highly recommended for first time user, as it contain most of the libraries and the syntax is easy.
- Install prerequisites
sudo apt-get update sudo apt-get install build-essential checkinstall sudo apt-get install libreadline-gplv2-dev libncursesw5-dev libssl-dev libsqlite3-dev tk-dev libgdbm-dev libc6-dev libbz2-dev - Downloading and extracting Python
cd /usr/src sudo wget https://www.python.org/ftp/python/2.7.14/Python-2.7.14.tgz sudo tar xzf Python-2.7.14.tgz - Compile python source
cd Python-2.7.14
sudo ./configure --enable-optimizations
sudo make altinstall
Tkinter
Tkinter is used to make GUI based applications in python. Tkinter provides several GUI widgets like buttons,menu, canvas,text,frame,label etc. To install Tkinter:
sudo apt-get install python-tk
Pyserial
PySerial is a library which provides support for serial connection, which I am going to be using to communicate between my aruduino code and python. To install it pip install pyserial==2.7
Arduino code (LED)
I will be using python to communicate to my arduino code, The Aatiny 44 has no serial communication, thus ensure to add softwareSerial library and the define the tx and rx pins. Moreover the software serial can not usually handle more than 4800 baud rate so its recommended to either use 4800 or less.
//LED button code, turns on the led once the button is toggeled
// Murad Saadeh
// 22/4/2017
#include <SoftwareSerial.h>

SoftwareSerial mySerial(0, 1); // RX, TX


char serialData;

int led = 3; // as PA7 is represented as 7 in arduino

// the setup routine runs once when you press reset:
void setup() {
  // initialize the digital pin as an output.
  pinMode(led, OUTPUT);
mySerial.begin(4800);

}

// the loop routine runs over and over again forever:
void loop() {


    if (mySerial.available()) {
      serialData = mySerial.read();
      mySerial.print(serialData);


      if (serialData == '1')

    {
      digitalWrite(led, HIGH);   // turn the LED on (HIGH is the voltage level)

     }
          if (serialData == '0' )
    {
     digitalWrite(led, LOW);    // turn the LED off by making the voltage LOW

    }
}
}
Graphical User Interface (GUI) LED python
I ll be using lilclipse text editor to create and run my GUI. lilclipse is a version of eclipse and its somehow good as it accept most coding language such as python, java etc. I had soo much trouble trying to add pydev library to eclipse thats why I downloaded lilclipse which actually has pydev library already installed.
import serial #import the serial communication (pyserial)
import Tkinter #import Tkinter
from Tkinter import * #import eveything from Tkinter
import time #import the delay library time
arduinoData = serial.Serial ("/dev/ttyUSB1", 4800) # Set the communication between python and the arduino in such by defining the port and the baud rate.
def led_on(): #create a command to turn the LED on
arduinoData.write('0') # write 0 to the LED PA3 pin as its connected to the vcc, it would trun on
def led_off():
arduinoData.write('1')
def close_window (): # create a command to shut down the application
led_control_window.destroy()
led_control_window = Tkinter.Tk() # create an application window using Tkinter ( open the loop)
led_control_window.geometry('450x300') # the window size
led_control_window.title("Murad Application") # the window name
Button = Tkinter.Button #create a button using Tkinter library
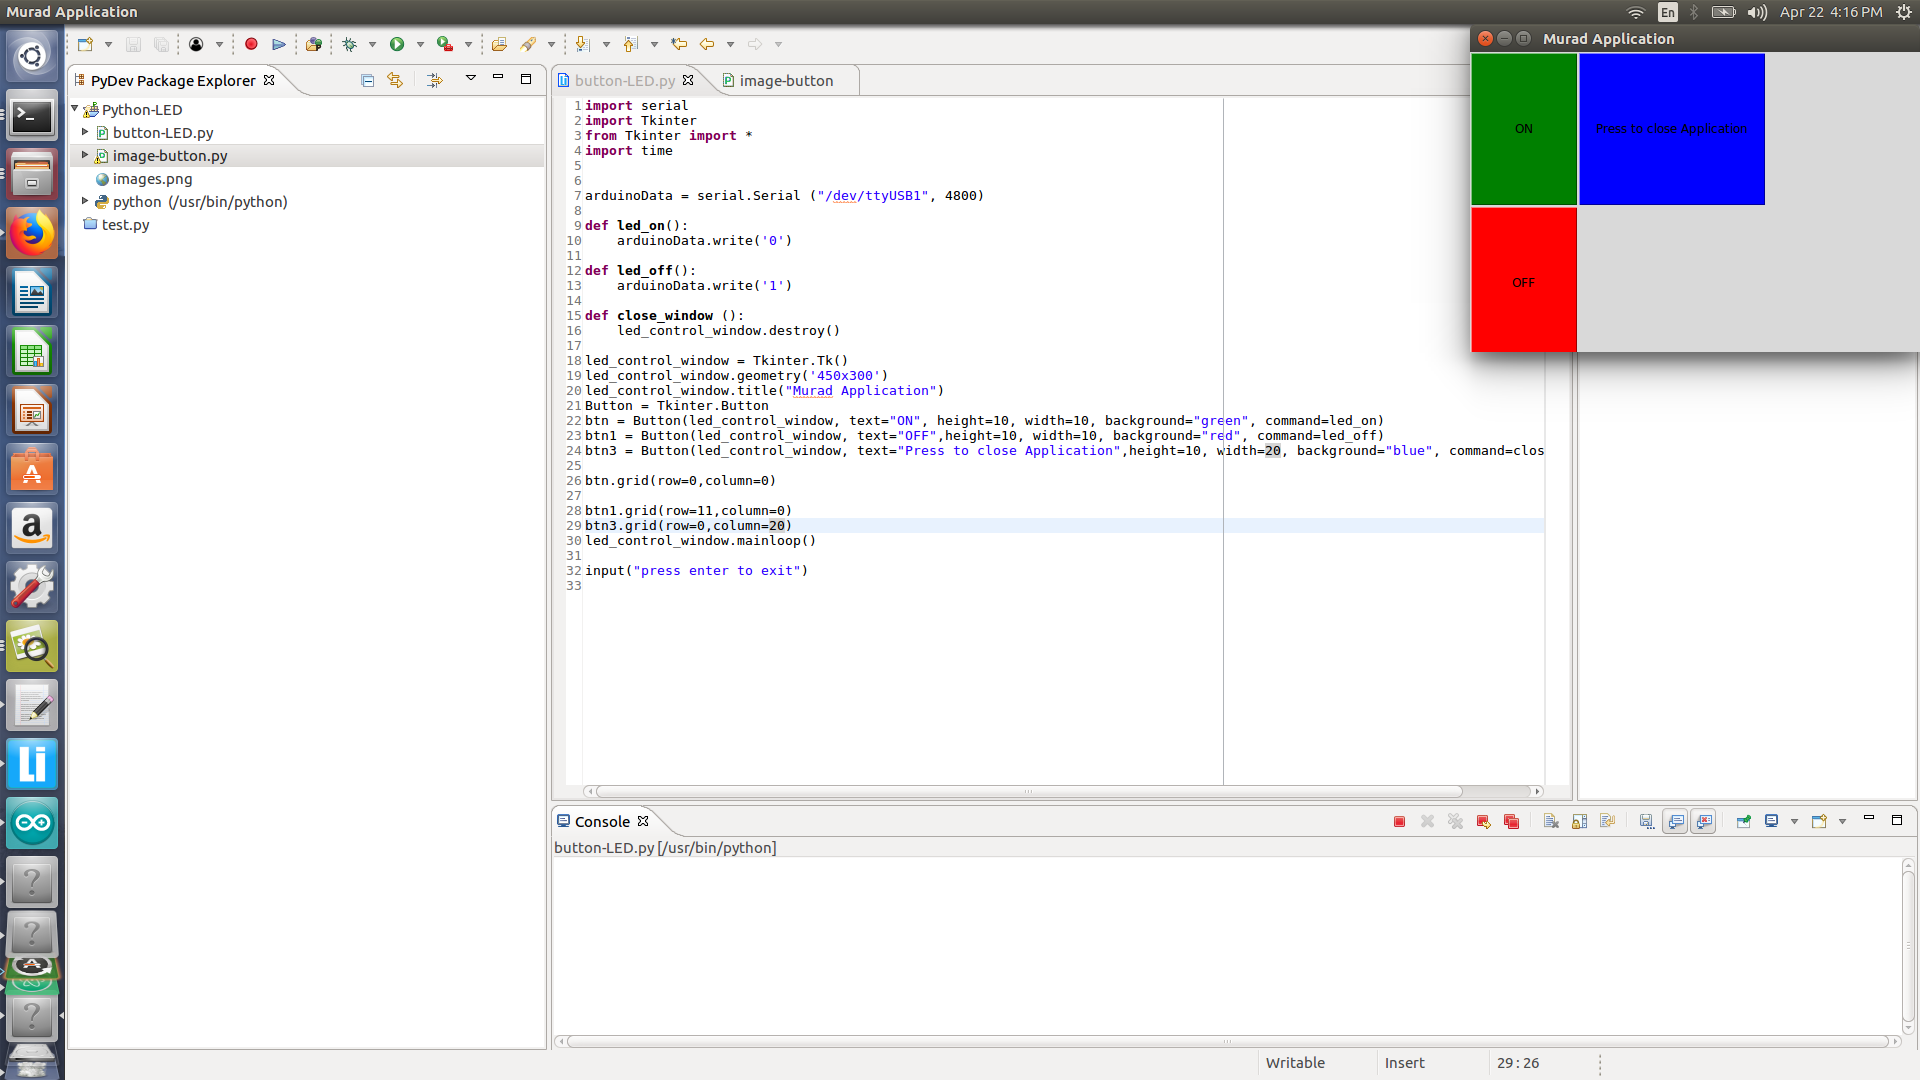
btn = Button(led_control_window, text="ON", height=10, width=10, background="green", command=led_on) #create the on button specification
btn1 = Button(led_control_window, text="OFF",height=10, width=10, background="red", command=led_off)
btn3 = Button(led_control_window, text="Press to close Application",height=10, width=20, background="blue", command=close_window)
btn.grid(row=0,column=0) # position of the on button
btn1.grid(row=11,column=0)
btn3.grid(row=0,column=20)
led_control_window.mainloop() # close the loop
input("press enter to exit")
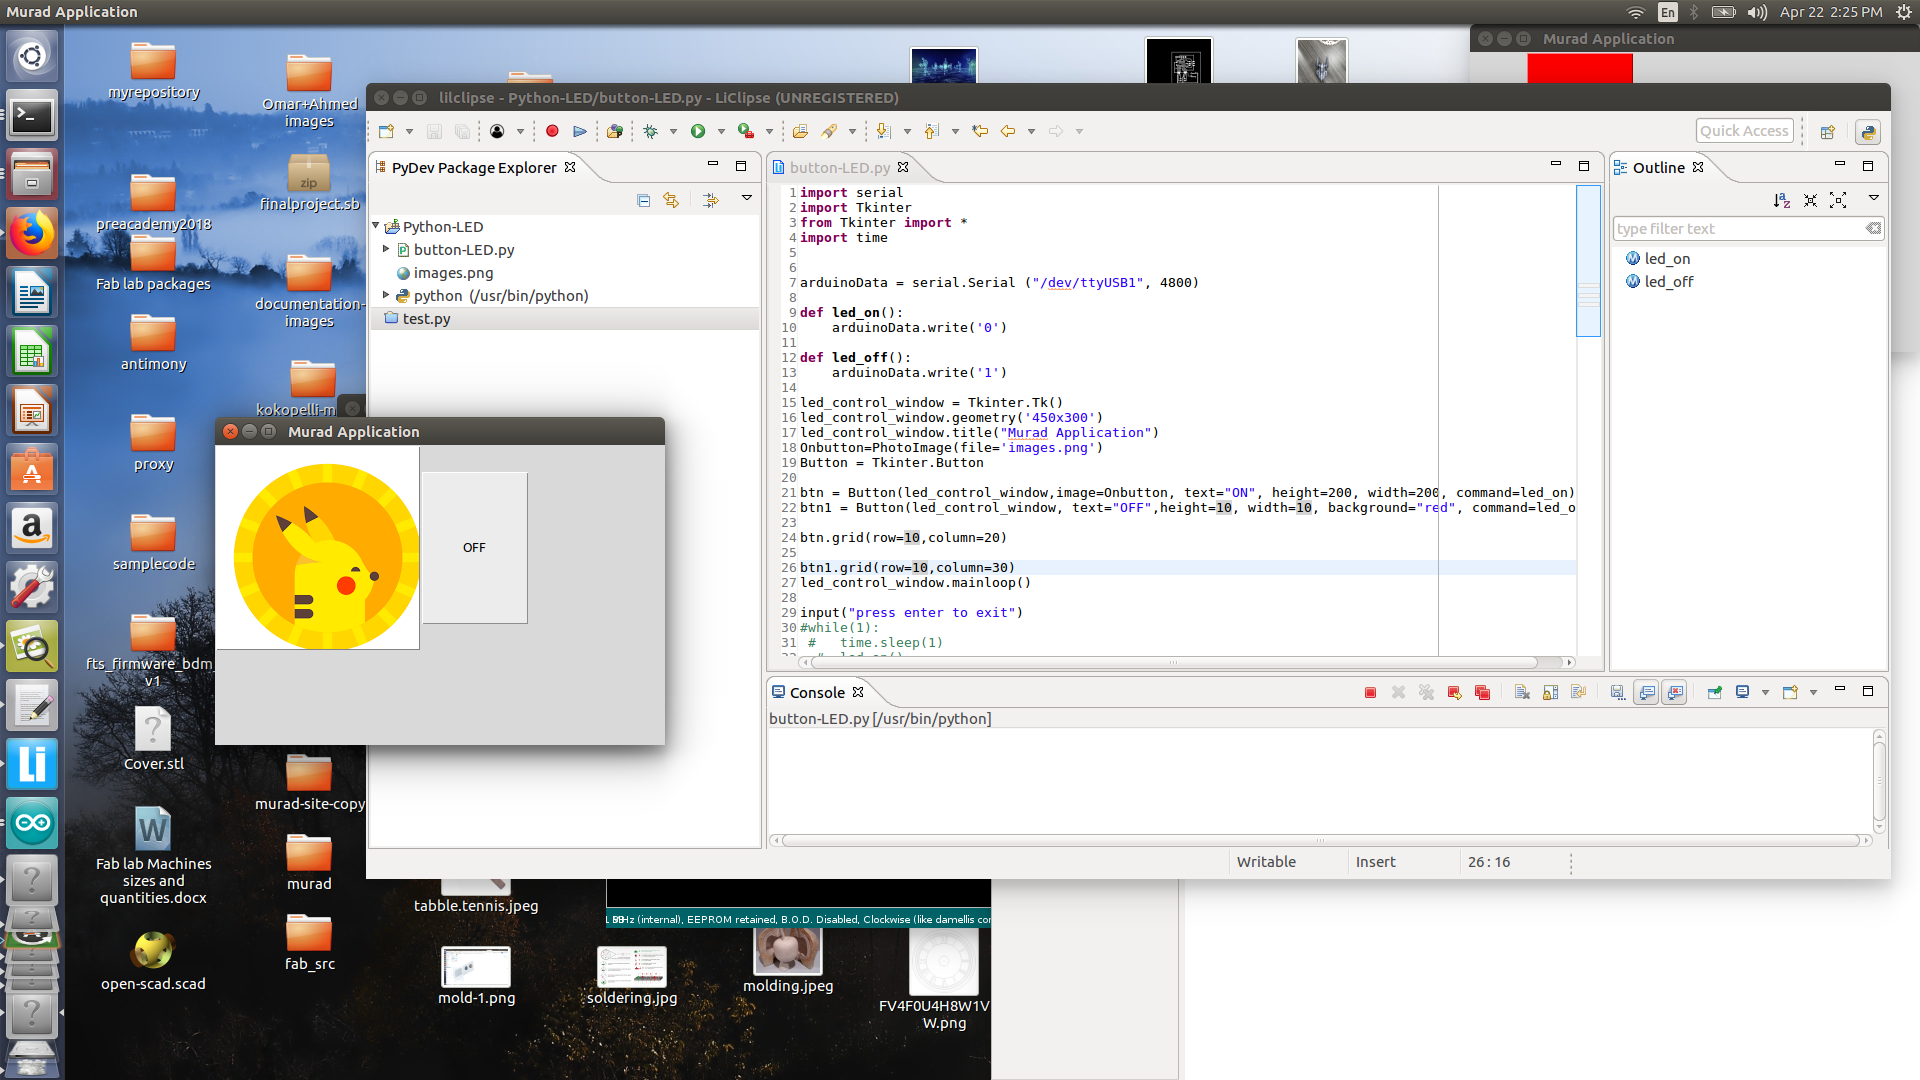
- Adding an image on the icon
Onbutton=PhotoImage(file='images.png') # define the image location

btn = Button(led_control_window,image=Onbutton, text="ON", height=200, width=200, command=led_on)
Arduino code stepper motor
I write a code that controls stepper motor where some specific serial data would instruct the motor to either go clockwise, anticlockwise, neutral state or break. I be using the same code as last week but I ll add the serial communication .
//application that controls stepper motors Forward, reverse, neutral and stop.
// Murad Saadeh
// 22/4/2017
#include <SoftwareSerial.h>

SoftwareSerial mySerial(0, 1); // RX, TX
#define F_CPU 1000000UL // clock 20MHZ external
#define setbit(register, bit) (register) |= (1 << (bit))
#define clearbit(register, bit) (register) &= ~(1 << (bit))
#define testbit(register, bit) (register) & (1 << (bit))
#include <avr/io.h>
#include <util/delay.h> // include the delay library
#define wait 10

char serialData;
// the setup routine runs once when you press reset:
void setup() {
  // initialize the digital pin as an output.

mySerial.begin(4800);

setbit (DDRB, PB1); //set PB1 as output
setbit (DDRB, PB0); //set PB0 as output
setbit(DDRA, PA7); //set PA7 as output
setbit(DDRB, PB2); //set PB2 as output

clearbit (PORTB, PB1);
setbit (PORTB, PB0);
clearbit(PORTA, PA7);
setbit(PORTB, PB2);

}

// the loop routine runs over and over again forever:
void loop() {

   if (mySerial.available()) {
      serialData = mySerial.read();
//      mySerial.print(serialData);


   if (serialData == 'D')
    {
//1
      clearbit (PORTB, PB1);
      setbit (PORTB, PB0);

      _delay_ms(wait);

//2

      setbit(PORTA, PA7);
      clearbit(PORTB, PB2);

      _delay_ms(wait);

//3

      setbit(PORTB, PB1);
      clearbit(PORTB, PB0);

      _delay_ms(wait);
//4

      clearbit(PORTA, PA7);
      setbit(PORTB, PB2);

      _delay_ms(wait);

    }
  // neutral mode
   if (serialData == 'N' )
    {
      clearbit (PORTB, PB1);
      clearbit (PORTB, PB0);
      clearbit(PORTA, PA7);
      clearbit(PORTB, PB2);
    }

    // break mode
 if (serialData == 'P' )
    {
      setbit (PORTB, PB1);
      clearbit (PORTB, PB0);
      clearbit(PORTA, PA7);
      clearbit(PORTB, PB2);
    }
// reverse mode
     if (serialData == 'R' )
    {
//4

      clearbit(PORTA, PA7);
      setbit(PORTB, PB2);

      _delay_ms(wait);
//3

      setbit(PORTB, PB1);
      clearbit(PORTB, PB0);

      _delay_ms(wait);

//2

      setbit(PORTA, PA7);
      clearbit(PORTB, PB2);

      _delay_ms(wait);

//1
      clearbit (PORTB, PB1);
      setbit (PORTB, PB0);

      _delay_ms(wait);


    }


}
Stepper motor Python code
I wrote a python code that would allow me to control the direction of the stepper motor, Forward, Reverse, Neutral and stop. its very similar to LED python code.
import serial
import Tkinter
from Tkinter import *
import time
arduinoData = serial.Serial ("/dev/ttyUSB1", 4800)
def Drive():
arduinoData.write('D')
def Neutral():
arduinoData.write('N')
def Stop():
arduinoData.write('P')
def Reverse():
arduinoData.write('R')
def close_window ():
led_control_window.destroy()
led_control_window = Tkinter.Tk()
led_control_window.geometry('450x300')
led_control_window.title("Murad Application")
Button = Tkinter.Button
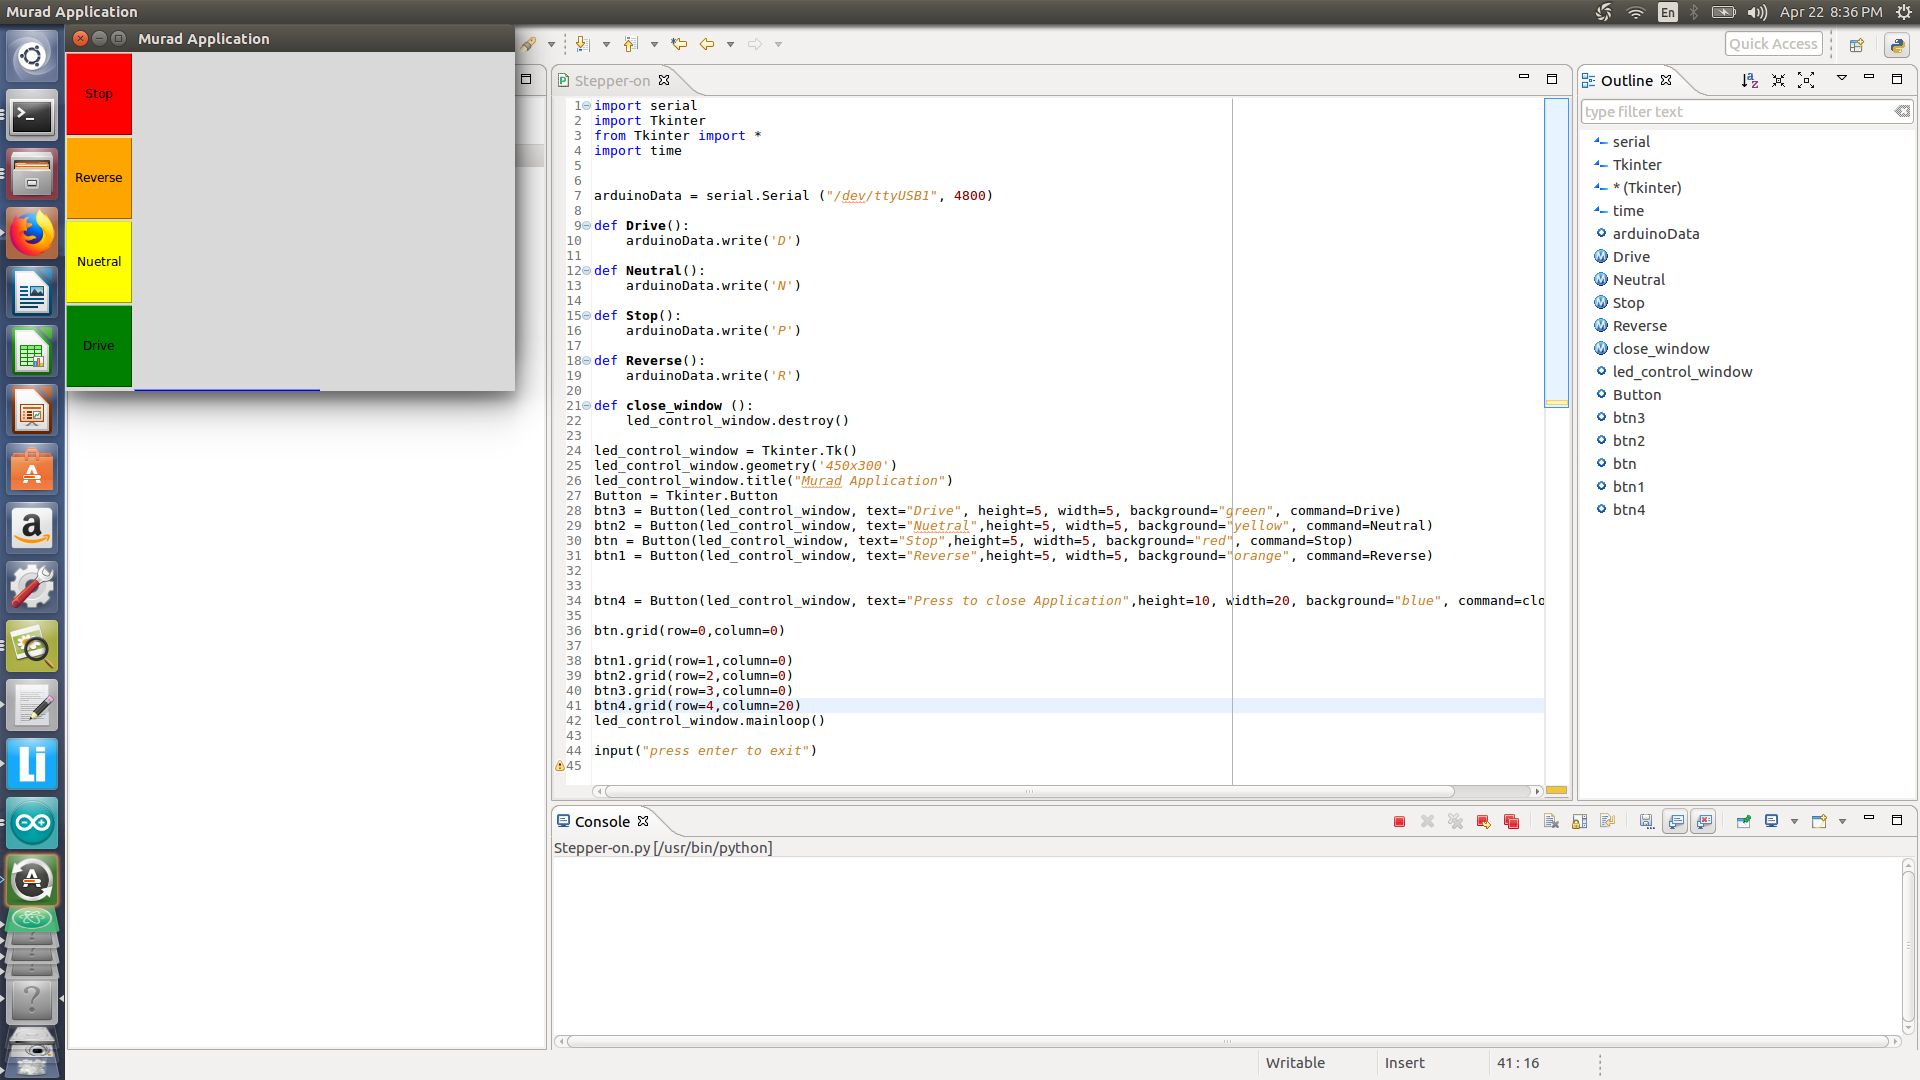
btn3 = Button(led_control_window, text="Drive", height=5, width=5, background="green", command=Drive)
btn2 = Button(led_control_window, text="Nuetral",height=5, width=5, background="yellow", command=Neutral)
btn = Button(led_control_window, text="Stop",height=5, width=5, background="red", command=Stop)
btn1 = Button(led_control_window, text="Reverse",height=5, width=5, background="orange", command=Reverse)
btn4 = Button(led_control_window, text="Press to close Application",height=10, width=20, background="blue", command=close_window)
btn.grid(row=0,column=0)
btn1.grid(row=1,column=0)
btn2.grid(row=2,column=0)
btn3.grid(row=3,column=0)
btn4.grid(row=0,column=20)
led_control_window.mainloop()
input("press enter to exit")
Running Python code
You can run python code either by using the terminal directly by opening a terminal in the project location then typing ` python2 button-LED.py` where button-LED.py is the file name. Or you could eaily run it using the lilclipse directly, however make sure to close other project when you desire to run a new one.