Prior to the first fab academy lecture this year about project management, I have used Pandoc before to convert md files to html with a CSS file. However I have never worked on editing html file or CSS files.
Web development:
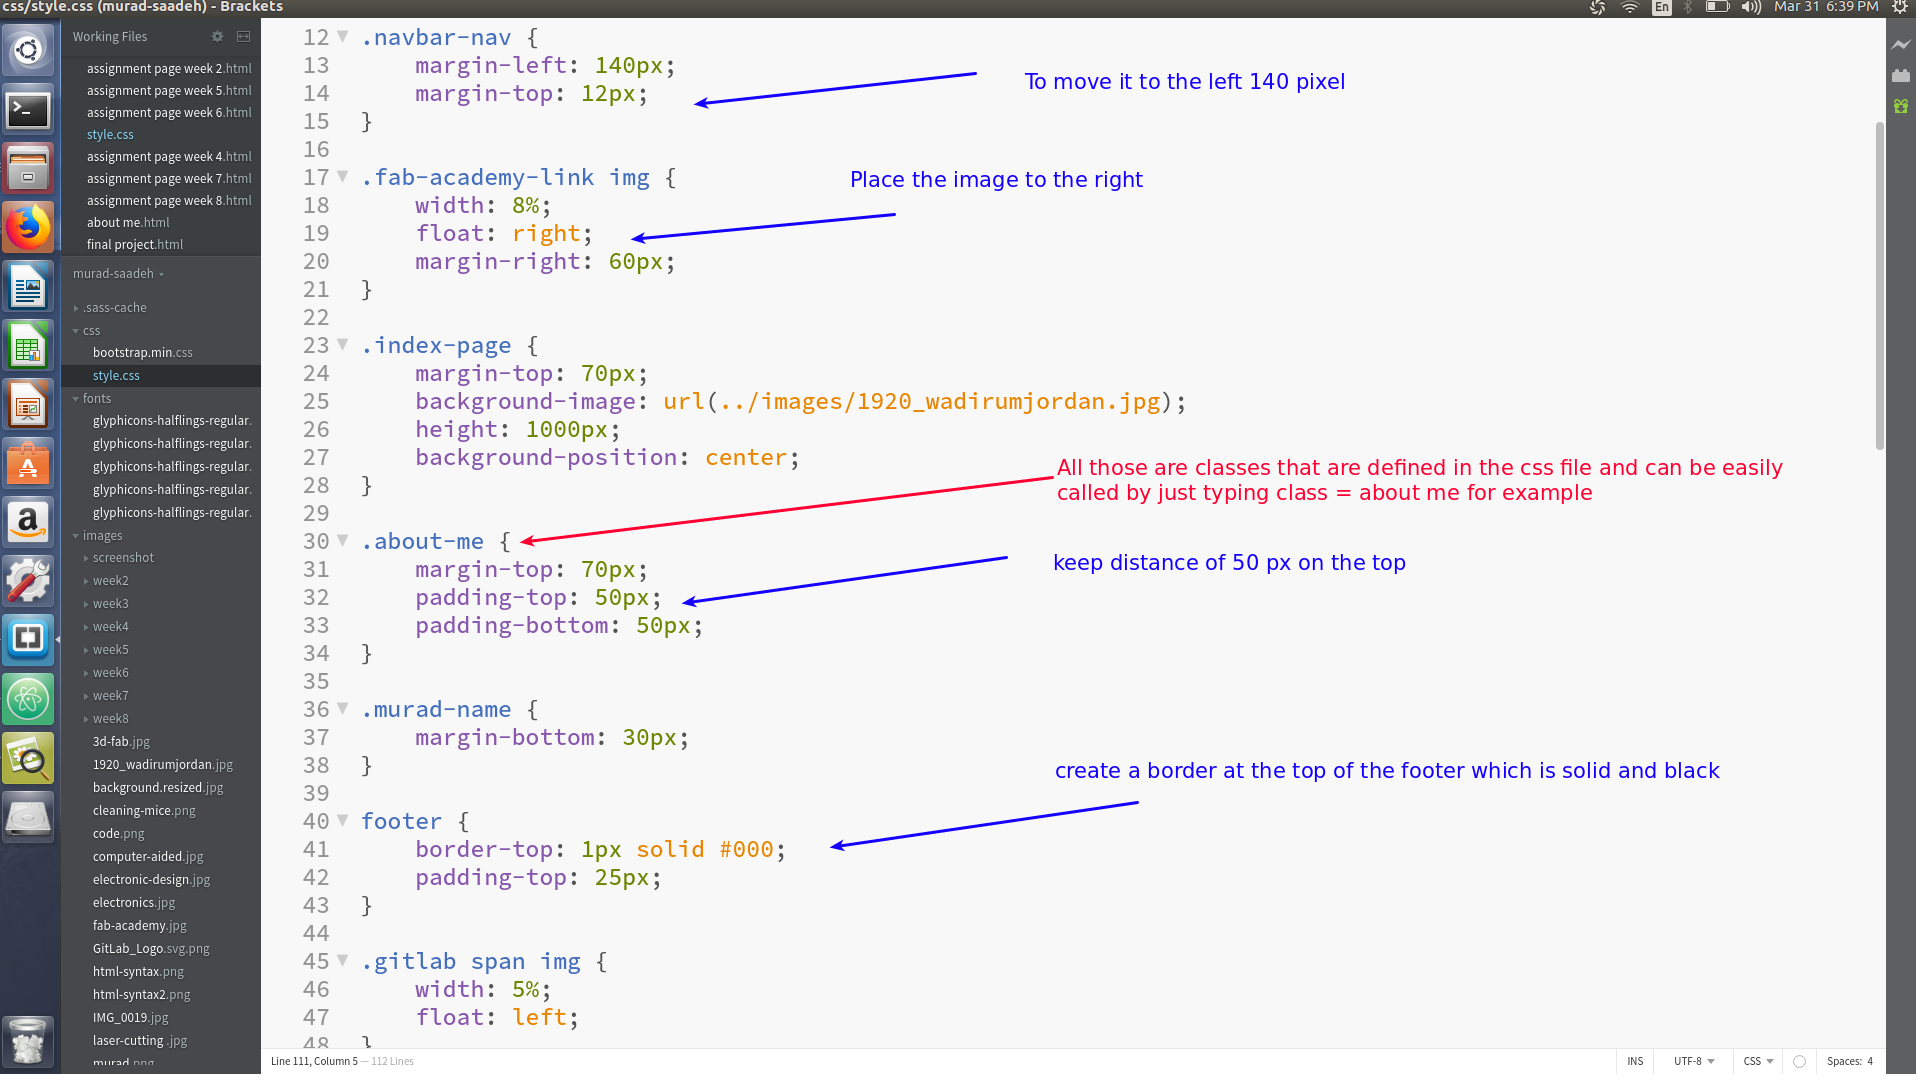
Creating CSS files:
Looking at a CSS file for the first time kind of scare you, however its pretty simple once you understand it.
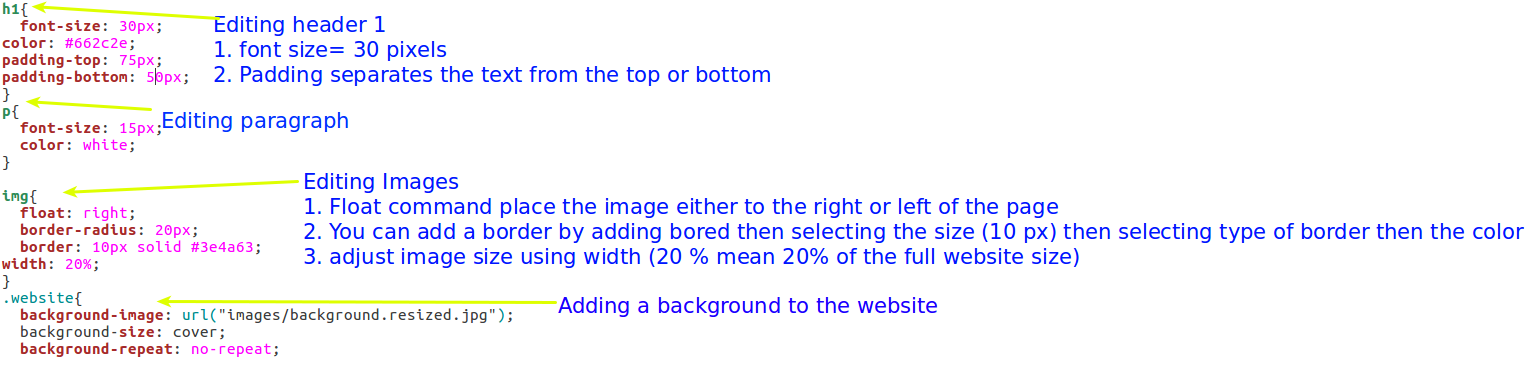
In the above image are the basic tool you should be able to know in order to generate a css file.
Note:
- To convert Markdown file to html including css type, you use this command in the terminal
pandoc -s -t html -c Mstyle.css index.md -o index.html - Always ensure to close the curly bracket.
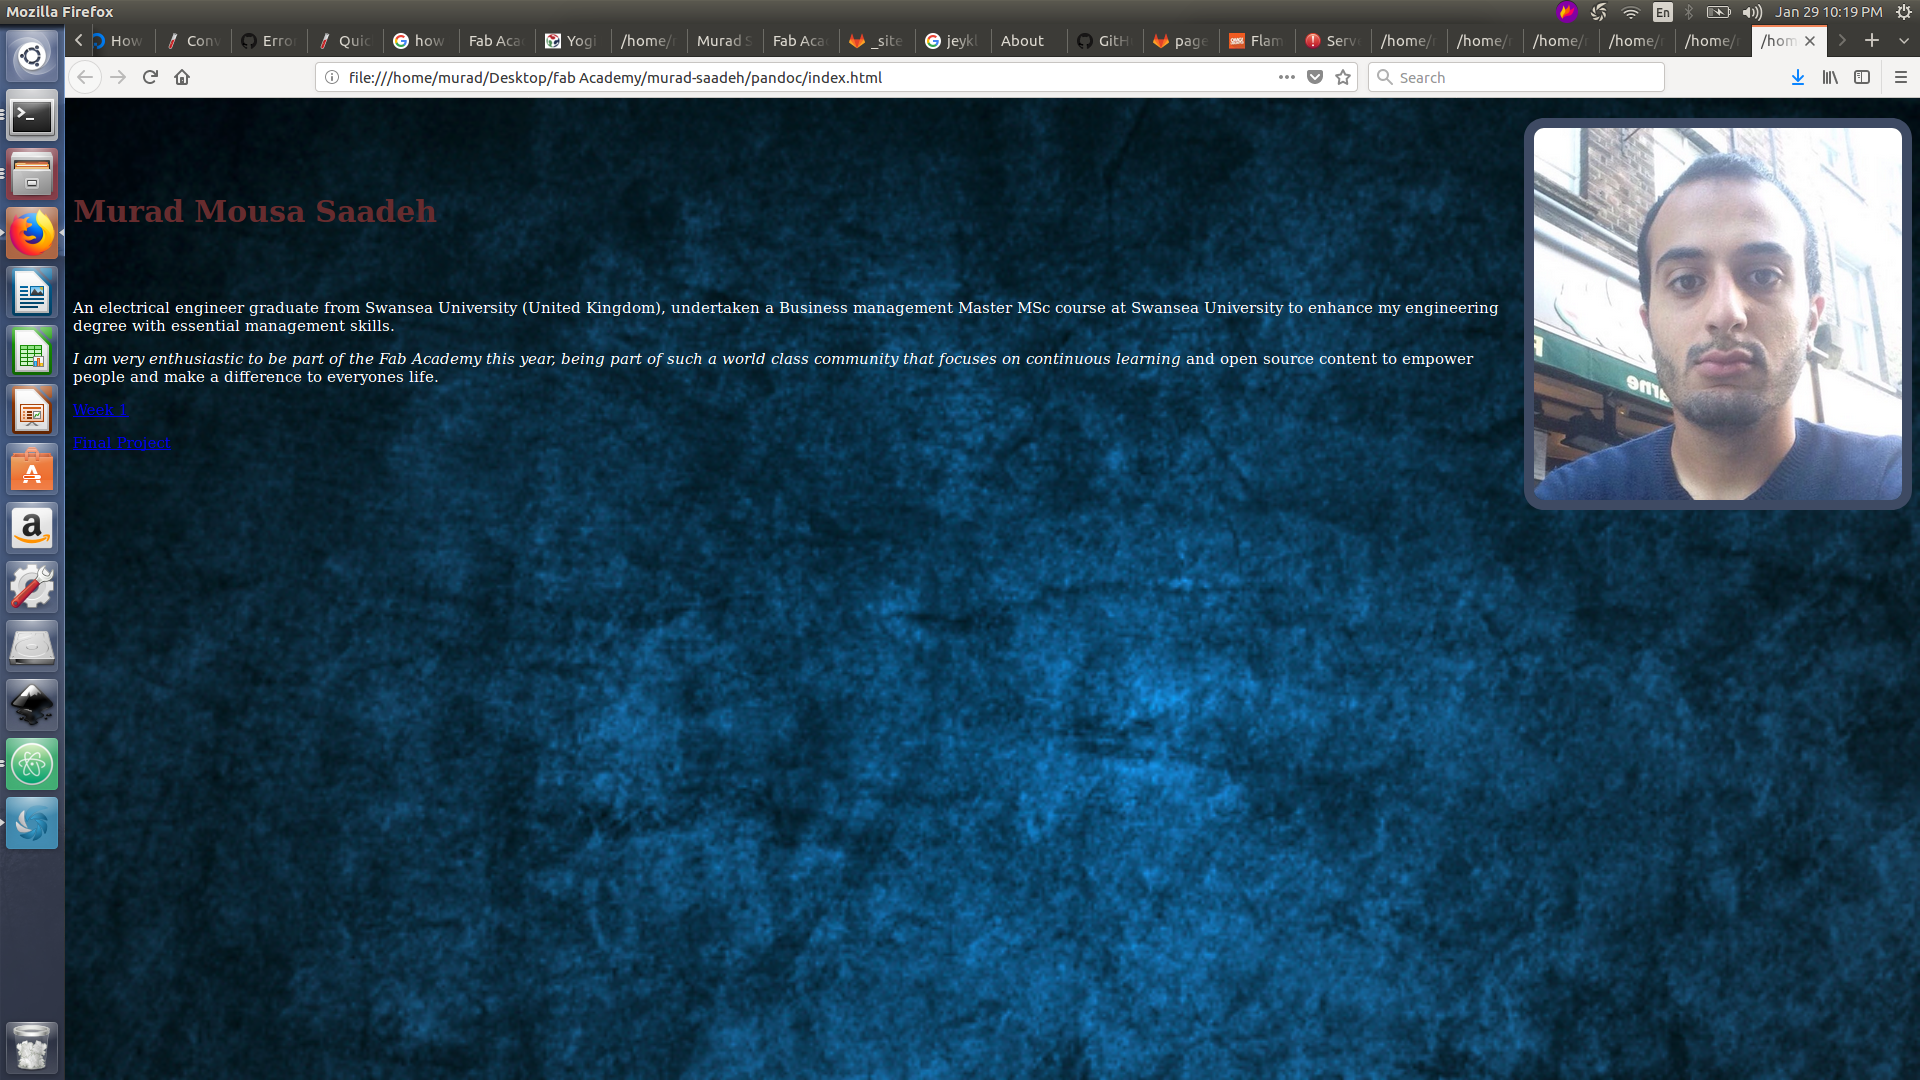
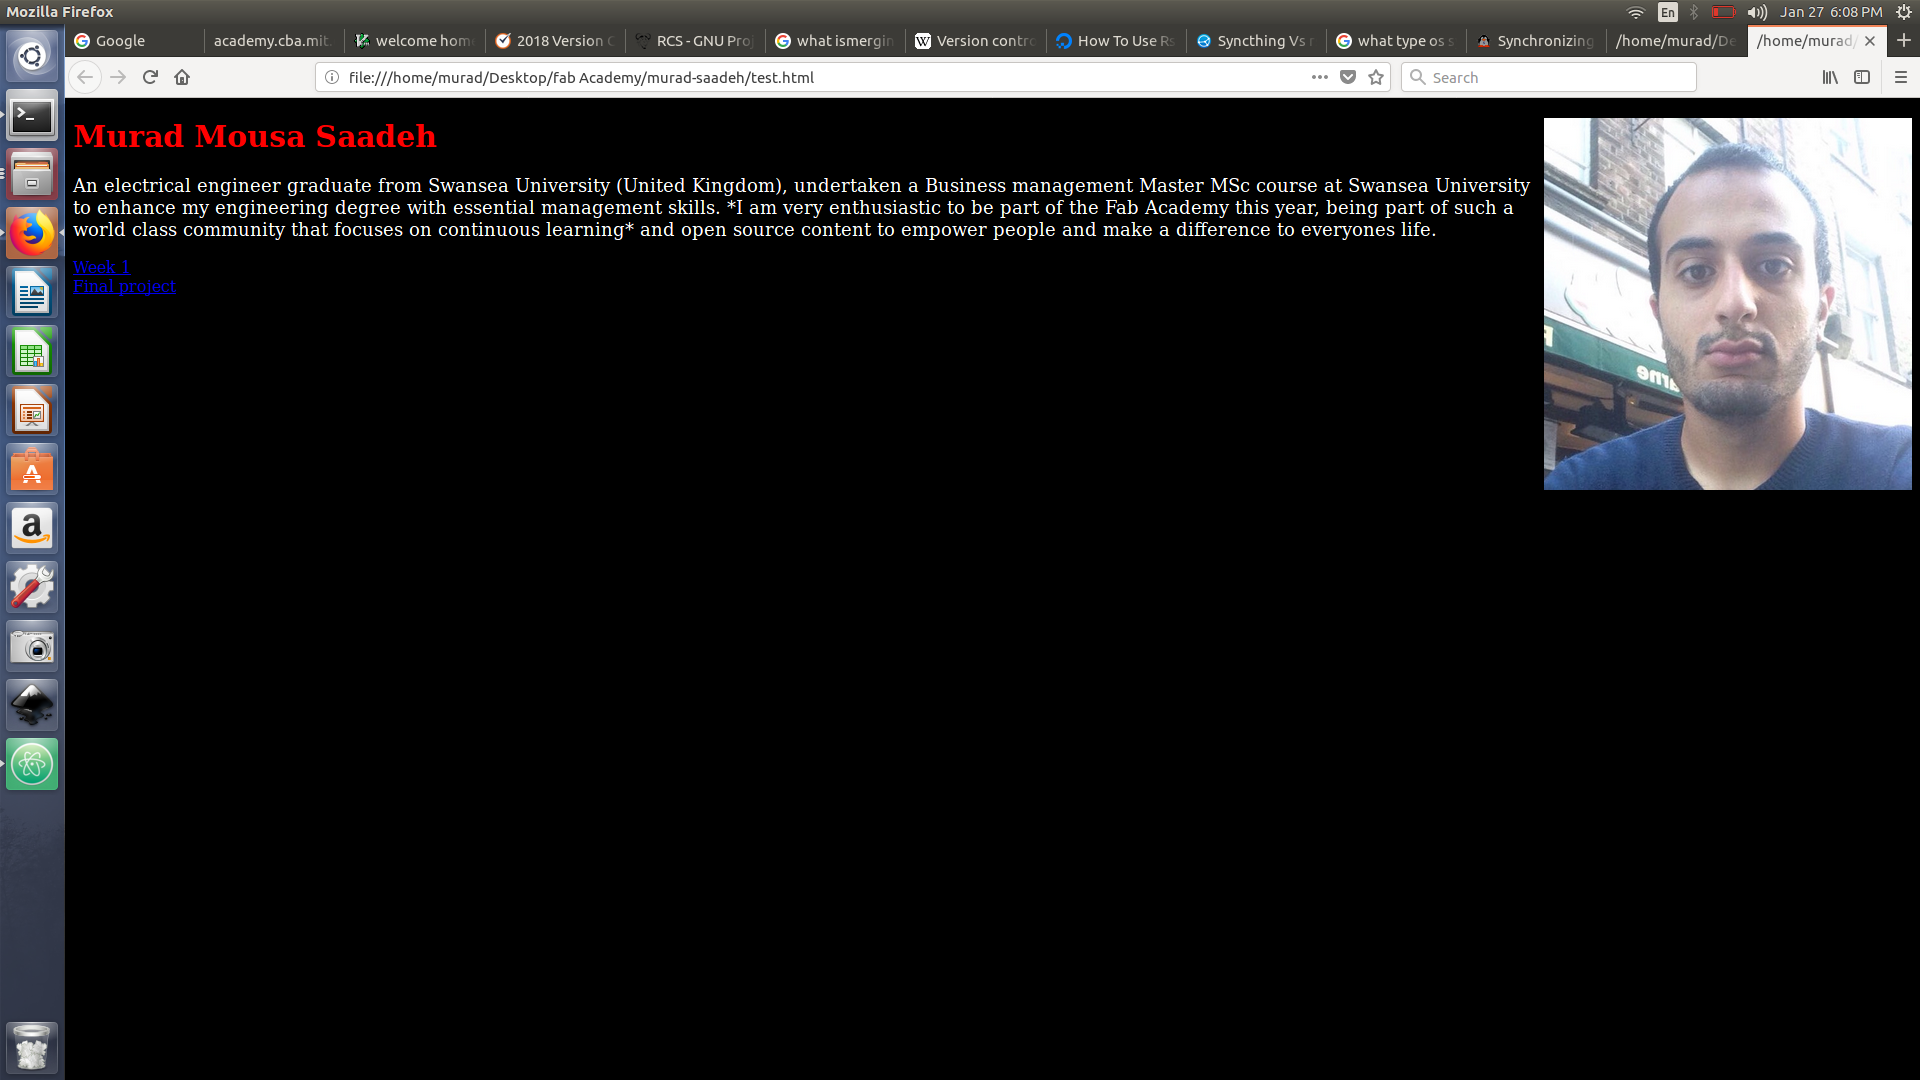
- I wanted the image to be to the right of the text, so I had to change my md file and place the image before the header.
- I faced some difficulties reducing the image size as it was extremely huge. in the image section i updated the width to be 20 % of the entire size
Generating website using HTML syntax
I have previously used pandoc to convert mark down to html where I created my css file , Today I am trying to learn html syntax.
HTML: uses tag syntax, to start writing in html at the beggining of the page you should include <!DOCTYPE html> then open a html tag to start editing using html <html> then once you are done </html> (close tag). The content should all be at the body where the head is used to link css file and title to the web page.
for example to define text as heading 1 we use <h1> text </h1>
To break a line we use <br>
Html allow user to add css styling to do that by either adding it in-line or internally.
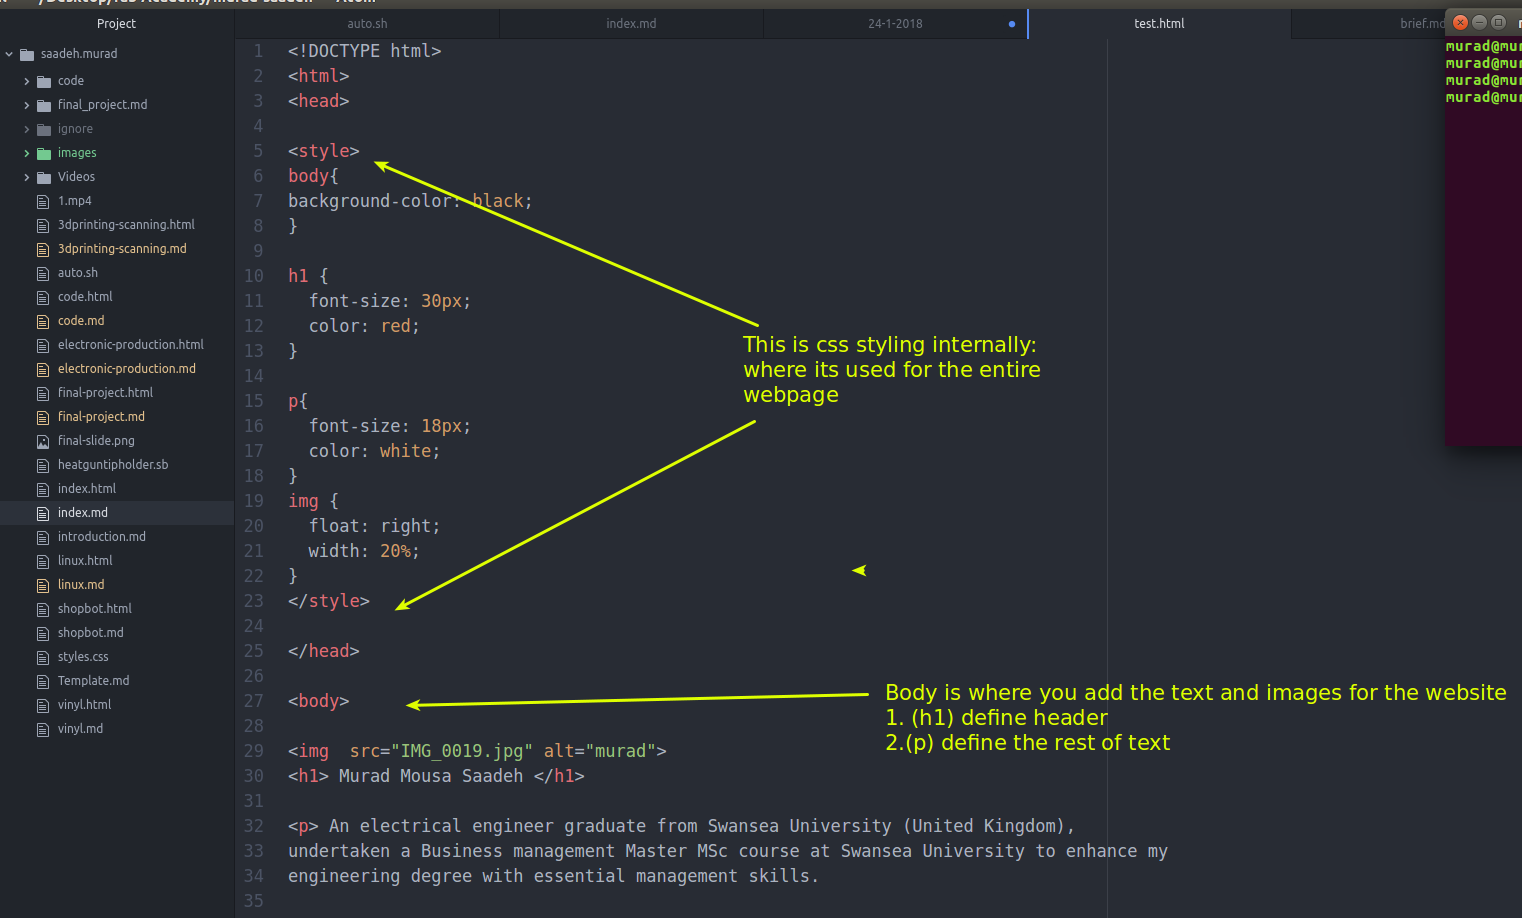
Its actually not that hard to use html however I had problems making sure to always close the tag. The amazing thing about is that you don’t need to link it to an external css file as you can type it internally.
Issues:
- I am using atom to write html, thus its annoying to every time open and close the tag. I used Brackets text editor and my instructor Sibu suggested to add plug in to atom to solve this issue
Generating website using jekyll
jekyll is static site generator that convert Markdown file into html and gives ability to add themes. Jekyll is actually better used to generate website than pandoc as it gives user the flexibility to adjust several layout and automatically generate blogs.
Installation requirement:
- Ruby available
- Ruby Gem available
Note: ruby is an open source programming language
Install:
gem install jekyll bundler
Creating website:
jekyll new my-site- then cd to my-site
jekyll serve- In fireFox type
localhost:4000to start viewing your website
** Adding page **
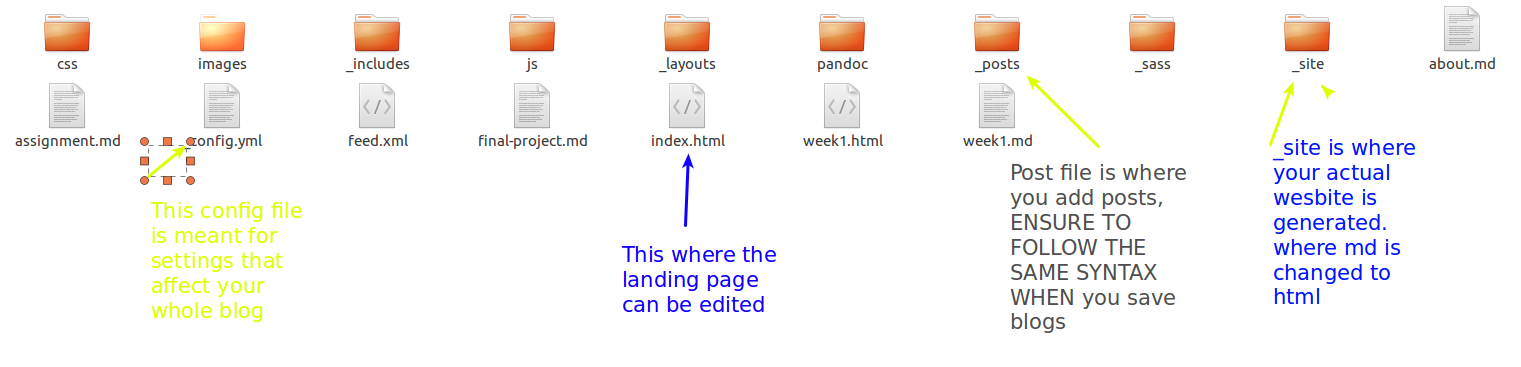
- Just add markdown files to the folder and it will be converted to html directly and placed in -site folder
- make sure to include this at the begging of the markdown file
--- layout: page title: Final project permalink: /final-project/ --- - by setting layout to page this mean it will be placed at the top of the site

Difficulties
- I faced a problem committing the jekyll CI-yml file to my repository, This problem was solved by adding the url address and the base url. the url: http://fab.academany.org , the base url: /2018/labs/fablabtechworks/students/murad-saadeh/
- After changing my url and base url I faced some difficulties locally hosting my site, this was solved by adding the base url next to localhost:4000
- I tried to use prologue theme, I downloaded from jekyyl themes, however it could be published locally as my jekyll version was 2.1 and it requires a more advanced version. In order to update jekyll I must updare gem first
sudo update --systemdidn’t update the jekyll. so I had to dobundle update jekyllbut my ruby was also an old version. I updated ruby usingthenI updated gem and jekyll `` - I am facing a problem with my current theme, as any Markdown file except the pages write wouldn’t be immediately changed to html and it would stay in the md format. My instructor Sibu suggested to amend some statements in the layout file. Due to the shortage of time I ll use posts to post my current documentation. As for the rest they are actually pages ( about me , final project)
-
- The images that I add to my posts do not show, I have tried relative path but this still didn’t fix it. Thus i am trying to find where does those images actually get Generated. My instructor sibu suggested to rename my images folder to assets, I have done done that by
git mv images assets
- The images that I add to my posts do not show, I have tried relative path but this still didn’t fix it. Thus i am trying to find where does those images actually get Generated. My instructor sibu suggested to rename my images folder to assets, I have done done that by
Bootstrap 3
I have ended up using bootstrap to design my website, as Jekyl was very limiting. For example I faced difficulties trying to arrange the tabs or even to create a assignment tab that would contain all the assignment. Using html sytnax give the user incredible flexibility to control and design an awesome website. bootstrap is easy to use: anybody with just basic knowledge of HTML and CSS can start using Bootstrap and bootstrap gives the website a responsive features: bootstrap’s responsive CSS adjusts to phones, tablets, and desktops bootstrap website
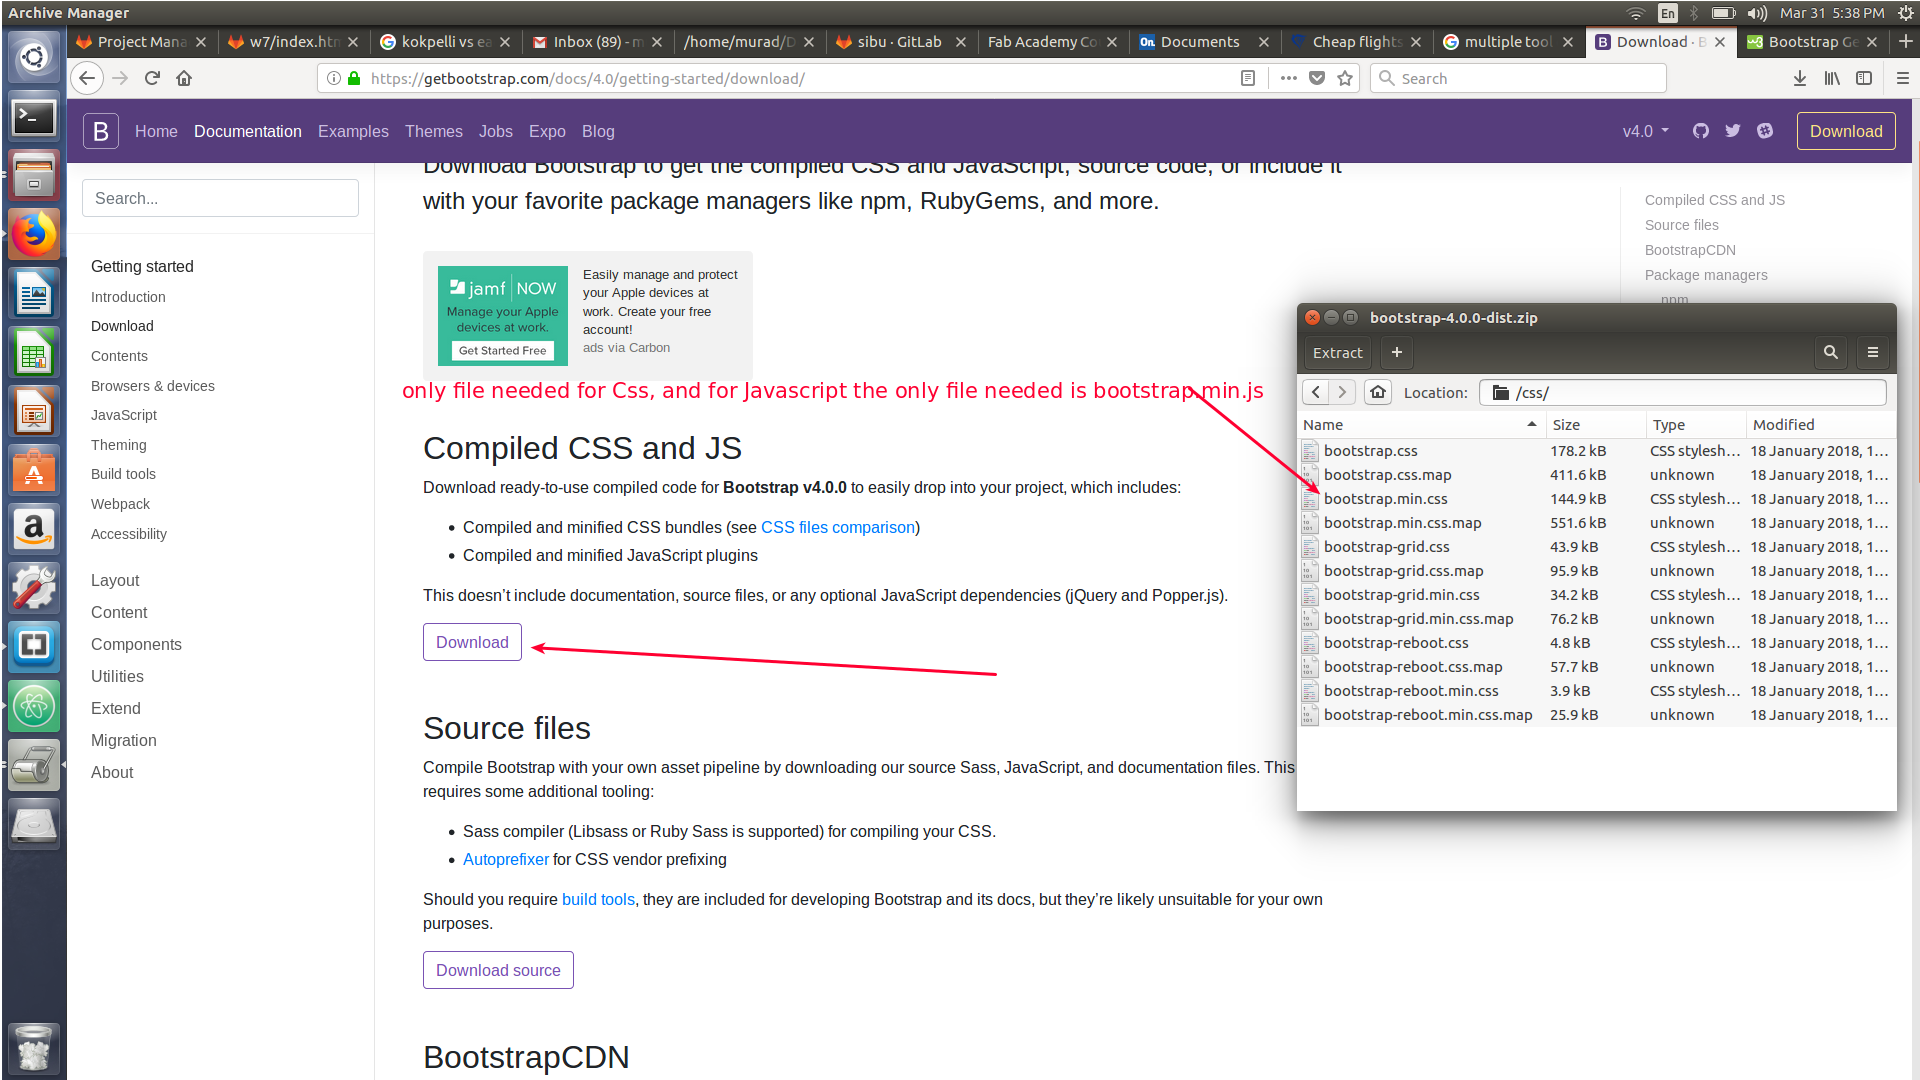
- First download the bootstrap source file using link which are the Css file and the java script files.
-
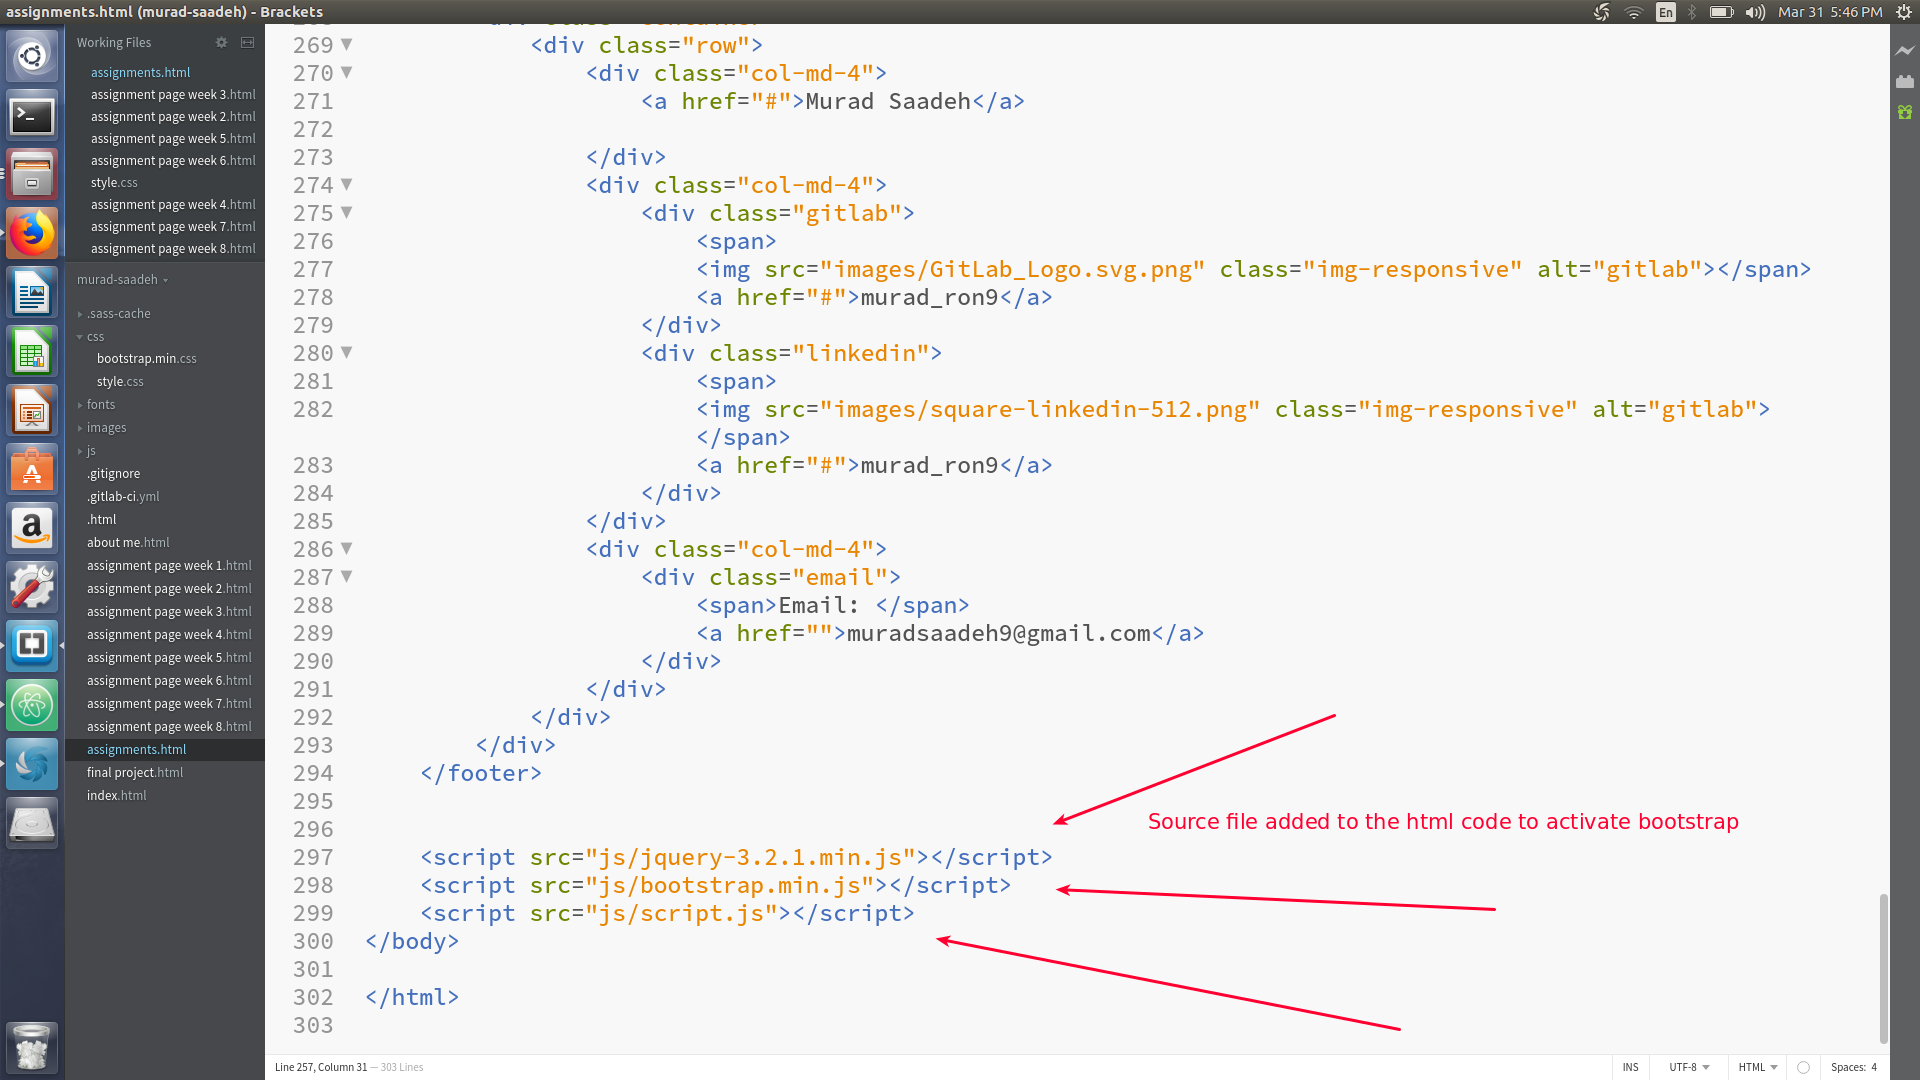
To activate bootstrap Java script you must download J-query source file link add it to java script folder
-
Add those files to the end of the code to activate the bootstrap
-
There are already classes that are used to make the website responsive which are saved in the bootstrap.min.css, for example container means to always put the content in the middle.
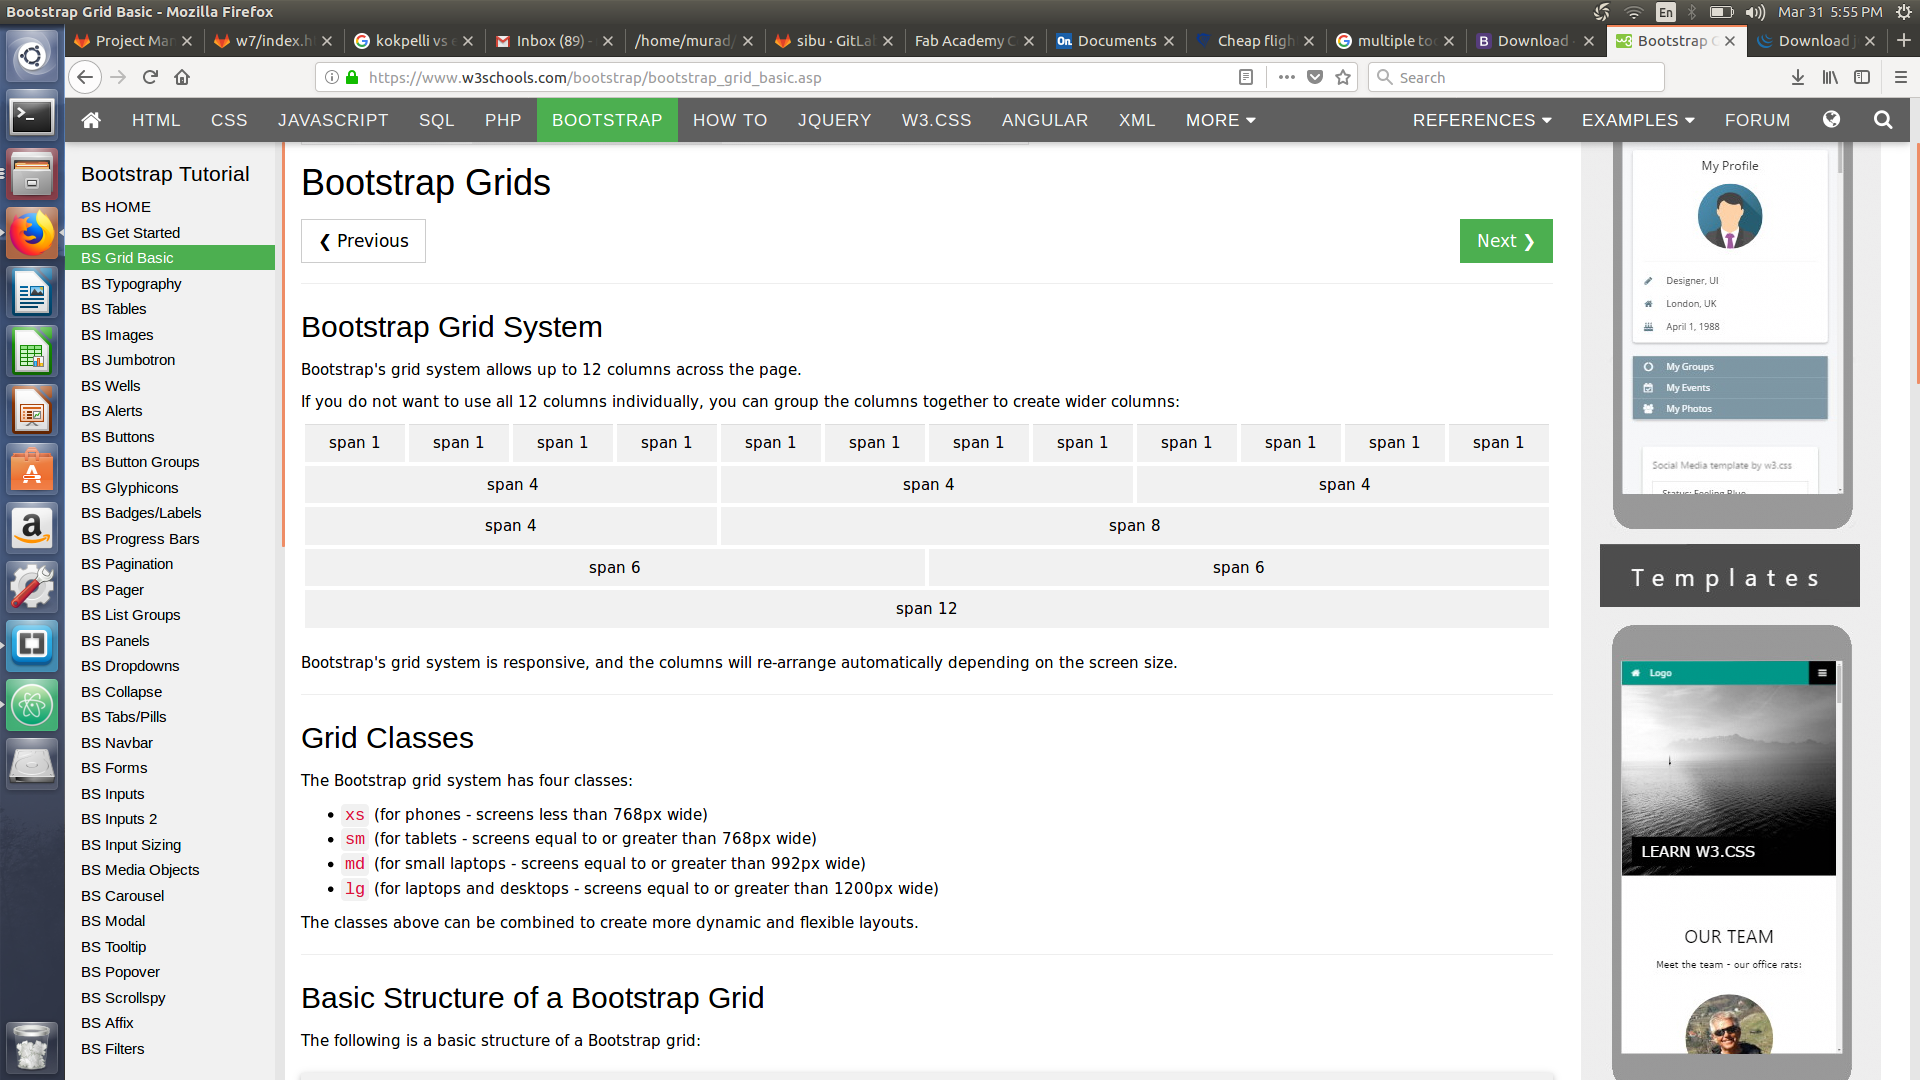
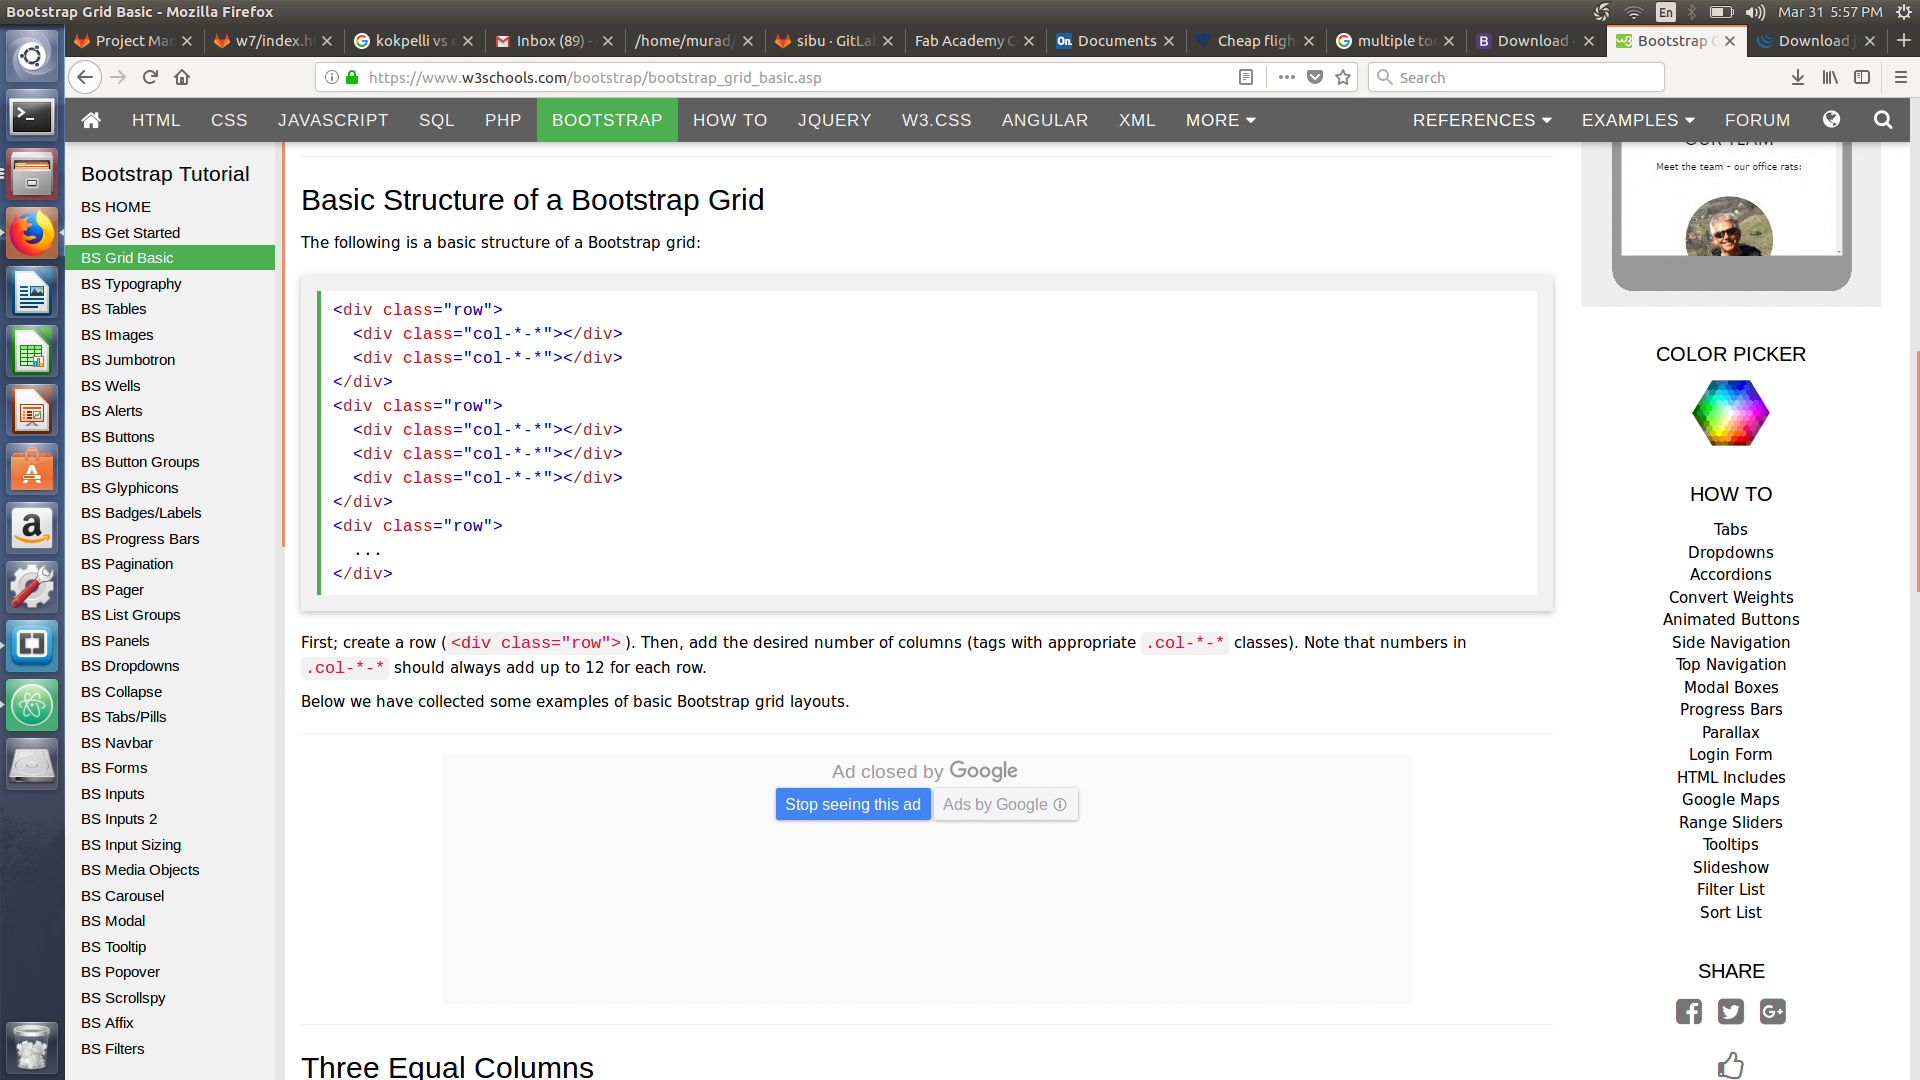
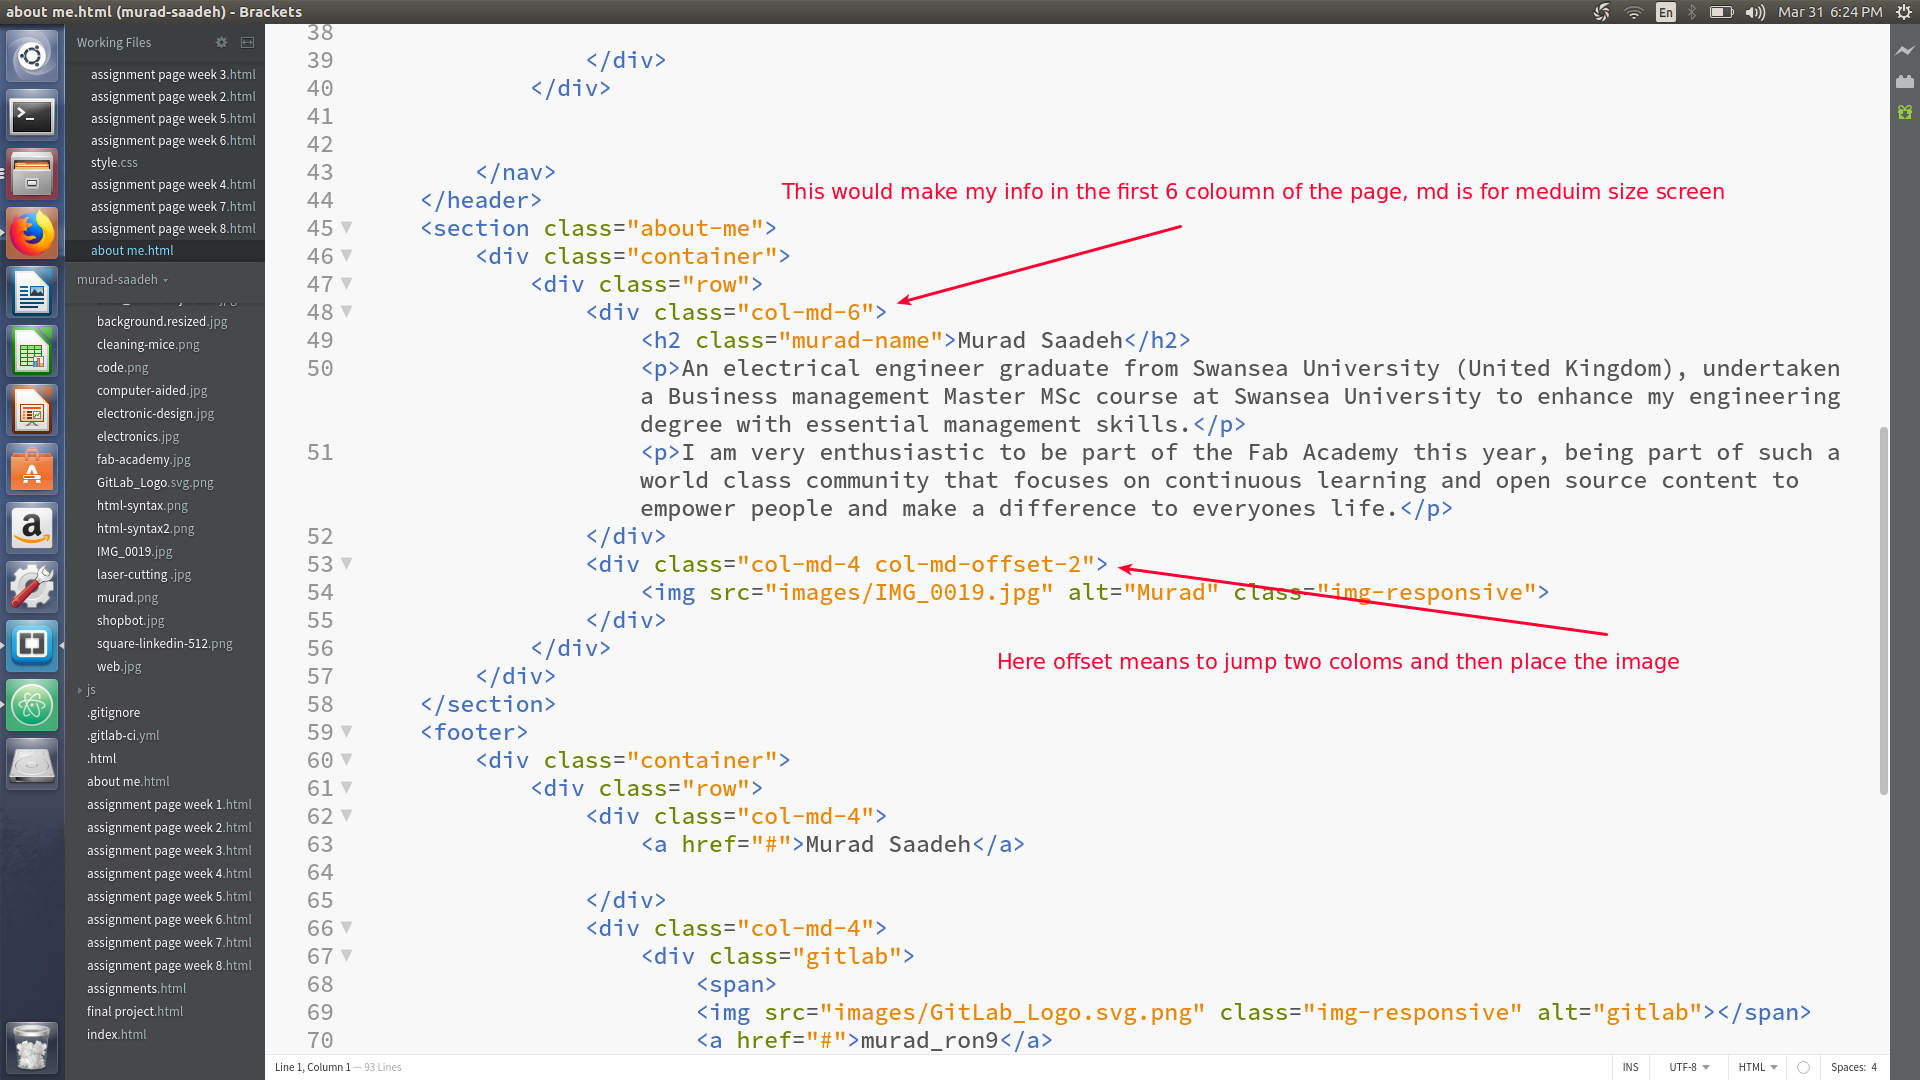
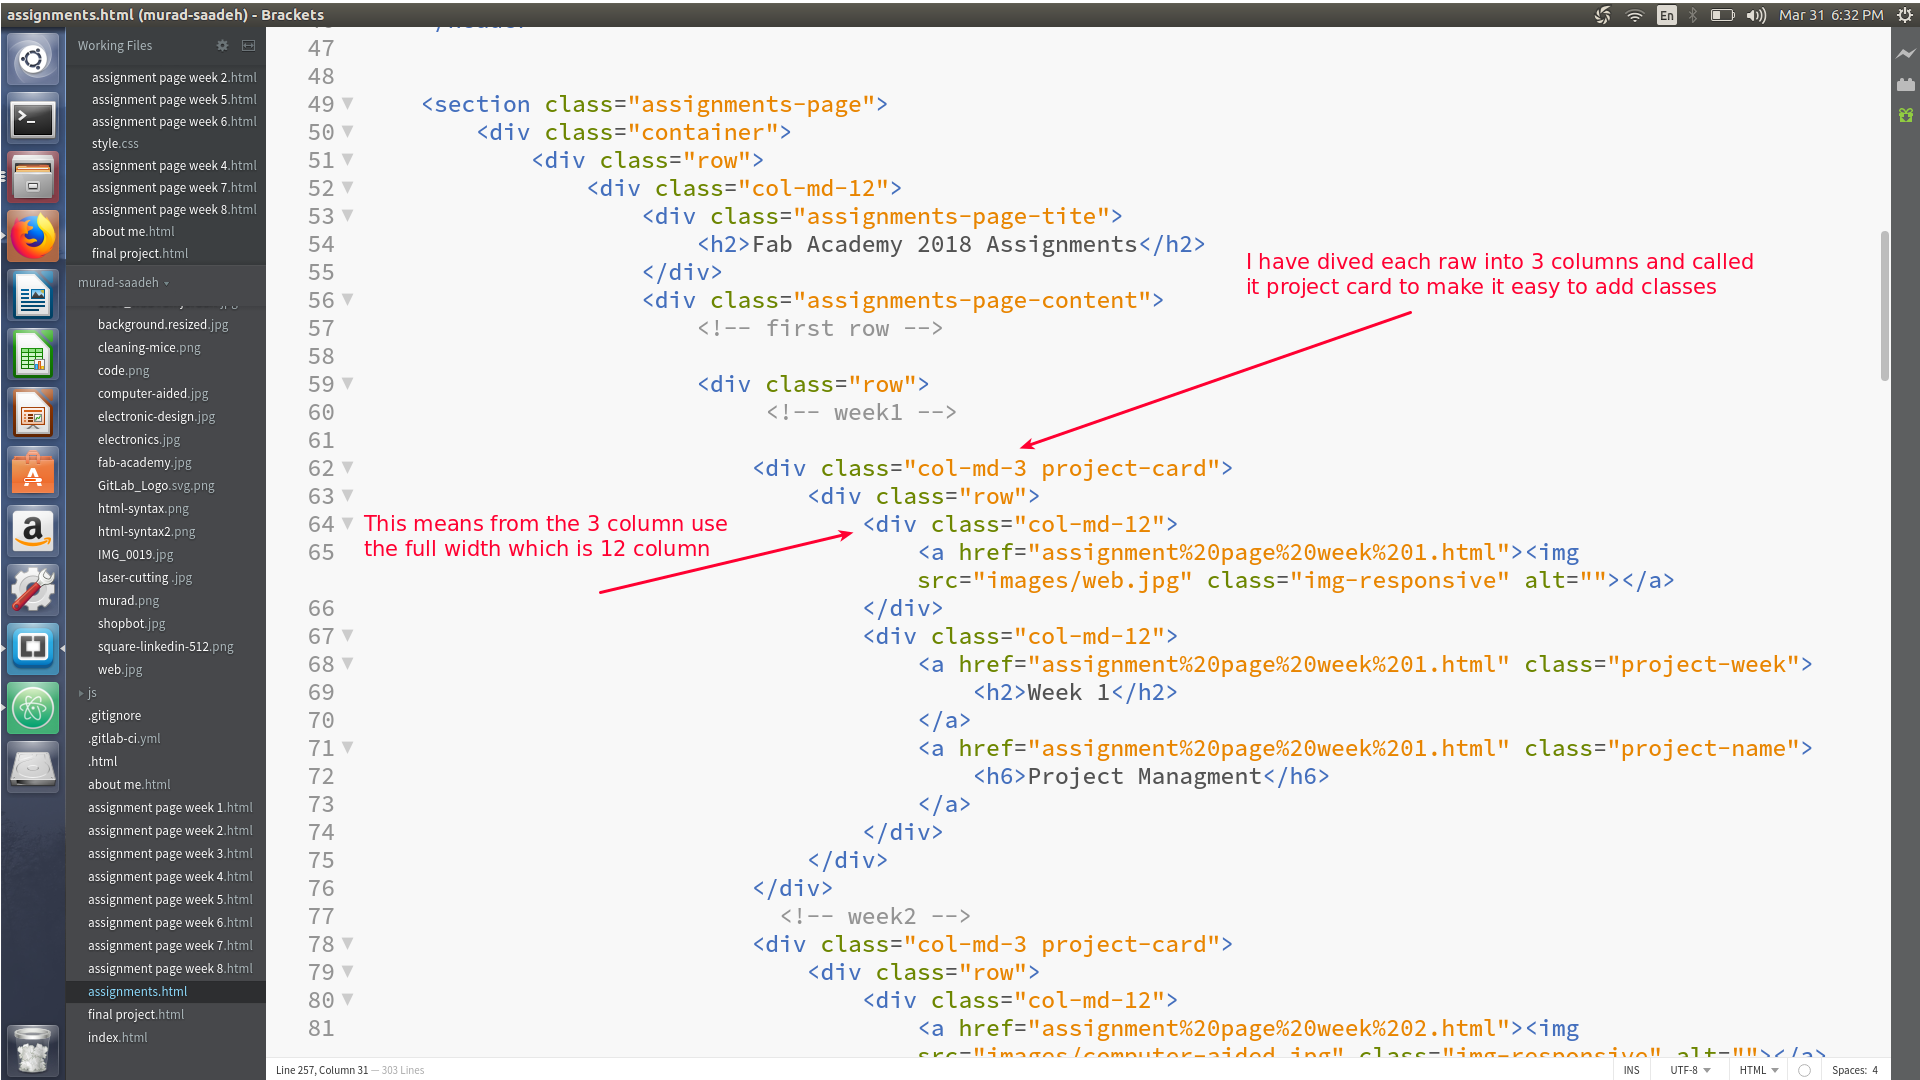
- Bootstrap usually divide the web page into 12 columns however you can redifine that to divide them into either 3 or 2 or 1 columns. more info available here link
-
Header
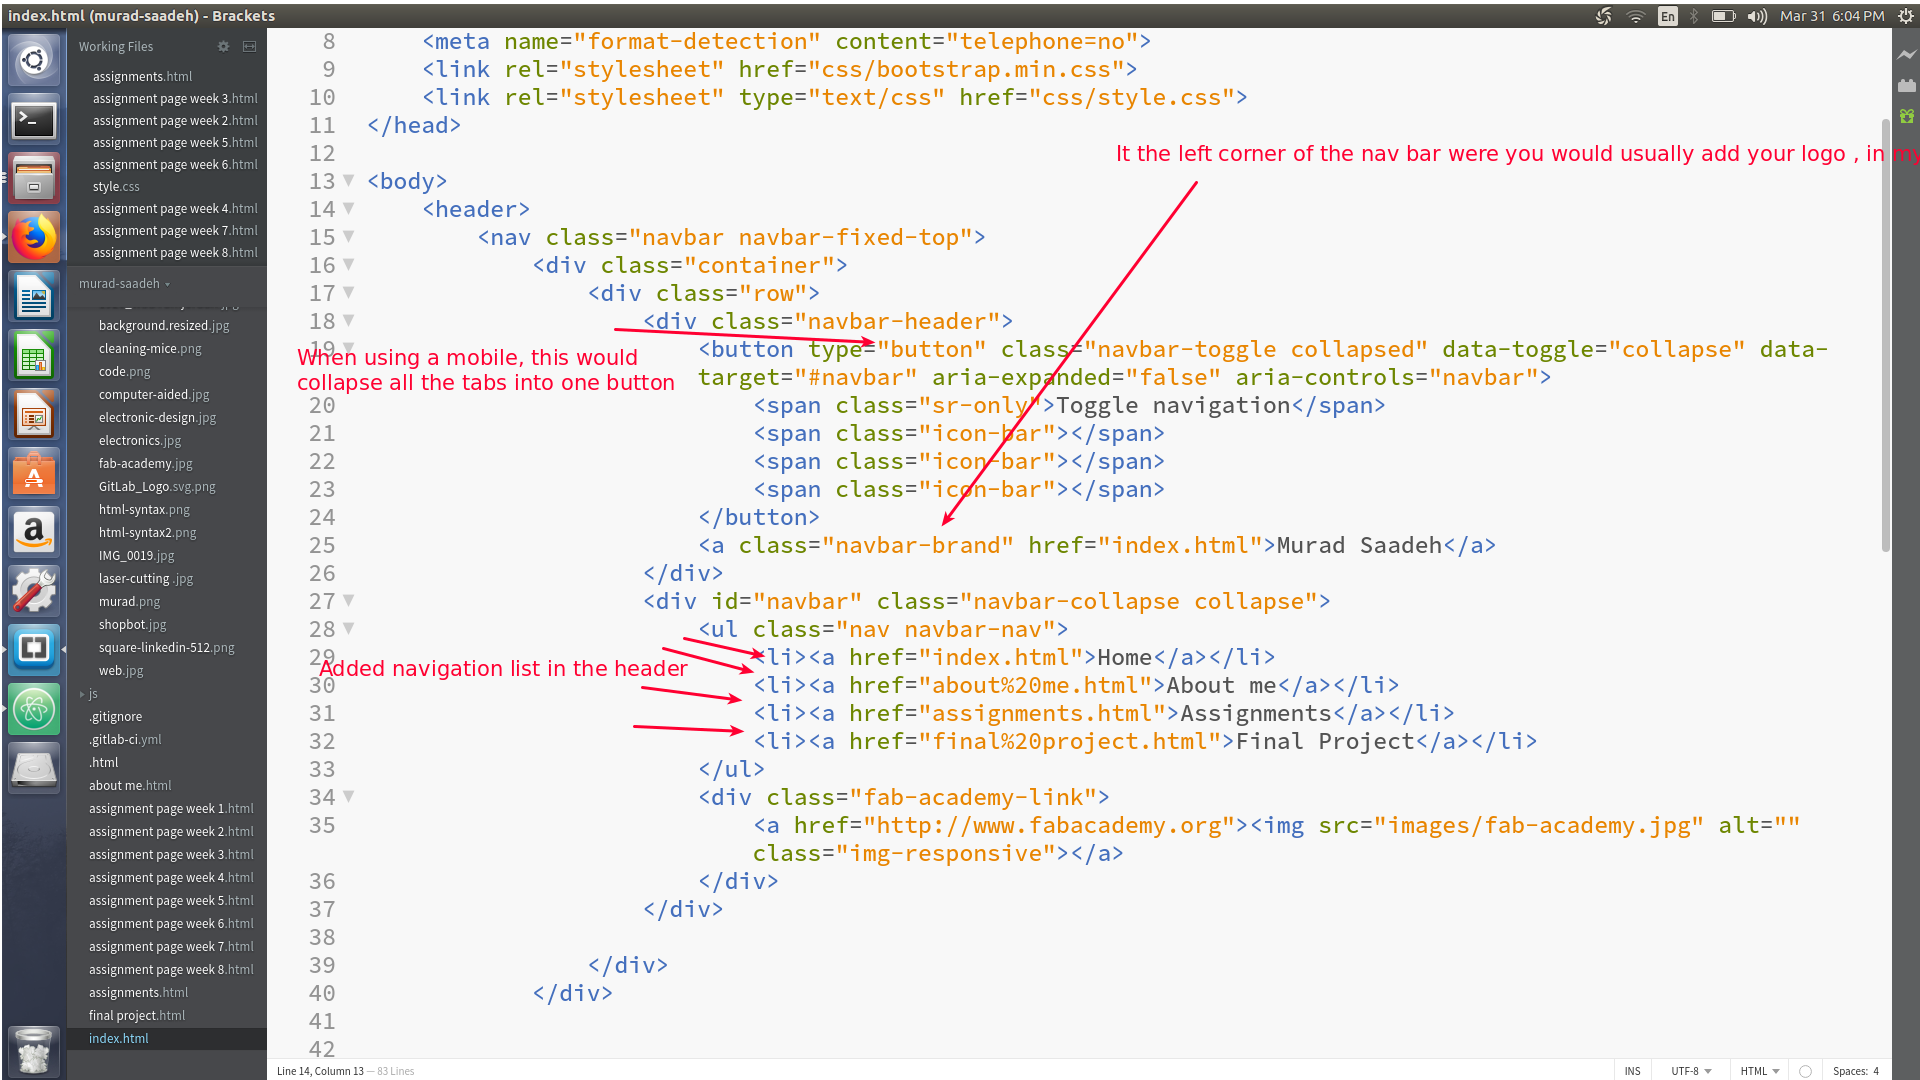
-
Footer

-
columns and raws
- You can create a css file and then define classes to automatically just place the style in the html
I really hate to add content using html sytnax, thus currently I am using jekyll post to transform my md file to html then use it from the page source and paste it in my bootstarp.
Synchronization:
As required by Fab Academy, we will be using git repository to push and pull assignment and files. First you should access your git lab and clone your page to your computer git clone SHH or HTTP. As Mr.Fiore stated on Monday 29th of January SHH is better to use as it will no longer ask you for user-name and password every time you push. Once you clone the file to your desktop you can now add documents and file. to push those file git add . then git status then git commit -m "TYPE YOUR MESSAGE HERE" finally git push. Its recommended to use git status after each command to know the current status of the repository and know what to exactly do next.To publish your website you must add a CI file to your repository, This is done via git lab website. This file would search for your index file and makes it your website landing page.
Adding jekyll to your repository
I faced some difficulties performing that as I pushed the entire site to my repository so I had to revert some changes this commit, I have done that by using git reset head^^ It then took me back to the commit prior to the last one, however I needed to go back 2 commits behind, thus I used git reset head (Commit id number)
further Research
help user Synchronize file and documents between 2 or more computers.
Tools:
- Resync
- unison
- Syncthing
The main differences between the tools :
-
resync only mirrors file from on place to another in ** one direction**, however unison copies the file in both direction. for example using if you changed a file at you added something to your work computer and at the same time you added something else to your private computer, using unison you could choose the direction of the sync.
-
Syncthing is very similar to unison but it can also sync between more than 2 computers at once, syncthing can run continuously syncing the changes as they happen.
Version control:
are softwares responsible for managing changes to documents, programs, website , or any other type of data. This is done by creating different version of the file that hold a specific time stamp and person conducting this change. Moreover, the ability to create two different copies of the same file is doable by making different branches. branches are mainly used to help user work on the same document using two different copies.
Plenty of version control were introduced, The main differences between them is if they are server based or peer to peer.
CVS previously only used to update the latest version of the file only, however now CVS work with branches. The disadvantages of CVS is that moving or renaming files does not update the version and branch operations is not designed for long term branching.
SVN (subervision): is a newer technology that uses CVS and improved it, SVN allow long term branching. SVN doesnt not use DRC ( distributed revision control) which is a peer to peer model, thus it uses servers (if the server is down you cant access it ). SVN has a very slow comparative speed
Git: uses distributed revision control which is a peer to peer model that allow users to access full history tree offline and provide a very high operation speed. Git has limited support on windows
** Mercurial: is also a distributed revision control model, Mercurial uses Python as the rest uses C (a lot of python developer uses Mercurial). Merging parents is not allowed ( More than one commit wont create merge ) **READ MORE
Mercurial overs a brigde between CVS and GIT.
SVN and GIT hosting:
- beanstalk
- unfuddle
- slikSVN
- XP-Dev.com
Image tools
For capturing screenshot I did use flame-shot and edited it by shutter software. The benifit of using flame-shot is that instead of taking a screen shoot of the entire page, I could just easily select the part that I need. However, I cant add arrows or text to screen shoot using flame-shot, thus I used shutter to do that.