week 1 - Principels, Practices & Project Managment
This week's tasks are:
- Create a website
- the website published
- Describe my self and my graduation project
Step1: Getting introduced to git and publish a test file
What is Git? After reading a lot I concluded that git is something that helps in keep tracking the chagnes in your computer files and this helps in tracking your projects (like if you are writing an article, each ime you write some words to your article and save. What happens if you want to go back to a previous version after saving!. Git helps you in that and there are many other version controlling systems but I think that git is the most popular because it's open source.
These are some definitions that I learned about:
- Version control system (VCS):the management of changes to documents, computer programs, large web sites, and other collections of information.
- Git: a version control system for tracking changes in computer files and coordinating work on those files among multiple people. It is primarily used for source code management in software development,[8] but it can be used to keep track of changes in any set of files.
- Repository:The place where the history of work is stored.
- Remote repository:What is a remote repository? It's a repository that is not-on-your-machine, so it's anything that is not your computer. Usually, it is online, GitLab.com for instance.
There are many ways to use git through Graphical User Interfaces or command lines. For Me using windows 8 I will be using Git bash. Git bash is a shell where you can write commands based on linux mainly and it givese these commands to the operating system to perform.
- Install Git bash
- Setup your account on git lab
- Connecting your Remote repository with your local repository
- SHH key:Secure Shell (SSH) is a cryptographic network protocol for operating network services securely over an unsecured network.Usually there is two keys one is General and one is private, Both are generated from your computer but one is shown to the public and the other is stored privately on your computer.
- Generating SHH key
- Clone the remote repository locally
- Push a test file
Download git bash for windows from Git for windows and then install it to your computer
Open your account on gitlab.fabcloud.org by entering your username and passowrd received on your email from fab academy. Gitlab.fabcloud acts as a remote repository where all Fab Academy websites exists. Also it's connected to Fab Academy serever so everything on it will be published.
when you open gitlab a list of projects will appear with your colleagues in your node, Choose the one with your name.
When you open it you will see something like this.
We should connect the local repository( which is my lab top) to my remote repository which is (Git Lab) to make all the changes in my labtop or computer uploaded to Git lab. This Connection will be made through something called SHH key.
Open your Git bash and make sure that there is no already generated key on your computer, Generate one then copy it using these commands:
 cat ~/.ssh/id_rsa.pub                         to make suer you don't have a key already

 ssh-keygen -t rsa -C "User email"             to generate a new key
 $ cat ~/.ssh/id_rsa.pub | clip                to copy the key to clipboard
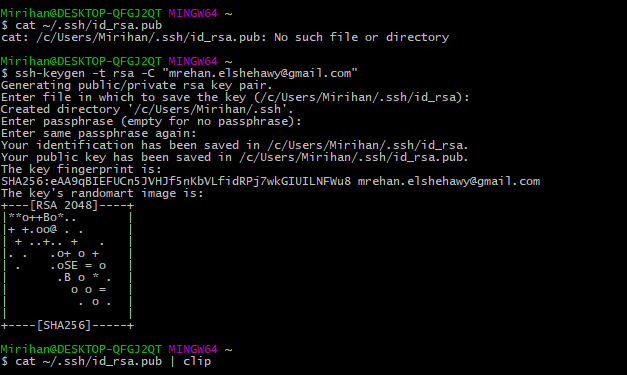
This is what you will see normally after Generating the SHH key
In git lab open settings then open SHH keys
Paste in the key area then press "Add key"
The SHH key is added successfully
- Cloning:to get a copy of a remote repository content to look at or to make changes on.
Change directory to the desired location where you would like your repository to be in, Then clone the remote repository.
You will used these commands:
 cd                         to go to a desired location
note that cd in git bash only takes one arguement so if your folders names have spaces you have to write it between two quotations.
Example:
cd D:/"MY FLODER"/"My website"/


git clone URL               to clone a remote repository to a local one

After changing directrory clone from your URL and it will clone successfully
After cloning you will see a folder with your name appears in the location you choose. Open it and create a word document for example test.docx
Important terms in Git
- add:adding means make a file trackable to see the changes made on it.
- commit:the way to call the latest changes made on a repository. When changes are tracked, commits mark the changes on a document.
- push: to make the changes delivered to a remote repository.
This is how to write these command in git :
 git add  --all                         to track all changes
 git all "file name"                     to track a certain file
 git commit -m " comment"                commits all tracked files
 git push                                pushs all the commits to your remote Repo


Committing and pushing the test file
Now the test file will appear in your Git Lab repo. Same steps will be repeated for each push.
Step2: Making a website
- I started learning about HTML and CSS from code academy website. It's a very friendly and easy website where it gives you explaination, an area to write your code and an interactive are where you see the results of your code all at the same place!.
- I didn't want to start making the website from scratch so I searched about bootstrabed files.
- I started to design my website and what I need to change in the frame work I chose.
- I started to search about a good editor to edit my code in and I decided to use Bracketsbecause it has a live preview!.
you don't have to open your browser and refresh your code each time you make a small modification but it goes life while you are working. - Something that will help you a lot when you are using a frame work is the inspection opyion in your browser.
open the page you are modifying in the live preview, right click anywhere in the browser and choose inspect. This tool will help you to determine where the part you want to change exactly is in the code sections.and what are the styling codes related to it.
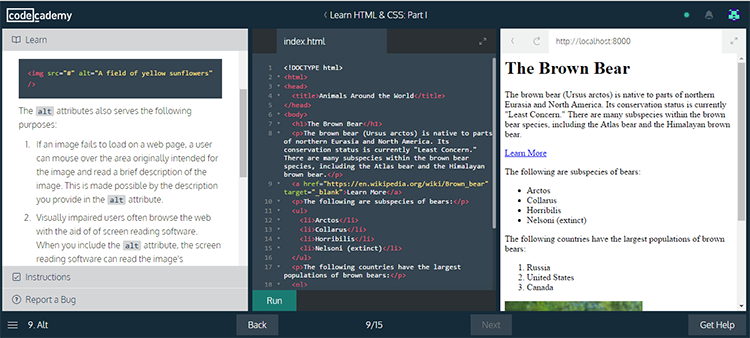
Code Academy website
- Bootstrap:a free and open-source front-end web framework for designing websites and web applications.
there are a lot of sites that offers free bootstraps like ShapeBootstrap,Start Bootstrap andBootstrap.
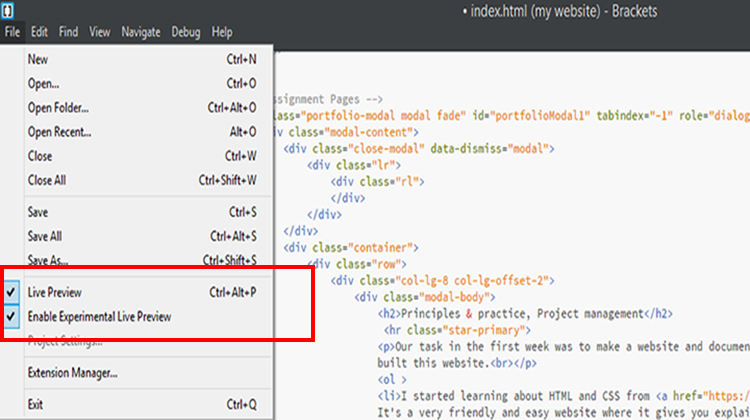
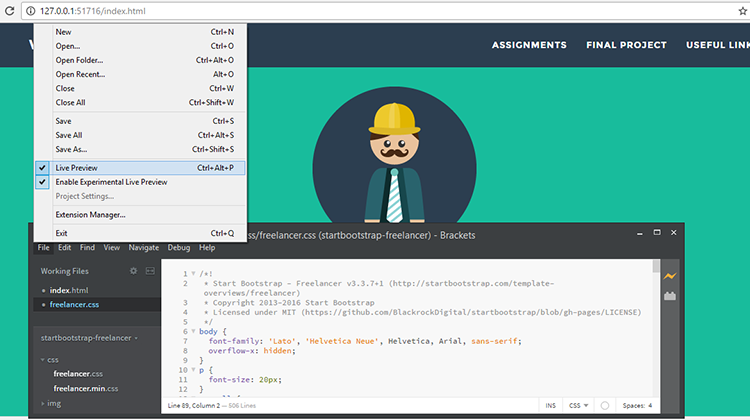
Live preview in Brackets
Enabling live preview in the browser
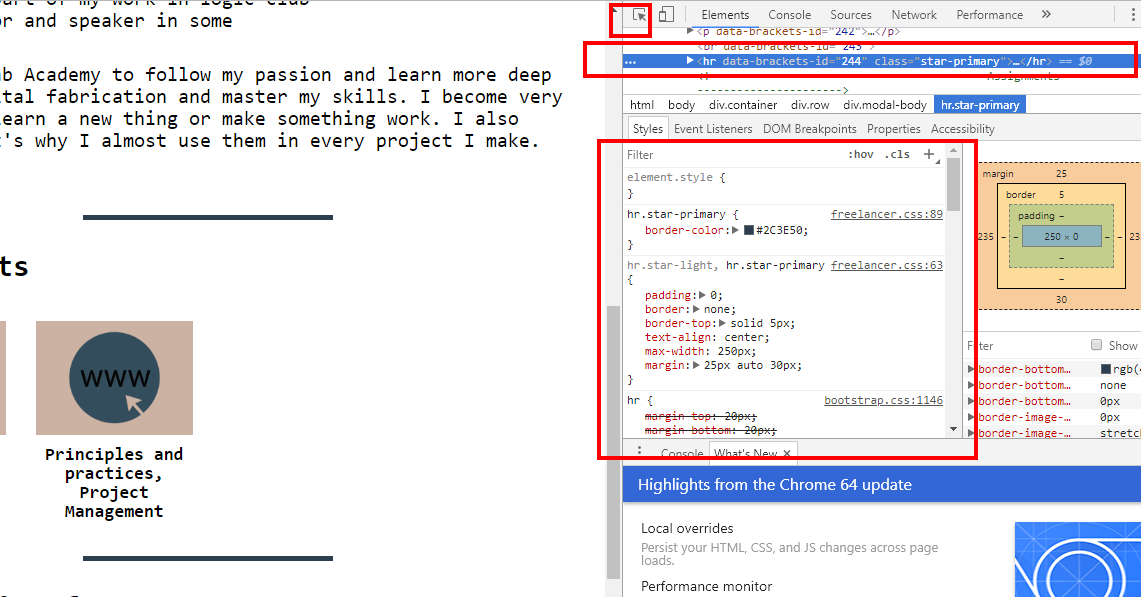
Right click on the webpage and click inspect, A list will appear on the right. Choose the cursor then click on the item you want to inspect then the data about it will show up.
Step2: Uploading website
- After Creating the website, I Put the files in the directory with My name and then followed the same steps of pushing the test file. You will find your Website files on Git lab.
- I figured out that to make the website published through Git lab I should add (.yml) file
The website is pushed.
Create a new file
choose the file type t be (.git-ci.yml)
Apply HTML template
The content will be added then Press commit changes
The website is published now.
Resources I used in this week:
- w3schoolss for learning coding.
- Bootstrap documentation.
- Understanding git.
- git basics.
- Bootstrap design tools.
- Math JAX for inserting mathematical equations on a website.
- Math JAX basic tutorial.

