Applications & Implications
At a young age, we learn many things through PLAY! Preschool-age toys teach ABC’s, 123’s, Shapes, Colors, and more… My final project will focus on teaching basic shapes and colors as well as spatial relationships, hand-eye coordination, color simple color wheel principles.
My toy design will have a base unit containing a circular, a square, and a triangular recess. Three matching shaped pegs will accompany it. The pegs as well as the rim around each recess will be colored red, blue, or yellow. When the child places the identically shaped and colored peg into the appropriate recess, an embedded acrylic smiley face will illuminate with the corresponding color. If the child places additional pegs into their corresponding recess, the smiley face will illuminate in the appropriate secondary color, or in the case of all three pegs, brown!

I will accomplish this by placing a Hall Effect sensor beneath the bottom of each recess and embedding a magnet into the ends of each peg. When a sensor detects a magnetic field, I will calculate the appropriate color and push that value to an RGB LED. To ensure that only the correct shape can fit into the correct hole, I will size the circular recess and peg to be larger than a circle that would inscribe the square and triangle and smaller than one that would circumscribe them. To ensure a child’s safety, I will also ensure that the pegs cannot fit into a choke tube.
Prior Art:
I found a few other FabAcademy students (past and present) who's final projects are in the category of "interactive toys for children". They are both quite intersting, bt each is differnt from my idea and design. You should check them out:
Lavina Utamani: "Twinkle Tracks"
My Bill of Materials will include:
- 5/4 Maple – 8” x 12”
- 3mm clear acrylic
- 3mm plywood
- 3x - Hall Effect sensors
- 1x RGB LED
- 1x - ATtiny44 microcontroller
- 2x - 1K resistors
- 1x - 499 resistor
- 1x - 10K resistor
- 1x - 1uf capacitor
- 1x – 9V Battery adapter
I will acquire most of my materials from the FabLab inventory, but will purchase my Maple board from a local lumberyard. I estimate that the total cost of the project will be under $20 US.
Fabrication processes:
- Wooden Base and Pegs – milled on the ShopBot.
- Circuit Board –machined on the Roland precision mill.
- Electronics – soldered by hand.
- Acrylic – cut and etched on the Tormac laser cutter.
- Software – developed using Arduino.
- Tongue Oil Finish – applied by hand.
Remaining Tasks:
- Finalize the Mechanical Design
- Design the PCBs
- Purchase Maple board
- Fabricate all the items listed in the "Fabrication processes" section above
- Write code for the board (use Input/Output week's homework as starting point)
- Final Assembly
Open Questions:
- How does the hall effect sensor respond to the magnetic field as varying thickness of wood are placed between the two?
- How can I get my RED LED to be more a vibrant red?
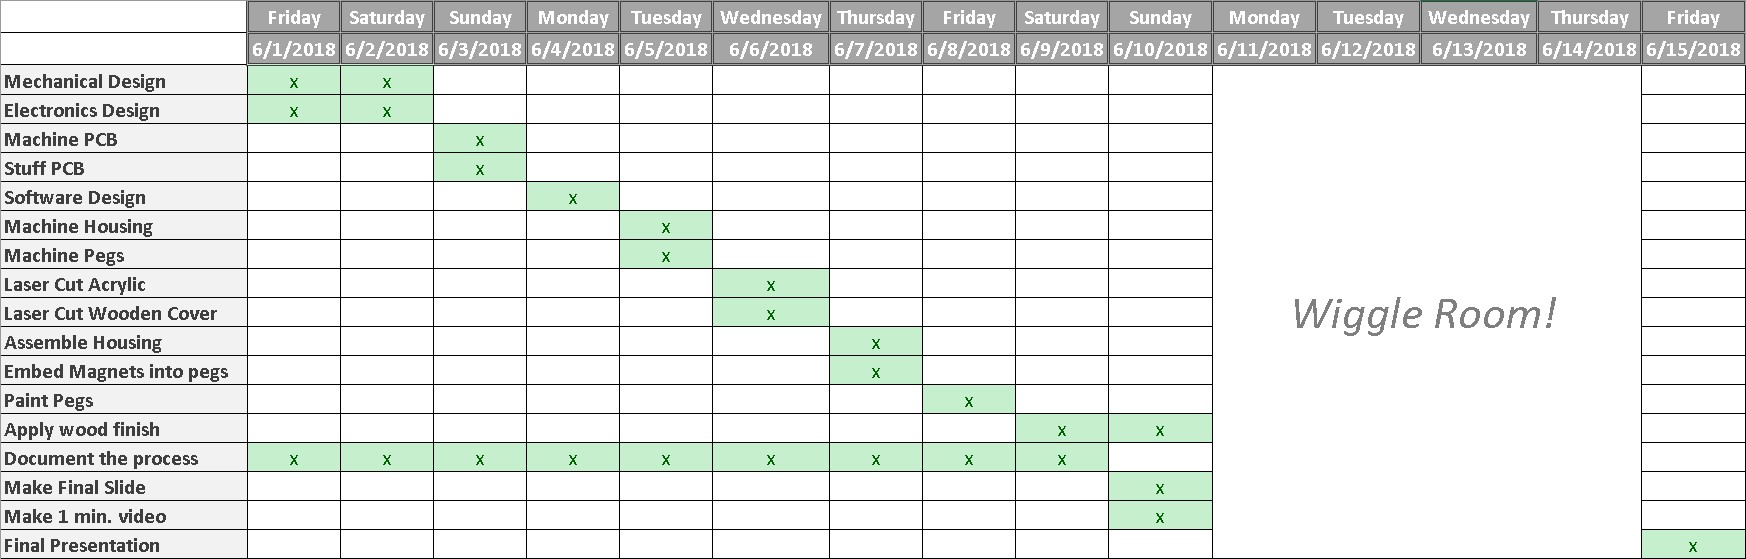
Schedule:
Defining Success:
- I'd expect that we'd agree the project is a success if it functions the way that I described at the top of this page and it is finished to a quality that one might display on a shelf in a toy store.
*NOTE: My first aim is to power this device with a USB cable. I fully acknowledge that a commercial product for a toddler would not have a cord. In the interest of spiral development, however, I am starting with corded power and time permitting will work towards a battery powered solution.