Stages of Development for Language Learning Game For Refugee Children
When a refugee family arrived in my home town of Brighton and didn’t speak English, the adults quickly learned to say “Sainsbury’s” and “How are you?”. But the children needed to learn a different set of words for nursery school and unlike British children they didn’t hear them at home. For toddlers arriving in a new culture, starting nursery may be confusing and scary. It could make a big difference to settling in if they are familiar with the meaning of words they will learning. Every word in ‘The Hungry Caterpillar’ or the ‘The Wheels on the Bus’ would be completely new to them.
So I came up with the idea of adding an electronic circuit to a wooden peg puzzle. When a child puts the right piece in, it will say the word out loud in English. The toy is intended to meet the needs of 2 particular children, and can also be adapted to meet the needs of other children learning a new language.
I received a £250 grant from the Royal Society of Arts, Commerce and Manufacture to produce 10 games for local refugee families and will publish the plans online for other people to make or adapt the games too.
Stage 1 - Initial Prototype with a Bare Conductive Touchboard
To test the concept, I made the first version with a Bare Conductive Touchboard which has capacative touch sensors and plays audio using an onboard SD card. But it would be too costly to be viable and had design limitations. At the beginning of FabAcademy, this represents my level of electronics and design software knowledge. The development of the toy, which includes creating my own printed circuit board and designing a housing that encloses it all in a child-safe way charts my learning on the course.
Materials
- Bare Conductive Touch Board
- White Paint
- 3mm Plywood
- A3 White Cardboard
- 12x Nuts and Bolts (for handles)
- Thin electrical wire
- Speaker with small jack attached
- Solder
- Stickers
- USB cable
- 5V Power supply
- Aluminium foil
- Glue
- Insulation tape
Equipment
- Computer with a Micro SD Card reader
- Laser cutter
- Soldering iron
- Scissors
- Paint brush
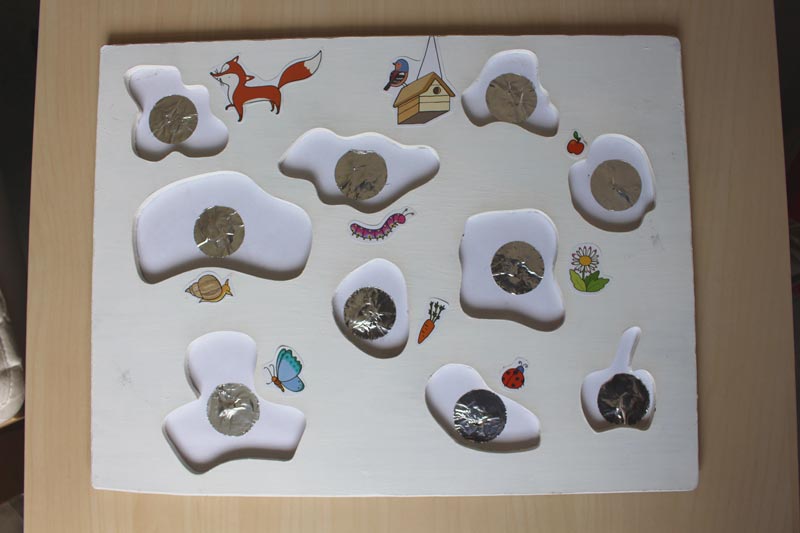
Step 1 - Using Adobe Illustrator, create shapes that will have the stickers on. Draw a rectangle for the edge of the board and position the shapes inside it.
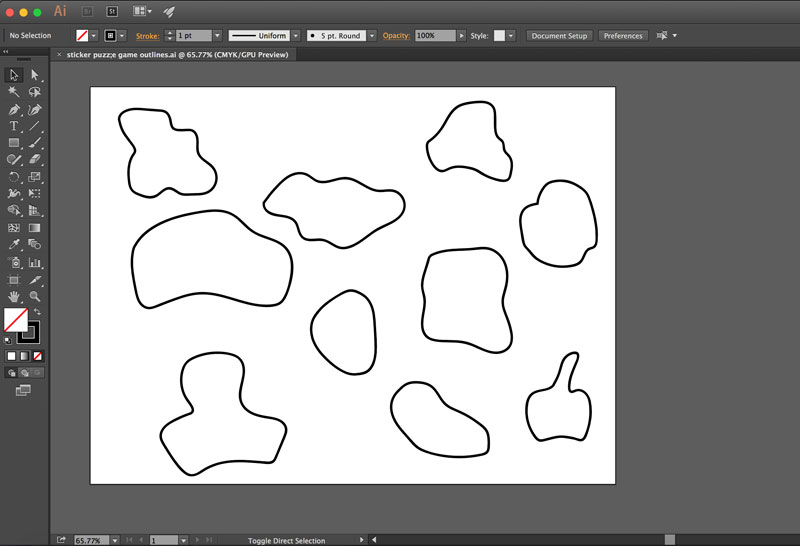
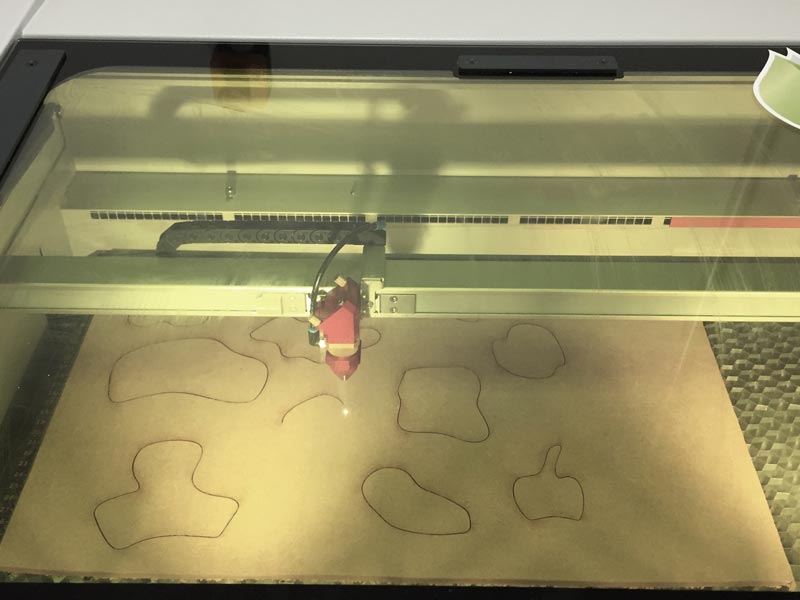
Step 2 - Cut out with a laser cutter.
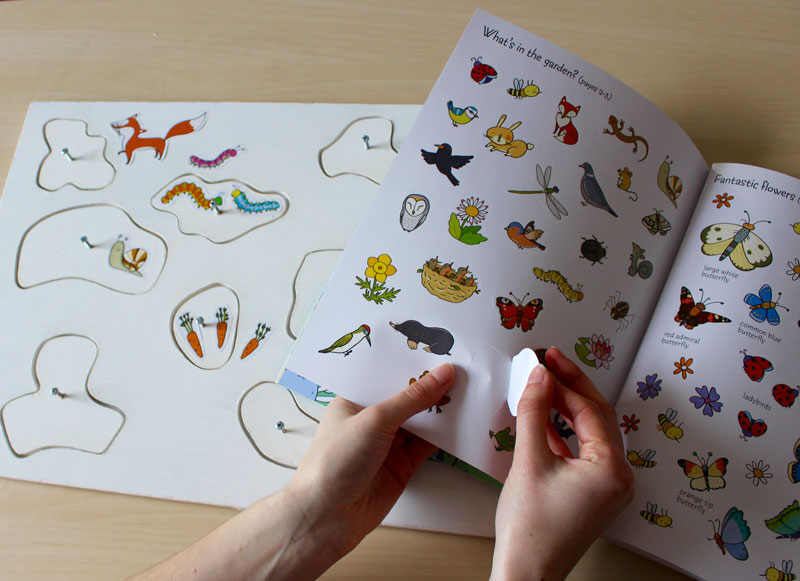
Step 3 - Paint everything white. Drill holes through the middle of each shape and counter sink on the reverse side. Attach the nut and bolt through.

Step 4 - Attach the stickers. Put related stickers on the board to indicate where the shapes go. Record the name of each object as separate MP3 files and upload to the SD card, following the steps at www. bareconductive.com/make/changing- the-mp3s-on-the-micro-sd-card/
Step 5 - Solder thin electrical wire onto the Touch Board electrodes.
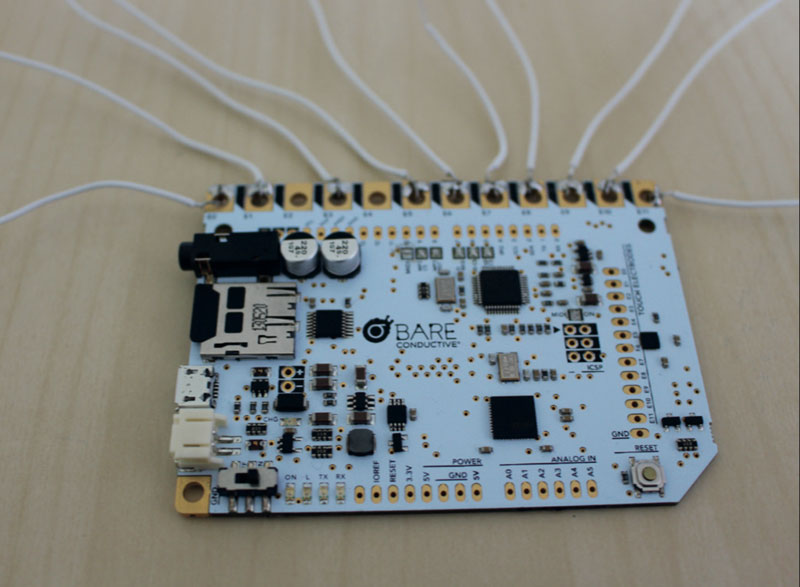
Step 6- Glue the cardboard to the back of the wooden board. Poke each wire through the cardboard in the middle of each shape, making a hole. Cover the tip of the wire with a circle of aluminium foil and glue down. Plug the speaker and power supply into the Touch Board.
What I learnt
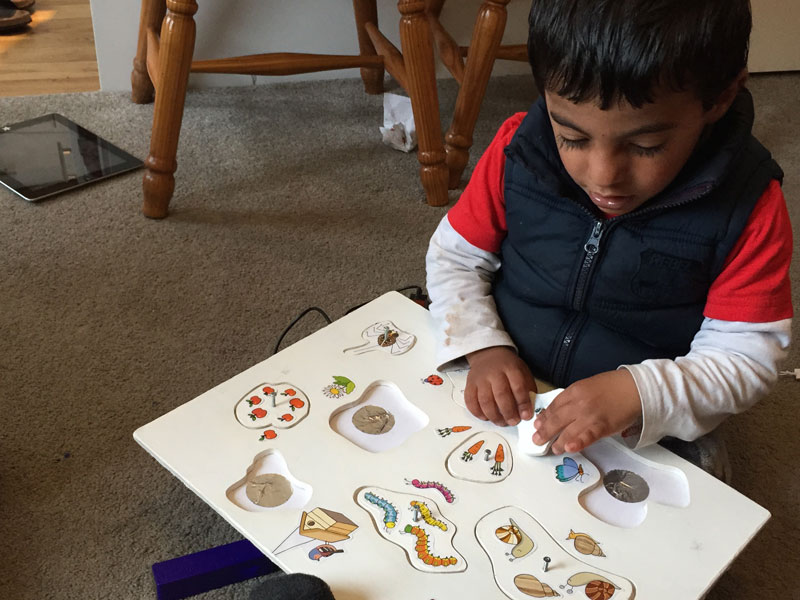
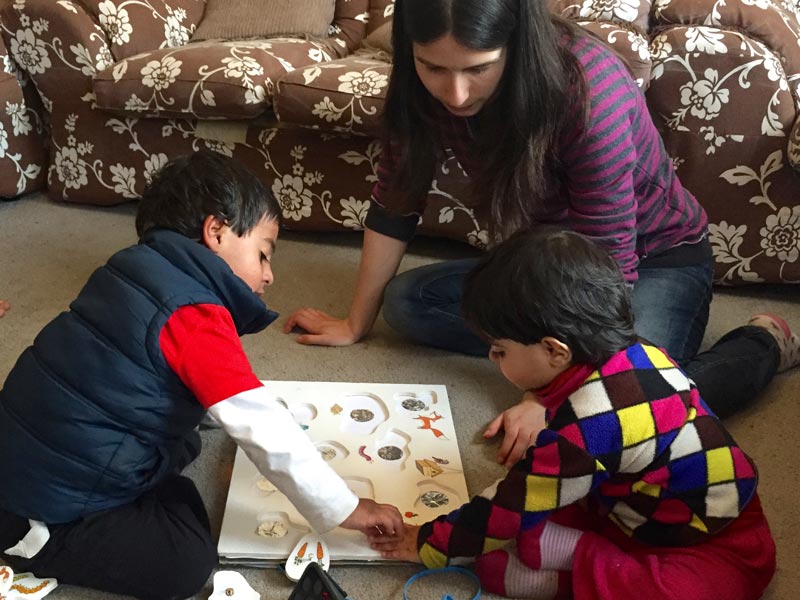
Both children were interested in the toy. Initially, the 3 year old boy, needed help orientating the puzzle pieces, but he spontaneously attempted to repeat the words. He enjoyed putting all the pieces in, turning the board over to remove them and starting again, but getting the right orientation of the pieces was slow. He played with it for approximately 20 minutes and his pronunciation of the words became clearer during that time. His 2 year old sister made sounds when each piece went in but they were unrecognisable.
Both parents repeated the words as well and came over to see what the words represented. It became a focal point for attempting conversation. They allowed me to take photos of the children but moved away to make sure they didn’t appear in the pictures themselves.
The background noise from the TV meant the sound of the words was sometimes too faint.
The board was too large for comfort on a child’s lap. Most of the time both children happily shared the board, but occasionally fought over whose lap it was on. The edges should be rounded.
The pictures indicating where each puzzle piece went were near each hole. They found this confusing. It would be better to have the pictures inside the holes, but this isn’t possible because of the conductive tape in each hole.
The shapes of the puzzle pieces were designed to make it impossible for the child to insert them in the wrong hole and trigger the wrong word. But the shapes were too difficult for a 3 year old to orientate. They may make the game more interesting if designed for older children, but for this age group they need to be simplified.
The natural kerf on laser cut acrylic is an advantage for the puzzle pieces because they would be too difficult to use if there was a tight fit. But for 3 year olds, I decided the difference in size could be greater. I kept the size of the holes the same and reduced the size of the numbers by 1mm all round. This meant some slivers of acrylic were still attached to the puzzle pieces when they came out of the laser cutter, but they broke off easily and without any jagged edges.
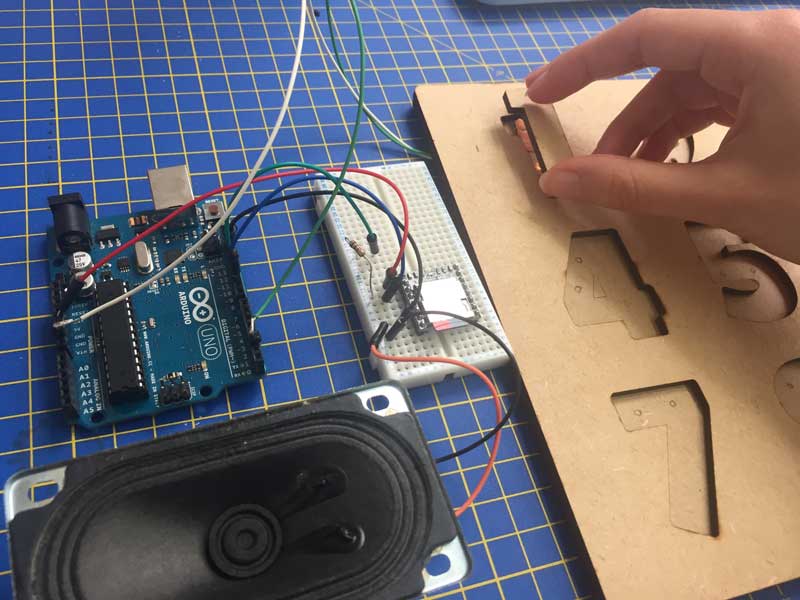
Stage 2 - Using an Arduino
Building on the work done in Outputs Week, I adapted the code and circuit diagram to use the DFPlayer MP3 module with sensors rather the buttons.
Explored 3 different sensor methods
- Capacitive touch - needs conductive material under puzzle piece and handles, which may not be appropriate for some pictures
- Creating a switch by bridging a gap in the circuit - needs conductive material under puzzle pieces
- Light Dependent Resistors (LDR)
Using Capacitive Touch Sensors
 /* The basis of this code has been done by combining the example CapacitiveSense Library Demo Sketch by Paul Badger with the PlayMP3 Sketch from the DFPlayer Mini MP3 by Makuna library.
 * Uses a high value resistor e.g. 10M between send pin and receive pin
 * Resistor effects sensitivity, experiment with values, 50K - 50M. Larger resistor values yield larger sensor values.
 * Receive pin is the sensor pin - try different amounts of foil/metal on this pin
 */

#include <CapacitiveSensor.h>
#include <SoftwareSerial.h>
#include <DFMiniMp3.h>

CapacitiveSensor   cs_5_9 = CapacitiveSensor(5,9);        // Capacative touch sensor between pin 5 & 9. Resistor attached to wire between pin 5.
CapacitiveSensor   cs_5_8 = CapacitiveSensor(5,8);        // Capacative touch sensor between pin 5 & 8. Resistor attached to wire between pin 5.
CapacitiveSensor   cs_5_6 = CapacitiveSensor(5,6);        // Capacative touch sensor between pin 5 & 6. Resistor attached to wire between pin 5.
int ledpin = 13;

// implement a notification class,
// its member methods will get called
//
class Mp3Notify
{
public:
  static void OnError(uint16_t errorCode)
  {
    // see DfMp3_Error for code meaning
    Serial.println();
    Serial.print("Com Error ");
    Serial.println(errorCode);
  }

  static void OnPlayFinished(uint16_t globalTrack)
  {
    Serial.println();
    Serial.print("Play finished for #");
    Serial.println(globalTrack);
  }

  static void OnCardOnline(uint16_t code)
  {
    Serial.println();
    Serial.print("Card online ");
    Serial.println(code);
  }

  static void OnCardInserted(uint16_t code)
  {
    Serial.println();
    Serial.print("Card inserted ");
    Serial.println(code);
  }

  static void OnCardRemoved(uint16_t code)
  {
    Serial.println();
    Serial.print("Card removed ");
    Serial.println(code);
  }
};

// instance a DFMiniMp3 object,
// defined with the above notification class and the hardware serial class
//
//DFMiniMp3<HardwareSerial, Mp3Notify> mp3(Serial1);

// Some arduino boards only have one hardware serial port, so a software serial port is needed instead.
// comment out the above definition and uncomment these lines
SoftwareSerial secondarySerial(10, 12); // RX, TX
DFMiniMp3<SoftwareSerial, Mp3Notify> mp3(secondarySerial);

void setup()
{
   cs_5_9.set_CS_AutocaL_Millis(0xFFFFFFFF);     // turn off autocalibrate on channel 1 - just as an example
   Serial.begin(9600);
   pinMode(ledpin, OUTPUT);

   Serial.println("initializing...");

    mp3.begin();
}


void loop()
{
    long start = millis();
    long total1 =  cs_5_9.capacitiveSensor(30);
    long total2 =  cs_5_8.capacitiveSensor(30);
    long total3 =  cs_5_6.capacitiveSensor(30);

    Serial.print(millis() - start);        // check on performance in milliseconds
    Serial.print("\t");                    // tab character for debug windown spacing

    Serial.print(total1);                  // print sensor output 1
    Serial.print("\t");
    Serial.print(total2);                  // print sensor output 2
    Serial.print("\t");
    Serial.println(total3);                // print sensor output 3

   if (total1 > 200) {
  digitalWrite(ledpin, HIGH);
  Serial.println("bird");
  // play track 1:
  Serial.println("track 1");
  mp3.playMp3FolderTrack(1);  // sd:/mp3/0001.mp3
  delay(1000); // stops it repeating the word over and over again
    }
  else {
  digitalWrite(ledpin, LOW);
}

    if (total2 > 200) {
  digitalWrite(ledpin, HIGH);
  Serial.println("carrot");
  // play track 2:
  Serial.println("track 2");
  mp3.playMp3FolderTrack(2);  // sd:/mp3/0002.mp3
  delay(1000); // stops it repeating the word over and over again
    }
  else {
  digitalWrite(ledpin, LOW);
}

if (total3 > 200) {
  digitalWrite(ledpin, HIGH);
  Serial.println("caterpillar");
  // play track 3:
  Serial.println("track 3");
  mp3.playMp3FolderTrack(3);  // sd:/mp3/0003.mp3
  delay(1000); // stops it repeating the word over and over again
    }
  else {
  digitalWrite(ledpin, LOW);
}

//  delay(200);                             // arbitrary delay to limit data to serial port
}
Creating a switch by bridging a gap in the circuit
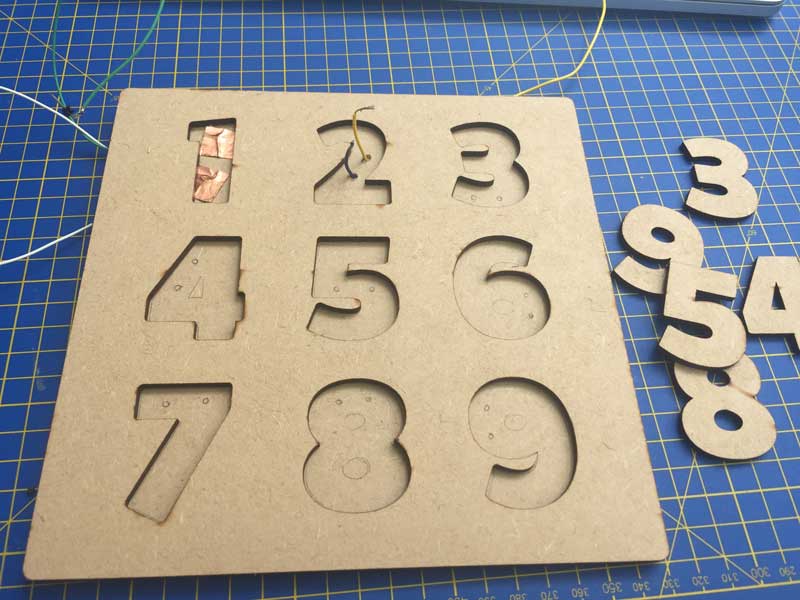
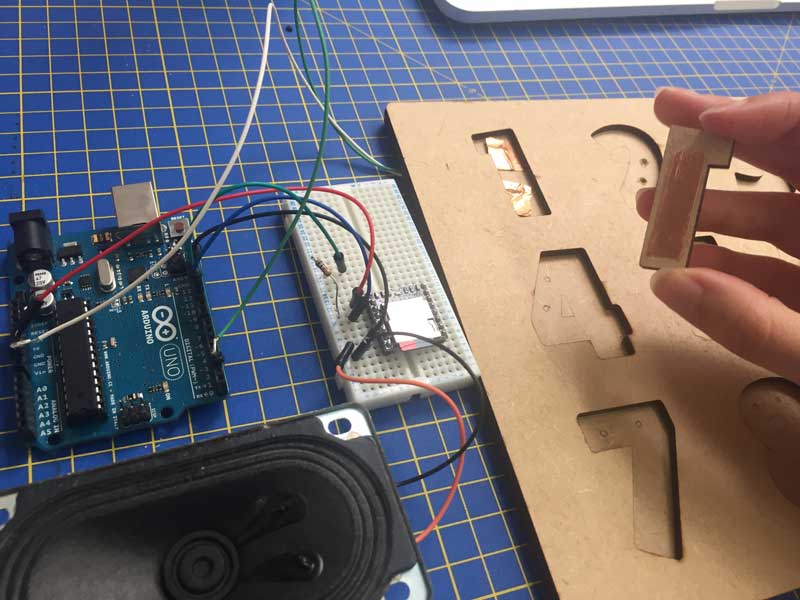
Changing from animals to numbers
As this toy is for a particular family, and the eldest child has now learned the original words from the first prototype, the current version uses numbers as puzzle pieces. He has settled in at nursery and is picking up new words. His little sister is now 3 and has started nursery too. Learning numbers has the potential to benefit both children, so this version has numbers 1-9.
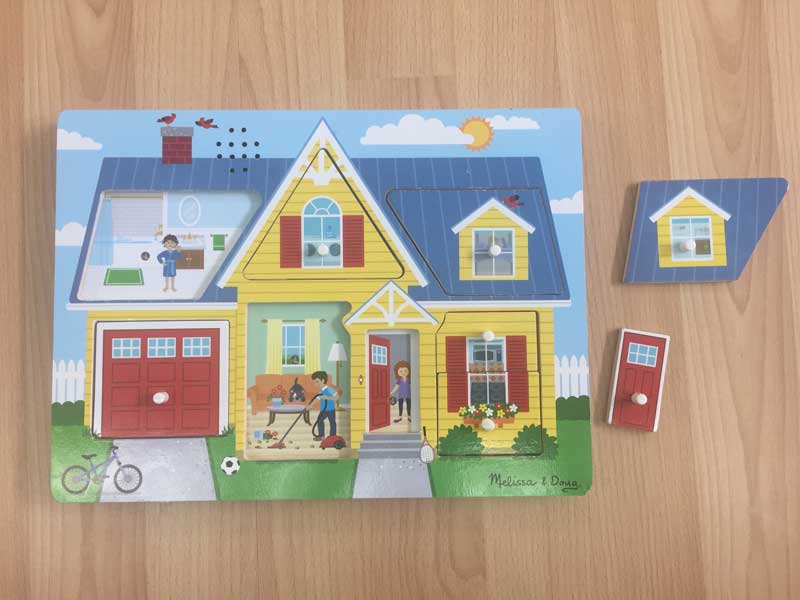
Deconstructing a Melissa and Doug sound puzzle
I had produced my second MDF prototype for the talking puzzle before I discovered that similar products are available to buy. This does not eliminate the need for my project, because mine is DIY and customisable for the needs of particular children, but it was reassuring because they showed there is a market for electronic games that teach only a few words.
The need for customisation was also highlighted by the pictures on the board I deconstructed. One reinforced a stereotype by portraying a woman wearing an apron doing the cooking. And it would be insensitive to give it to the Muslim refugee family I visit because the woman has bare arms, and a short skirt.

Things learnt:
- Uses light dependent resistors
- a comment on youtube complains that there's no on/off switch so to turn it off you have to take the batteries out. Not very practical as a screwdriver is needed to open the battery holder.
- The word is played when you take the puzzle piece out, rather than put it in.
- Uses lots of hot glue.
- They've managed to make the board thinner than I had imagined.
- Curious how the sound files are stored, as it doesn't use an SD card.
Using Light Dependent Resistors (LDR)
I used the circuit diagram from www.instructables.com/id/Auotmatic-Street-lights-control-using-LDR-and-Ardu/ for my initial starting point with LDRs. And then changed the LED from their instructions to the DF Player Mini.
The site www.tweaking4all.com/hardware/arduino/arduino-light-sensitive-resistor/ has lots of useful info about using LDRs on digital pins, and I adapted their code for the digital pins, as shown below.
A limitation of LDRs is that the code has to be set to a range of light, which may not work in all lighting situations. I considered Neil's suggestion of using photo transistors, but LDRs are more accessible and affordable, which is important as this is going to be shared as an Instructable.
#include <SoftwareSerial.h>
#include <DFMiniMp3.h>
#define LDRpin 8  // pin where we connect LDR and resistor

int LDRValue = 0; // result of reading the analog pin
int led = 13;

// implement a notification class,
// its member methods will get called
//
class Mp3Notify
{
public:
  static void OnError(uint16_t errorCode)
  {
    // see DfMp3_Error for code meaning
    Serial.println();
    Serial.print("Com Error ");
    Serial.println(errorCode);
  }

  static void OnPlayFinished(uint16_t globalTrack)
  {
    Serial.println();
    Serial.print("Play finished for #");
    Serial.println(globalTrack);
  }

  static void OnCardOnline(uint16_t code)
  {
    Serial.println();
    Serial.print("Card online ");
    Serial.println(code);
  }

  static void OnCardInserted(uint16_t code)
  {
    Serial.println();
    Serial.print("Card inserted ");
    Serial.println(code);
  }

  static void OnCardRemoved(uint16_t code)
  {
    Serial.println();
    Serial.print("Card removed ");
    Serial.println(code);
  }
};

// instance a DFMiniMp3 object,
// defined with the above notification class and the hardware serial class
//
//DFMiniMp3<HardwareSerial, Mp3Notify> mp3(Serial1);

// Some arduino boards only have one hardware serial port, so a software serial port is needed instead.
// comment out the above definition and uncomment these lines
SoftwareSerial secondarySerial(10, 11); // RX, TX
DFMiniMp3<SoftwareSerial, Mp3Notify> mp3(secondarySerial);

void setup()
{


  Serial.begin(9600);

  // mp3_set_serial (mySerial);  //set softwareSerial for DFPlayer-mini mp3 module

  Serial.println("initializing...");

mp3.begin();
}


void loop() {

  LDRValue = digitalRead(LDRpin);// read the value from the LDR
  Serial.println(LDRValue);      // print the value to the serial port
  delay(100);                    // wait a little


if (LDRValue == LOW) {
    // play track 1:
    Serial.println("track 1");

  mp3.playMp3FolderTrack(1);  // sd:/mp3/0001.mp3
  delay(2500);
  // turn LED on:
    digitalWrite(led, HIGH);
  } else {
    // turn LED off:
    digitalWrite(led, LOW);
  }

}
Speakers
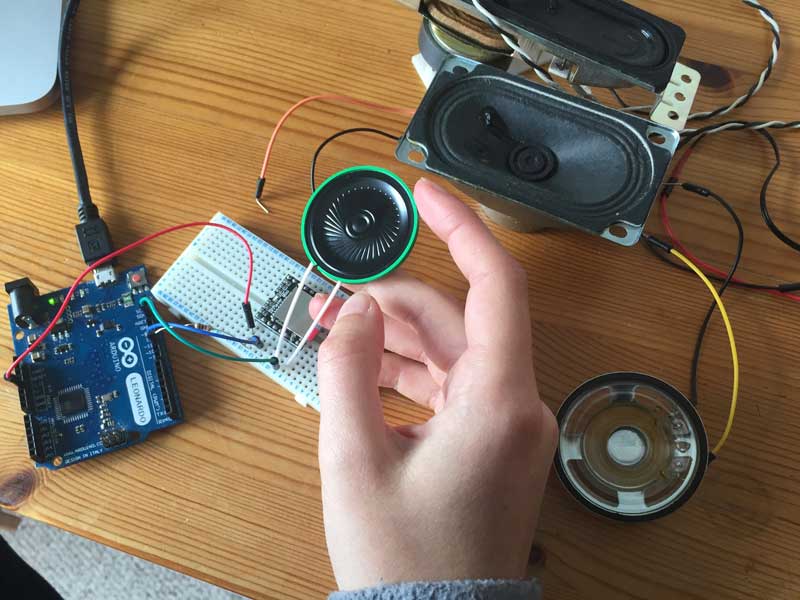
When comparing speakers I was looking at:
- The ability to produce sounds that can be heard clearly in a home with background noise
- Thickness, which could affect the overall dimensions of the game
- Weight
- Price
I considered reusing speakers from old televisions which I have access to for free. These produce rich quality sounds and high volume, but they are bulky and heavy and would require the game to be made in a deeper box than the other options.
Thin Speaker 0.25W 8 Ohm 40mm from Kitronik. Cost 97p Sound quality OK. Volume quiet but OK Size Ideal
8 Ohm 50mm Speaker transducer from Farnells £1.27 Sound quality crisp and clear. Volume OK Size 18mm deep which would require an extra layer of acrylic for the box, which would add weight and cost.
I chose the Kitroniks speaker even though it was the lowest quality option because it was good enough for the specific use and considerably better than the speaker in the Melissa and Doug comparison. This allowed me to make the board smaller than in the second prototype which was based on a speaker 50mm in diameter.
CE marking
This game is not intended as a commercial product so it doesn’t need to display a CE label but I intend to put one on the boards and the boxes before distributing them and have designed it with an awareness that it needs to comply with British Standards. There are no sharp edges. The electronic components are contained inside a childproof box but this version of the game has removable numbers that are potential choking hazards for children under 3 years old. The Instructable will have a warning and a variation for children under 3. I will find out more about CE labelling before distributing the game and publishing the design.
License
I intend to publish the design as an Instructable with an open source license - Creative Commons, Attribution-NonCommercial-ShareAlike
Sustainablity
Young children and toddlers will have access to this game, so instead of being designed for disassembly, the priority has been making it childproof. The Instructable will have information about how to dismantle it for disposable. The box containing the electronic components is joined using hot glue rather than screws. It can be separated, to reuse the components, using a hairdryer.