I'm going to first use the Arduino IDE and Arduino language to make my board do two things:
1. Have a small heart beat when it's idle
2. When the button's pressed - say "Hello world" in Morse code.
Sure, the Morse code "Hello world" has already been done a million times, but it is just so appropriate!
First what I'm gonna do is the heart beat.
It's going to be outputting power from pin 7, to the led, and just going to have a nice pretty cycle for how the heart beat happens.
I'm also going to set up the needed code to make the button useful while I'm at it.
So I set up the variables, set up the pinModes, and since I'll be using the button press to trigger the "Hello world" saying I also already set up the 'If' conditional.
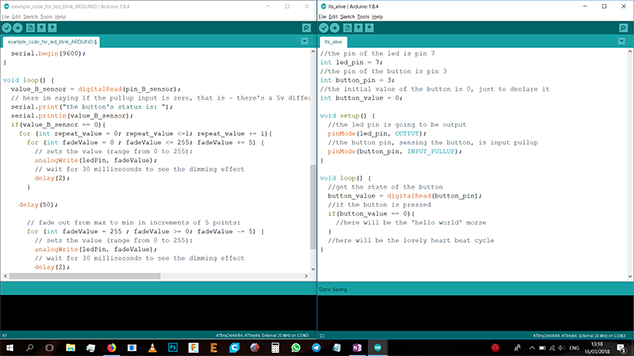
Now the breathing cycle code. It's a few simple 'for' loops, the code has the explanation commented in it:
Now that the heartbeat's done, it's time for the Morse code. I googled "Morse code translator" and got a translation website as the first result.
"Hello world" in Morse looks like this:
.... . .-.. .-.. --- / .-- --- .-. .-.. -..
There is a set tempo by which it runs, there's short sounds, long sounds, and the / is a break. I don't know what tempo value to set up, as I feel it'd be kind of a trial and error thing, so I'll just set one up for 200ms and will see from there.
This will be used to determine the "spacing" between each bleep and bloop. It's also how long the short bleeps will be. It's basically the basis of the whole tempo of the whole thing. Longer bleeps will have double the value, short bleeps will have just the value, short breaks will have just the value, and longer breaks will have double the value.
Since Arduino language is basically like C, I'll go ahead and declare a couple functions, I'll call them "blip" and "bloop". They'll be already containing the 'lights on', 'wait', 'lights off' and 'wait again' functionality in them.
Now I just gotta write the code to imitate the Morse, inside the 'if' statement:
Isn't this an absolute pleasure? ^_^
I compiled the code, found some minor syntax errors (missing ";" in the blip and bloop functions) and fixed them.
Going to Sketch > Upload I uploaded the sketch to my board (using my programmer) and tested it out. Judging by eye, the Morse code tempo is a bit too slow. I dropped it to 50 and tried again. Too fast. After a few tries I settled on a 70 tempo value, and made some adjustments to the blip bloop series from above to make them act more aesthetically.
It's super cute.
Video
https://www.youtube.com/embed/DQ0TMaZucXsIt's very nice ^_^ I like it sooo much, it's like my little baby.
Reading the Datasheet
Of course, the second part of the assignment is to get familiar with the datasheet of the microchip.
I have, to an extent, and because my interest was piqued when I read the microchip has different sleep/idle capabilities, I decided to do something with that.
I'm going to put the device to sleep, and then wake it up with the press of a button!
Here's how I'm gonna do it:
1. Set up a counter
2. Count three presses of a button
3. After three presses - put the device to sleep
4. If the button is pressed again - it wakes up! And zeroes the counter
To do this, I need to learn 'how' to do this. So I searched it up, and found this website:
https://www.nongnu.org/avr-libc/user-manual/group__avr__sleep.htmlThis one has some documentation about sleep with the Arduino IDE and language, and I also found some code online in the form of:
I made a small modification to the code, and a few additional attachments to my own, to the form of:
These code parts are implemented in my full breathing and Morse code. To explain:
The button counter is there to count whether the button was pressed three times. Each time it's pressed, +1 is added to the counter.
Very important to note - I did not make any mechanism to detect the "real" count of how many times the button was pressed. Rather, it's just going by whether the value of the button_value variable is 0 for three loop cycles. So, if I hold it down for long enough, the counter would become 3.
At the start of every loop cycle - the code checks whether the counter is 3 or more than 3. If it's 3 or more, it calls the sleep() function, which should:
Enable sleep mode
Listen for interruptions coming from Pin 3 (where my button is connected)
Actually go to sleep
And it also sets the was_sleeping variable to True, to indicate the chip went to sleep. This variable is used every loop cycle to check whether the chip has fallen asleep.
Why? Because after I interrupt it's sleep and wake it up, I want to record that it has just been asleep. If it has just been asleep, this part of the code:
Then resets the button counter to 0 and the was_sleeping variable to False. It's just a way to keep tabs on what's going on and make sure everything happens as I want it to.
Also this part of the code is before the sleep part of the code, I don't want to accidentally get stuck in a loop of falling asleep every cycle anew.
I compiled the code, found out that 'False' and 'True' are not proper boolean values, checked the Arduino documentation online and found that the correct way to put it is 'false' and 'true', without capitals.
Changed the code accordingly, compiled again, and it looks like the 'wakeUpNow' call requires a function to be present.
Reading the Arduino docu:
I see that the wakeUpNow function should be declared, but doesn't actually need any special code in it. So I just make an empty function:
Compile again, and it compiled without an error. Now it's time to upload the code to the chip and test it.
It's not working.
I found that in this page:
There is a full and proper documentation on exactly how to code a sleep function and how to get it going.
I also suspect that it might not be properly counting the number of times the button is pushed so I debugged it - it will delay 5 seconds if it's pushed three times.
Which it does not. So it means it's not counting the pushes, which is weird.
Going over the code I found out that I'm checking whether button_value is 3, instead of button_counter, so ye. That's why it's not working.
Fixed it, then uploaded the code again, this time the delay is working.
I brought back the sleep function and removed the delay used for debugging. Time to try this out!
I push the button three times, and after it finishes each Morse code cycle, it falls asleep. I push a button again, and it doesn't actually wake up. So I put it to sleep, but can't wake it up. I commented out the whole Morse code script, it's kind of a waste of time during the testing, and made some additional changes. I figured that because I'm using a pullup input rather than regular input for the button press, maybe I need a different approach.
After further reading, coding and testing I came to the conclusion that my button cannot interrupt the sleep because I cannot read it's input. This is because it's a pullup input and because it's being read using digital read, within the main loop. Unfortunately it looks like It's not actually going to be interrupting my chip's sleep, but that's fine - the important thing is that I got it to sleep!
Anyway, here's the final full code below, and what it will do is: It will breathed, once a button is pushed it will say "Hello world" in Morse, and if it says "Hello world" in Morse 5 times it will get tired and go to sleep, only being able to wake up upon physical reset.