Assignment:
A_Read and understand the ATtiny44 datasheet.
B_Program your board to do something.
B_Program your board to do something.
A_Read the ATtiny datasheet
The datasheet is the instruction manual of an electronic component. It provides information that are crucial when integrating the component in a circuit design. While all the informations the datasheet contains are important it serves mostly as a reference document when looking for specific informations about the component design and architecture. I started reading the ATtiny datasheet and felt overwhelmed very quickly as most of the terms used are new and abstract to me. While getting an overall idea of the level of complexity embedded in such a tiny component as the ATtiny 44 microcontroler I focused my attention on assimilating its main features such as the pin configurations and their respective functions, the distinction between analog and digital inputs and outputs, power supply requirements, electrical ratings and schematic of the IC circuit, types of memories, clocks and the fuses. I have gathered infos that I beleive will eb helpful to refer to when designing circuits based on Atmel ATtiny microcontrolers.
.Arduino aloows to by-pass C programming of many functions of the microcontroler. Nevertheless understanding what is going on behing the hood is important to make better and more efficient circuit design.
This graphic shows the pin correspondance of the ATtiny with the different programming environment.
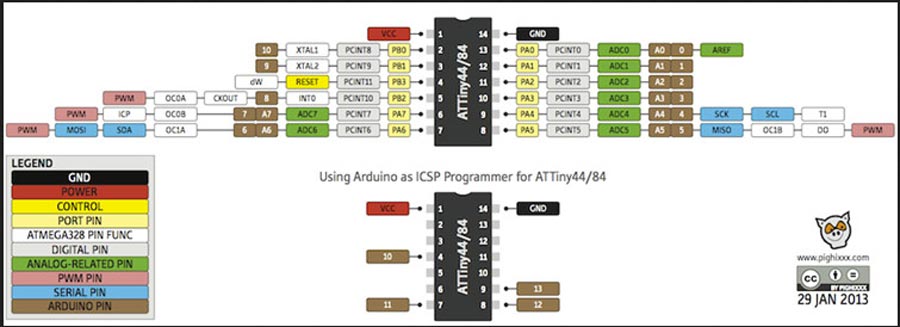
Here a homemade version just for Arduino.
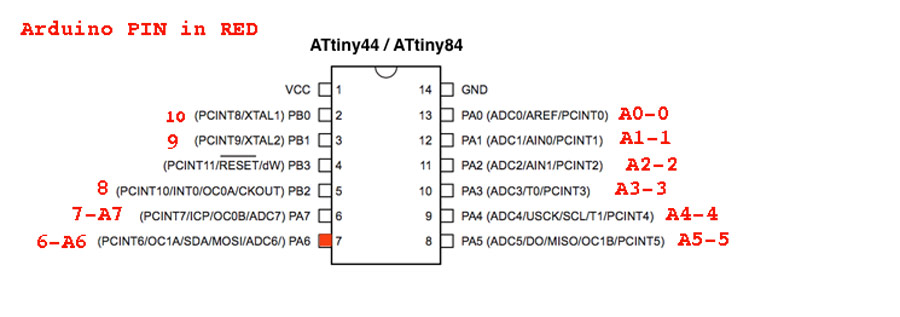
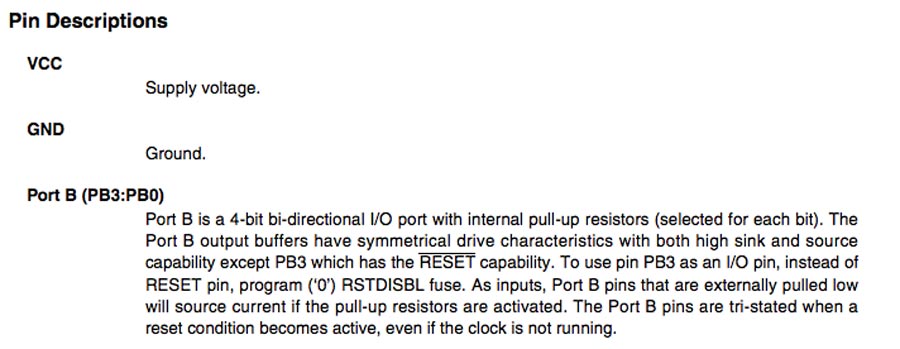
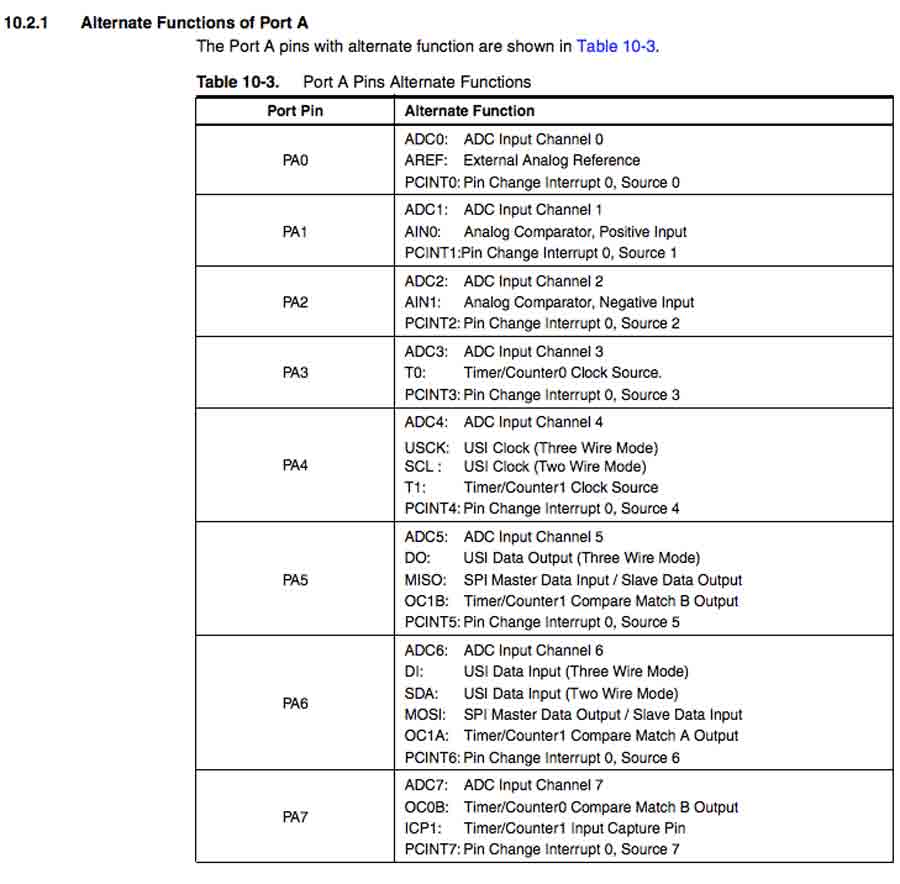
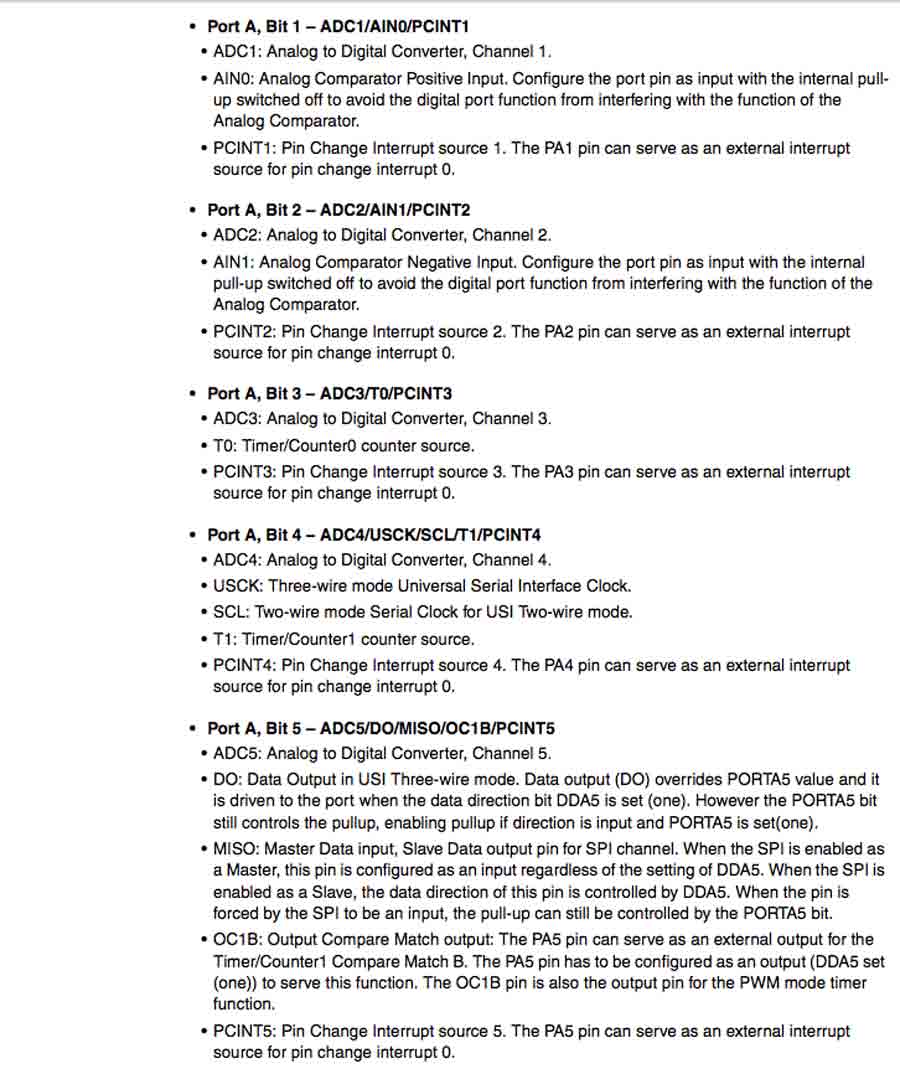
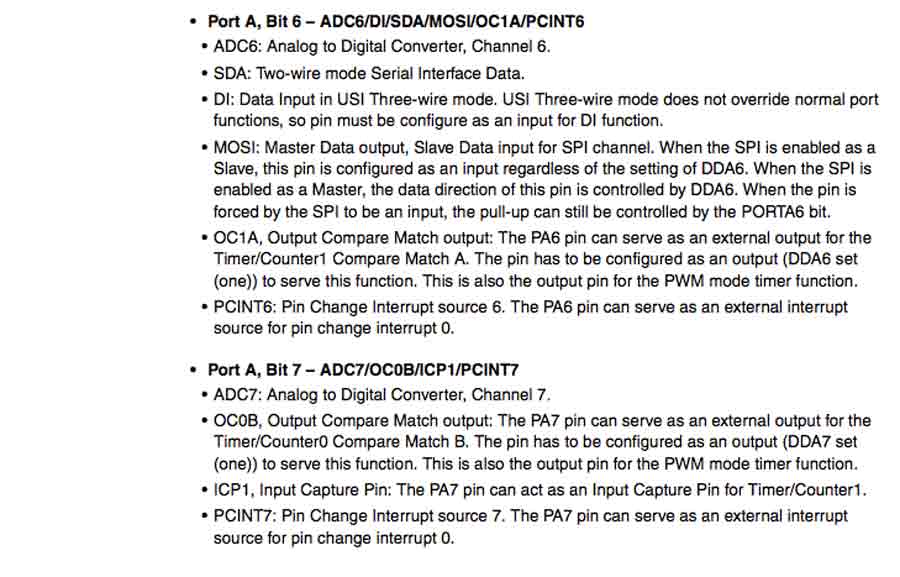
Each ports of the ATtiny serves for different functions. At this point it is fairly complex to understand but these informations are essentials when integrating this microcontroler into a board and proigramming it.


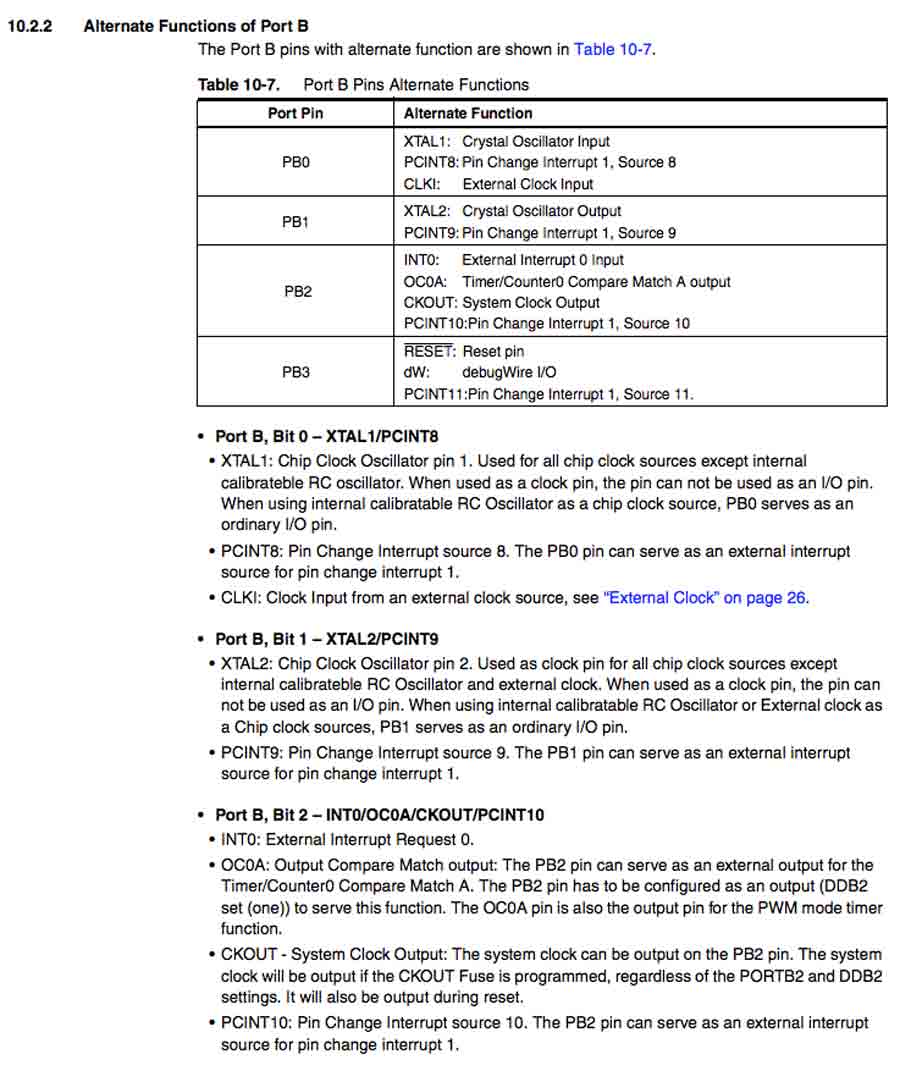
Apart from their main functions each port can be programmed for alternative functions.

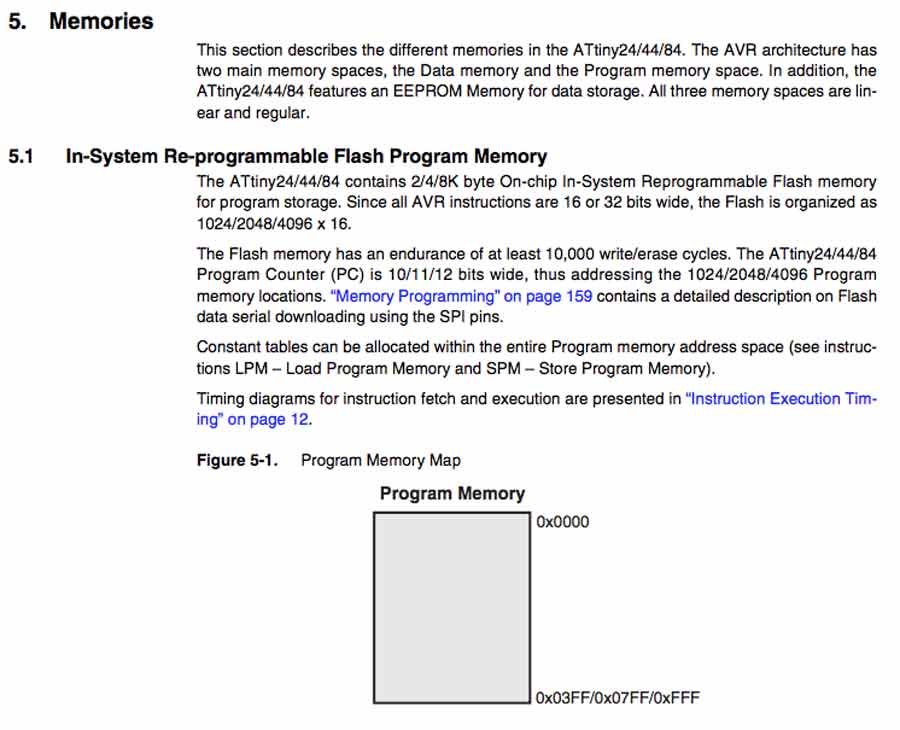
The concept of memory is also important to understand as it affects the performance of the microcontroler. The importance is in managing the memory usage.These are the main memory type integrated into the ATtiny.
The AVR microcontroller's memory is divided into Program Memory and Data Memory. Program Memory (ROM) is used for permanent saving program being executed, while Data Memory (RAM) is used for temporarily storing and keeping intermediate results and variables.
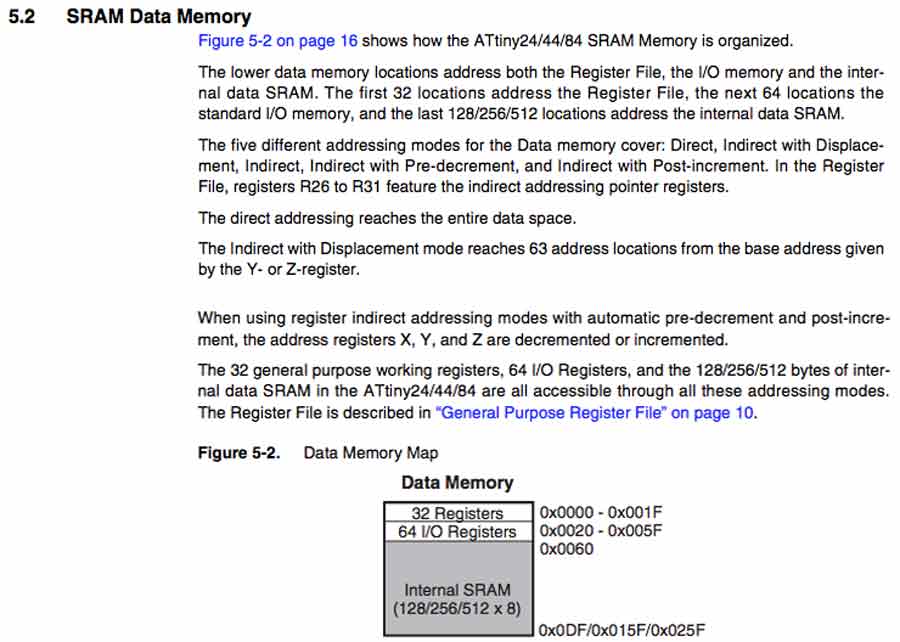
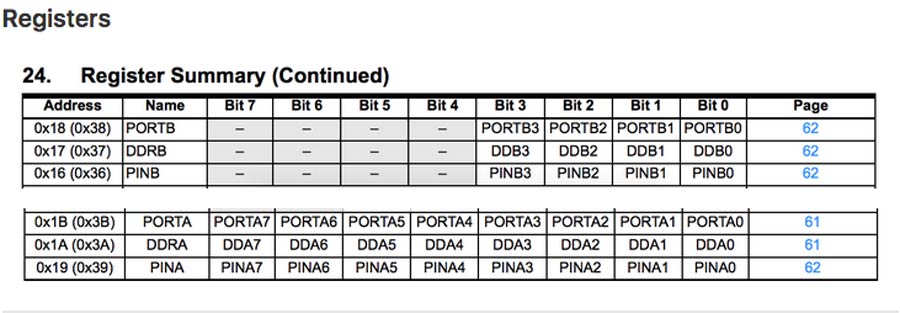
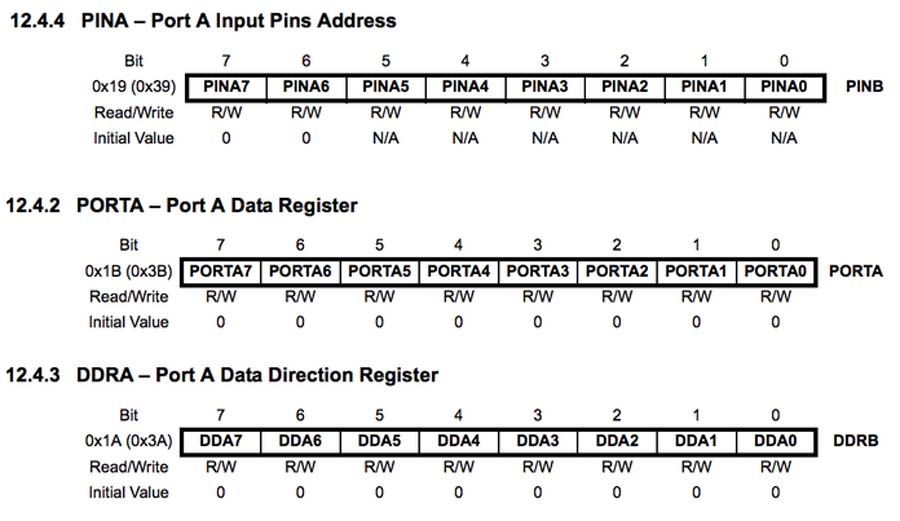
The registers are complex to understand and the need to be editing mostly in the case of C programming.
The register often refer to as (MAR (Memory Address Register) stores the memory address from which data will be fetched from the CPU or the address to which data will be sent and stored. In general the registers contains the next memory address to be manipulated. The registers functions is to control or monitor various aspects opf the microcontroler's functions.
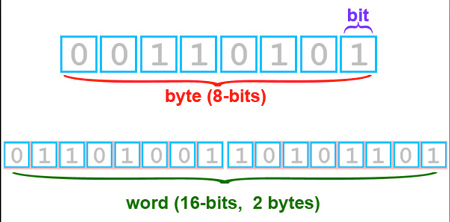
To properly understand and use registers we need to understand what a byte is.
In most computer systems, a byte is a unit of data that is eight binary digits long. A byte is the unit most computers use to represent a character such as a letter, number or typographic symbol. Each byte can hold a string of bits that need to be used in a larger unit for application purposes.

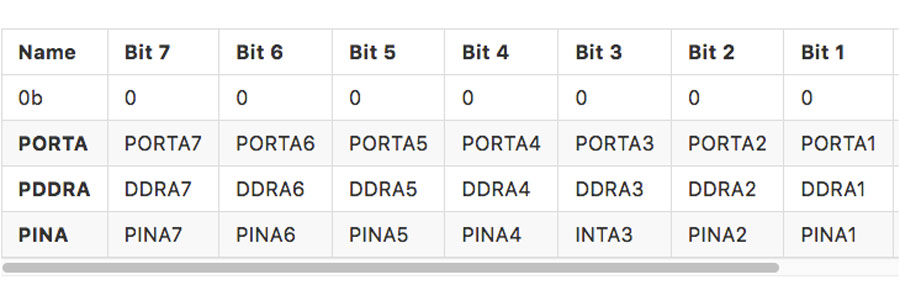
At this point I had enough of theory and I felt I should start putting those notions in practicce. So I went on with the assignment of programming my Hello board.
B_Program the ATtiny44 with Arduino IDE.
I downloaded Arduino IDE and installed it. Because by default ATtiny is not included into Arduino Board manager the ATtiny package has to be downloaded.
Go to Arduino preferences, Find “Additional Boards Manager URLs”.
Paste this URL into the field (use a coma to separate it from any URLs you’ve already added).
Click OK to save your preferences.
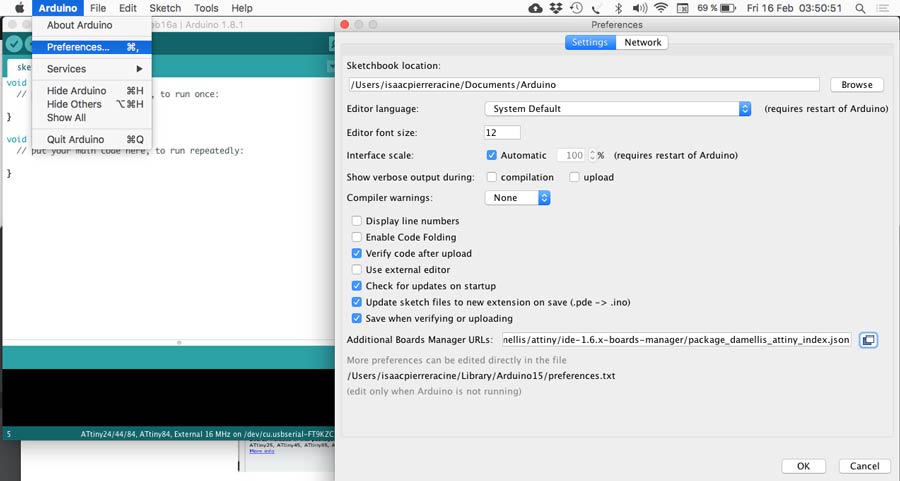
Open the boards manager in the "Tools/Board Manager" menu.
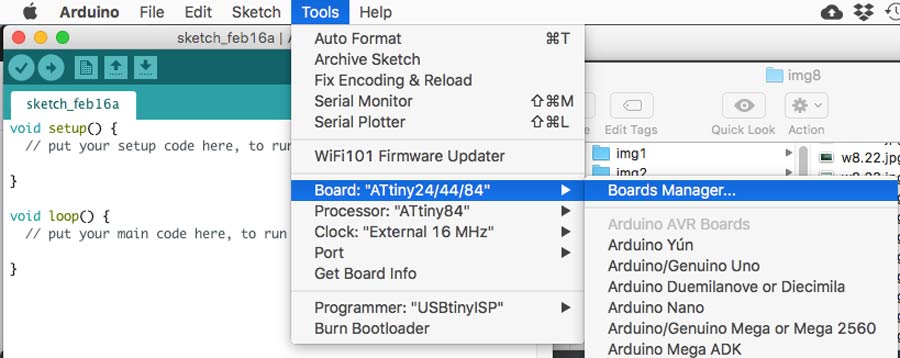
Scroll to the bottom of the list and select the ATtiny or write directly ATtiny in the search field.
Click the install button on the right side. The word "INSTALLED" should appear.

Before moving on any further the board needs to be connected to the USB port of the computer using a FTDI cable (which contains an integrated chip that allows communication. A normal USB cable will provide power but not communication), the ATtiny also conected to the USB port of the computer using a mini USB cable, and the ATtiny connected to the hello board using a 6 pin header cable.
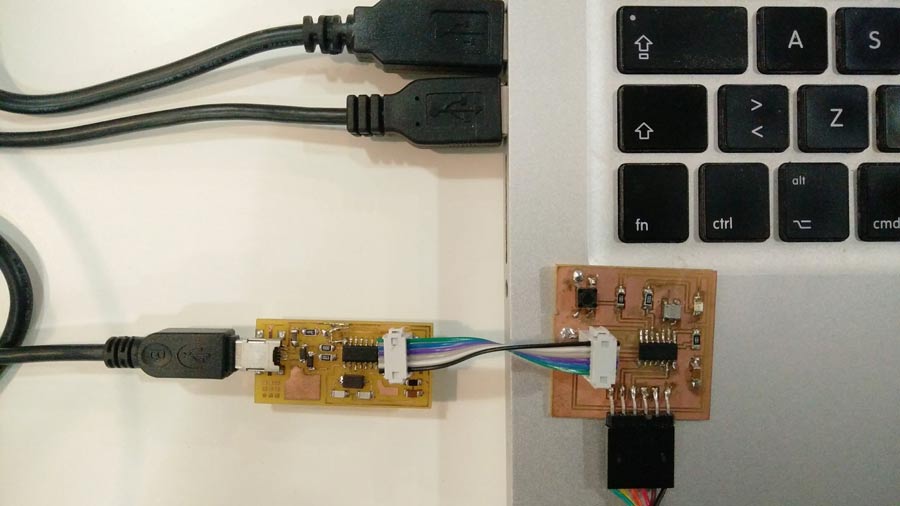
NOTE: Make shure six pin header Ground pins matches on both the ATtiny and the board.
Now we can configure Arduino and bootload the Hello Board. From the Arduino IDE menu open the Tool tab and select:
- Board"
- select "ATtiny24/44/84" (it is at the very bottom of the list)
- select the Processor (ATtiny44 in my case)
- select the clock (external 20MHz - because we are using the 20MHz oscilator of the ATtiny board and not the internal clock of the microcontroler)
- select the Programmer (USBtinyISP)
- select the port (the USB port the board is connected to)
- Burn bootloader
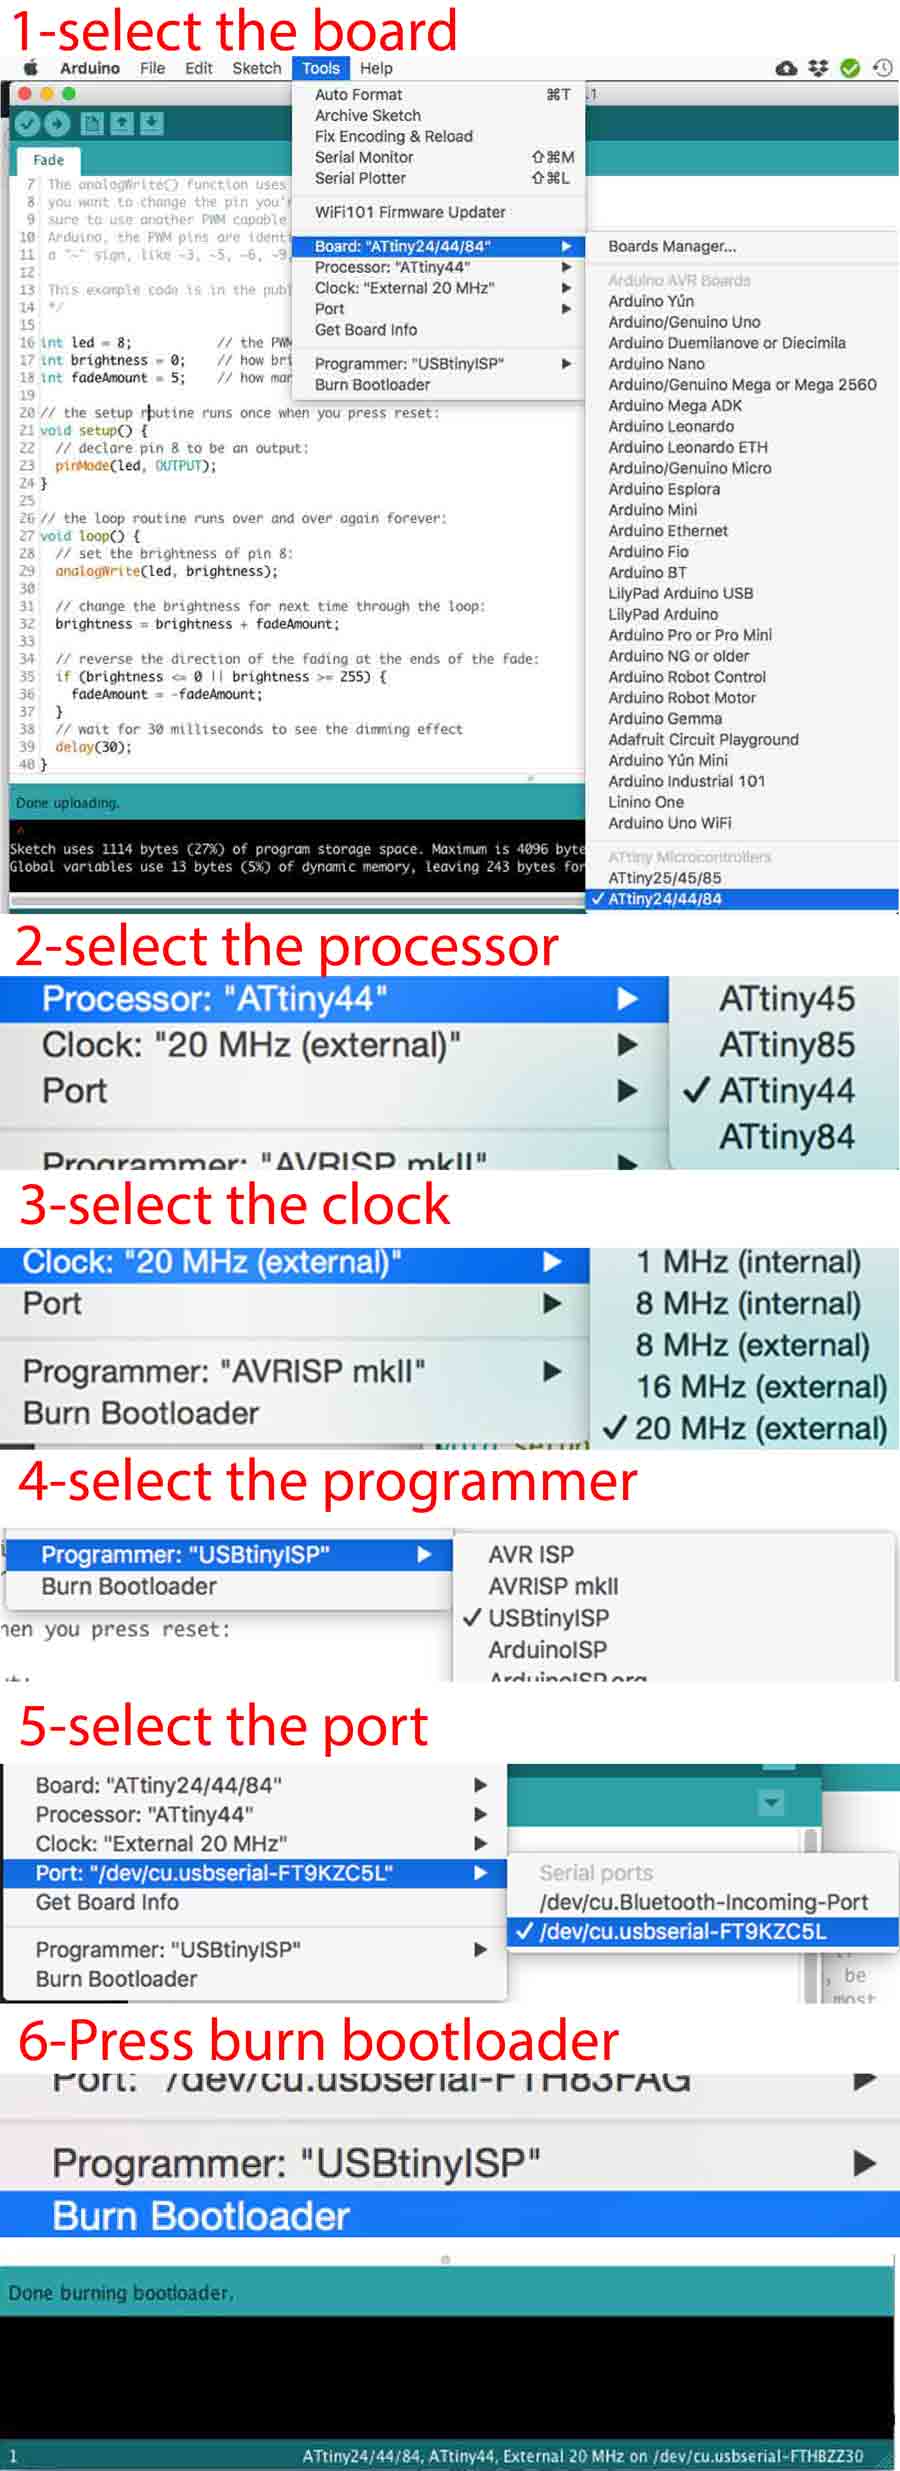
In the case of using an AVRISP it is the same procees only the configuration of the Arduino IDE need to be adapted.
NOTE: If a message error appears it is most probably due to a hardware problem and connections need to be reviewed and components tested.
The Hello board is now ready to be programmed. I will startloading programs using Arduino IDE and Arduino programming, then I will load some C code on Arduino IDE and eventully will complete the assignment programming the board usoing C ciode from Terminal directly.
I uploaded the "blink" example script In Arduino IDE, edited the input port to fit my board design:

I edited the Arduino script so it fits the pin set up of my board design and making the blink a little longer. The led on my hello board is connected to pin 5 which correspoinds to Arduino PIN 8. See charts at the beginning of thios documentation or go to this Arduino IDE aTtiny44 pin chart. In the code the pin 8 has to be declared as int LED builtin = 8.
Once the program is written it needs to be be compiled (clicking the "tick" mark on the top menu of the Arduino IDE. While compiling infos appears at the bottom of the window. If there are conflict in the code the text turns orange and gives an error message with indications helping to identify the problem. That is quite abstract to understand at the beginning. If it compiles weel it will say: DONE COMPILING.
Blink Arduino Ide Code
// the setup function runs once when you press reset or power the board
void setup() {
pinMode(8, OUTPUT); // initialize digital pin LED_BUILTIN as an output.
}
// the loop function runs over and over again forever
void loop() {
digitalWrite(8, HIGH); // turn the LED on (HIGH is the voltage level)
delay(1000); // wait for a second
digitalWrite(8, LOW); // turn the LED off by making the voltage
delay(50); // wait for a second
}
The program compiled properly but the led did not blink. I analysed the board and realized one of the resistor was wrong. I had mistaken the 499K resitor for a 1000K when selecting my components. With this resistance the current did not reach the led (too much resistance). I figured it out by-passing the resistor with another led which made the led light meaning the board was allright and that the issue was somewhere related to the led. Either the led it-self or before the led which is the resistor.
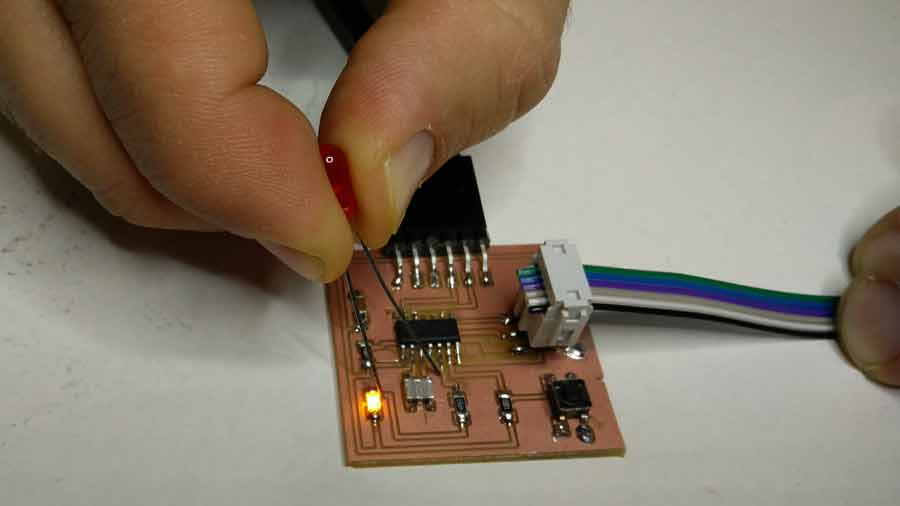
I replaced the resitor for a 100k (because there were no more 499k in the inventory) and it worked. Even though the original suggested resistor is 499k the 100k works because it is within the current margin the led can take.
I continued experiemnting with changing the delay so it would blink faster and slower accordingly. Then I loeaded a botton script, edited the sketch to suit my board design, adding the led and botton as constant integrer and the botton state as a variable integrer.
Button Arduino Ide Code
const int buttonPin = 7; // the number of the pushbutton pin
const int ledPin = 8; // the number of the LED pin
// variables will change:
int buttonState = 0; // variable for reading the pushbutton status
void setup() {
pinMode(ledPin, OUTPUT); // initialize the LED pin as an output:
pinMode(buttonPin, INPUT); // initialize the pushbutton pin as an input:
}
void loop() {
buttonState = digitalRead(buttonPin); // read the state of the pushbutton value:
if (buttonState == HIGH) { // check if the pushbutton is pressed.if it is, the buttonState is HIGH:
digitalWrite(ledPin, HIGH); // turn LED on:
} else {
digitalWrite(ledPin, LOW); // turn LED off:
}
}
I made a last exercise with Arduino programming a Fade sketch.
Fade Sketch
int led = 8; // the PWM pin the LED is attached to
int brightness = 0; // how bright is the LED
int fadeAmount = 5; // how many points to fade the LED by
// the setup routine runs once when you press reset:
void setup() {
pinMode(led, OUTPUT); // declare pin 8 to be an output:
}
// the loop routine runs over and over again forever:
void loop() {
analogWrite(led, brightness); // set the brightness of pin 8:
brightness = brightness + fadeAmount;
if (brightness <= 0 || brightness >= 255) { // reverse the direction of the fading at the ends of the fade:
fadeAmount = -fadeAmount;
}
delay(30); // wait for 30 milliseconds to see the dimming effect
}
Trying out editing existing Ccode
I went on to write the Blink sketch in C language but using Arduino IDE. The led is connected on port PB" of the ATtiny so I declared it as a DDRB register on the 6th and programmed PINB to go high (PINB = 0b0000100, wait 100ms and go low (PINB =0b00000000), wait 50ms in a loop.
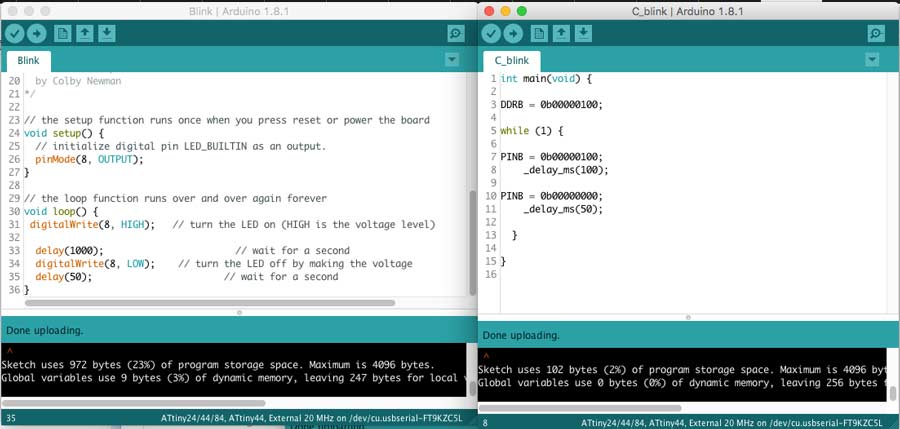
Blink Ccode
int main(void) {
DDRB = 0b00000100;
while (1) {
PORTB = 0b00000100;
_delay_ms(100);
PORTB = 0b00000000;
_delay_ms(100);
}
}
Next I went into learning to run Neil's Ccode in terminal and eventually adapted the code to integrate the botton.
To run the serial code on the hello board the very board nneeds to be programmed so it can run the Ccode. To program the board: Go to the directory where make and ccode files are downloaded
make -f hello.ftdi.44.echo.c.make
compile the program
make -f hello.ftdi.44.echo.c.make program-usbtiny-fuses
the first time a board is programmed fuses memory needs to be configured (to know more about fuses AVR tutorial FUSES.
make -f hello.ftdi.44.echo.c.make program-usbtiny
program the Ccode onto the hello board through the usbtiny.
Now the board is programmed to run a serial code. Let's execute the serial code using python script. To be able to do that the usb port that will establish the serial communication between the computer and the board needs to be identified :
ls -l /dev/cu.usb*
list the serial ports

python term.py /dev/ttyFT9KZC5L 115200
run the python script on the serial port at the 115200 baud rate what is baudrate)
A python window allowing to write and read the script.

Trying to go further experiementing with Ccode I copied the Ccode that includes a botton and a led which a fellow student created from Neils orginal hello world code and I adpated the pin setting so it run on my board clear/set config so when the button is unpressed the led is on and when the botton is pressed the led turns off.
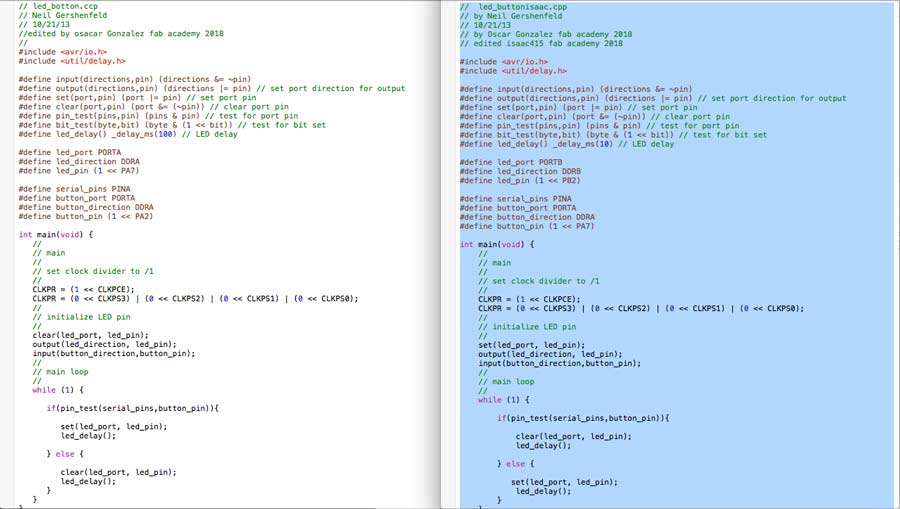
One important thing I learned is that the make file is a generic file (which can be copied from one projet to the other - the make file used for the serial exercise will work fro botton exercise if it contains the config of the programmer used) but it has to be in the same folder/directory and the line of text in the file that says "project= ...." has to be the same as the c code file name.

I compiled the program and programmed the board using the usbtiny
make -f led_bottonissac.make
make -f led_buttonisaac.make program-usbtiny
Then I played around creating an Arduino board with a light sensor, one green and one red LED and wrote a sketch so when there is day light the Green LED blinks and when not the RED blinks.
I used a breadbord and an ArduinoUNO and my connections went like that:
LED red =pin 13
LED green =pin 12
Light sensor = A0 + resistor 16 0 (Brown/Blue/Red) = 1600ohms
light sensor power from 5V pin
A resistor 77 ohms (Violet, violet = 77) between pin 12 and the Cathode of the Green LED
A resitor 77ohms between pin 13 and the cathode of the Red LED.
NOTE: The resitor made the Red led very dimmed.
Sketch Curtidos
int LEDR = 0; //analog pin to which LDR is connected, here we set it to 0 so it means A0
int LEDRValue = 0; //that’s a variable to store LDR values
int light_sensitivity = 500; //This is the approx value of light surrounding your LDR
void setup()
{
Serial.begin(9600); //start the serial monitor with 9600 baud
pinMode(13, OUTPUT); //we mostly use 13 because there is already a built in yellow LED in arduino which shows output when 13 pin is enabled
pinMode(12, OUTPUT); // green led co¡nnected to pin 12
}
void loop()
{
LEDRValue = analogRead(LEDR); //reads the ldr’s value through LDR
Serial.println(LEDRValue); //prints the LDR values to serial monitor
delay(500); //This is the speed by which LDR sends value to arduino
if (LEDRValue < light_sensitivity) // if vlaue of Red LED is less than light sensitivity
{
digitalWrite(13, HIGH);// turn red LED on
delay(500); // wait 500 ms
digitalWrite(13,LOW); // turn red LED off
}
else // otherwise
{
digitalWrite(12, LOW);//turn green LED off
}
if (LEDRValue > light_sensitivity)// if value of red LED is higher than light sensitivity
{digitalWrite(12, HIGH);//turn green LED on
delay(500);//wait 500ms
digitalWrite(12,LOW);//turn green LED off
}
else //otherwise
{digitalWrite(12,LOW);//turn the green LED off
}
}
Extras
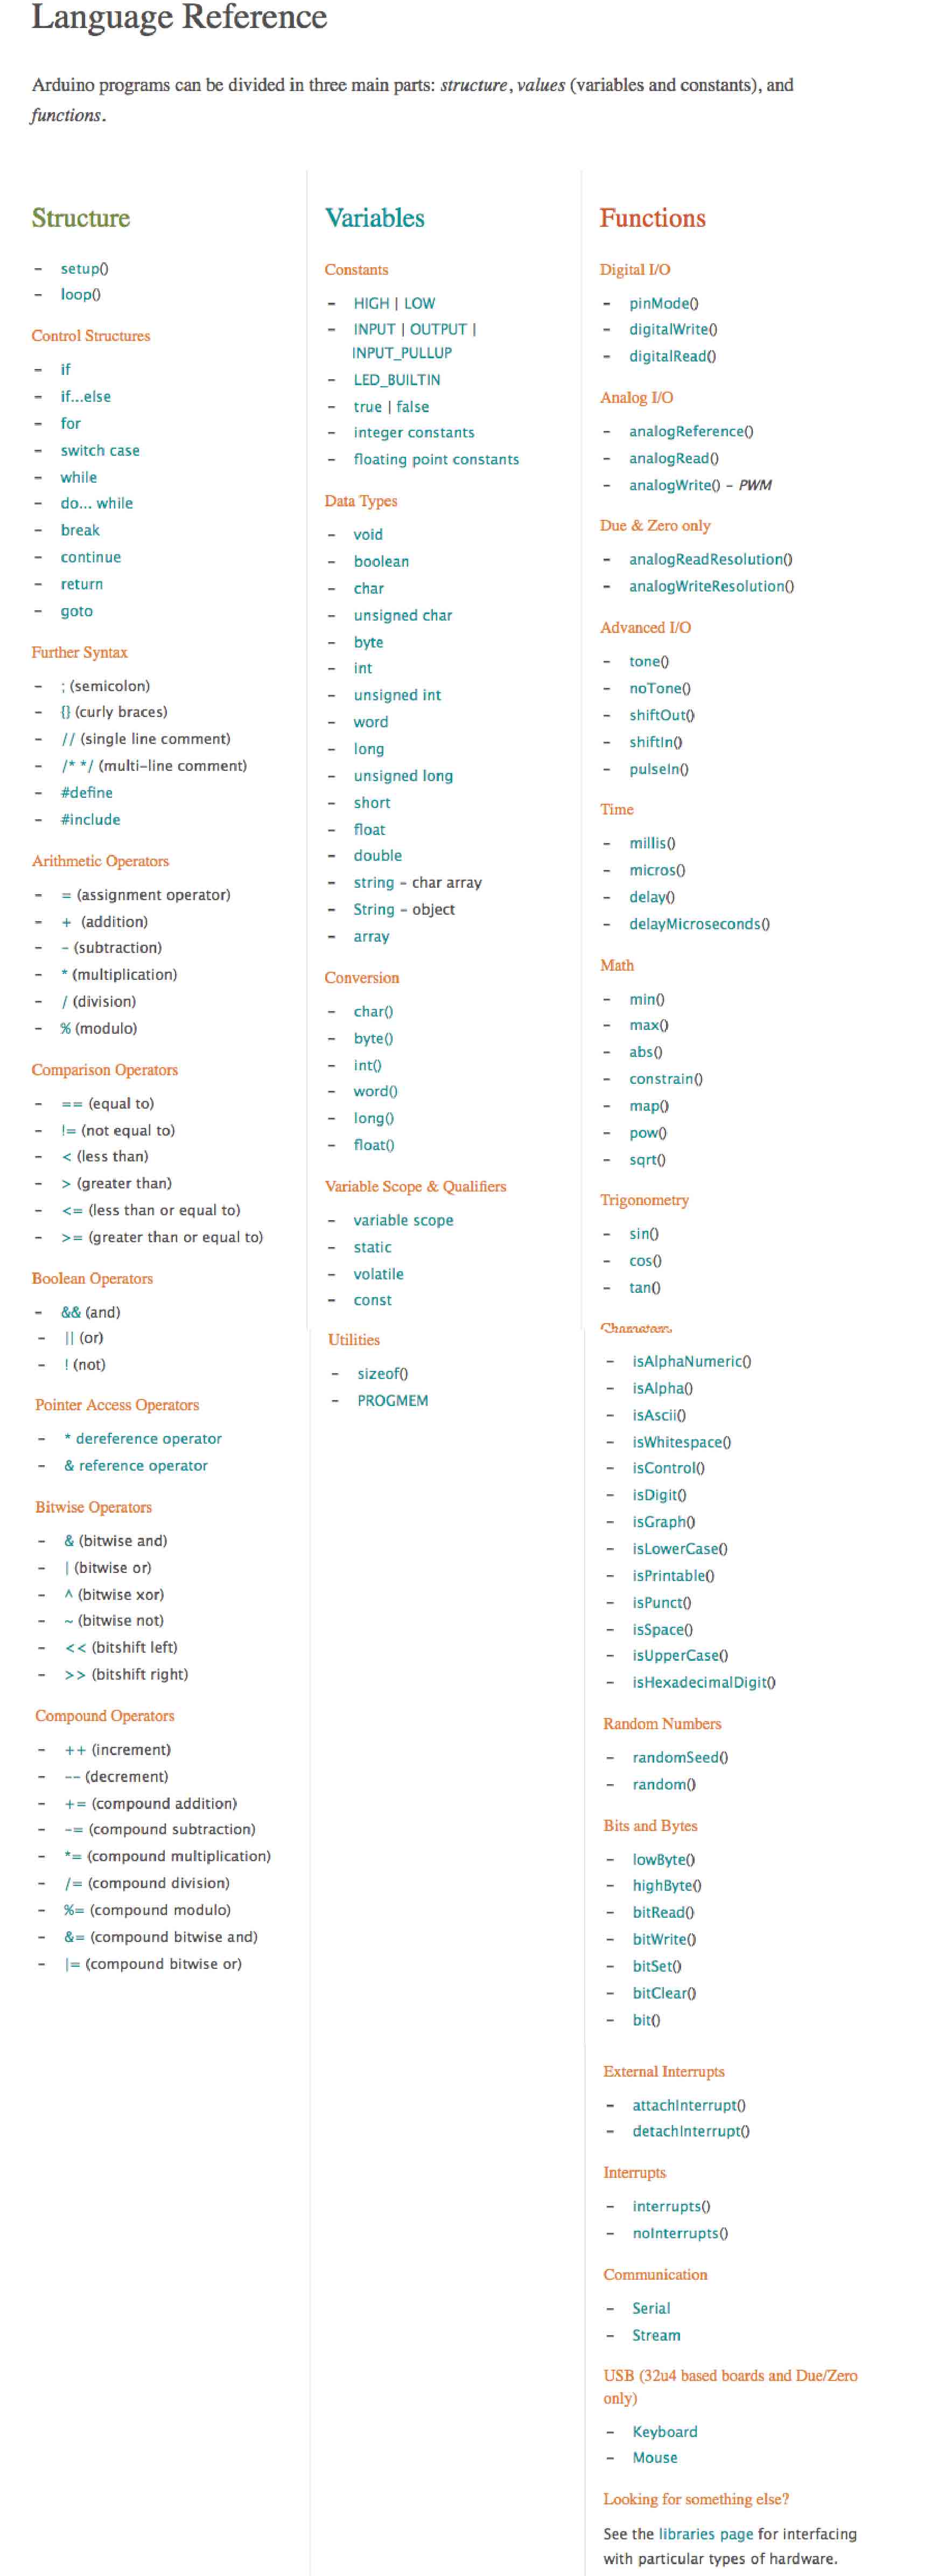
Knowing I am going to use Arduino a lot fo my next assignments I reviewed the Arduino tutorial from bottom to end to get more familiar with the programming environment. It is the first time that I challenge my-self to writing code so I need to assimilate many concepts before feeling comfortable with it. I also studied the Arduino reference pagethat I found helpful to refer to when I have doubt with the language, syntax, etc. , and I created a Language reference document for Arduino IDE..
Conclusion
This week I learn how far I am from an intrinsec understanding of how coding works. I understand a little better what embedding programming means: embed a program into a chip so it can execute a code that operates peripherals electronic devices.
