.jpg)

.jpg)
First of all, before starting the assignment, I had to investigate more about the 3D scanning due to the fact that I´ve never used this technology before. So, this is a short, resumed explanation of 3D scanner.
3D SCANNER
HOW DOES IT WORK?
The 3D-scanner defines the space coordinates of special number of points (the more – the better) on the surface of the scanned object.
It is possible thanks to the method of measuring of the distance to all defined points with the help of the antireflectory laser rangefinder.
Making a distance measurings the rangefinder´s beam deviate constantly from the previous arrangement to cross the matrix unit. The matrix is a net with the certain number of adjusting columns and lines. The more is the density index of the matrix units, the more is the density of the points that were measured on the object´s surface. These measuring are done quickly due to the fact that there are thousand operations per second.
With the help of 3D scanner you obtain a measured sample of three-dimensional coordinates for a lot of units (or points). This type of samples is called “scans” or “cloud of units”. Its number differs from thousands to millions.
Usually for the 3D scanning the laser rangefinder is used. Its movement trajectory takes place in horizontal plane. Following distinguished units and measured distance, the processor calculates the coordinate units.
The 3D scanners works thanks to the control panel, located on the scanner, or thanks to the portable computer with the special software. The obtained coordinates of units are saved on the memory card integrated into the scanner or are moved to the computer´s database.
For now, the laser 3D scanning gives a possibility for the best detailed object´s geometry. The result is that the 3D model is precise copy the real object.
WHAT TYPE OF SCANNERS EXIST NOWADAYS?
There is a great variety of 3D scanners. As for example I´d like to mention some of them that recently appeared on the market and those that you can do by yourself! I´ll make one too!
3D SCANNER OF GOOGLE COMPANY. Permits you to create the map of living space in your house. The Google project “Tango” is all about interior maps. Thanks to this project a new smartphone was created. Its camera has an integrated depth sensor that helps you to scan a 3D model of the space you are in. This sensor can also make a navigation inside the living zone and create some 3D games. It has two laser radiators and a base for an object that is turning around while scanning during 3 minutes only. The turning step is about 0.45 degrees.
There is an interesting project that consists of 36 modules located in the circle with cameras, leds and computer raspberry Pi integrated. This scanner is designed to scan a big volume object. It´s perfect for scanning people, especially for kids. Raspberry Pi synchronizes all images and then it´s ready to be modified by any software.
STRUCTURE SENSOR – 3D scanner for mobile phones. US company Occipital designed a concept of 3D scanner for mobile phones. This devise is fastening on the mobile phone above the camera and the special application creates a 3D model. Also this company is planning to launch a Structure Sensor with open initial code that allows to make any application and to integrate with Oculus Rift. http://www.oculusvr.com/
This one is easy to make by yourself. DIGITIZER MAKERBOT is a simple construction that consists of one webcam, two laser radiators and a stepper motor coout 3 minutes. Scanning step is 0.45 degrees.land Modela. It scans objects of 160 mm and 250 mm in tall. The all scanning process takes about 3 minutes.
ROLAND MODELA
| The characteristics of this machine I mentioned in the previous assignment describing the cutting process of the electronic board. As for scanning this machine is really useful and the result is satisfactory. |
|
|---|
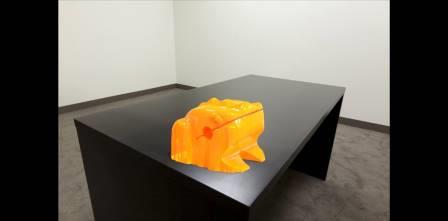
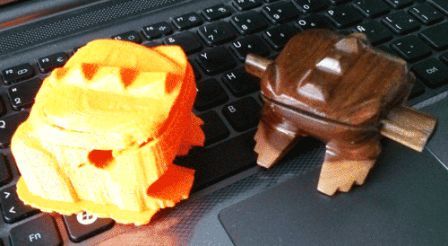
To try different materials, I scanned this wooden frog with the help of Roland Modela. The scanning process took 3 hours. To scan any object, put it on the base of Modela calculating the distance of X and Y.
The object is fixed with a double face adhesive tape. Then we´ve got to make settings in the software Picza. You can work with millimeters or inches. The needle moves vertically and recognazes the object´s position. It´s recommended to leave some space around the object and the machine has to begin scanning some millimeters away from the object. We do this to avoid inexact result. The needle is moving till collide with the surface, and this way it detects the coordinates of the object.
.jpg) |
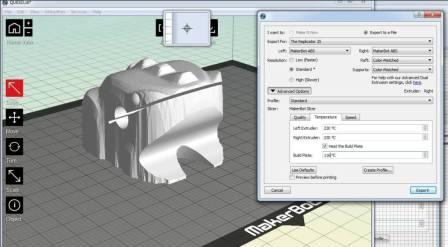
On the interface you can see all the setting of Modela scanner. The blue rectangle set the scanning area. As for X and Y direction I have set 0.038 inches. This software is user-friendly and permits you to make a precise location of the object. |
|---|---|
 |
This render was made in Keyshot software. During the printing surged some technical problems: the MakerBot pulled the PLA and made some unneccessary movements. The process was interrupted two times. You can see two lines on the front of the frog. There I switched off the printer and turned it on again. To set the "Z" coordinate, you are just to use a piece of paper of 60 gramms. |
 |
A screen short made in Maker Bot program. The idea is that before start the printing process, put a piece of paper on the printer´s platform and push "up" button untill it has a connection with the milling tool. The paper defines the distance. That´s what we need. My conclution is that the printer was not well calibrated. |
 |
PRINTING And also this frog will have some Leds and when you touch it with the stick, it will give a light. It´s just a part of your clothes or accessories. It´s one of the ideas for testing! |
| VIDEO_3_SKANECT SCANNING DESCRIPTION | KINECT SENSOR Xbox 360 also works like a 3D scanner. The software is called Skanect. |
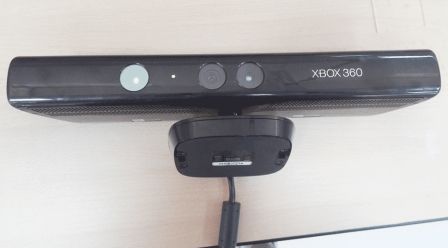 |
KINECT SENSOR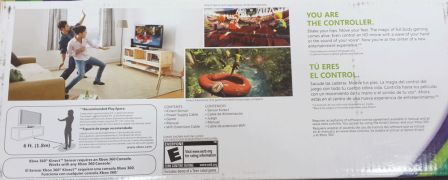 |
|---|---|
 |
|
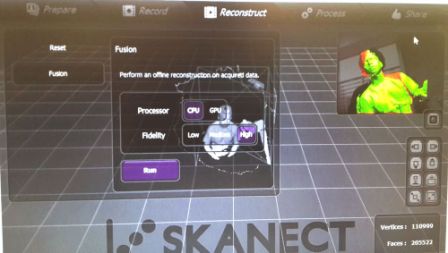
Scanning a person First of all, I´d like to comment that this 3D scanner is better for the human body than for an object scanning. The problem is that the object, located on any surface is not recognized separatly from this surface. That´s why it´s neccessary to hold it or to suspend it with any thread. Well, I made some tests with two objects but the result was not satisfactory. So, I scanned my friend, the fablab coworker, for some 5 minutes. This software is a trial. That´s why the resolution of the 3D model is only 5000 faces. For the best result you ought to process about 2000 faces. |
So, how to use the software SKANECT? Chose any object and fix it. If you are scanning a body, a person is ought to stay quite. Then, press the button "Prepare" on the control menu above, where you´ll chose the option scanning of "a body" or "an object". Then, record your object or a person. Push the button "Record" to star scanning. When you finish, another time push the button "Record" to stop it. Then "Reconstruct" defines the cuality of the scanned object. When you finish, just process it. |
 1 1 |
 2 2 |
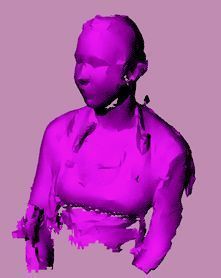
| Here you can see the direct scanning result without any modifications. The first model is more precise because was scanned only on the front. The second model has a lack of faces because was scanned all around, 360 degrees. | The resolution of the second model could be better if the program would permited to use more faces. Here is an example of bad scanning (a green one). The model had 10000 faces, and due to the resolution of the software, appeared only 5000 faces. |
MAKERBOT THE 3D PRINTER
 |
Before you start printing be sure that the Printer is well calibrated. Put a piece of paper on the base of the printing area and down the extractor of the plastic till it touches the surface. Check the tubes of the plastic. Sometimes they are blocked with the plastic that you used for previous printing. That´s why when you finish to print, clean well the extractor. |
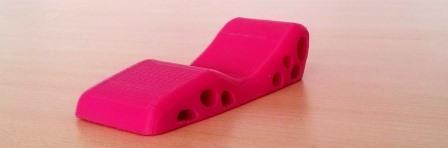 |
I printed a prototype of my furniture for the assignment "Something Big". Its recommended to use all accesible ways of prototyping to see how will be the future product and what errors does it have. |
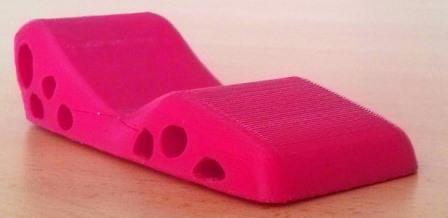 |
So, I decided to change the design and optimize the usage of the playwood. For example, these holes will be the little tables where you can put a cup of tea or your book. |
  |
Also you can try to print some moulds for Food! |
GO!SCAN 3D
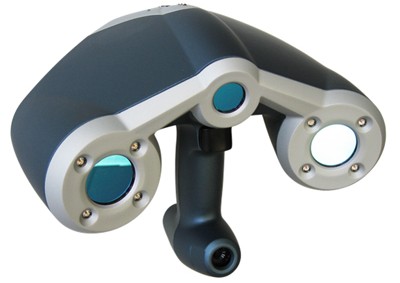
Technical specifications
| Weight | 1.1 kg (2.4 lbs) | That’s about the same as a liter of milk |
|---|---|---|
| Dimensions | 127 x 156 x 262 mm (5 x 6.2 x 10.3 in.) |
Think about a box of tissues |
| Light Source | White LED | Similar to your LED flashlight |
| Resolution | 0.500 mm (0.020 in.) | Corresponds to a grain of sand (but please don’t try to scan one) |
| Accuracy | Up to 0.1 mm (0.004 in.) | Less than the thickness of a human hair |
| Scanning Area | 380 x 380 mm (15 x 15 in.) |
Imagine a square that’s about half the size of a movie poster |
| Output Formats | .dae, .fbx, .ma, .obj, .ply, .stl, .txt, .wrl, .x3d, .x3dz, .zpr |
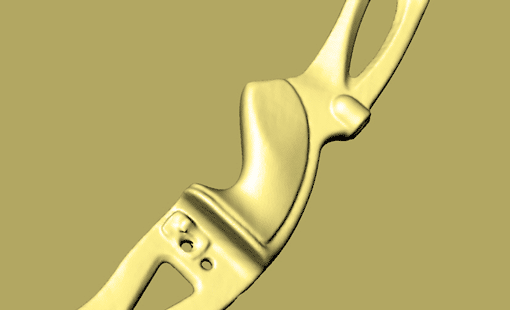
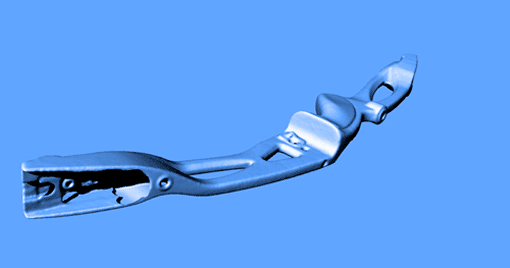
The company Geincor has provided us with this portable scanner and helped to scan objects. As I practice archery, I scanned the metallic part of the Olimpic Bow. The metallic surface reflects the light too much. That´s why for the best result Geincor used a special spray that creates a matte effect.
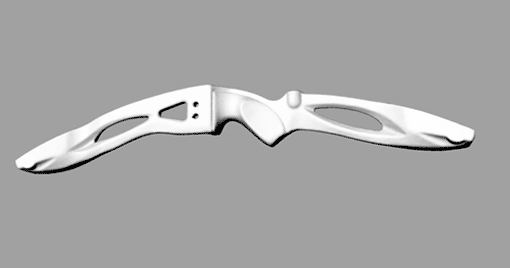
It´possible to scan with or without positioning targets depending on the nature of the part geometry. You can scan a wide range of parts in different sizes, materials, and colors.
CONCLUSIONS
The reason why I scanned a human body is that my final project is a wearable electronics. That means that I´ll be able to measure any neccessary part to put a sensor. The frog that I scanned can be used as a lavalier with electronics integrated or a part of the clothes.
Making this assignment, I learned a lot about the 3D scanning and printing. Now I´ve got more ideas for my final project. With the help of human body scanning, now I can design intelligent clothes, using these models. It´ll be a T-shirt and a Jacket with integrated sensors. Conductive materials are: metal strings bathed in the varnish.
.jpg)