Interface and Application Programming
Assignment
Write an application that interfaces with an input &/or output device
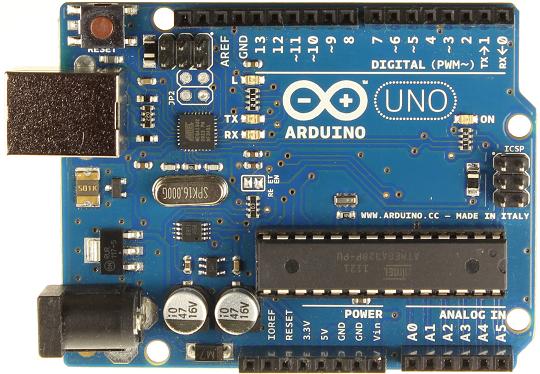
For the Assignment of this week I decided to try a Arduino UNO board.
The main features are:
Microcontroller ATmega328 Operating Voltage 5V Input Voltage (recommended) 7-12V Input Voltage (limits) 6-20V Digital I/O Pins 14 (of which 6 provide PWM output) Analog Input Pins 6 DC Current per I/O Pin 40 mA DC Current for 3.3V Pin 50 mA Flash Memory 32 KB (ATmega328) of which 0.5 KB used by bootloader SRAM 2 KB (ATmega328) EEPROM 1 KB (ATmega328) Clock Speed 16 MHz
With the USB cable to connect to PC allow:
- Powering the mainboard
- Firmware load to Arduino thanks to bootloader that is factory
- Have serial communication between Arduino and PC
You can download a firmware Arduino UNO to interact from PC.This requires use Firmata a sample firmware that comes with the Arduino software.
Firmata is a generic protocol for communicating with microcontrollers from software on a host computer. It is intended to work with any host computer software package. Right now there is a matching object in a number of languages. It is easy to add objects for other software to use this protocol. Basically, this firmware establishes a protocol for talking to the Arduino from the host software. The aim is to allow people to completely control the Arduino from software on the host computer.
STEPS to load Firmata
Now we have the Arduino Uno prepares to be managed by applications that can be run from the PC
- Download the last release Arduino software and unzip
- Connect the Arduino Uno board to the PC with USB cable
- Install Arduino UNO driver, It is located in "Unzip Folder" \ drivers
- Run the Arduino software.
- Select examples -> Firmata -> Standardfirmata and click to load the firmware to Arduino UNO
Arduino and Processing
To write the aplication I use Processing software. Processing is an open source language/ development tool for writing programs in other computers. Useful when you want those other computers to "talk" with an Arduino, for instance to display or save some data collected by the Arduino.
Arduino comes with some basic examples for communicating with Processing (in Examples > Communication). These are useful for when you want to write both Arduino and Processing programs and have them talk to each other. This works best for communicating simple information. If you just want to control an Arduino board from a Processing program, you may want to use the Arduino library for Processing described below.
This library allows you to control an Arduino board from Processing without writing code for the Arduino. Instead, you upload a standard firmware (program) to the board and communicate with it using the library. The firmware is called Firmata, and is included in the Arduino software. The corresponding Processing library can be downloaded below.
STEPS to program in Processing
- Download the stable release of Processing and unzip
- If you want to try some example from Arduino and Processing
- Download Processing Library: processing-arduino.zip (Updated 11 Nov. 2011)
- Unzip to Processing libraries (ProcessingFolder\modes\java\libraries)
- Run the Processing, load Examples -> Libraries -> Arduino
Ruben Procesing program
I wrote a program to read a group of Aruino One pin as input / output / analog
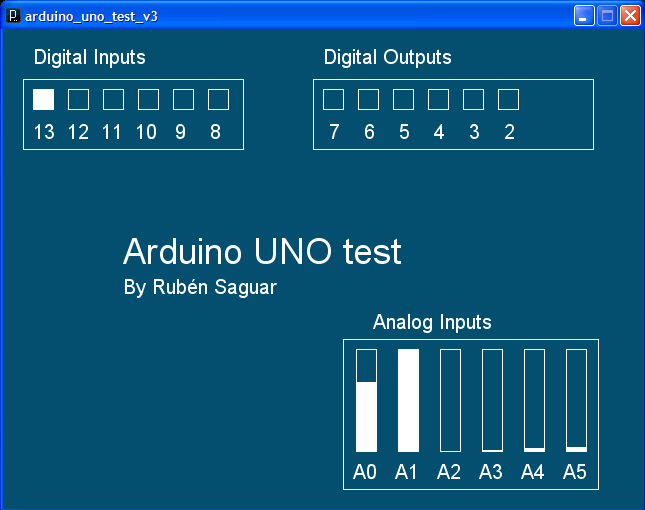
import processing.serial.*;

import cc.arduino.*;

Arduino arduino;

color off = color(4, 79, 111);
color on = color(255, 255, 255);
int[] analogvalue = new int[6];


int[] values = { Arduino.LOW, Arduino.LOW, Arduino.LOW, Arduino.LOW,
 Arduino.LOW, Arduino.LOW, Arduino.LOW, Arduino.LOW, Arduino.LOW,
 Arduino.LOW, Arduino.LOW, Arduino.LOW, Arduino.LOW, Arduino.LOW };

PFont font;

void setup() {
  size(640, 480);

  font = createFont("SansSerif",1);
  textFont(font,20);

  arduino = new Arduino(this, Arduino.list()[1], 57600);

  for (int i = 2; i <= 7; i++)
    arduino.pinMode(i, Arduino.OUTPUT);
  for (int i = 8; i <= 13; i++)
    arduino.pinMode(i, Arduino.INPUT);

  background(off);
  stroke(on);
  fill(off);
  rect(20 , 50, 220, 70);
  rect(310 , 50, 280, 70);
  rect(340 , 310, 255,150);

  for (int i = 0; i < 6; i++)
    rect(563 - i*42, 320, 20, 102);

  fill(on);
  text("Digital Inputs",30,35);
  text("13  12  11  10   9    8",30,110);

  text("Digital Outputs",320,35);
  text(" 7    6    5    4    3    2",320,110);
  text("By Rubén Saguar",120,265);

  text("Analog Inputs",370,300);
  text("A0   A1   A2   A3   A4   A5",350,450 );

  textFont(font,36);
  text("Arduino UNO test",120,235);

  textFont(font,20);
}

void draw()
{

  for (int i = 2; i <=13; i++)
  {
    if (i<8)
    {
      if (values[i] == Arduino.HIGH)
        fill(on);
      else
        fill(off);
      rect(565 - i * 35, 60, 20, 20);
    }
    else
    {
        if (arduino.digitalRead(i) == Arduino.HIGH)
          fill(on);
        else
          fill(off);
        rect(485 - i * 35, 60, 20, 20);
    }
  }


  for (int i = 0; i <= 5; i++)
  {
    fill(off);
    rect(353 + i*42, 320, 20,102);
//    text("A" + i + ": " + analogvalue[i],220,340 + i*20 );

    analogvalue[i] = arduino.analogRead(i);

    fill(on);
    rect(353 + i*42, 422, 20,  - (analogvalue[i]/10));
//    text("A" + i + ": " + analogvalue[i],220,340 + i*20 );
  }
}

void mousePressed()
{
  int pin = ((600-mouseX) / 35);

  if ((pin>1)&& (pin<8))
  {
    if (values[pin] == Arduino.LOW)
    {
      arduino.digitalWrite(pin, Arduino.HIGH);
      values[pin] = Arduino.HIGH;
    }
    else
    {
      arduino.digitalWrite(pin, Arduino.LOW);
      values[pin] = Arduino.LOW;
    }
  }
}
Example Arduino Uno test
Digital Inputs
Analog Inputs
- Pin 13 connected to 5v
- Pin 8 - 12 not connected
- Pin A0 connected to 3.3v
- Pin A1 connected to 5v
- Pin A2 connected to 0v