Goal
The goal of this assignment is to design or modify a machine, making as many of the components as possible. We should also document the progress as a group.
Thinking what to do
Our initial idea as a group was to design a new machine from scratch. The problem was that we did not know what machine to make and what for. So we spent 5 days thinking what to do and got three (put an adjective here) ideas:
- A dispenser for electronics components for the hello boards. The machine should give you all the components needed to fabricate any given hello board. This project lies a lot on mechanical design to sort and pick all the components.
- A rotating machine for automating the photo taking of an object for sending to 123D Catch and obtaining a 3D model.
- A wall charboard so you can paint remotely. It was mechanically simple and the difficulty lied on the software and the interface.
Luciano was encouraging us all the time to choose and develop one but I have to admit that the group was not responding accordingly, we were stuck. Then we asked Tomas his opinion on the three projects and after listening to them he didn't like any. That helped to lower the morale to negative values. But I sort of agree with him. Probably if we make one of these machines, next year it will become part of the museum of junk that we store under the tables here in the lab. If we'd measure whether those were good ideas by thinking: "If I would see this project or machine in kickstarter or any other crowfunding site, would I put any money?" The answer would probably be no. But that's not bad. You know, you cannot force inspiration. This is not like: This week is machine design so we will design the best and most useful machine ever made. It doesn't work like this. Inspiration will come one day doing something that probably has nothing to do with fab academy. Those machines were serving artificially invented needs, and that's the only part that you should never invent: the purpose.
So finally we decided to modify and improve the MTM Snap that last year students abandoned unfinished in the lab because of materials sourcing problems. Some people don't like this project because it's not designed from scratch but I think this project serves a real need. Out there there are lots of open source great machines that we cannot make because we can't source most of the parts. And if you try to, it will cost you a lot of money, if they even ship it to you. So we should adapt those machines to the supplies we can source or even better, modify them to fabricate most of the parts. And that is what we are going to do with the MTM Snap.
MTM Snap Lock machine
Work break down structure
Please find below a work break down structure for the MTM machine in Barcelona.

Step 1: Research
The MTM Snap is based in a great idea. The frame and the clipping system are awesome. But also it has a big problem for us. It depends too much on materials mostly sourced from a particular vendor that does not ship overseas anymore. We are happy they took this decision. We need this kind of behavior to accelerate the so named 3rd industrial revolution. That way we are forced to produce and fabricate the items we need. Actually, that is why we all came here. I am sure the items we will fabricate won't have the precision and accuracy of the original MTM snap, but it will be a tipping point.
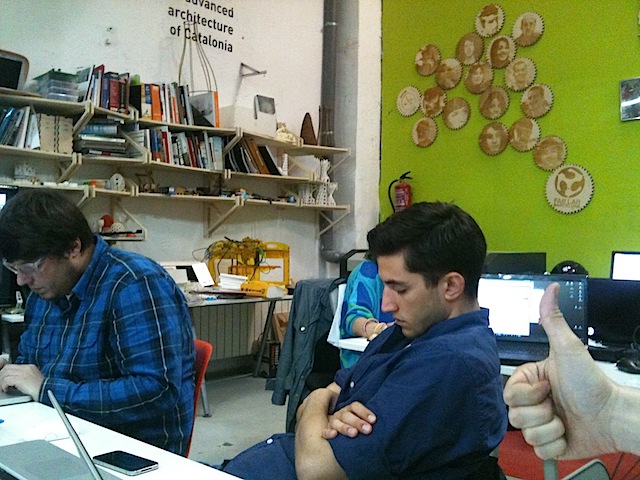
The following days we were working in our final projects and the machine. Some people was working in the belt, some other in the documentation. Another set of people modifying the machine axis.
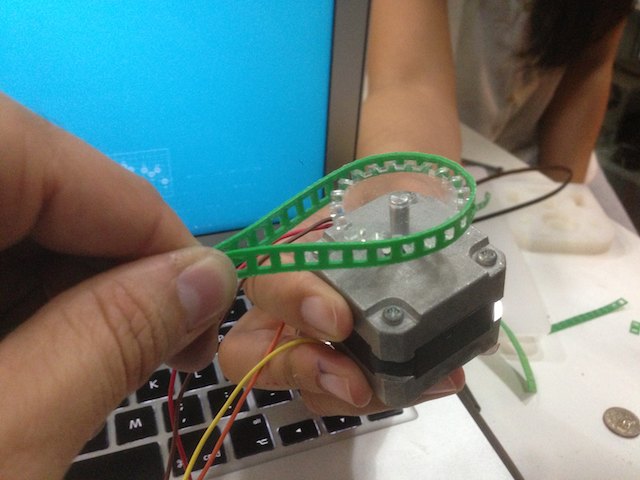
But the design was not achieving the required deadline. Until one day panic finally appeared in the Iaac, 10 days before the deadline. The machine was barely modified in the plans. No one really knew how to move forward because the workload was already huge and the machine required full time attention. It was time for meditation and accepting the facts. Fact 1: We are a group of students that want to convert the MTM snap machine to a timing belt transmission system. True. Fact 2: And we do not want to buy anything, we want to fabricate everything, even the timing belt. True. Fact 3: In MIT there are a group of genius graduate students that have been working in the MTM for years and they could not achieve what we want to do. True. Conclusion: I don't know what we drank when we thought that we could fix in a few weeks what the MIT students could not in years of full time research. Also it takes twice the time to fix something that rebuilding it again from scratch. Before modifying the machine we have to understand something that we didn't even design. It's just impossible. And the best prove is the machine status right now.
Step 2: Fabricating
No way back. We are going to look for the parts in McMaster-Carr and try to reproduce them using processes available in any Fab Lab (computer controlled cutting, molding and casting, composites, 3D printing, etc). So we wanted to start by printing a couple of shaft rods 10" long and 3/8" OD. We wanted to use the high resolution 3D printer machine, the one that is supposed to be 2 micron resolution. If the machine cannot properly print a couple of cylinders it will be yet another complete miserable failure.

Unfortunately, there is a huge project underway in Fablab BCN and they are 3D printing thousands of buildings, actually a scale model of Barcelona in 1700. So we could not use the high resolution machine.
The Makerbot can not print 10" rod because it's too long, but anyway we printed a piece of 5 cm of a rod in horizontal position just to see how it behaved in the machine. We know we could have printed it in vertical position with better resolution but Anastasia warned us that it would have a poor shear strength performance. The rod performed a lot of friction even using bushings.
We think that the best idea is using shafts salvaged from printers, even if have different diameters, since we can make a machine tailored to our needs.
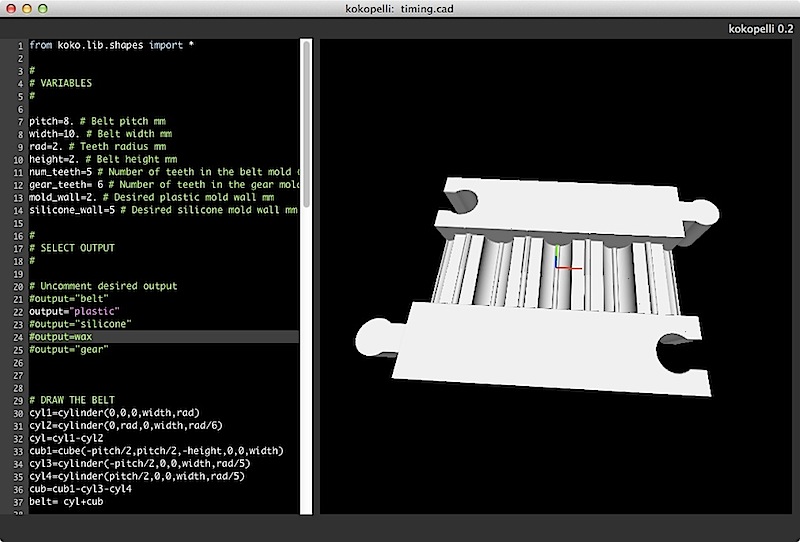
Step 3: Porting the design to kokopelli
We ported the design (originally in DXF) to kokopelli. The reason
we did so is because our material was not exactly the same
thickness as the original design. Apparently not too much, just
+0.3 mm, but enough for not fitting and requiring several
modifications scattered over the whole design. The main advantage
of porting the design to kokopelli is that it became parametric.
The most important parameters are: bit diameter, material
thickness and bed size. Adjusting these parameters redraws the
whole machine instantly. So it is now possible to make a different
size MTM snap lock in any material thickness.
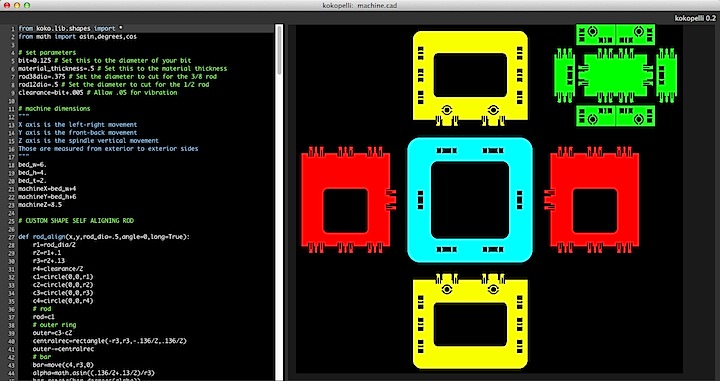
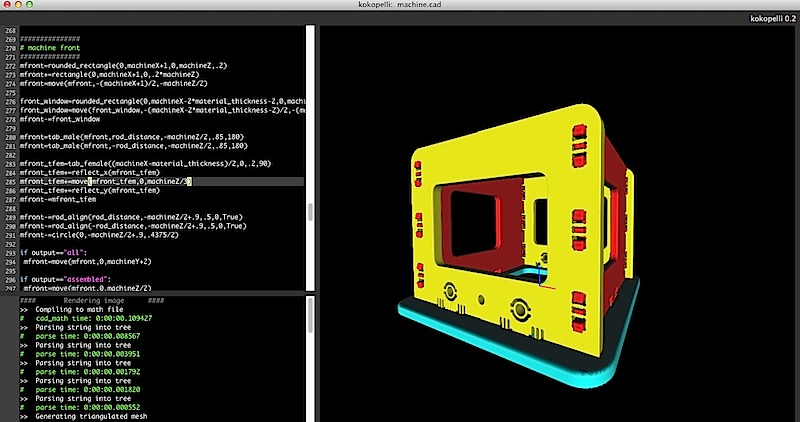
We tweaked a bit the design by looking at the commercial version, the Othermill. So in the final version we got the best from the MTM and the best from the Othermill machine.
The kokopelli CAD file can be found here. (For kokopelli 0.2)
Step 4. Electronics and Software
Ramin Shambayati Jose Figueroa, Sara Ezz and Paul Giron, worked in the electronics and software.
Here is Ramin Shanbayati page about the stepper drivers.
Machine Second attempt. The Drawbot machine
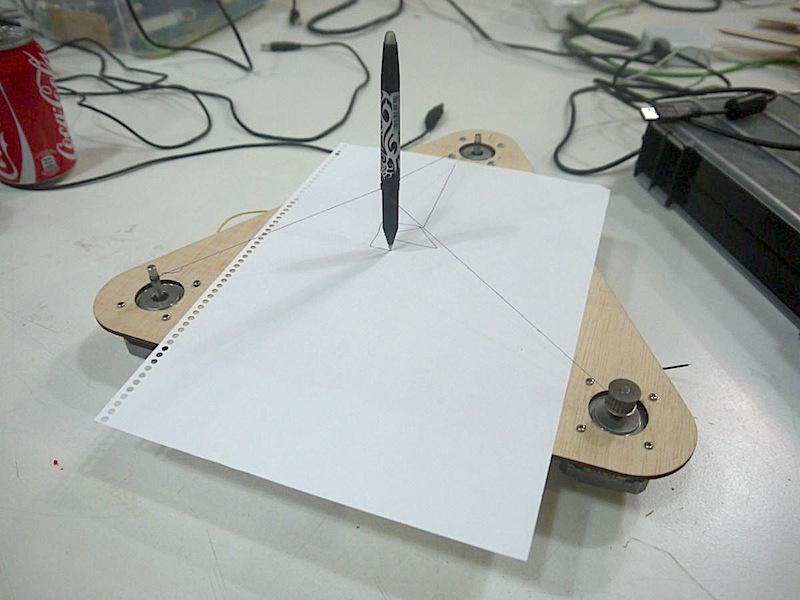
We opened a new design fork for a new machine using the same electronics, led by John Rees. Please proceed to Rees' page for the documentation.
Conclusion: What worked, what didn't
Aside from the multiple problems we had dealing with electronics and mechanics, etc. We faced problems not related to technical issues, but related to group management. No single person took the ownership of the project. Everyone worked very hard on different aspects of the machine, but there wasn't a leader with a clear vision of the machine outcome. We definitely had final goal, but individual goals were not aligned to reach this group target, and the outcome of this was that everyone did days and days of wasted work. This meant lots of work duplication, working in opposite directions and undeveloped (but necessary) areas of work. We individually mastered the processes but integration of them was unsuccessful.
In a way we are happy that we didn't finish the machine because that way we learned an incredibly powerful lesson about group management for our future projects. Absolute democracy just didn´t work. A leader and owner of the project is essential. We think this is one of the biggest and more useful lessons we have learned in the Academy.
About
This is the common page for Week 15 assignment in Fablab Barcelona. We are making a version of the MTM Snap, modified to suit some parts we have and converting the transmission to timing belt.
Background
Some resources you should also check out:
- MTM
Machines that make. - MTM
Snap
The version the we originally wanted to make. - Build your CNC
- ShapeOko and ShapeOko kits
- Lasersaur for manual and documentation
- Guerrilla guide to CNC machining, mold making, and resin casting
- Build log