Computer-Controlled Cutting Feb 6
After two weeks of navigating the computer world, we finally we’re able to stretch the legs of some of our fabulous machines. The assignment this week was to design snap-fit pieces using a cad program, and then print them on cardboard using the laser cutter.
The easiest point of this exercise for me was using the laser cutter. I am constantly amazed at how user-friendly these seemingly complicated machines were. The struggle for me was once again using the CAD programs. My skills are improving, but I still have a lot to learn.
First I began by attempting to create the simple snap-fit pieces that were featured during last week’s class. It was a lot easier for me to attempt to re-create already finished molds, but I still found some struggles. I used Autodesk Inventor (which as referenced last week has a free tool for students/educators and I happen to be both). I began by creating a rough shape, and then attempting to constrain all the sides to match my idea of how big they should be. For example, the shape I have named “Ninja-star” looked like this:

About 1 out of every 3 pieces I attempted to create that way worked: Me creating a rough sketch, and then constraining the edges to fit. It was not until many frustrating hours later attempting the “triangle of death” that I realized I could just type my dimensions in as I went and the constraining would be done for me. This sped up the process a ton and I was ready to print my first batch. At this point I had to jump through a few formating hoops. I exported from Autodesk Inventor to AutoCAD. Then I had to save the AutoCAD in the 2004 file format, at which point I could open up the file in Illustrator and go from there. Having never used Illustrator before I closed out of some intro screen and hit print and low and behold I had cool puzzle pieces. Only one problem (that’s just an expression, there were probably more than one), those intro-screens I ignored had the scaling of the paper size on them, and by ignoring and just going with the default, I lost the scaling to my pieces. I had twenty or so peices of cardboard that looked really cool but had no chance of ever fitting together.
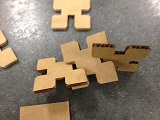
Going back and taking the time to do it right, and getting a little help from my fabulous compatriots, I figured out how to change the default settings, got my scalling right, and printed some usable pieces.

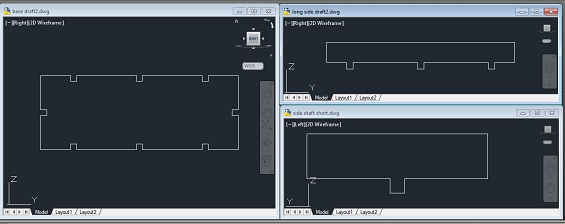
Now that I had the hang of things, I thought about how I could apply this to my final project. Since I will be making a robotic car, I thought I could use snap-fit pieces to assemble pieces of the car. Feeling super confident, I whipped up a design for the base and walls of the car on Inventor, exported, saved, opened, and printed. Of course, they didnt fit. What, you might ask, was the problem this time? Formatting issue? Laser issues? CAD inabilities? No, far worse, it was my old nemesis subtraction. I had made a pretty silly math error when calculating my dimensions. Fixed that, rinse and repeat, and below you’ll see a draft version of the base and walls of my car (or to those of you with more experience you might call it a box). I plan to scale it up in the next few weeks as I figure out what size works best for the onboard computer and engine.