Assignments
Scanning and printing / 3D scan and 3D print an object
My poor son For this practice I wanted to print a child's head in the 3D printer. Actually, at first after watching Neil's class, I realized there are many new ways to do
this. But I had to choose what was important to get the practice done correctly and in
time.
The tests we had done some time ago with the Kinect and Firefly had needed a lot of
cleaning of the generated solids, and even if I initially wanted to use it I couldn't afford
spending most of the assignments time cleaning the stl files.
I had never gotten before a 3D model from photographic images, and was curious to see
if I was going to be able to get it now. At the beginning I didn't want to believe that I
many checkpoints were needed, and I made some tests with small objects and no
checkpoints, but the results were poor.
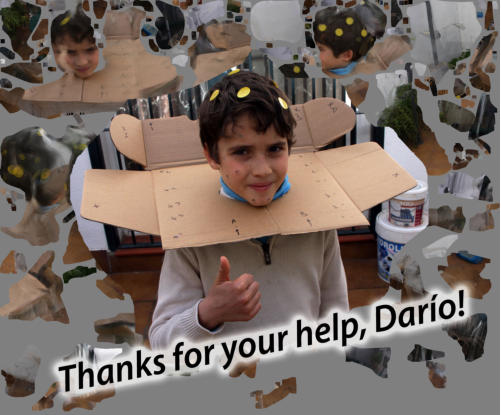
Then I also tried with my son Darius, who has been my assistant and has suffered my
experiments with him. At first I didn't understand that it was the camera that had to be
moved around the model, so I made my son turn around while I photographed him. My
son was annoyed and I did not get anything good from the experience.
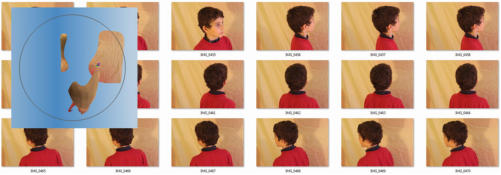
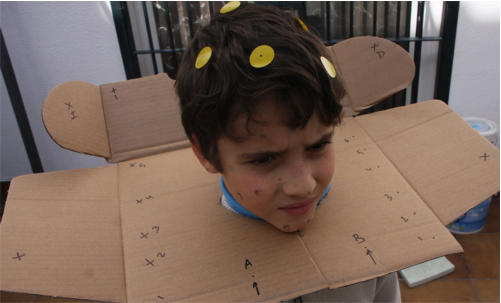
My son thought that I would tire him as much as the first time he helped me, and I knew I
would have little time before he would flee.. So, I marked his hair with yellow stickers
and painted his face with carnival makeup to have more control of the elements. This
time I did not want to fail because I had many chores to do in the weekend.
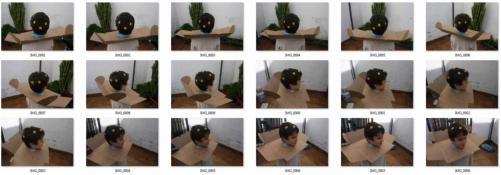
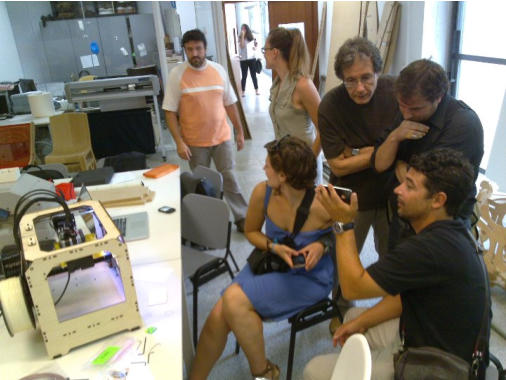
I made about 90 pictures, I signed up in 123DC and started with the latests photographs.
The result has been spectacular. It is not perfect but I have been very satisfied.
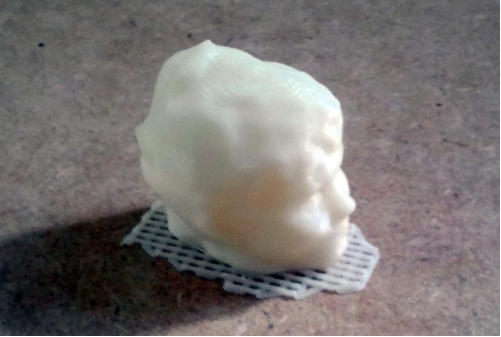
The second test I made was not so good, but I was able to start using the control points
with which I had marked Darius. Without worrying much I used more than the four
control points recommended by the program. I didn't like the result much.
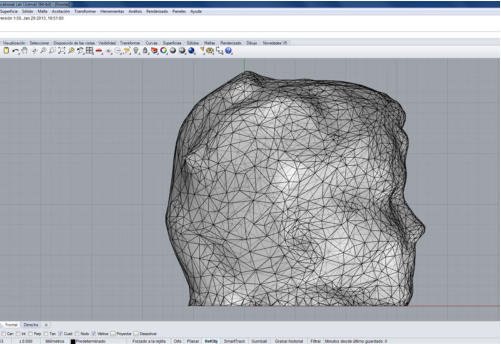
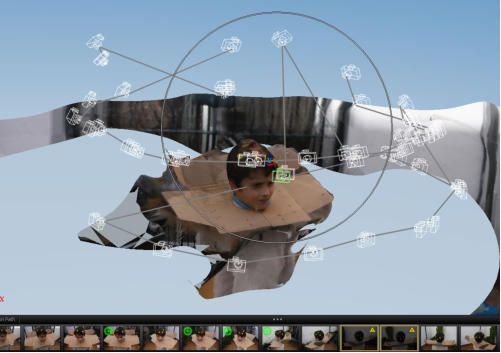
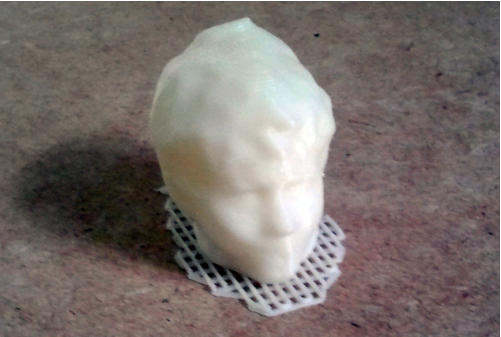
I returned then to to my first test, and I placed control points following the program's
instructions, and got a model that was very similar to the final result. When I thought that
the model was correct and had it cleaned up, I exported it as an OBJ file (dario5.obj).
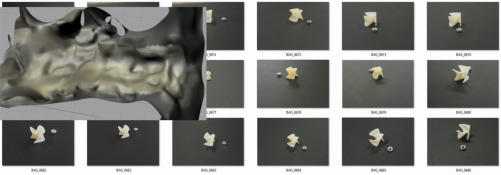
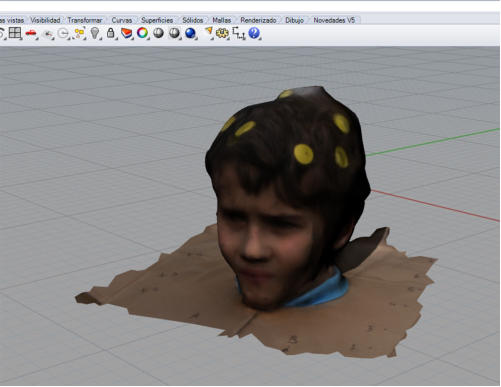
To prepare the STL file I used Rhinoceros (dario5.3dm); I closed the holes and saved the
result as STL (dario5.stl).
The printer I have used is a Makerbot Replicator. It is a printer with two injection heads,
with the following specifications:
MECHANICAL
Dimensions: 320 x 467 x 381 mm | 12.6 x 18.4 x 15 in
Weight: 32 lbs
Linear ball bearings
Precision shafts 8 mm land
In add-on, snap front carriage assemblies
ELECTRONIC
MakerBot motherboard MightyBoard unique piece
5 axes, 1/16 micro-stepping motor control
4x20 character LCD display and multi-directional control pad
Piezo Buzzer
Software-controllable RGB LED lighting
Universal power supply: 100-240V, 50/60Hz, 4.0A (input), and IEC standard socket cord
SOFTWARE: REPLICATORG ™
Compatibility: Linux, OSX and Windows
Printing from SD card or USB
Input file type: STL, Gcode
Approximately 5 liters
Choose Layer thickness 0.2-0.3 mm with stock nozzle
The nozzle diameter of 0.4 mm
Accelerating 40 mm / s
Flow Approximately 24 cc / hr
Maximum recommended extruder temperature 230 C
Heated Build Platform 120 C Maximum
2.5 micron precision in positioning the Z axis
11.micron in XY
MATERIALS
Works with ABS, PLA and other materials
Filament diameter: 1.75 mm
The printer software is simple to use REPLICATORG. The process is very sensitive to
cold and if the printer is not carefully calibrated models do not print well. Heat is
important; these weeks in Sevilla temperatures are low. To keep the machine warm, we
have had to cover the it with a plastic bag, which has been very successful.
The model was printed in 25 minutes and has a height of 3 cm. The result appears in the
images, and I, who am the father of Darius, can ensure that the model looks like him.
The result of this is very interesting for my final project, as a suitable exercise to design
for children between 13 and 15 years old.
Please note:
•
Checkpoints in the elements
•
Many photographs
•
Beware of the elements around the model. The board I used on Darius' neck had
too much information; it shouldn't have had the rear flaps.
•
Optimum conditions for the printer.
Actually, at first after watching Neil's class, I realized there are many new ways to do
this. But I had to choose what was important to get the practice done correctly and in
time.
The tests we had done some time ago with the Kinect and Firefly had needed a lot of
cleaning of the generated solids, and even if I initially wanted to use it I couldn't afford
spending most of the assignments time cleaning the stl files.
I had never gotten before a 3D model from photographic images, and was curious to see
if I was going to be able to get it now. At the beginning I didn't want to believe that I
many checkpoints were needed, and I made some tests with small objects and no
checkpoints, but the results were poor.
Then I also tried with my son Darius, who has been my assistant and has suffered my
experiments with him. At first I didn't understand that it was the camera that had to be
moved around the model, so I made my son turn around while I photographed him. My
son was annoyed and I did not get anything good from the experience.
My son thought that I would tire him as much as the first time he helped me, and I knew I
would have little time before he would flee.. So, I marked his hair with yellow stickers
and painted his face with carnival makeup to have more control of the elements. This
time I did not want to fail because I had many chores to do in the weekend.
I made about 90 pictures, I signed up in 123DC and started with the latests photographs.
The result has been spectacular. It is not perfect but I have been very satisfied.
The second test I made was not so good, but I was able to start using the control points
with which I had marked Darius. Without worrying much I used more than the four
control points recommended by the program. I didn't like the result much.
I returned then to to my first test, and I placed control points following the program's
instructions, and got a model that was very similar to the final result. When I thought that
the model was correct and had it cleaned up, I exported it as an OBJ file (dario5.obj).
To prepare the STL file I used Rhinoceros (dario5.3dm); I closed the holes and saved the
result as STL (dario5.stl).
The printer I have used is a Makerbot Replicator. It is a printer with two injection heads,
with the following specifications:
MECHANICAL
Dimensions: 320 x 467 x 381 mm | 12.6 x 18.4 x 15 in
Weight: 32 lbs
Linear ball bearings
Precision shafts 8 mm land
In add-on, snap front carriage assemblies
ELECTRONIC
MakerBot motherboard MightyBoard unique piece
5 axes, 1/16 micro-stepping motor control
4x20 character LCD display and multi-directional control pad
Piezo Buzzer
Software-controllable RGB LED lighting
Universal power supply: 100-240V, 50/60Hz, 4.0A (input), and IEC standard socket cord
SOFTWARE: REPLICATORG ™
Compatibility: Linux, OSX and Windows
Printing from SD card or USB
Input file type: STL, Gcode
Approximately 5 liters
Choose Layer thickness 0.2-0.3 mm with stock nozzle
The nozzle diameter of 0.4 mm
Accelerating 40 mm / s
Flow Approximately 24 cc / hr
Maximum recommended extruder temperature 230 C
Heated Build Platform 120 C Maximum
2.5 micron precision in positioning the Z axis
11.micron in XY
MATERIALS
Works with ABS, PLA and other materials
Filament diameter: 1.75 mm
The printer software is simple to use REPLICATORG. The process is very sensitive to
cold and if the printer is not carefully calibrated models do not print well. Heat is
important; these weeks in Sevilla temperatures are low. To keep the machine warm, we
have had to cover the it with a plastic bag, which has been very successful.
The model was printed in 25 minutes and has a height of 3 cm. The result appears in the
images, and I, who am the father of Darius, can ensure that the model looks like him.
The result of this is very interesting for my final project, as a suitable exercise to design
for children between 13 and 15 years old.
Please note:
•
Checkpoints in the elements
•
Many photographs
•
Beware of the elements around the model. The board I used on Darius' neck had
too much information; it shouldn't have had the rear flaps.
•
Optimum conditions for the printer.

Juan Carlos Pérez Juidias. Fab Lab Escuela Técnica Superior de Arquitectura de la Universidad de Sevilla