01 - Principles and Practices
Final Project - Modular Synthesizer
After recieving my B.S. in Electrical Engineering from UMass Amherst in 2010, I became the AS220 Labs coordinator in Providence, RI. I have been a musician for the better part of my life, mainly concentrating on guitars and keyboards. I picked up in an interest in recording/audio engineering in high school, and it became my main area of interest during college. I started a student run recording studio there, and was the lead recording engineer and studio manager. I still record music, but I am shifting more towards creating sounds with electronics, making and using different types of synthesizers.
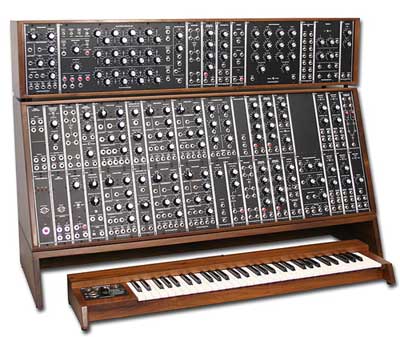
My final project is going to involve building a type of modular synthesizer that uses non-tradional techniques to trigger and control traditional synthesizer components. This synthesizer component will include digitally controlled VCO (Voltage Controled Oscillators), VCF (Voltage Controlled Filters), and VCA (Voltage Controlled Amplifiers). The triggering and control (human interface) component will involve different types of motion, color, tempature, and light sensors.
02 - Project Management
Mercurial
To document and manage my final project, I needed to install Mercurial. Which is a version tracking software designed for collobration on software. Instead we are using it to publish documentation to a global archive for Fab Academy.
I use a 1st generation macbook for my laptop, and have a dual boot between ubuntu (linux) and mac os x snow leopard. I wanted to install mercurial on both operating systems so that I could work and document from both environments, and also provide support to anyone that is having trouble.
Ubuntu 10.10 - Mercurial Install
Installation on linux is pretty straight forward. Simply open up a terminal screen (the command line) and enter the following command:
sudo apt-get install mercurial
This will install the software and any dependencies needed to run the software correctly. Next, in order to properly set the sercuity keys so that I had access to the global fab academy archive, I downloaded the two secuirty key files (academy and academy.pub). These are text files that have a lot of characters, in order to correctly read them without changing anything - use a text editor (not processor) such as Gedit to open up the files. I created two new identical copies of the files and stored them in the following directory:
~/.ssh/keys
To make the directory, use the following command:
mkdir ~/.ssh/keys
To move the files into the directory, use the following command:
sudo mv ~/Downloads/academy.pub ~/.ssh/keys
sudo mv ~/Downloads/academy ~/.ssh/keys
To change permission on the file, use the following command:
sudo chmod go-rw-r--r-- academy.pub
sudo chmod go-rw academy
The final thing to do is configure mercurial so that you are able to connect to the global archive and pull the latest version from the internet and put it onto your computer. To do this you need to create a config file for mercurial and write a couple of statements. To create a new config file, simply enter into the ~/.ssh/keys directory and make the file by the following command:
gedit config
This creates a new file, "config" and now you can enter in the following settings:
host fab.cba.mit.edu
port 846
After this has been setup, mercurial is ready to clone the fab academy archive.
03 - Computer Design
Google SketchUp
After installing both Blender and Google SketchUp and trying them both out, it was not long before I decided to do my 3D designs with Google SketchUp. The interface is clean, simple, and very easy to get used to. There is also some handy instructor/tutorials that come along with the software - super helpful. Blender has a much more complicated interface and has more of a learning curve than SketchUp.
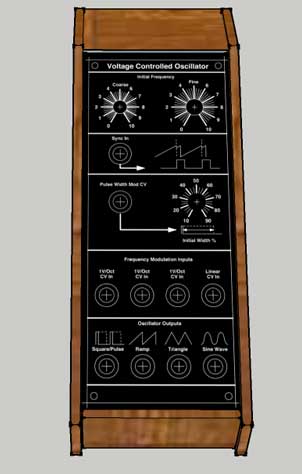
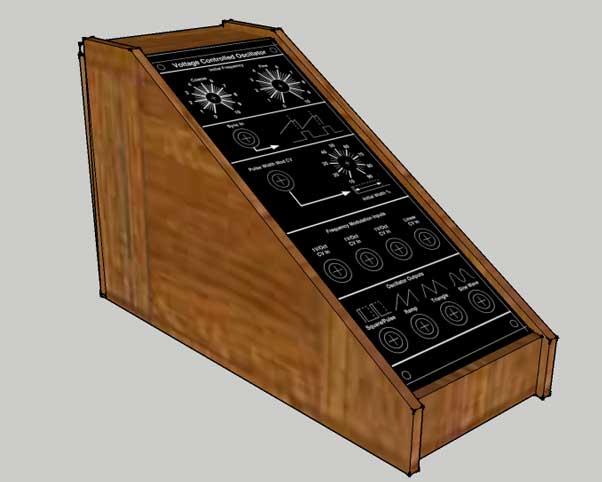
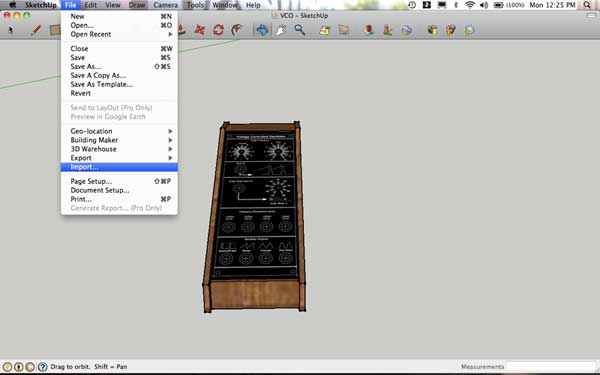
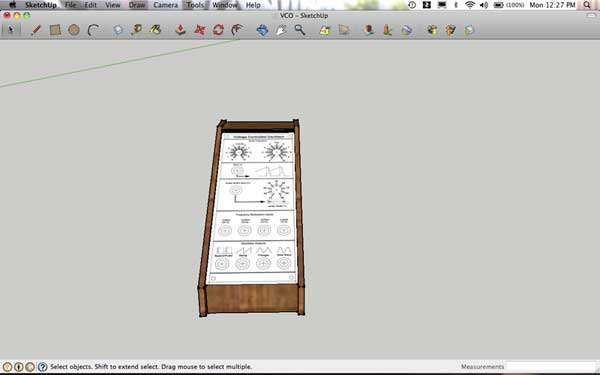
Voltage Controlled Oscillator Enclosure
My final project is going to be a series of modular analog synthesizer circuits that are controlled digitally with environmental sensors (light, color, tempature, etc.). I designed a potential enclosure for one of the synth modules, a voltage controlled oscillator (VCO). A VCO is a circuit that is very similar to a function generator, but is usually limited to the audio range of frequencies (20Hz - 20kHz). An oscillator creates a waveform (sine, square, triangle) and repeats the waveform at a specific frequency. The frequency is usually controlled with a keyboard and corresponds to a musical tone (or note). The waveform is usually selected by the user and corresponds to the timbre of the sound. In my design, I am not going to be using a traditional keyboard to generate a control voltage that normally would set the frequency, instead I will be generating a control signal using sensors and a microcontroller to control the synthesizer.
Google SketchUp Tips - Making Custom Surfaces
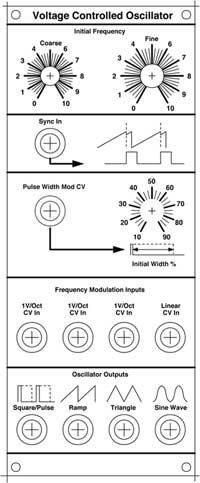
Using the "import" function in SketchUp, you can overlay an image onto a 3D surface. This is useful if you are trying to put images on a curved surface, or want to design a user interface for your final product. In my case, I wanted to to take the front panel template from a design of a VCO - accquired here. I wanted to overlay this on top of my 3D synth enclosure that I designed in SketchUp. This can be done be fairly easily following these steps.
Step 1: Create Your Image To Use
In my case, I downloaded the graphic from the internet and tweaked around with it using Photoshop.
Step 2: Import Graphic into SketchUp
Go to "File->Import" at the top menu of SketchUp and navigate through your filesystem to find your image
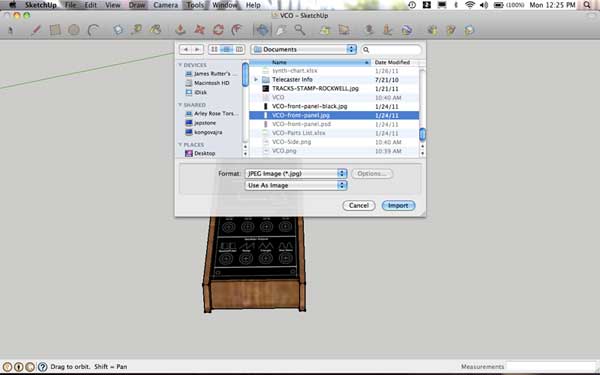
Step 3: Select Surface and Scale
Once you've imported your image, you will have to select your surface to apply the graphic to and then scale it up on the surface to size that you desire. Below are the amount of each design files needed to be cut out to make the dome:
04 - Computer Cutting
Press Fit Construction - Geodesic Dome
For my press fit construction project, I choose to make a geodesic dome - I based my design off of Nadya Peek's project. I plan on outfitting the top of the dome with a connector for a light attachment to create some sort of disco-ball type light - most likely with LEDs.
For materials, I used cardboard (0.16" thickness), for the design - I used two different triangles that form a hexagon and a pentagon pattern respectively, the final piece was a connector piece that connected all of the triangles together. I experimented a little bit with different methods of creating the shapes in inkscape
The design I made uses 20 Hexagons (6 Sided) and 12 Pentagons (5 Sided). I optimized my design files to make the entire dome out of 5 - 24"x12" sheets of cardboard (~$5 materials).
geodesic-triangle1.svg (cut out 2 of these)
geodesic-triangle2.svg (cut out 1 of these)
geodesic-mix.svg (cut out 1 of these)
geodesic-connector.svg (cut out 1 of these)
There will be some extra parts lefts over in case some of them break or don't cut out correctly on the laser cutter. I have zipped up the design files and stored them on the archives, you can download the files here.