Final Project
Slide of the Final Project
Video of the Final Project
MakerGarden
Link to the week 1: More Details about the Potenial Final Project
Minor Modifications to the Final Project Idea
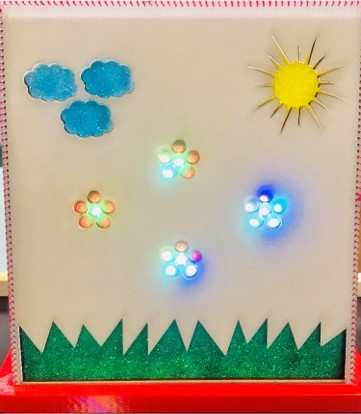
Although I find the friendship garden idea very potential in the sense of enhancing children's empathy skills, I believe that some psychological expertise is needed when it comes to developing ideas related to children especially in some sensitive areas such as friendship and representing the status of the friendship in public.Therefore, I decided to make some minor modifications to the idea. Instead of having friendship garden, I am considering to have a "MakerGarden". I came up with "MakerGarden" idea after reading more scientific articles with empirical data regarding children and making. I figured out that in making activities, some children would be known among others as expertise for some specific skills like programming for example. And other children refer to those well known children when they are in need of help. "MakerGarden" has the same features as friendship garden. In "MakerGarden", there are 4 flowers for:
- 3D Skills
- 2D Skills
- Programming
- Electronics
How "MakerGarden" board demostrates the status of making expertise for each classroom?
- While students are working in groups/peers in a making project, some happen to be known as expertise in one (or more) making skill among other children.
- So in these cases, there is an application interfacing with the "MakerGarden" board. Students rate each other based on the expertise title that they have got. The rating would be reviewed by the classroom teacher/facilitator and then when it is approved, it would light up flowers on the "MakerGarden" board.
- It would help to demonstrate the status of the making skills in each classroom.
- It leads to the collaboration among various classes and distributing expertise. If a class is in a need for good programmers, they could ask help from the other class and vice versa. So the classes would benefit from eah other.
- Collaboration in a project with some new people in other classes, would help students to socialize more and to get to know some new people and consequently, they would be more prepared for the real working life.
- Students find the opportunity to find some new and good friends.
- It would bring competitive advantage. If a class seems to be weak in some expertise compared to other classrooms, they would try to improve themselves.
- It could be counted as a good source of data collection in making workshops for the researchers of digital fabrication and making for children. A kind of defamiliarization in data collecting method :-)
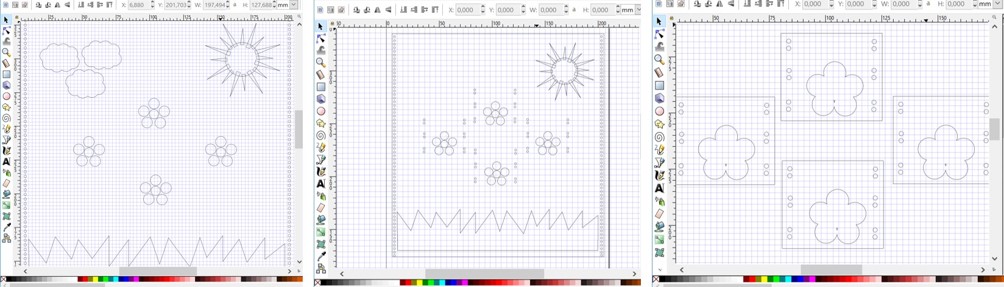
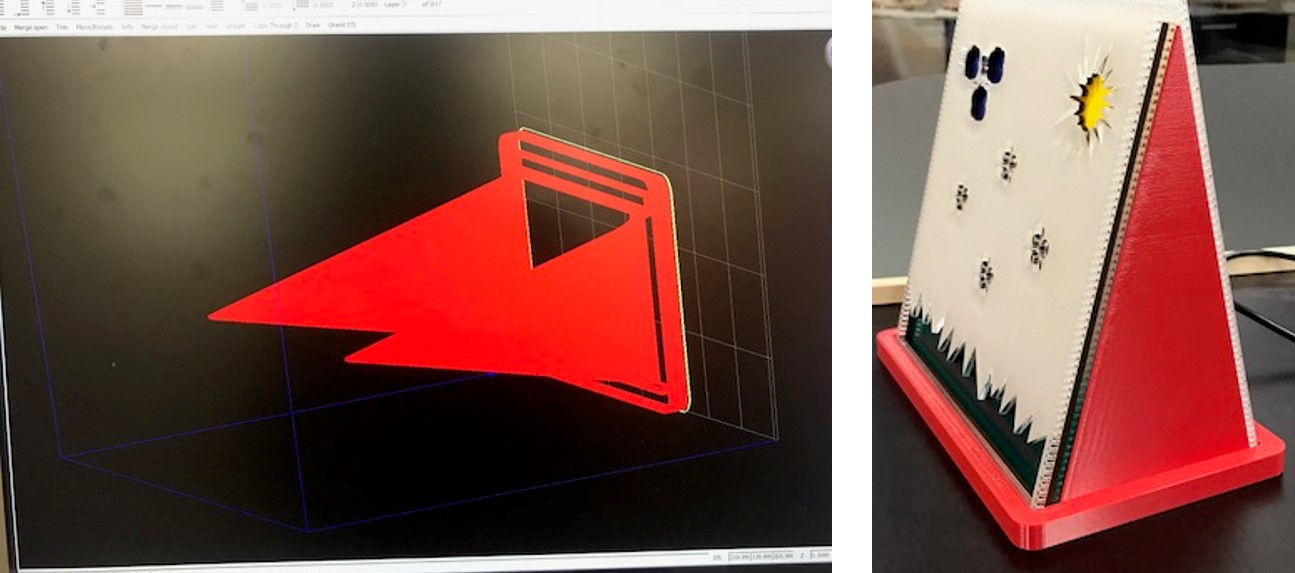
2D Designing
Designed with:- Inkscape
I designed the display layers considering 6 logics (I gained them by experience and after a few times of unsuccessful tries):
- Logic 1:
- With some cuts in sun, grass, flowers and clouds.
- Logic 2:
- For engraving those areas that flowers are located in.
- And with some cuts of holes around area flowers for attaching the flower board to it.
- Logic 3:
- A complete angraved surface for the back.
- Optional layer:
- Logic 4: For firstly sewing flower boards to another support layer (a bit bigger that the flower board layer) and then sewing the set to the bottom layer. (This method is optional but makes the sewing time and the look better if some material is used like cardboard that needle passes through easily)
- Logic 5: vertical holes at both sides of the layer and horizontal holes at the top of the layer.
- Logic 6: only vertical holes at both sides of the layer.
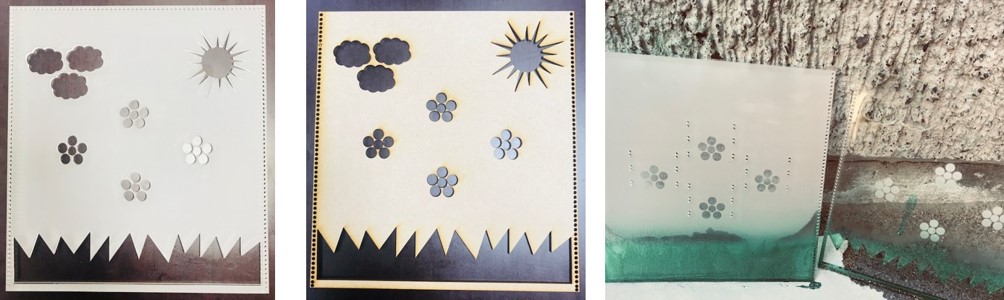
Laser Cutting
Important Considerations:- First cut the horizontal and/or vertical side holes.
- Then perform the engravings.
- Then cut the border of the layer.
I have designed in different layers in Inkscape, so just by hididng and locking some layers you could save as .pdf those layers that are visible. In this way, you have control over cutting and engraving different elements in a single design file.
Cut with:
- Laser Cutting Machine (EPILOG LASER FUSION)
- Acrylic 3 mm
- MDF 3 mm
I cut 5 layers:
- Top layer with acrylic following Logic 1 and Logic 5
- Middle layer using MDF following logic 1 and Logic 6.
- Bottom layer using acrylic following logic 2 and Logic 6.
- Back layer following logic 3 and Logic 5.
- Support layer following logic 4
for cutting acrylic 3mm:
- Speed: 6%
- Power: 100%
- Freq: 100
- For Engraving acrylic 3mm: Image Dithering: Jarvis
- Speed: 10%
- Power: 80%
- Freq: 20
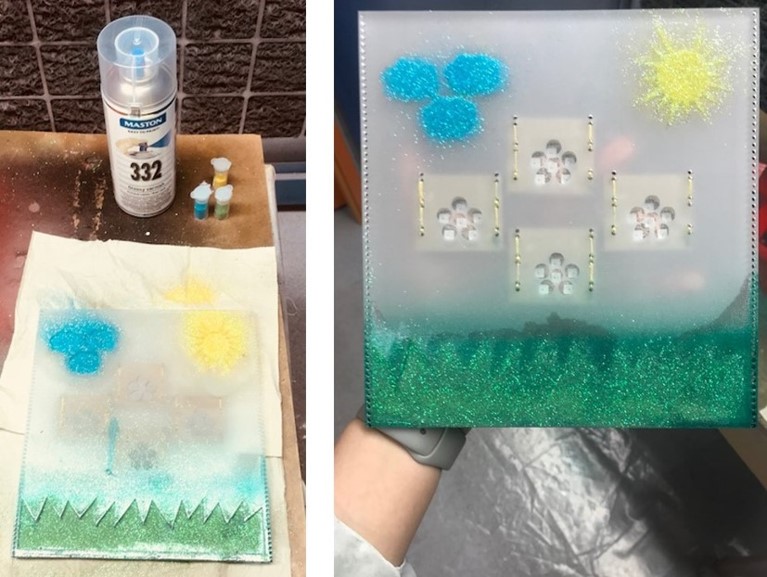
Coloring
Sprayed with:- MASTON Glossy Varnish (good for plastic)
- Glowing Powders
I colored the sun, the clouds and the grass of the bottom layer (acrylic) through the following method:
- First I used a layer with some cuts in only sun, grass, flower and cloud area to cover the rest of the surface.
- Then I sprayed over the sun area and immediately before it gets dry, I spread the yellow glowing powder in the sun area. And let it dry. I did the same for grass and clouds.
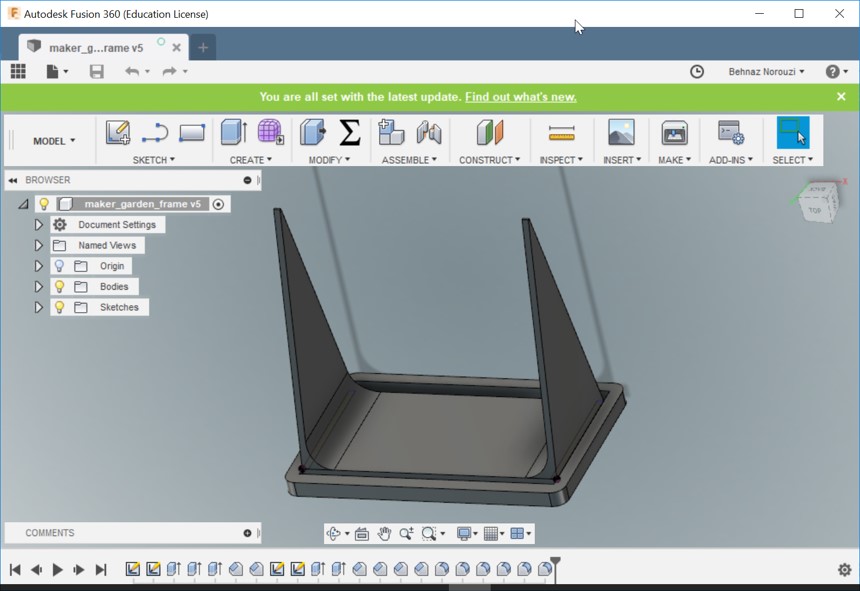
3D Designing
Designed with:- FUSION 360
Features:
- Regtangle
- Extrusion
- Chamfer
- Fillet
3D Printing
Printed with:- STRATASYS 3D Printer
Features:
- Part interior style: solid-normal
- Model: ABS-M 30
- Support: SR 30 Support
Link to the week 5: Making an In-circuit Programmer by Milling the PCB
I programmed my main board with this programmer that I had made in week 5.
Programmer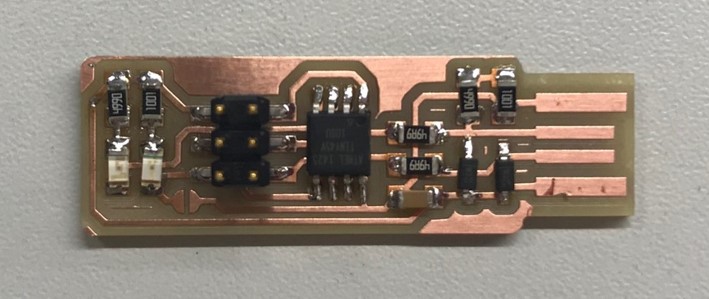
Link to the week 12: Output Devices
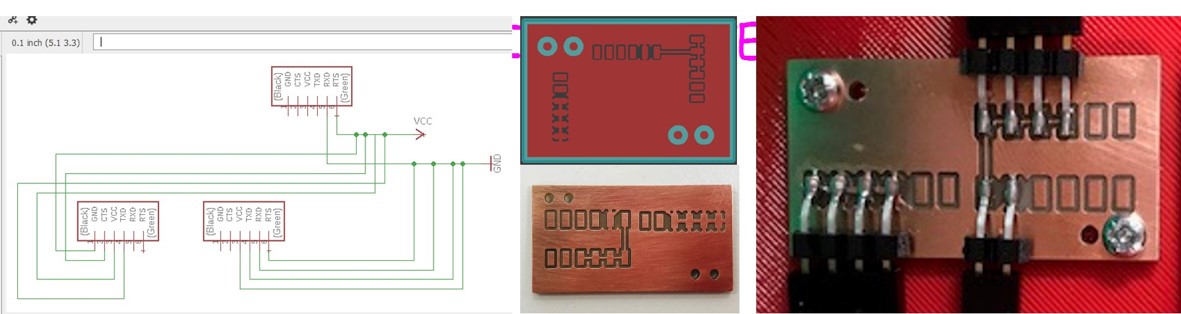
Considering getting familiar with electronics design and production during the previous weeks, I decided to dedicate this week's task to my final project by designing the main board, through which I would be able to light up or off the LEDs on the physical device. I also designed a board in flower shape consisting of neopixels in form of 5 petals and center to be integrated in the device.
As you see in the picture, in the project development weaek, I changed the FTDI pin header to the vertical one for a better fit into my package.
The Boards for Flowers and for Controlling Flowers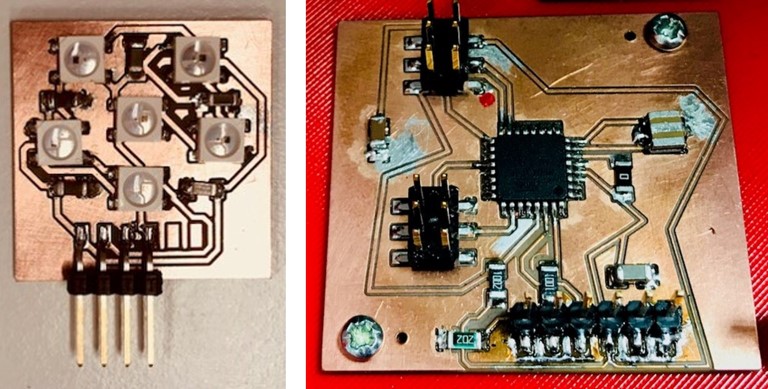
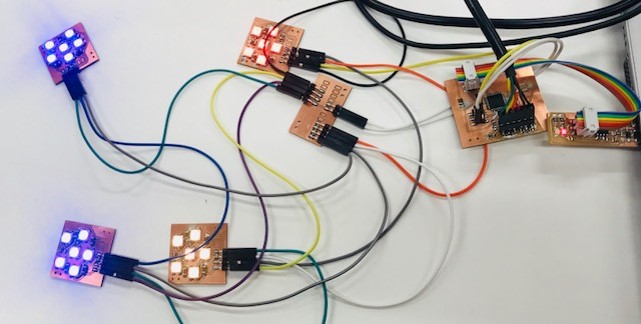
Board for distributing VCC and GND among Flower Boards
Software:- Eagle
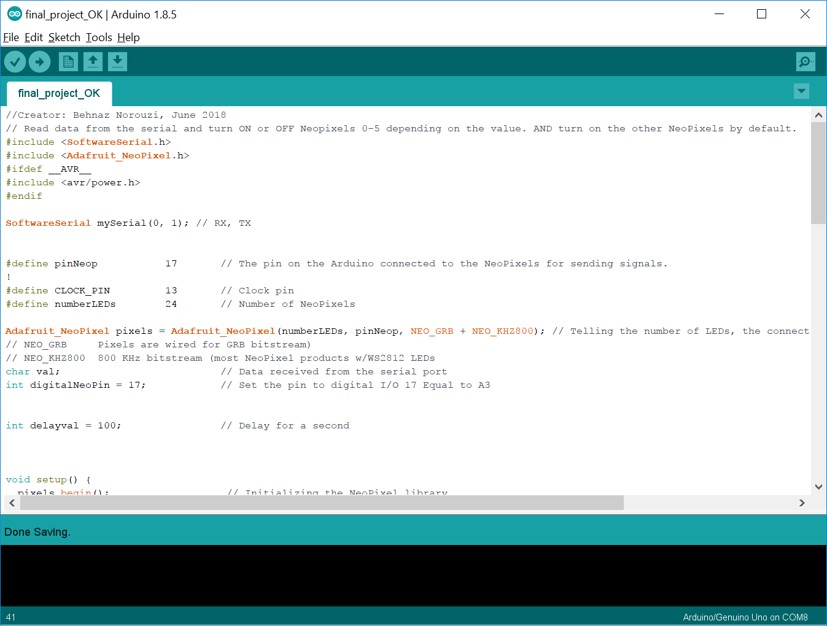
Embedded Programming
I wrote a code for interfacing my app with another board with a different microcontroller in Interface and Application Programming week .I used a code for lighting neopixels on in Output Device week.
And considering the knowledge I had already gained through those weeks, I wrote the code for Interfacing with the app and controlling individual NeoPixels in the project development weeks.
Software:
- Arduino
Link to the week 13: Interface and Application Programming
Software:- Processing
I developed the main user interface of my app during this week. And improved the UI during the project development weeks.
Why always using star rating system? why not flower rating system?
My innovative 5 petal rating system :-)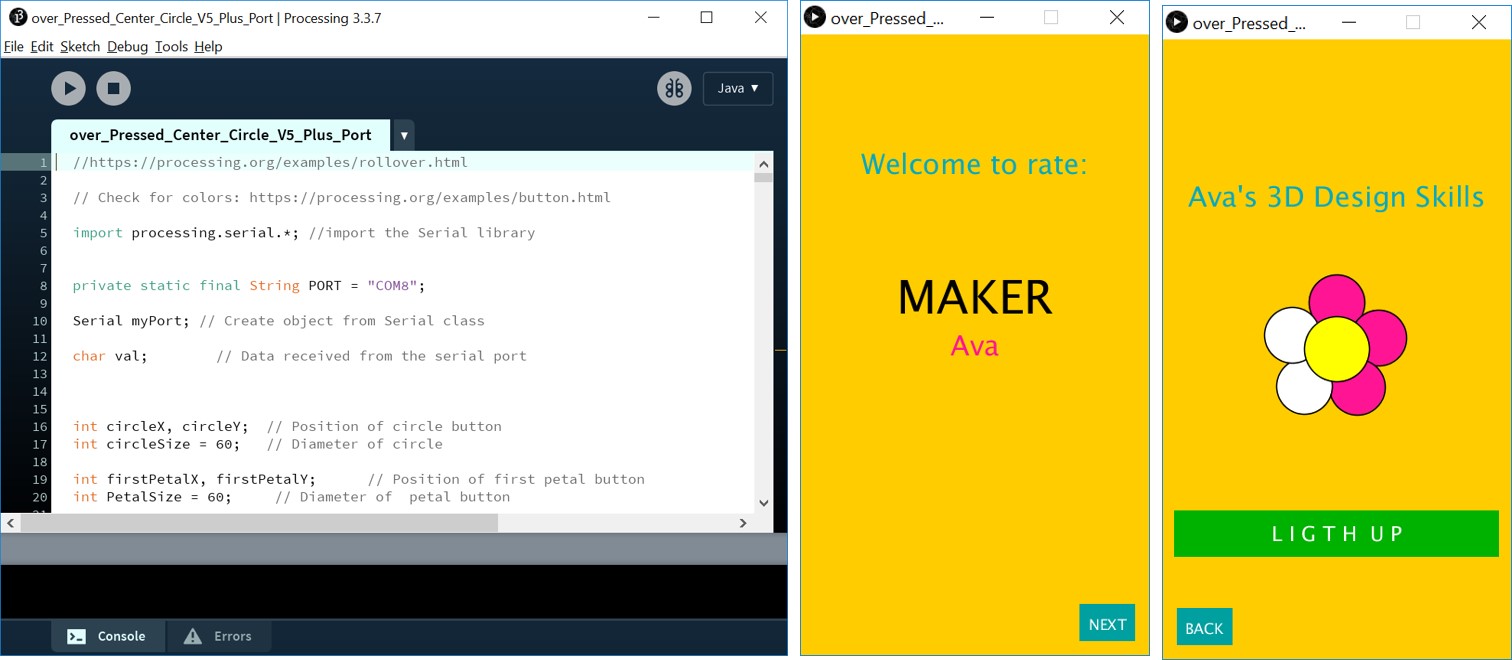
Assembling
Important Considerations in Assembling:- Sew the bottom layer to the middle layer.
- Sew the front layer to the back layer. I have considered these 2 layers a bit taller that the other 2 layers.
- First do the wire harnessing on a table using tapes to consider the right paths and at this stage do it with crimp connectors and make your wires. Then when everything is alright, add the connector blocks. And then use cable bundles for tidying up the wires.
- Easily dettaching the front and the back layer (which are sewed together) from the whole structure.
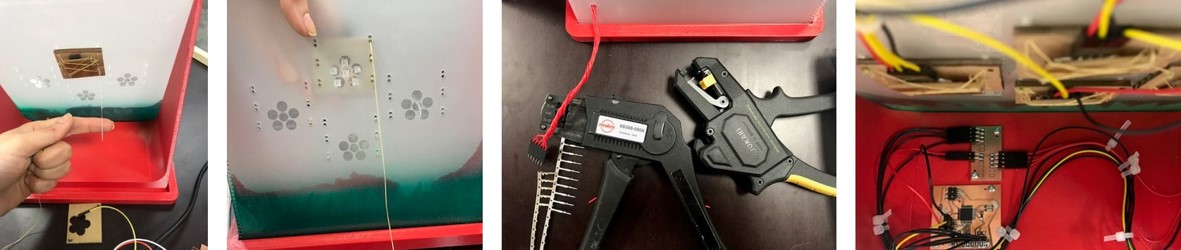
Different Views of MakerGarden

Bill of Materials (BOM)
The total price of the whole package is 123 $.
Link to the fab lab inventory
| Materials and Componenets | What for? | Quantity | Where did they come from? | Total cost |
|---|---|---|---|---|
| 3mm MDF | middle layer of the display | 200x220 mm | stock in Fab Lab Oulu | 0,50 $ |
| 3 mm Acrylic Clear | top layer, bottom layer and back layer of the display | 3x (200x220 mm) | stock in Fab Lab Oulu | 10 $ |
| 3D printer ABS filament + support material | body of the display | 210 cm3 | stock in Fab Lab Oulu | 80 $ |
| Single side machineable PCB stock | for milling flower boards, main board, VCC & GND Distributor board and programmer | 1 | stock in Fab Lab Oulu | 1 $ |
| Soldering tin | for soldering the components into the milled PCB. | arounf 2/10 of one roll | stock in the machine workshop in Univeristy of Oulu | 1 $ |
| ATmega 328P-AU | Microcontroller for the main board | 1 | stock in Fab Lab Oulu | 1,86 $ |
| NeoPixel RGB LED with Integrated Driver Chip | for each flower board | 24 | stock in Fab Lab Oulu | 8,50 $ |
| Capacitor 1uF | for the main board | 1 | stock in Fab Lab Oulu | 0,07 $ |
| Capacitor 10UF | 1 for the main board and 5 for the flower board | 6 | stock in Fab Lab Oulu | 1 $ |
| resonator 16MHz | for the main board | 1 | stock in Fab Lab Oulu | 0,32 $ |
| Positions Header Connector (PinHD2*3) | for the main board | 2 | stock in Fab Lab Oulu | 1,2 $ |
| Resistor 1KΩ SMD | for the main board | 1 | stock in Fab Lab Oulu | 0,01 $ |
| Resistor 10KΩ SMD | for the main board | 1 | stock in Fab Lab Oulu | 0,01 $ |
| Glowing powder | for coloring the bottom layer | 1 pack | purchased | 5 $ |
| Matson Glossy Varnish spray | for coloring the bottom layer | 1 | purchased | 5 $ |
| M3 2.5 mm screws | to fix main board and VCC board to the display | 4 | stock in the machine workshop in Univeristy of Oulu | 0,3 $ |
| 4position connector block | for wire harnessing | 6 | stock in Fab Lab Oulu | 3 $ |
| 2position connector block | for wire harnessing | 2 | sstock in Fab Lab Oulu | 0,4 $ |
| 6position connector block | for connecting from the main board to the FTDI cable | 2 | stock in Fab Lab Oulu | 1,14 $ |
| Male and female crimp connectors | for wire harnessing | 42 | stock in Fab Lab Oulu | 3 $ |
The Licence

This work is licensed under a Creative Commons Attribution-NonCommercial-ShareAlike 4.0 International License
Last But Not Least
Hereby, I express my special thanks of gratitude to Fab Lab oulu's manager and instructors: Jani Ylioja, Jari Pakarinen, Iván Sánchez, Antti Mäntyniemi, Juha-Pekka Mäkela, Eino Antikainen and Yrjö Louhisalmi, who supported me during fabacademy 2018's process. They kindly were available to guide me when it was needed. They paved the way for all of us (fabacademy students), throughout this long journey with lots of ups and downs.I am also grateful to my PHD supervisors, Netta Iivari and Marianne Kinnula for their support.
I would also like to mention and thank awesome fabacademy 2018's students, Jari Uusitalo, Peetu Virkkala, Megumi Iwata, Marta Cortesorduna, Heidi Hartikainen, Kati Pitkanen, Mikko Toivonen and Ari Vuokila, with whom we spent lots of time in fab lab and their presence was always nice and helpful if needed. I had also a huge help from one of my dear friends, Navid Yaraghi, for cutting the big furniture that I made during the Computer-Controlled Machining week and I appreciate his kindness.
I would also like to represent my special thanks to my global evaluator, Craig (Chobern), for his kind and valuable feedback.
It is also nice to mention and to thank my dear family's spiritual support from my home country, Iran, who always help me in allaying the doubts and fears of.
Original Design Files
Arduino Code (.ino)5 Petal Rating System Code (.pde)
Maker Garden Display 3DPart (.f3d)
Maker Garden Display 3DPart (.stl)
Design Files for the Main Board and Flower Boards Could Be Find in week 12: Output Devices
Schematic of VCC and GND Distributer (.sch)
Board of VCC and GND Distributer (.brd)
Traces of VCC and GND Distributer Board (.rml)
Outline of VCC and GND Distributer Board (.rml)
Display Top Layer (.svg)
Display Middle Layer For MDF (.svg)
Display Bottom Layer (.svg)
Display Back Layer (.svg)
Support Layer For Sewing Flower Board To The Bottom Layer (.svg)
Display Top Layer Cut Holes (.pdf)
Display Top Layer Cut Sun Grass Cloud Flowers (.pdf)
Display Top Layer Cutthe Outline and Engrave the Background (.pdf)
Display Middle Layer Cut Holes (.pdf)
Display Middle Layer Cut Sun Grass Cloud Flowers (.pdf)
Display Middle Layer Cut the Outline (.pdf)
Display Bottom Layer Cut Holes (.pdf)
Display Bottom Layer Engrave Flowers and background (.pdf)
Display Bottom Layer Cut Outline (.pdf)
Display Back Layer Cut Holes (.pdf)
Display Back Layer Cut the Outline And Engrave the Background (.pdf)
Support Layer Cut (.pdf)